

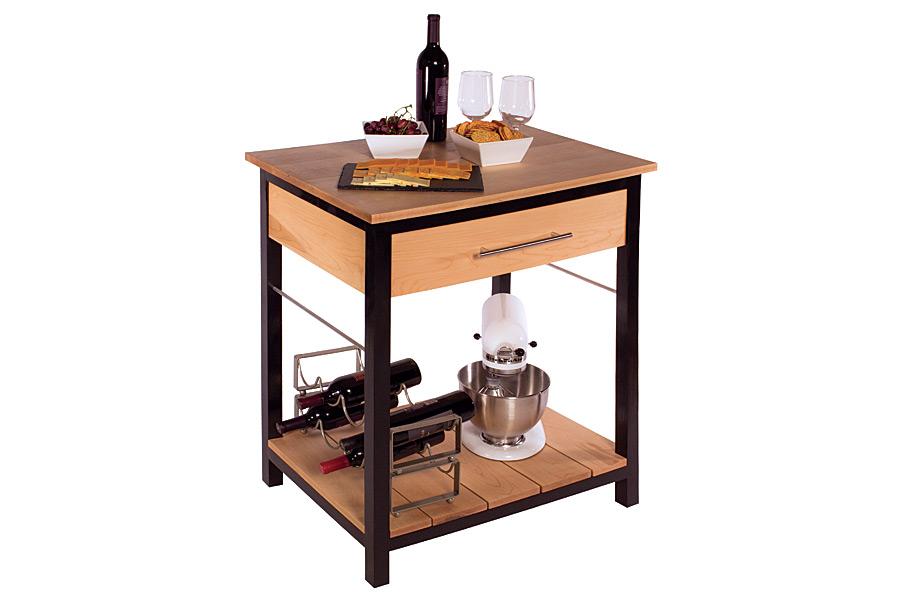
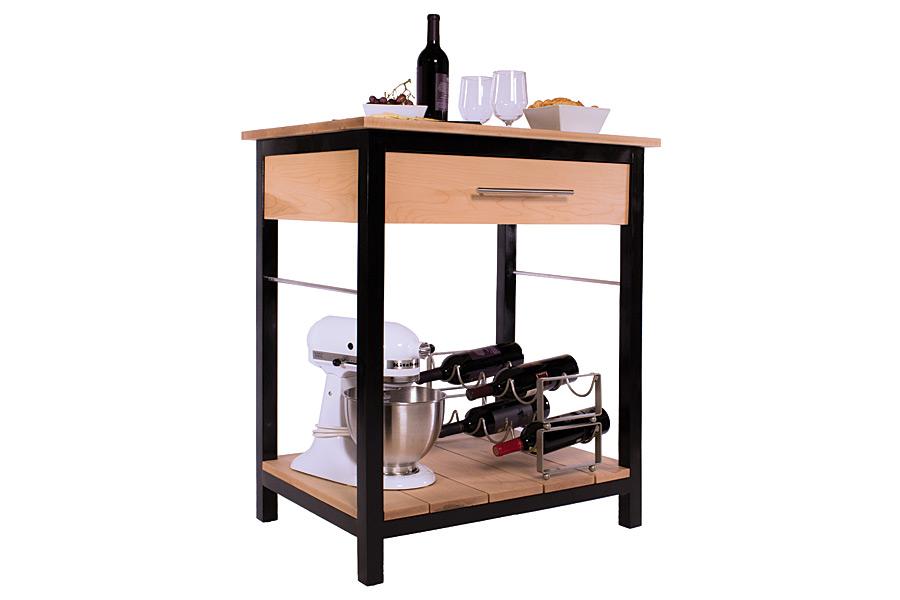


Here’s proof that you don’t need a lot of space to have a great-looking, hardworking island in your kitchen. This one measures less than 2′ x 3′, but it packs a lot of storage and work area into that small space. You can build one yourself with some pine and maple boards and a little bit of plywood.
Tools
Kreg Tools


Other Tools
-
Circular Saw (corded)

-
Jigsaw
-
Miter Saw
-
Square
-
Tape Measure
-
Drill (cordless)
-
Nail Gun
-
Sander
-
Air Compressor
Materials
Wood Products
- 2 Board , 1/2" x 4" , 24"
- 2 Board , 1/2" x 4" , 36"
- 3 Board , 1x6 , 96"
- 1 Board , 1x6 , 72"
- 2 Board , 2x2 , 96"
- 2 Board , 2x2 , 72"
- 1 Plywood , 3/4" Thick , 24" x 24"
Hardware & Supplies
- 39 1 1/4" fine-thread pocket hole screws
- 32 2 1/2" coarse-thread pocket hole screws
- 14 1" coarse-thread pocket hole screws
- 24 1" brad nails
- 1 Pint butcher block oil finish
- 1 Pair 16" center mount drawer glides
- 1 3/8" x 36" aluminum rod
- 1 Wood glue
Cut List & Parts
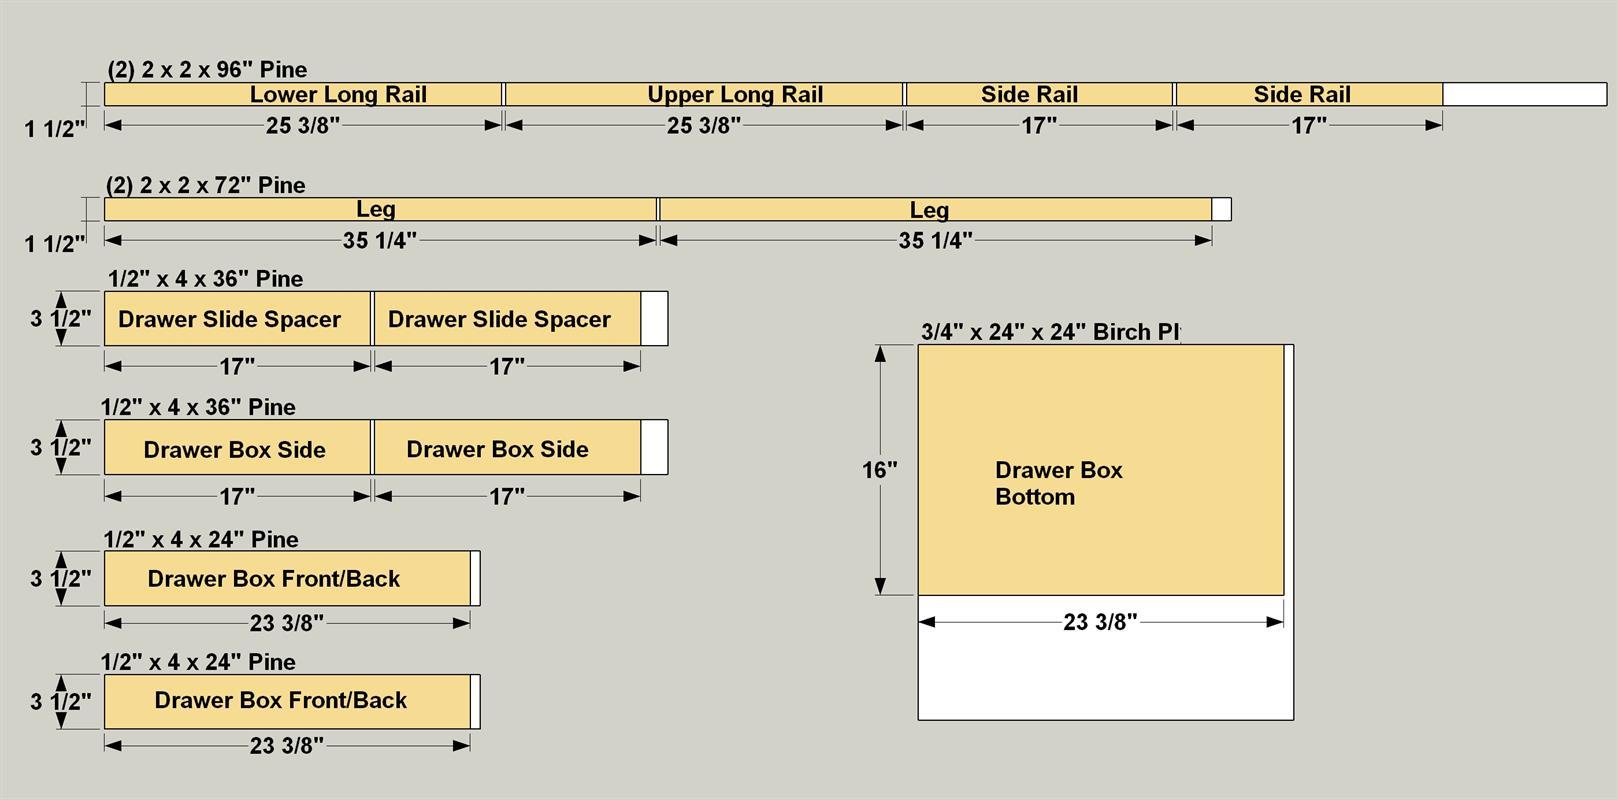
- 2 Upper Long Rail , 1 1/2" x 1 1/2" x 25 3/8" pine
- 2 Lower Long Rail , 1 1/2" x 1 1/2" x 25 3/8" pine
- 4 Side Rail , 1 1/2" x 1 1/2" x 17" pine
- 4 Leg , 1 1/2" x 1 1/2" x 35 1/4" pine
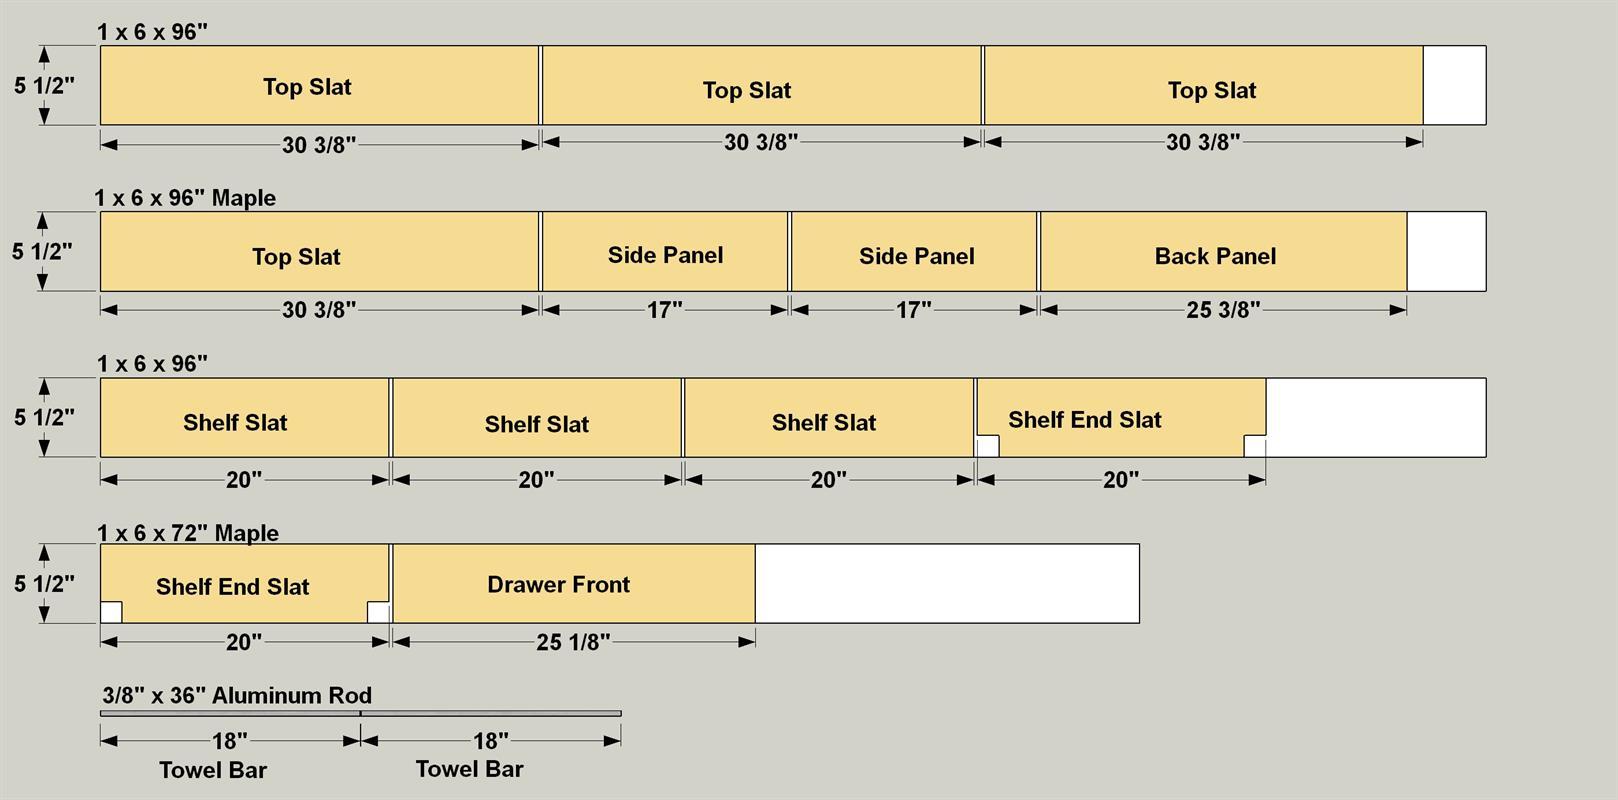
- 2 Towel Bar , 3/8" x 18" aluminum rod
- 2 Side Panel , 3/4" x 5 1/2" x 17" maple
- 1 Back Panel , 3/4" x 5 1/2" x 25 3/8" maple
- 4 Top Board , 3/4" x 5 1/2" x 30 3/8" maple
- 2 Drawer Slide Spacer , 1/2" x 3 1/2" x 17" pine
- 5 Shelf Slat , 3/4" x 5 1/2" x 20" maple
- 2 Drawer Box Side , 1/2" x 3 1/2" x 17" pine
- 2 Drawer Box Front/Back , 1/2" x 3 1/2" x 23 3/8" pine
- 1 Drawer Box Bottom , 3/4" x 16" x 23 2/8" birch plywood
- 1 Drawer Front , 3/4" x 5 1/2" x 25 1/8" maple
Directions
-
Cut the Frame Parts
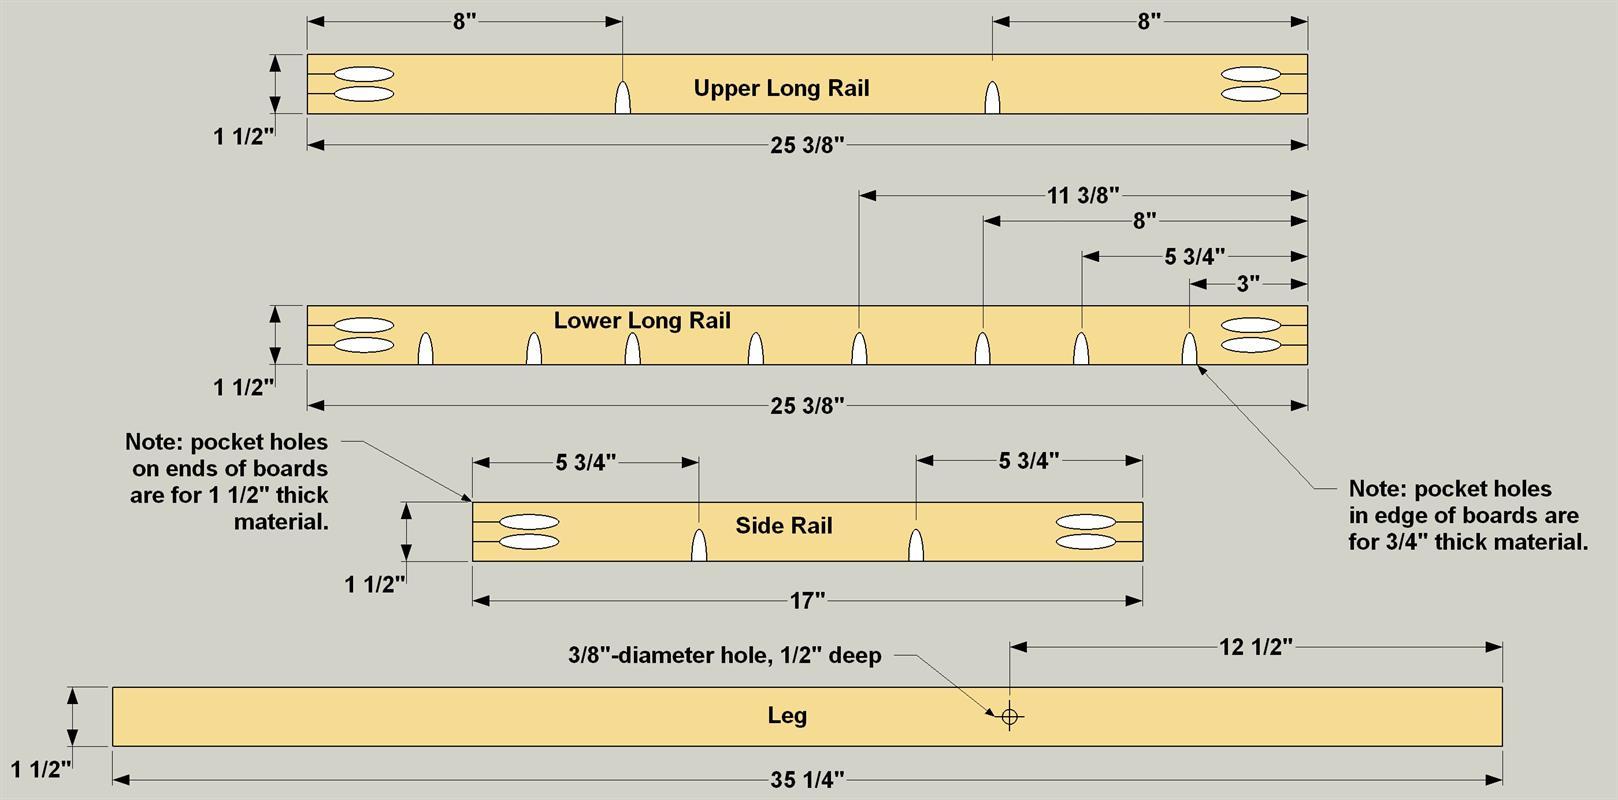
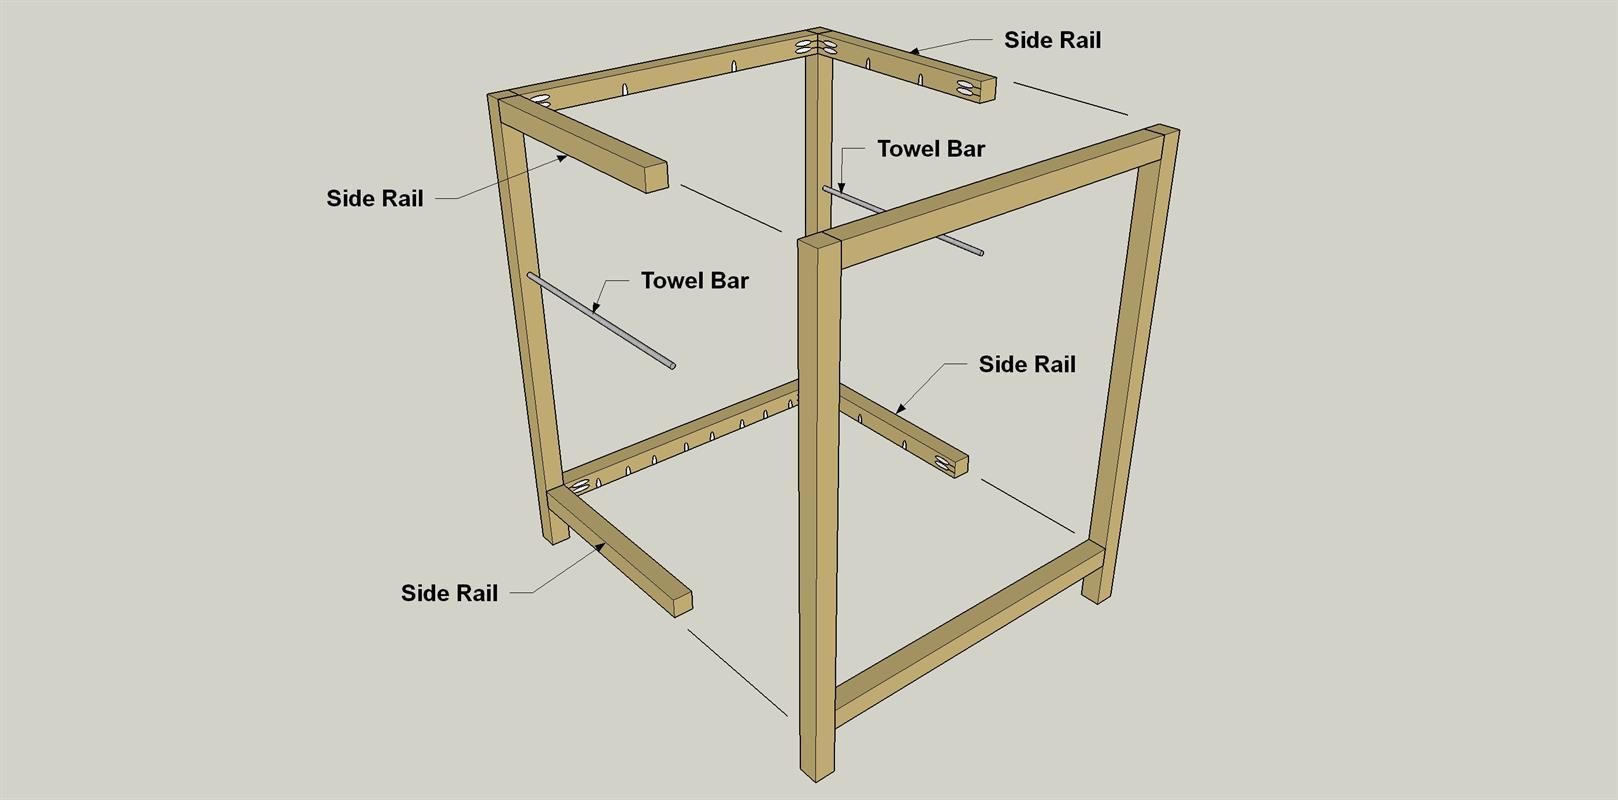
Cut two Upper Long Rails, two Lower Long Rails, four Side Rails, and four Legs to length from 2x2 pine boards, as shown in the cutting diagram. Set your pocket-hole jig (and bit) for 1 1/2"-thick material, and then drill pocket holes at the ends of all of the Rails, as shown. Reset the pocket-hole jig (and bit) for 3/4"-thick material, and then drill pocket holes on the edges the Rails at the locations shown. On the four Legs, drill a 3/8" hole, 1/2" deep at the location shown. Thiese holes will receive the aluminum Towel Rods that get added later.
-
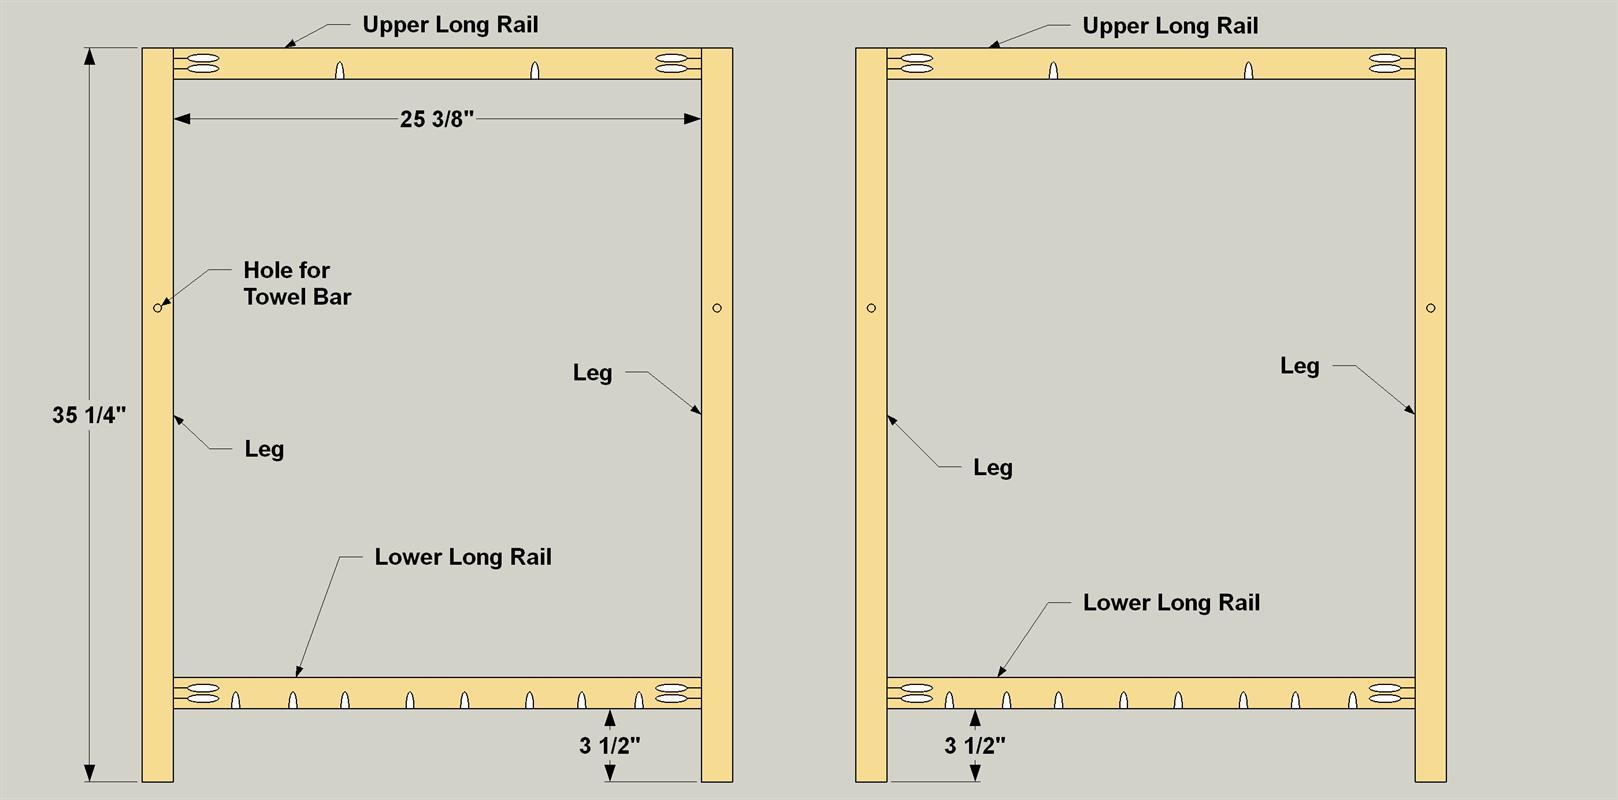
Assemble Front and Back Frames
Join the Long Rails and Legs, as shown, using wood glue and 2 1/2" coarse-thread pocket-hole screws to create front and back frames. Make sure the holes for the Towel Rods are oriented correctly.
-
Make the Towel Bars
Cut two Towel Bars to lengths from the 3/8" aluminum rod using a miter saw or a hacksaw, as shown in the cutting diagram. After cutting, use steel wool or a Scotch-Brite pad to smooth the Towel Bars and create a consistent sheen.
-
Assemble the Base
Attach the four Side Rails to the Back Frame Assembly using glue and 2 1/2" coarse-thread pocket-hole screws, as shown. Next, insert the Towel Bars in the holes you drilled earlier. Now attach the front frame assembly by aligning the Towel Bars with the holes in the Legs, and then attaching the Side Rails to the Legs. If you plan on painting the base, this a good time to sand, mask off the Towel Rods, and then paint. We sprayed on a coat of primer, and then three coats of semi-gloss black paint.
-
Create the Panels
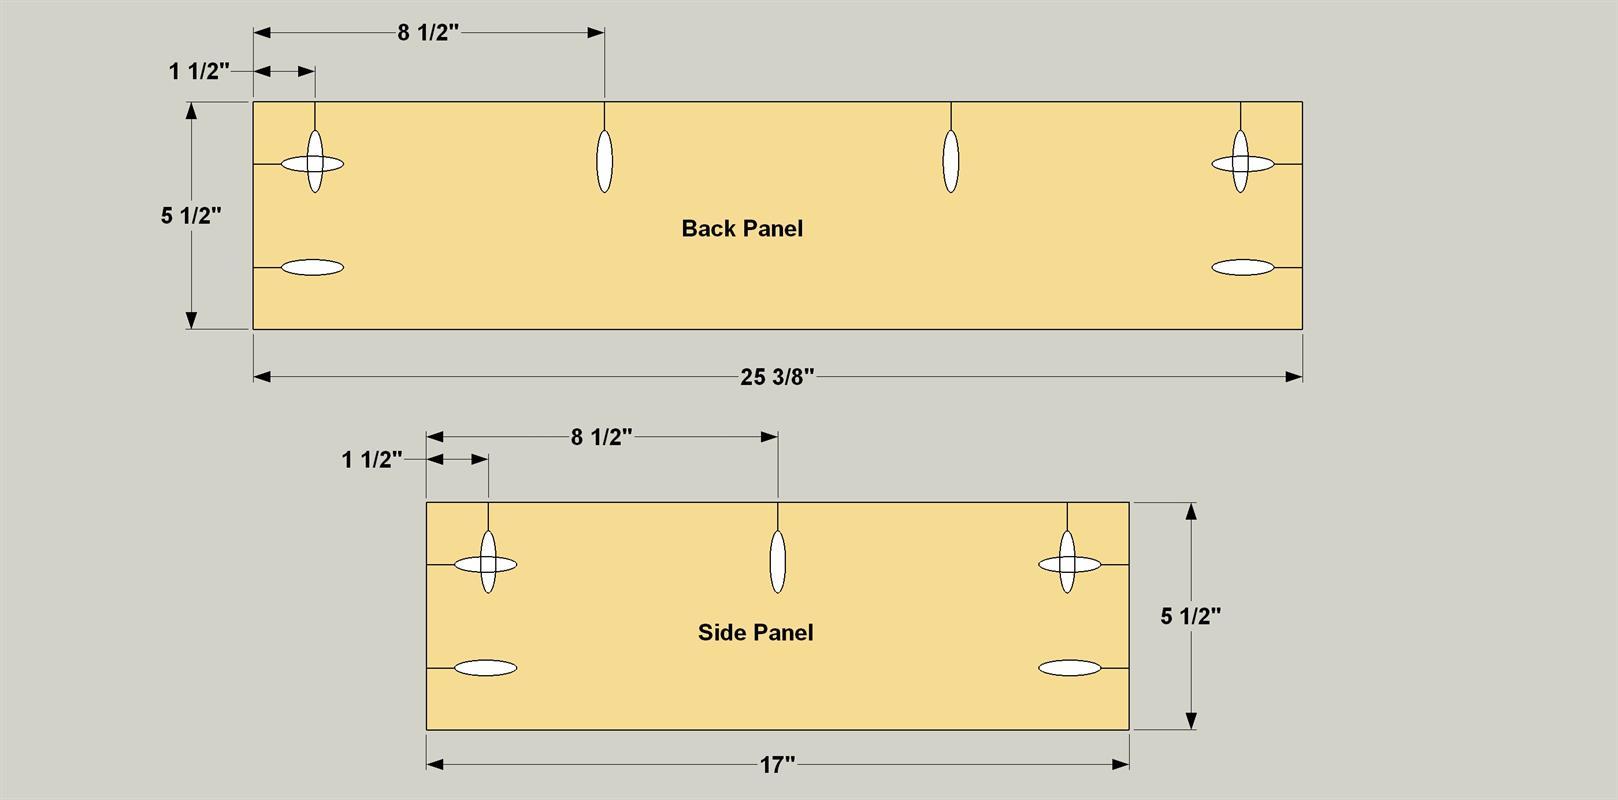
Cut one Back Panel and two Side Panels to length from 1x6 boards (we chose maple), as shown in the cutting diagram. Set your pocket-hole jig for 3/4" material, and then drill pocket holes where shown. Next, sand the Panels smooth, and apply finish to them. We wiped on two coats of butcher block oil finish. Wipe away the excess, and then let the oil dry.
-
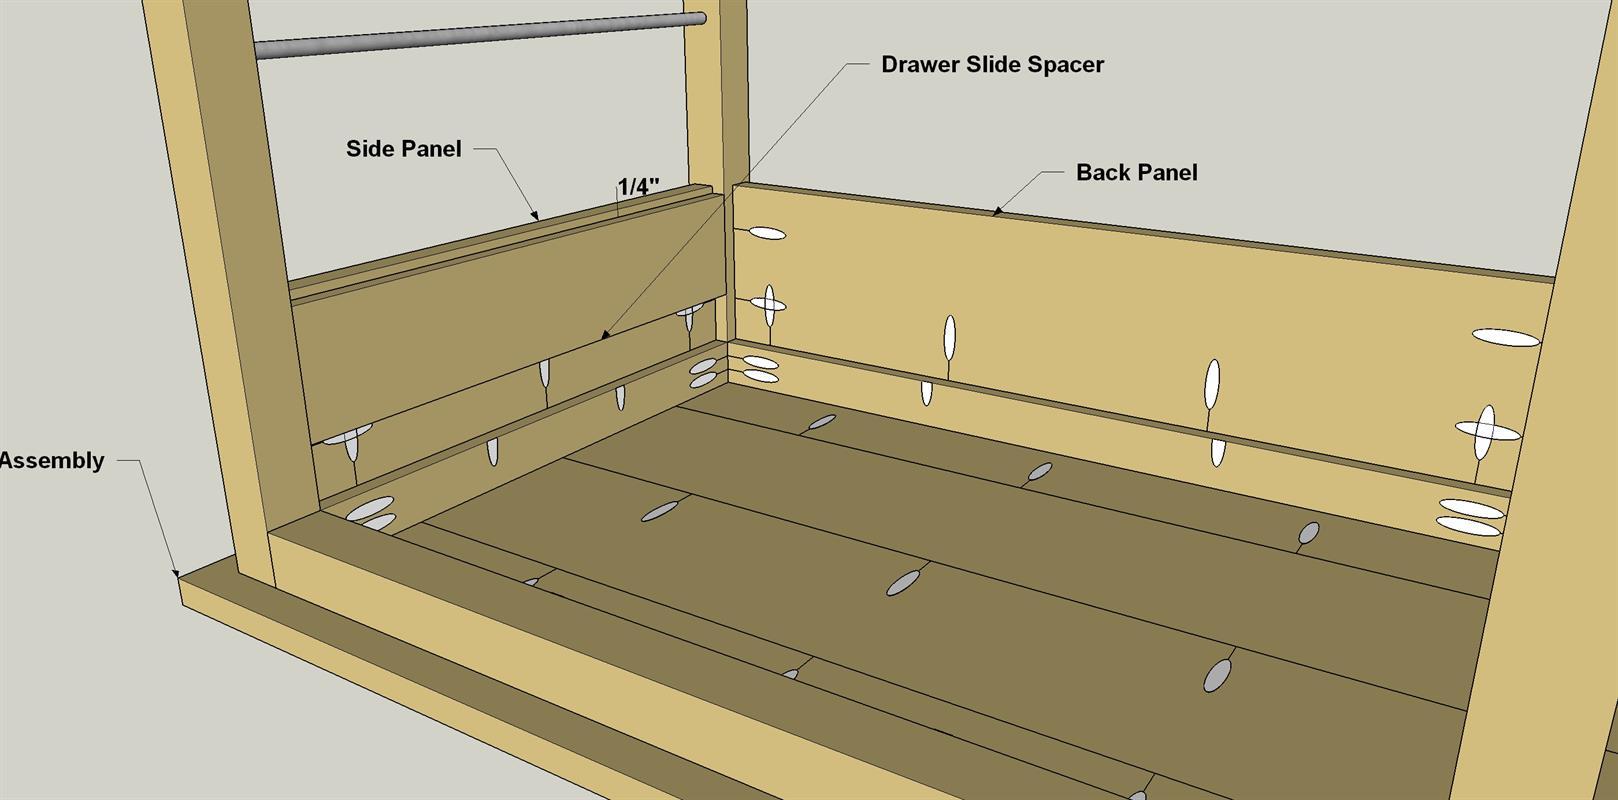
Attach the Side Panels
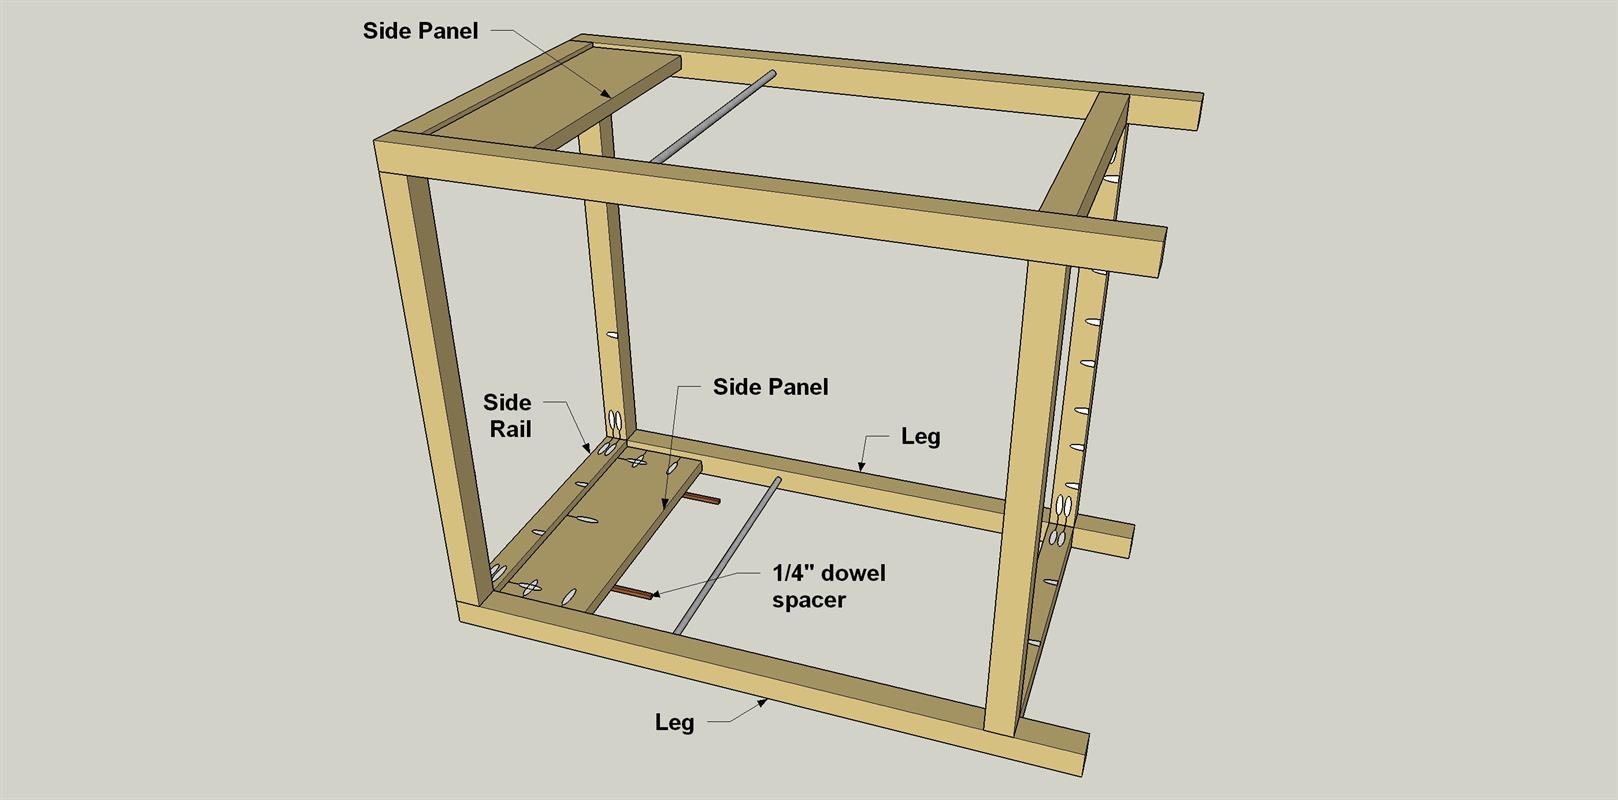
Once the finish on the Panels dries, lay the base assembly on end so that the Side Rails are on a flat surface. Then place a couple of 1/4"-thick spacers (square dowels work great) against the upper Side Rail, as shown. Position one Side Panel on top of the spacers, and then secure it to the base using 1 1/4" coarse-thread pocket-hole screws as shown. Flip the base, and attach the other Side Panel the same way.
-
Attach the Back Panel
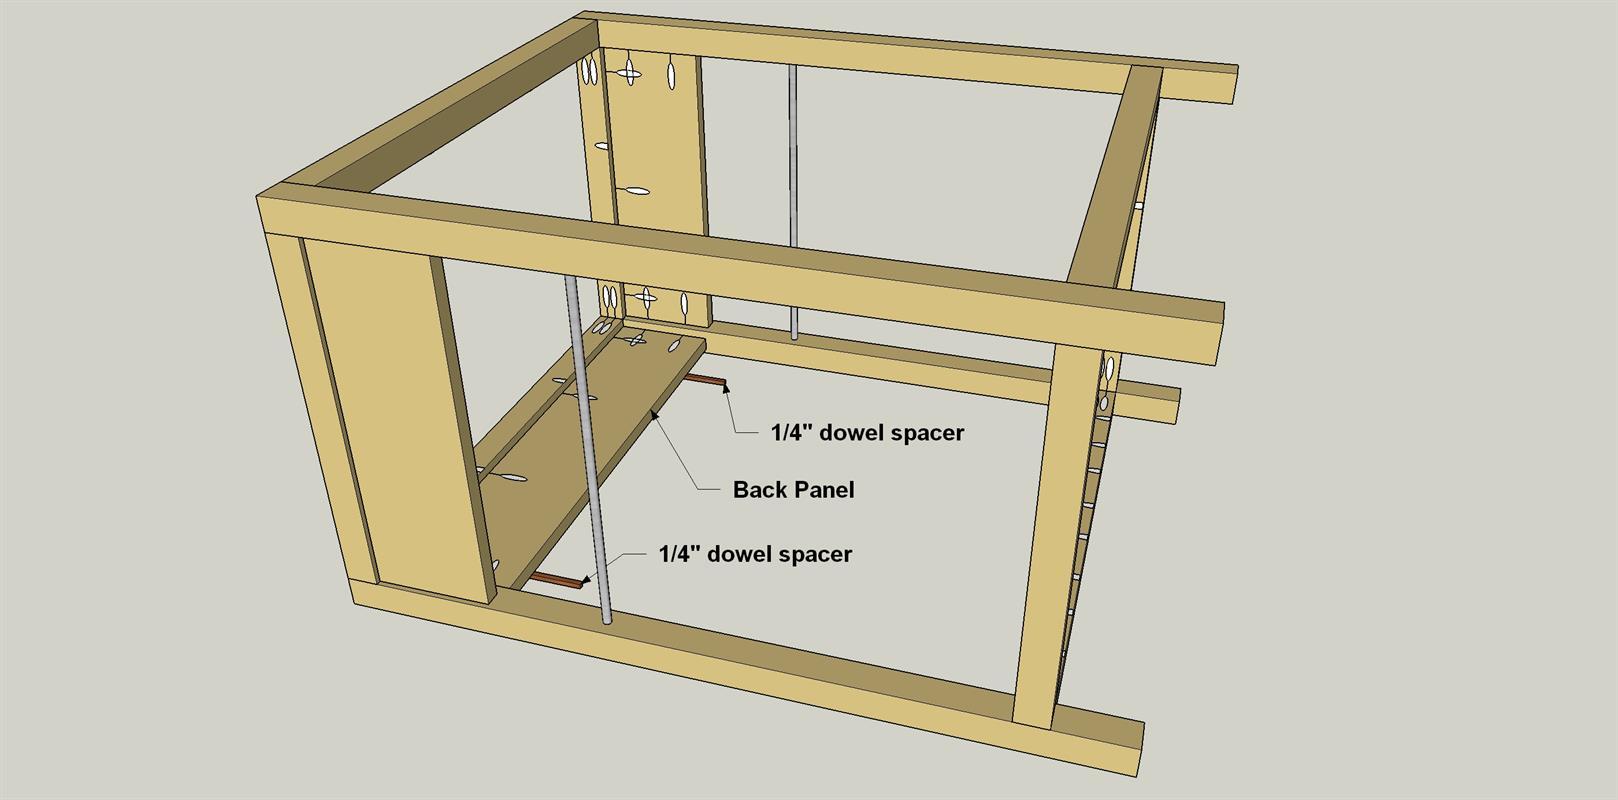
Now you can lay the base on its back, and then attach the Back Panel in the same way.
-
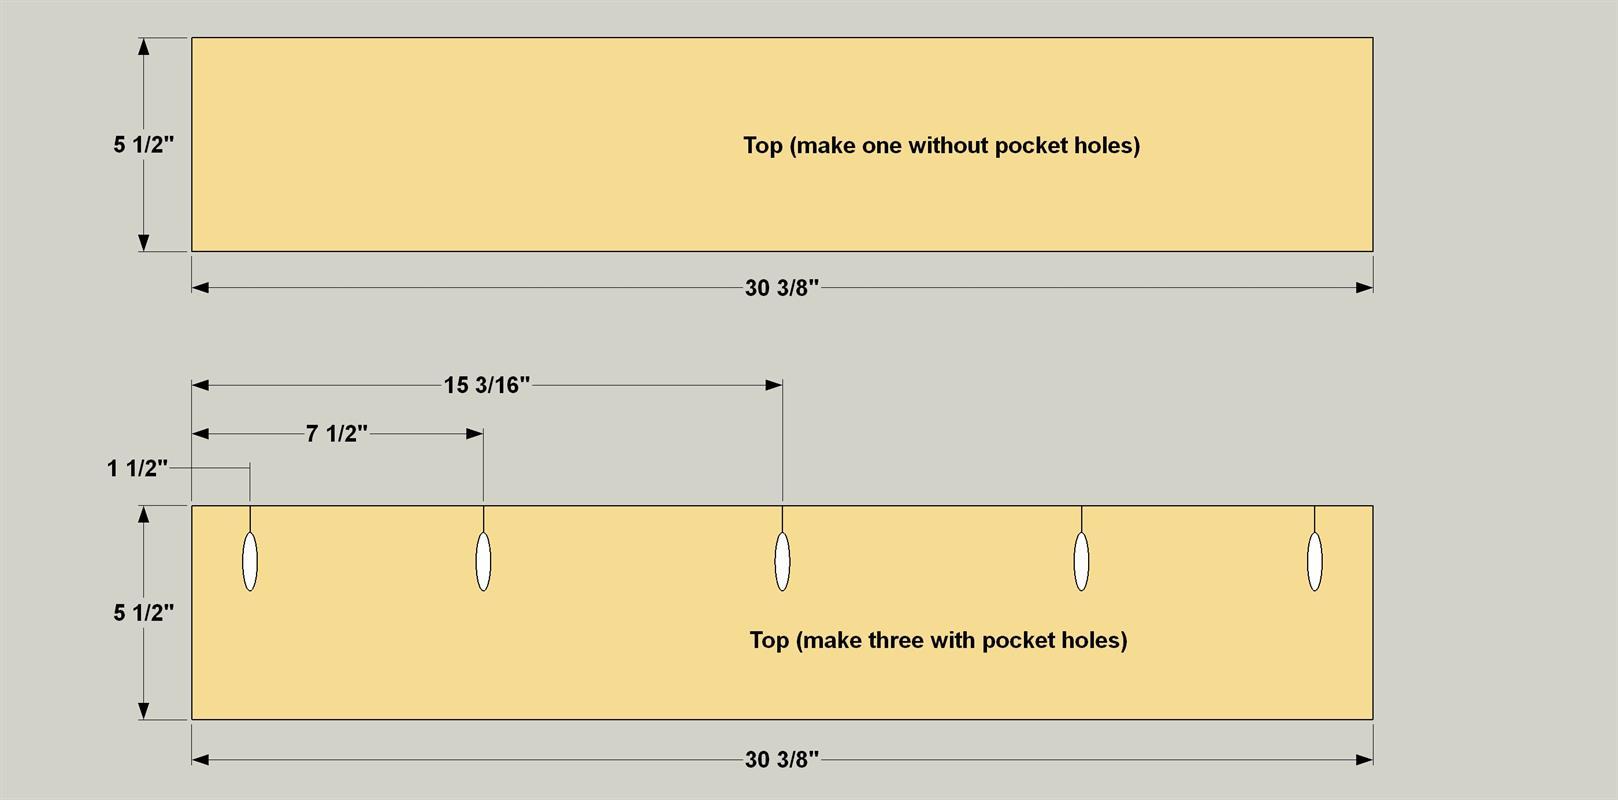
Make the Top Boards
Cut four Top boards to length from 1x6 maple, as shown in the cutting diagram. With your pocket-hole jig set for 3/4" material, drill pocket holes in three of the Top Boards at the locations shown. The fourth Top board doesn’t need holes.
-
Assemble the Top
Assemble the Top boards using glue and 1 1/4" fine-thread pocket-hole screws, as shown. Make sure the ends are aligned, and that the board faces sit as flush as possible. After the glue dries, sand the upper face of the top assembly flat and smooth, and then apply butcher block oil to the entire face, underside, and edges of the top assembly.

-
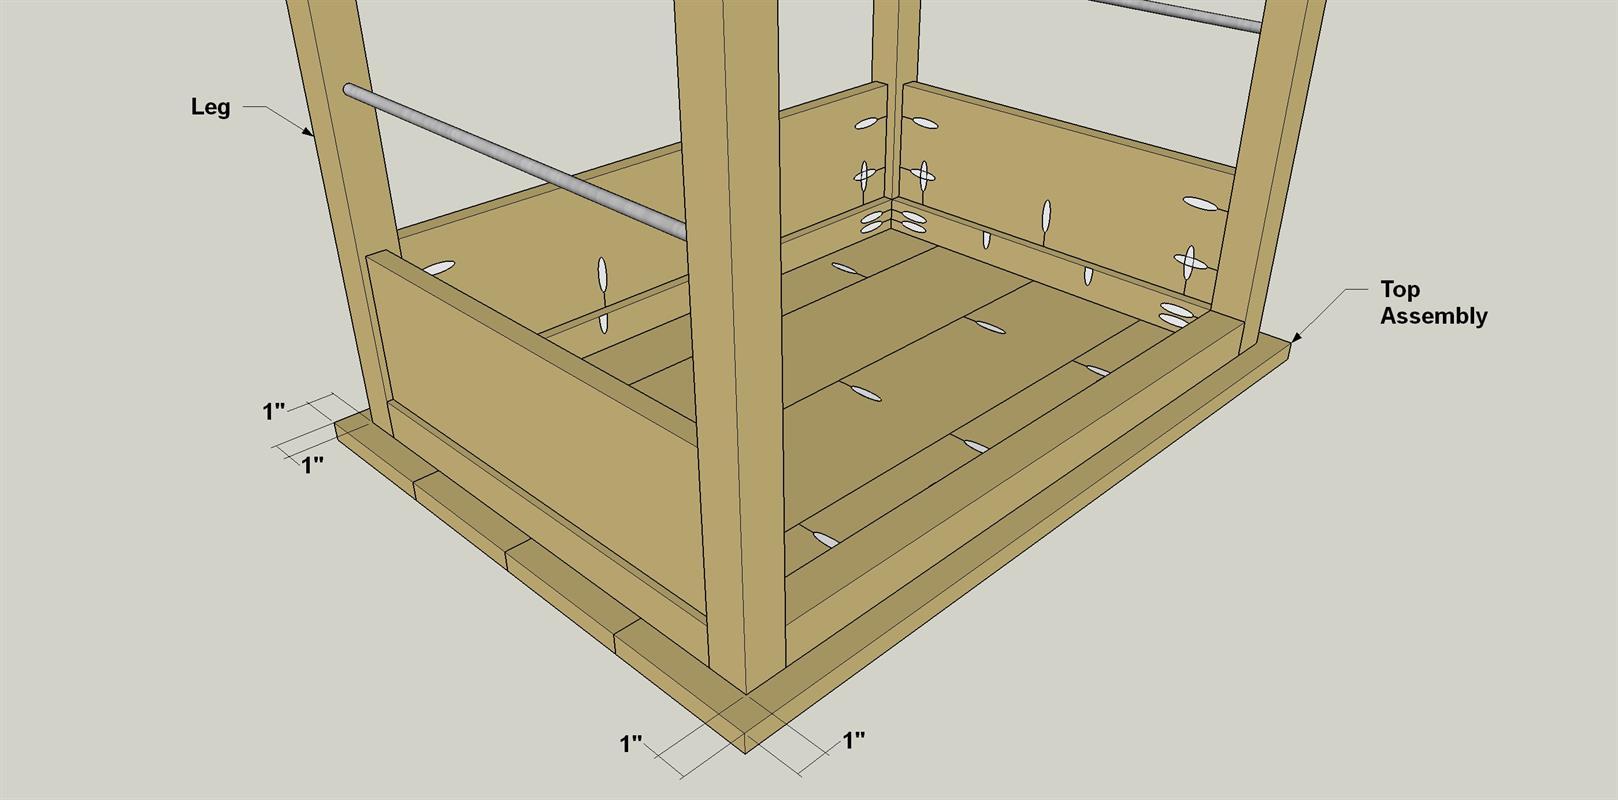
Attach the Top to the Base
Once the finish on the top assembly dries, lay it face down on a flat, smooth surface. An old bath towel works great to protect the finish. Position the assembled base on the top, as shown. Make sure the top overhangs by 1" on all sides. Secure the Top to the Base using 1 1/4" fine-thread pocket-hole screws, as shown.
-
Add Drawer Slide Spacers
Cut the Drawer Slide Spacers to length from 1/2" as shown in the cutting diagram. Attach the Drawer Slide Spacers to the inside of the Side Panels, as shown. Offset the bottom edge of the Spacer 1/4" from the bottom edge of the Side Panel. Use glue and 1" brads to secure the Spacers.
-
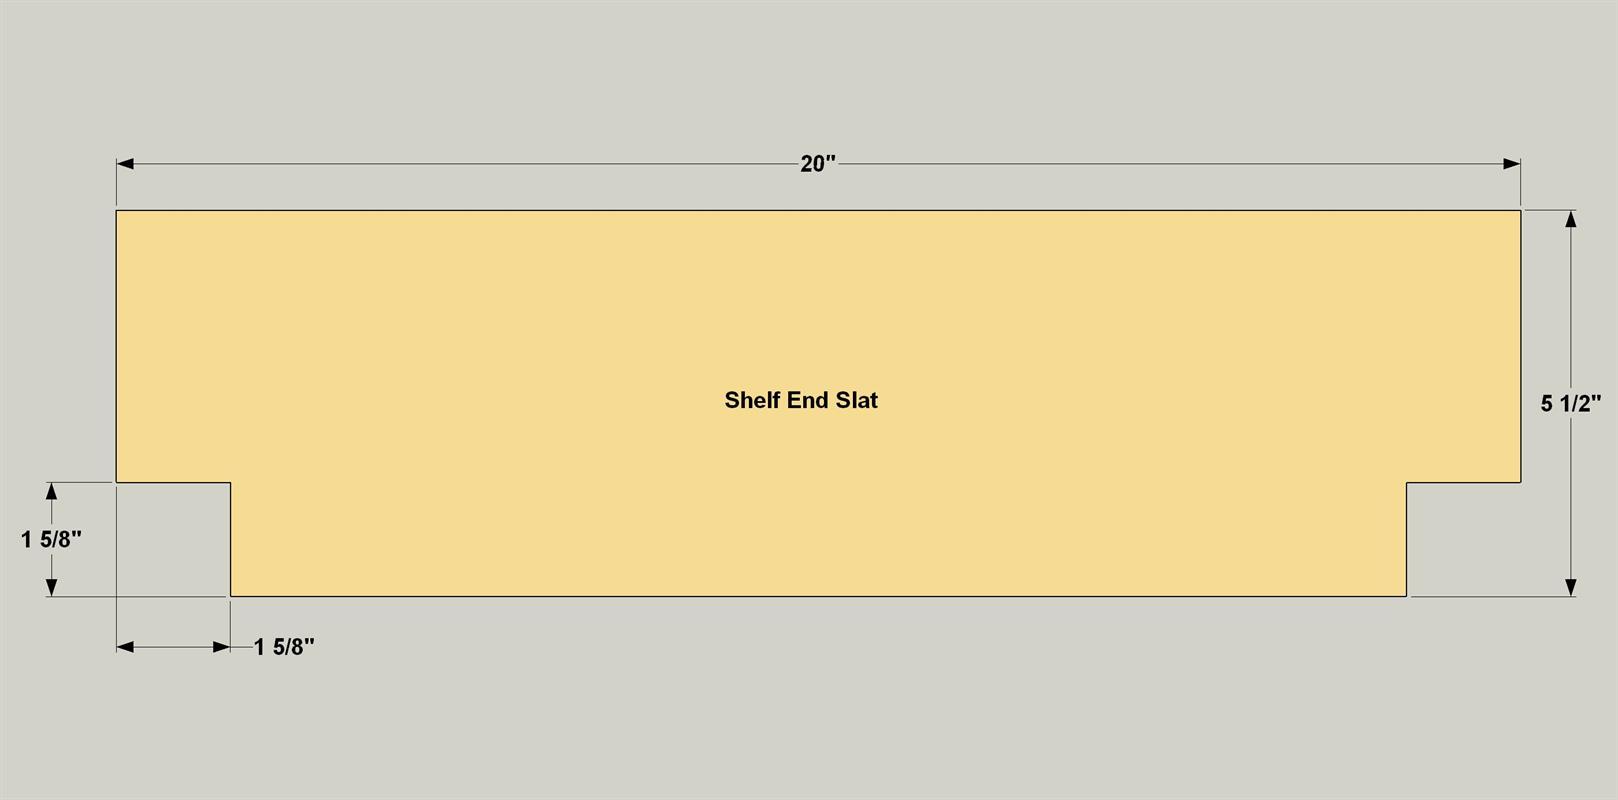
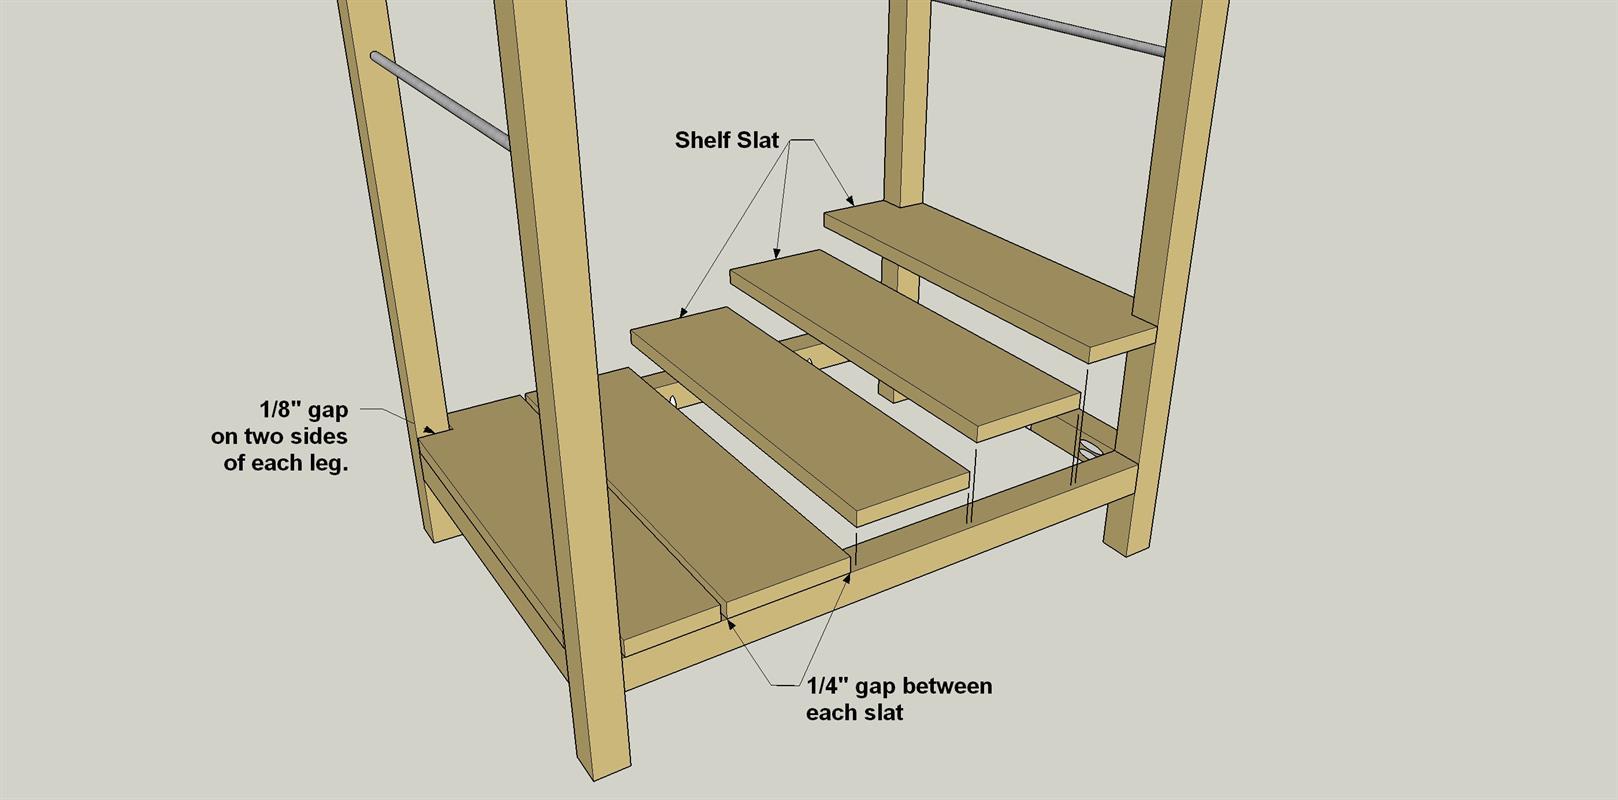
Cut Shelf Slats
Cut the five Shelf Slats to length from 1x6 maple as shown in the cutting diagram. On two of the Slats, mark 1 5/8" square notches on two corners as shown. Then, cut the notches out using a jigsaw with a fine tooth blade. Sand the cut edges smooth. Then sand the Shelf Slats and apply butcher block oil. Let the finish dry.
-
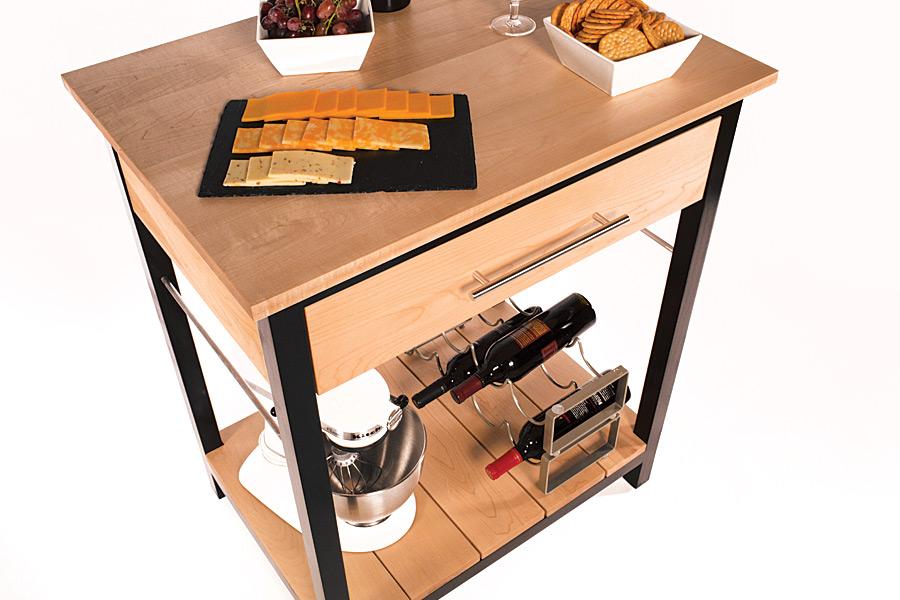
Attach Shelf Slats
Lay the two end Shelf Slats in place so the ends are flush with the Long Rails and the outside Slat edges are flush with the Side Rails. Secure the using 1 1/4" fine-thread pocket-hole screws. Position the other Slats, leaving equal spaces between them—about 1/4". Then secure these Slat with pocket-hole screws, as well.
-
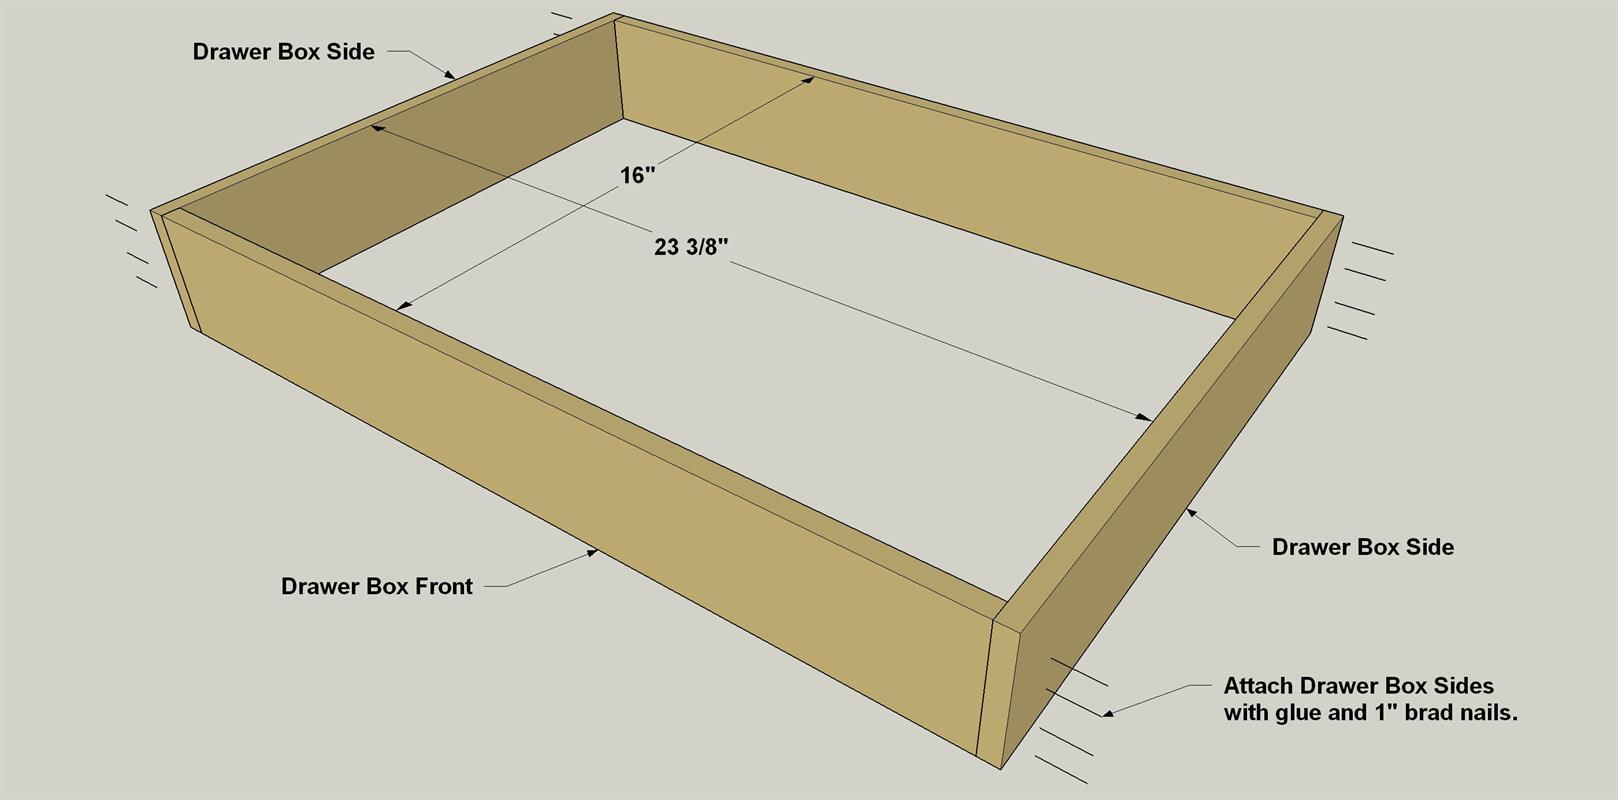
Make the Drawer Box
Cut two Drawer Box Sides, one Drawer Box Front, and one Drawer Box Back to length from 1/2" x 4" craft boards, as shown in the cutting diagram. While you’re at it, cut a Drawer Front from a 1x6 maple board. Now you can assemble the drawer box using glue and 1" brad nails as shown. You can use a regular hammer and nails, but a brad nailer works best for this type of assembly. They’ve gotten relatively inexpensive, or they can be rented, along with a compressor, at hardware stores and home centers.
-
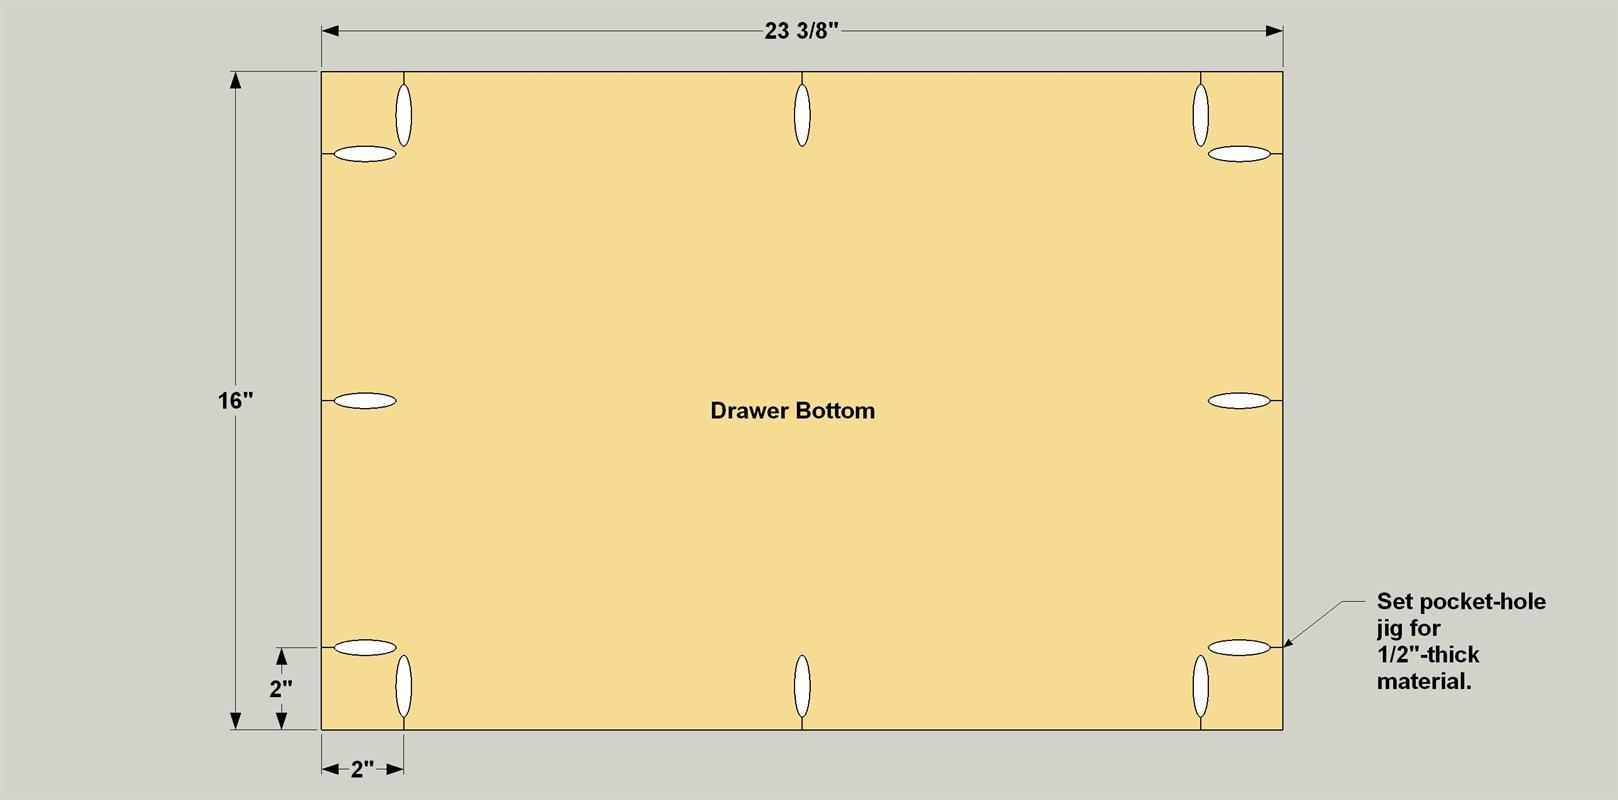
Make a Drawer Bottom
Cut the Drawer Bottom from 3/4" Birch Plywood as shown. Set your pocket hole jig (and bit) for 1/2" material, and then drill pocket holes at the locations shown.
-
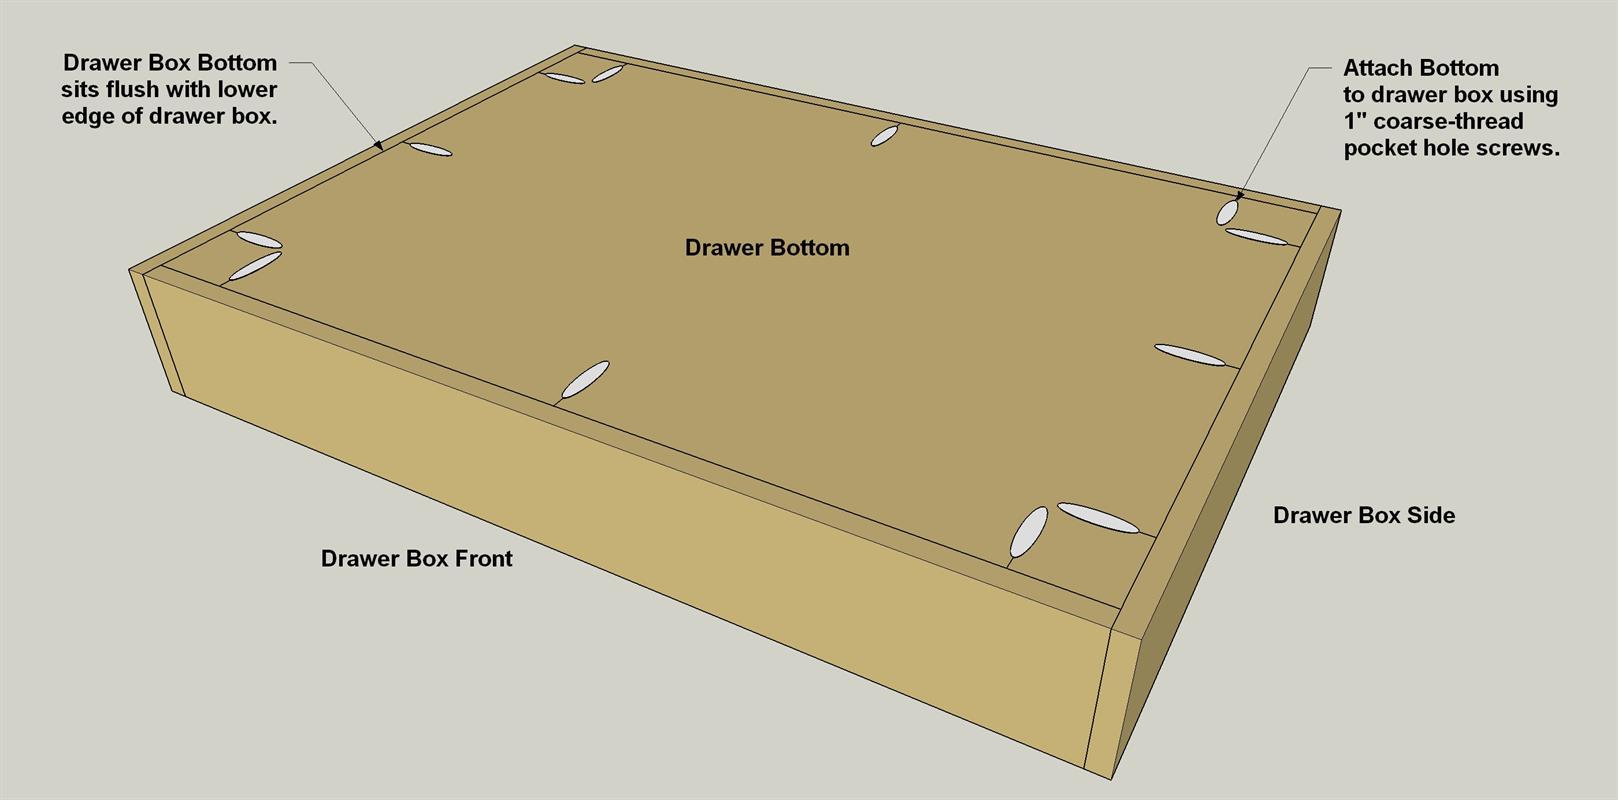
Attach the Drawer Bottom
Attach the Drawer Bottom to the drawer box assembly using 1" coarse-thread pocket-hole screws. The Drawer Bottom should sit flush with the lower edge of the drawer box. This is a good time to apply finish to the drawer box and the Drawer Front, as well. The drawer box doesn’t need finish for appearance, but finish will help keep it cleaner in the long run.
-
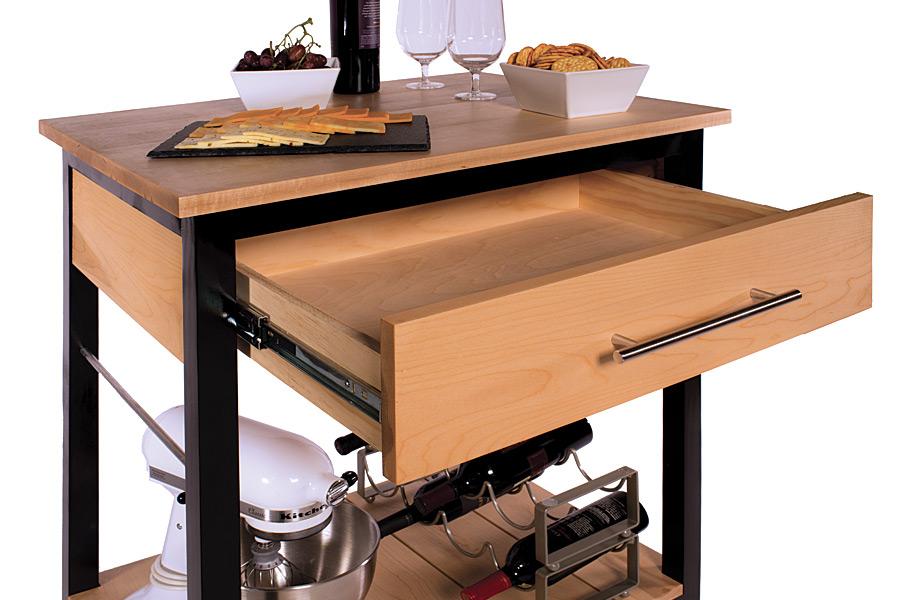
Install the Drawer
Install drawer slides by mounting them to the assembled drawer and to the Drawer Slide Spacers according to the manufacturer’s instructions. Slide the drawer box to its fully closed position. Then, apply a couple of pieces of double-faced carpet tape to the front of the drawer box. Position the Drawer Face, as shown, making sure the spacing is equal on the top and the sides. Press the Drawer Front firmly against the tape, and then gently open the drawer. Add a couple small clamps to secure the Face to the Drawer. Drill two pilot holes from inside the drawer box, and secure the Drawer Face to the drawer box using two 1" coarse-thread pocket-hole screws.
