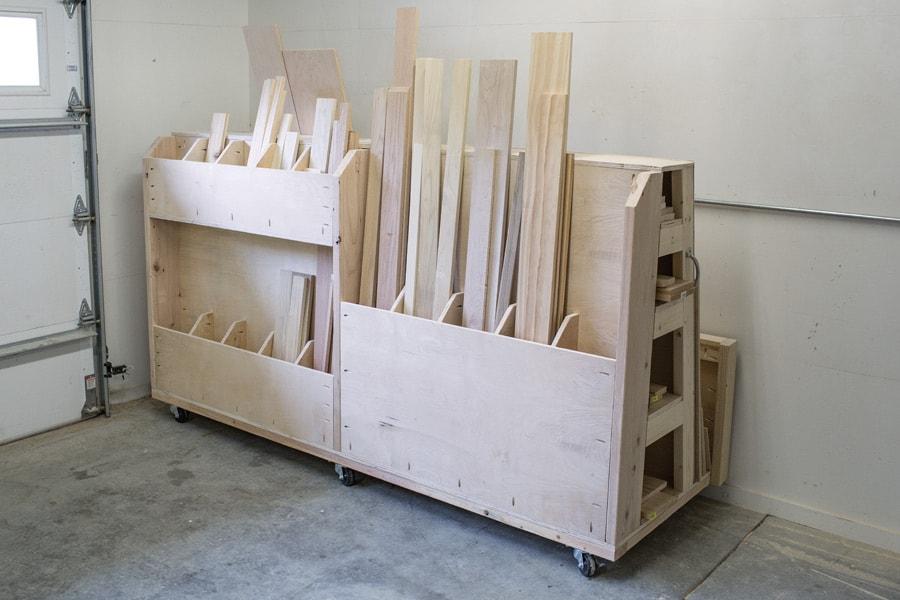
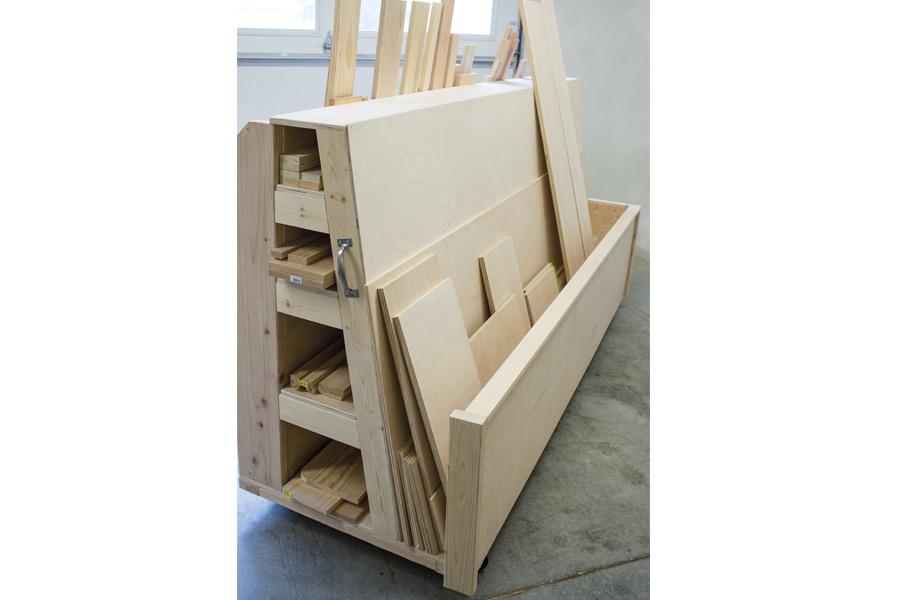
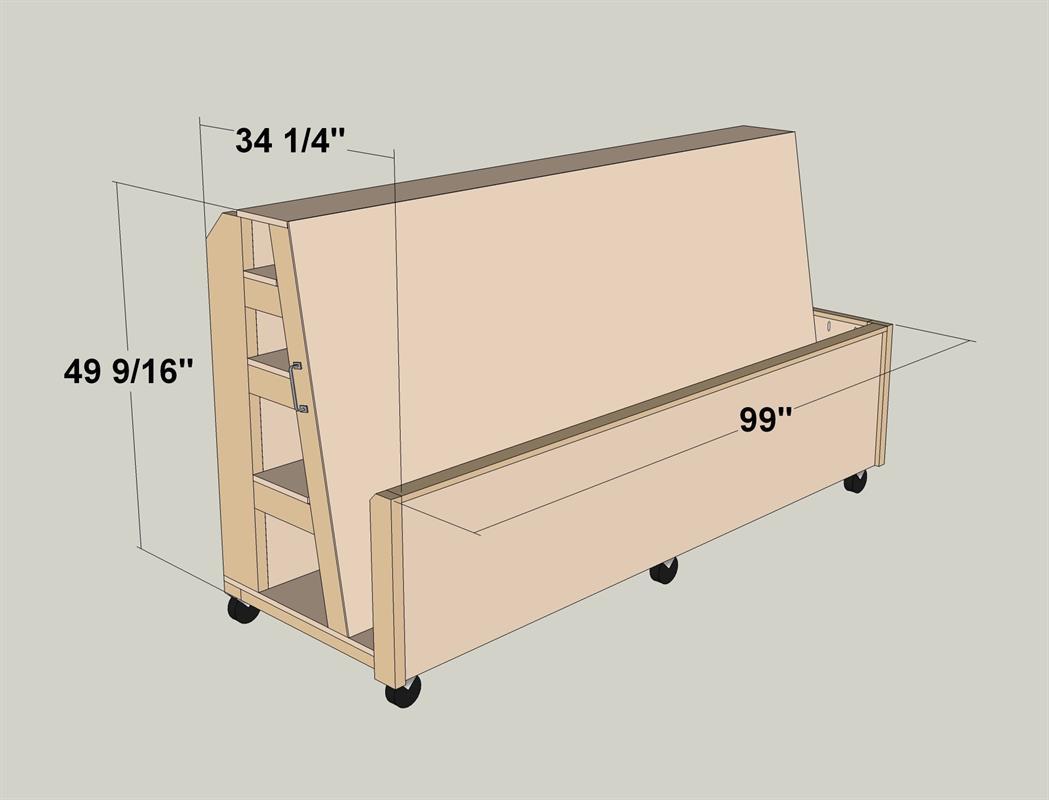


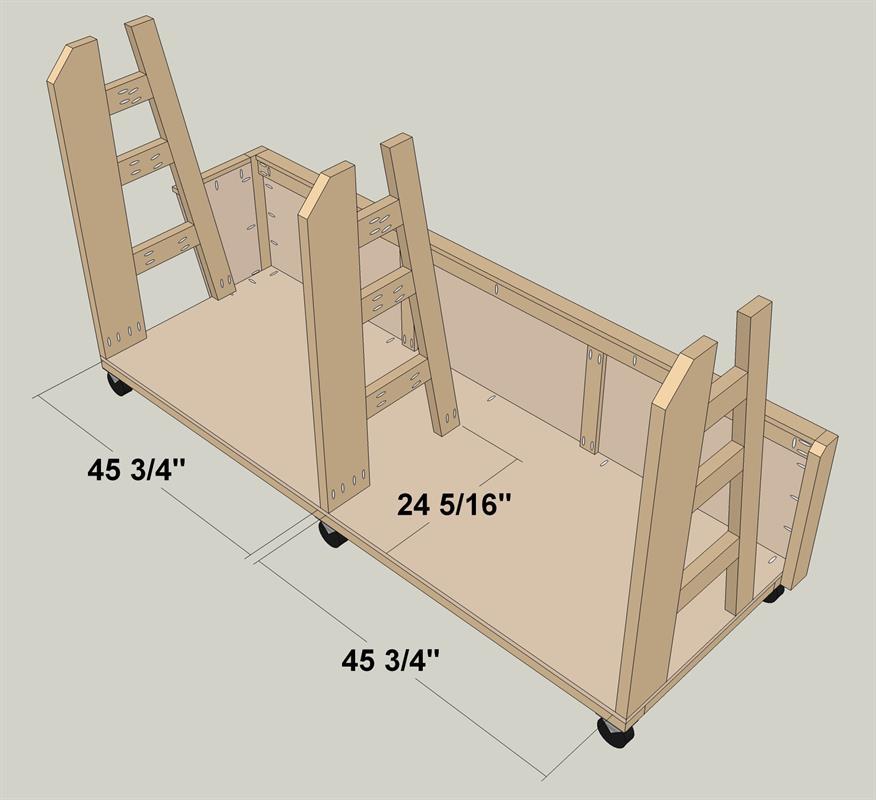
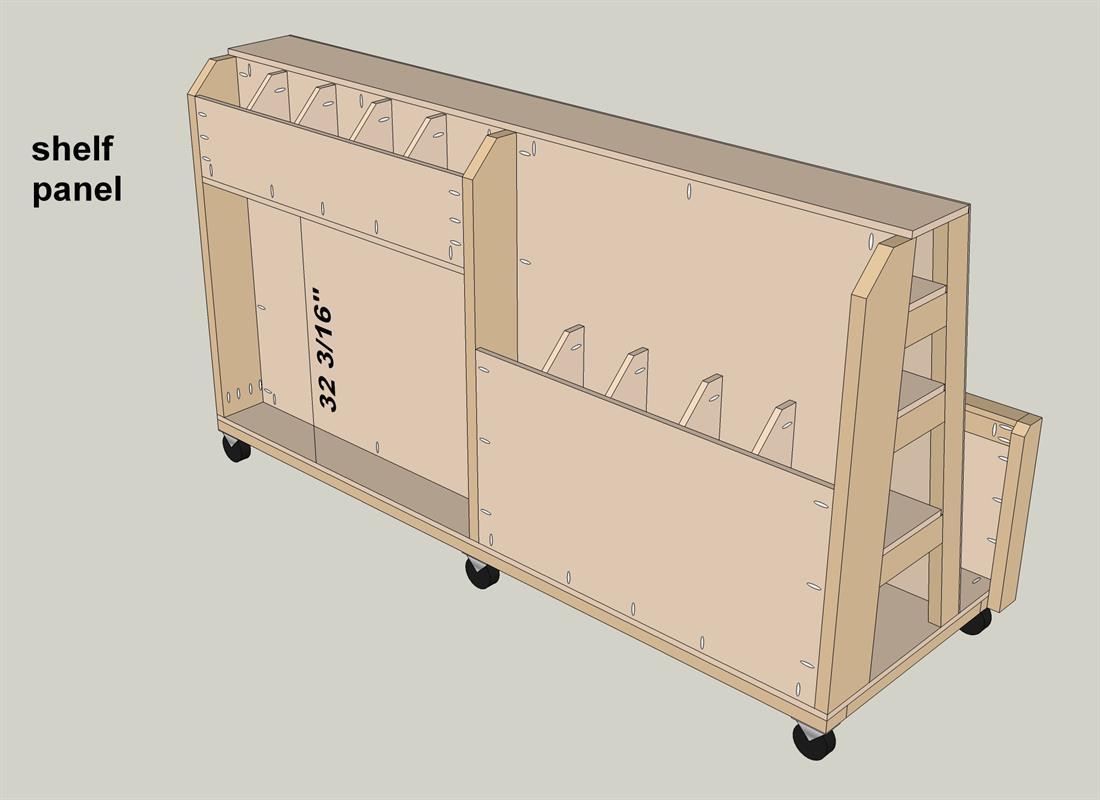
Finding a place to store lumber and sheet goods can be challenging. This lumber cart keeps them all organized with shelves to store long boards, upright bins for shorter pieces, and a large area to hold sheet goods. Plus, the cart rolls, so you can push it wherever you need to in your work space.
Tools
Kreg Tools

Other Tools
-
Circular Saw (corded)

-
Jigsaw
-
Miter Saw
-
Square
-
Tape Measure
-
Drill (cordless)
-
Hammer
-
Sander
Materials
Wood Products
- 1 Board , 1x2 , 24"
- 1 Board , 1x3 , 48"
- 2 Board , 1x3 , 96"
- 6 Board , 2x4 , 96"
- 2 Board , 2x6 , 96"
- 2 Board , 2x8 , 96"
- 1 Plywood , 1/4" Thick , Full Sheet
- 5 Plywood , 3/4" Thick , Full Sheet
Hardware & Supplies
- 22 2 1/2" coarse pocket hole screws
- 150 1 1/4" coarse pocket hole screws
- 125 4d finish nails
- 6 3" heavy duty locking swivel casters
- 24 3/8" x 1 1/2" lag screws
- 2 6 1/2" utility pulls
- 1 Wood glue
- 24 3/8" washers
Cut List & Parts
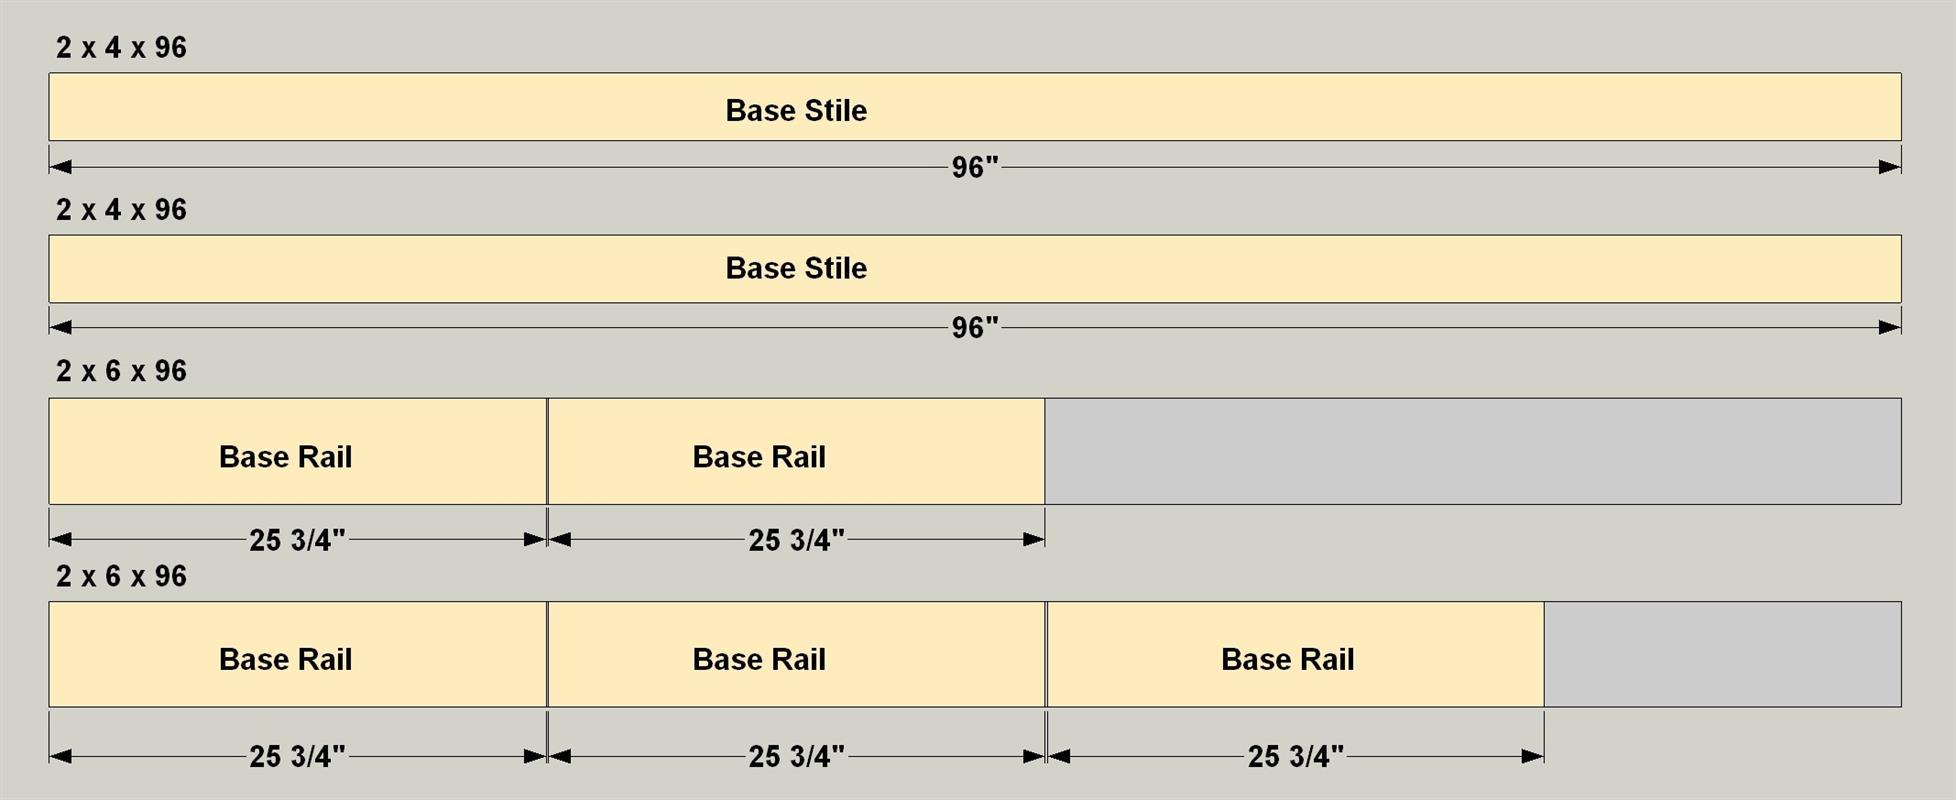
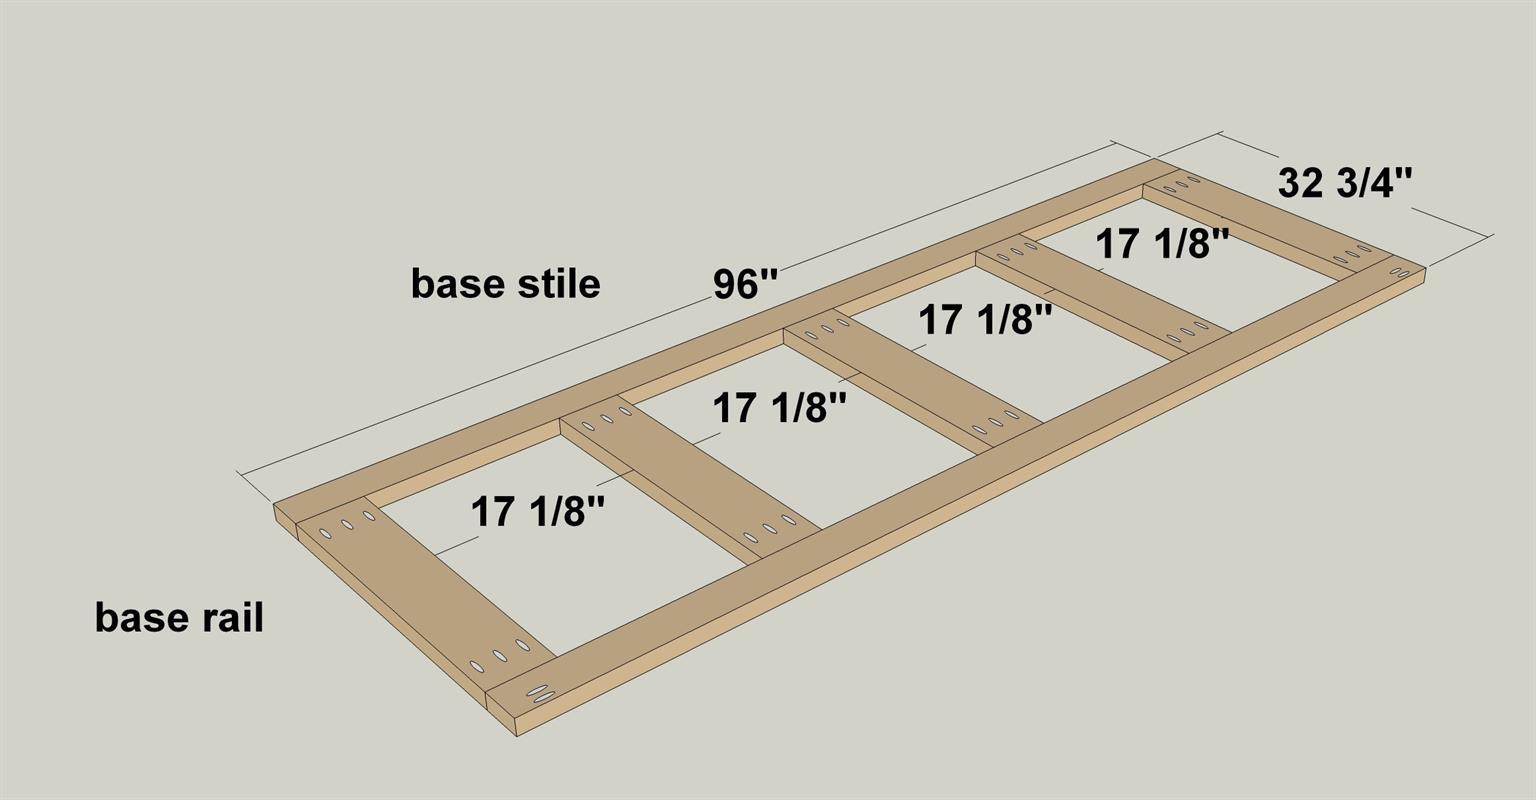
- 2 Base stiles , 1 1/2 x 3 1/2 x 96
- 5 Base rails , 1 1/2 x 5 1/2 x 25 3/4
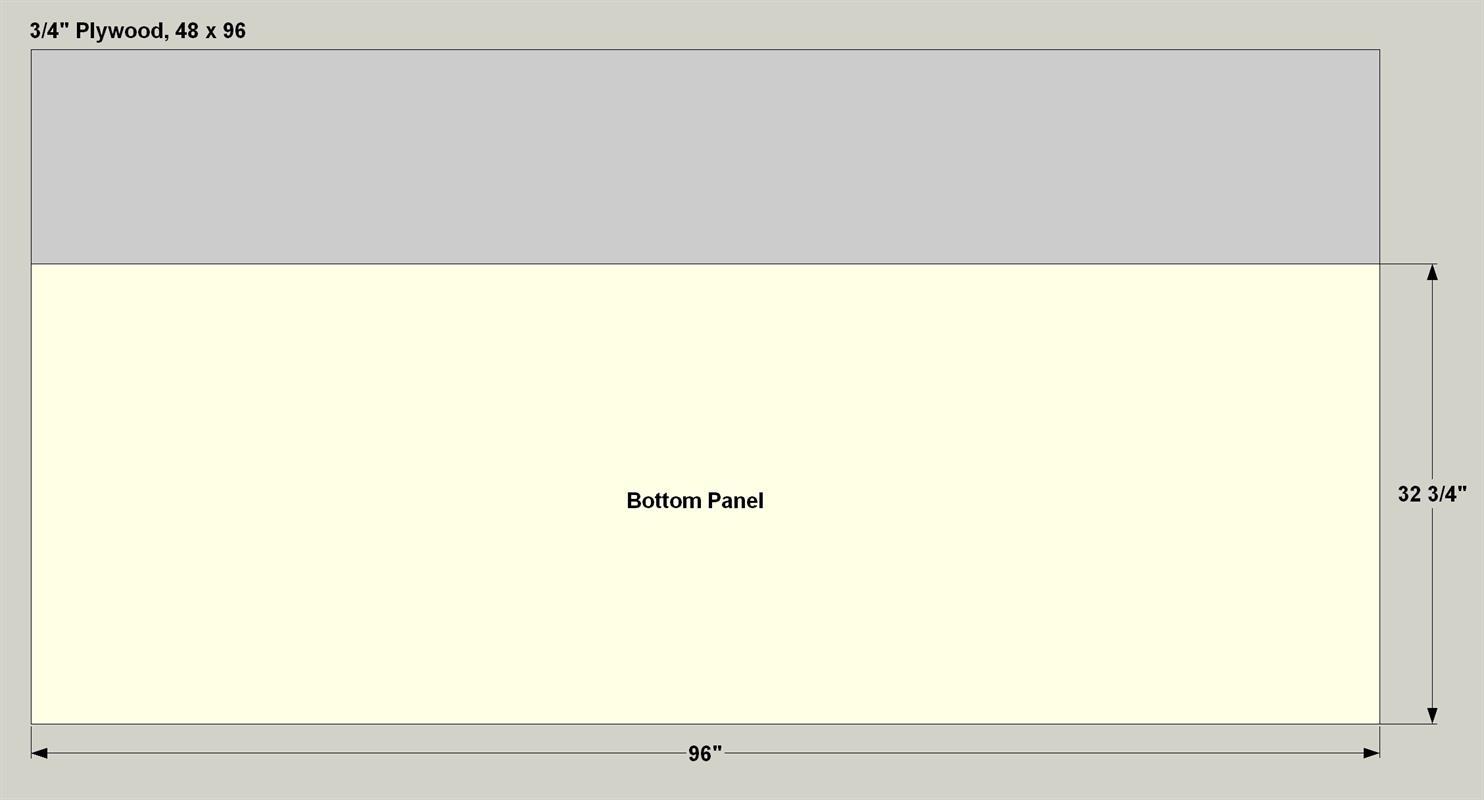
- 1 Bottom panel , 3/4 ply x 32 3/4 x 96
- 1 Front rail , 3/4 x 2 1/2 x 96
- 2 Front stiles , 3/4 x 2 1/2 x 16 3/4
- 1 Front panel , 3/4 ply x 21 1/2 x 96
- 1 Front panel trim , 3/4 x 2 1/2 x 96
- 2 Front panel ends , 1 1/2 x 3 1/2 x 22 1/4
- 1 End panel , 3/4 ply x 13 3/8 x 21 1/2
- 1 End panel trim , 3/4 x 1 1/2 x 13 3/8
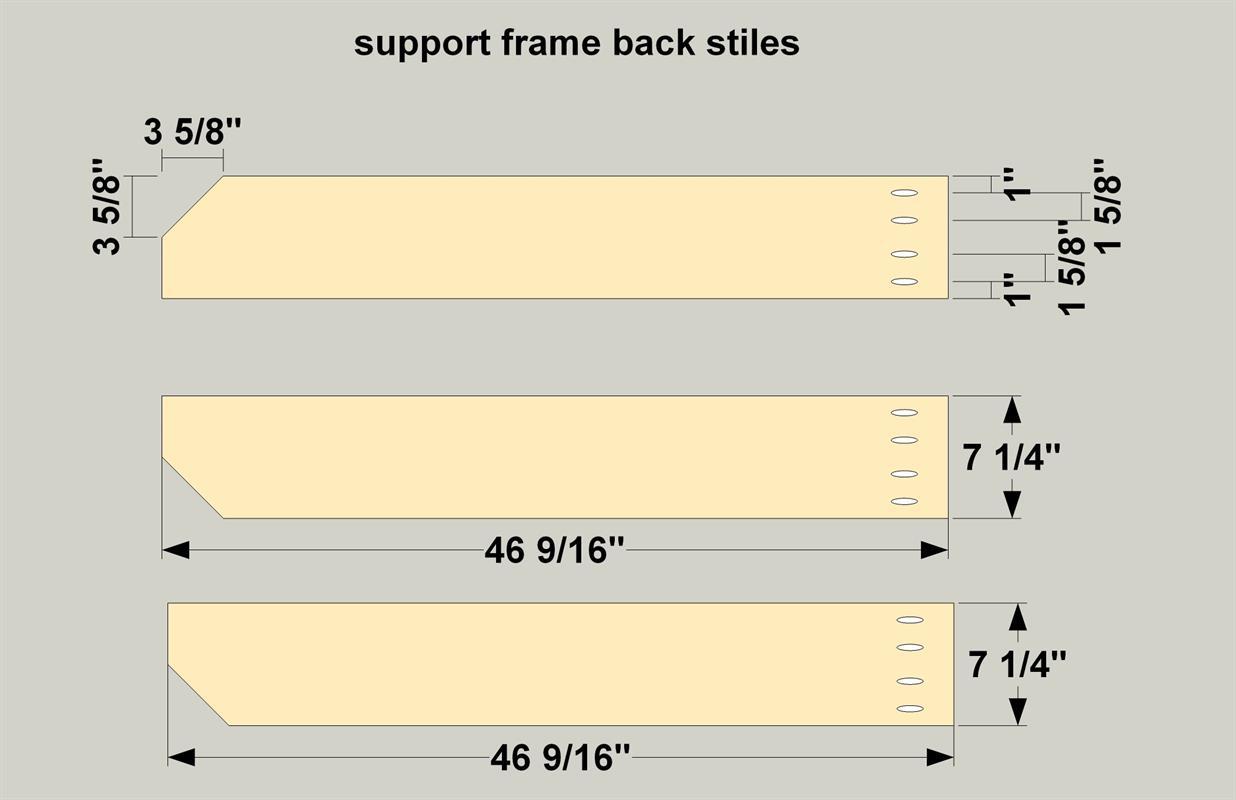
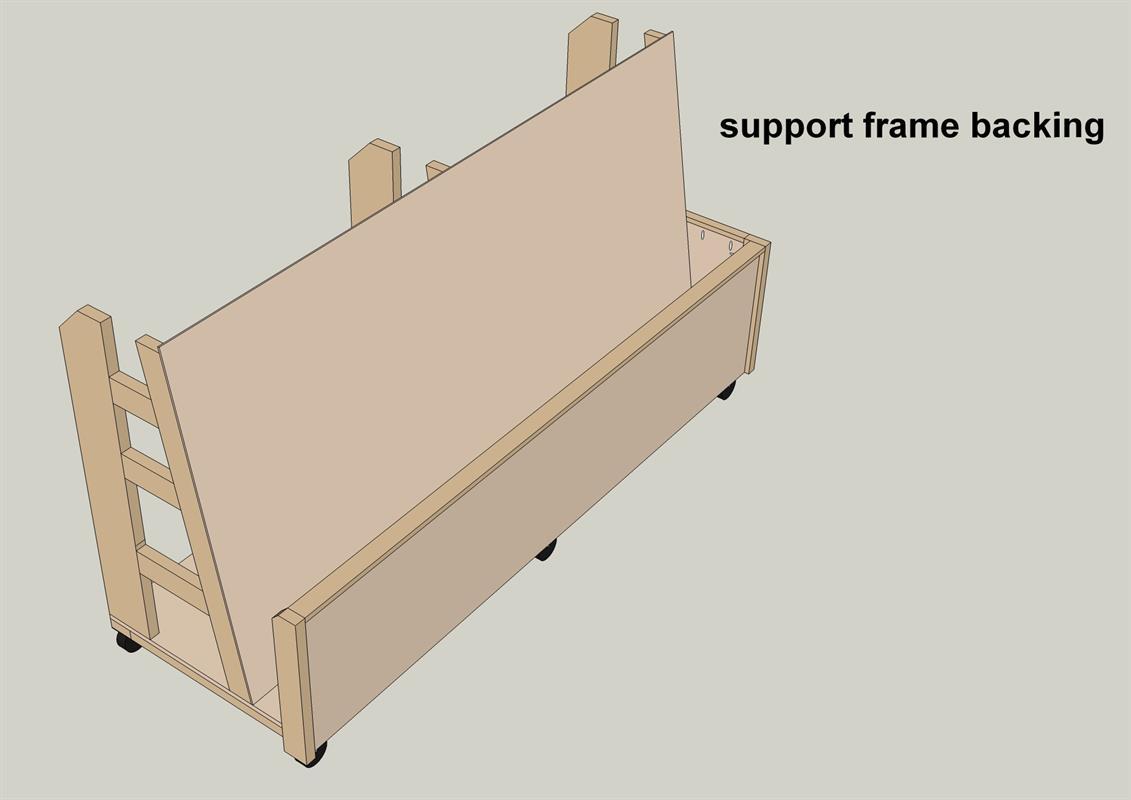
- 3 Support frame back stiles , 1 1/2 x 7 1/4 x 46 9/16
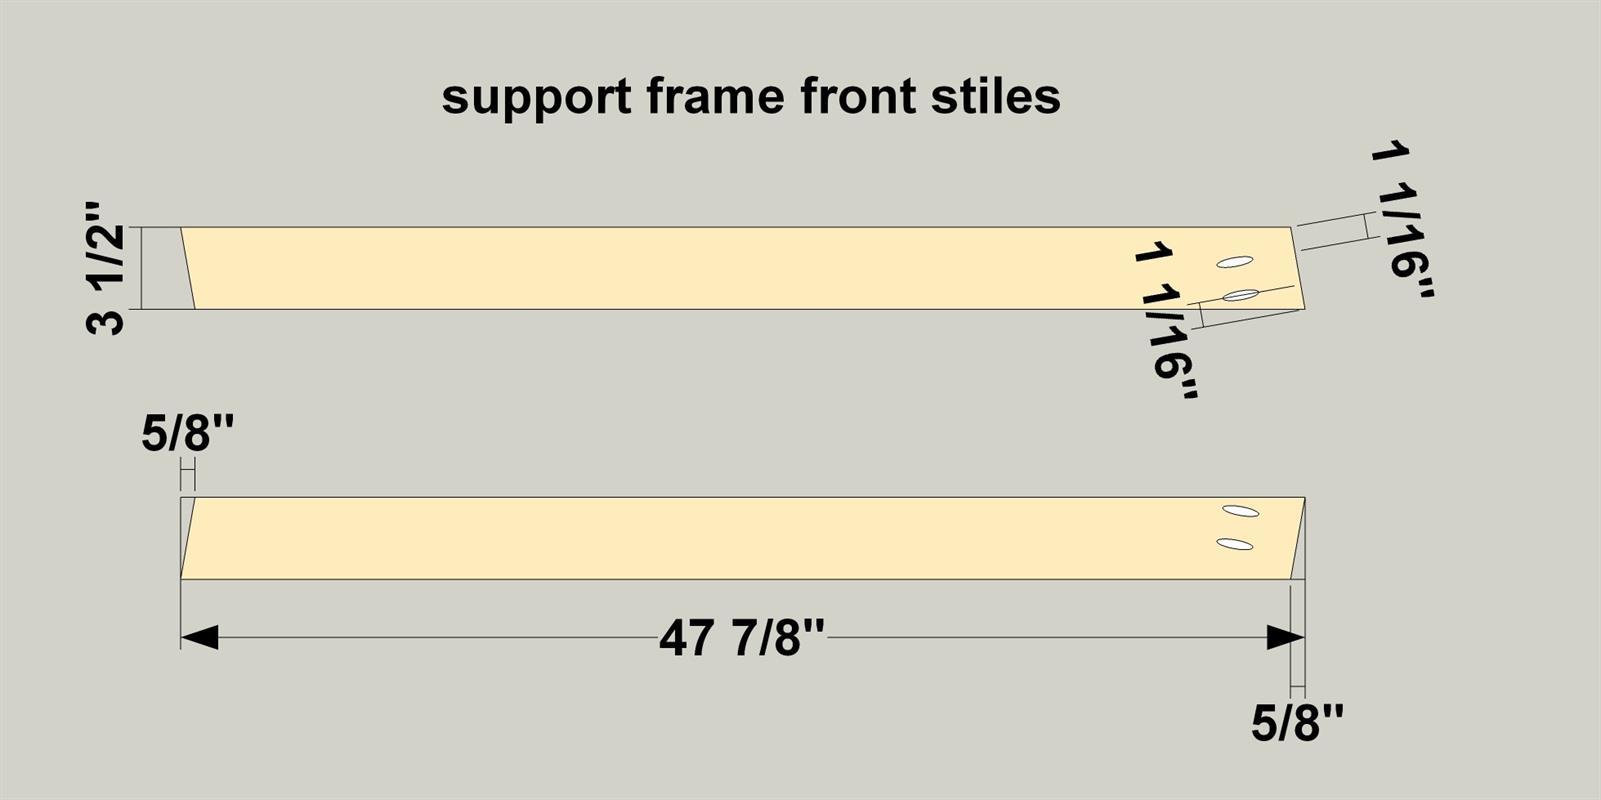
- 3 Support frame front stiles , 1 1/2 x 3 1/2 x 47 7/8
- 3 Support frame top rails , 1 1/2 x 3 1/2 x 7 1/8
- 3 Support frame middle rails , 1 1/2 x 3 1/2 x 9
- 3 Support frame bottom rails , 1 1/2 x 3 1/2 x 11 9/16
- 1 Support frame backing , 1/4 ply x 48 x 96
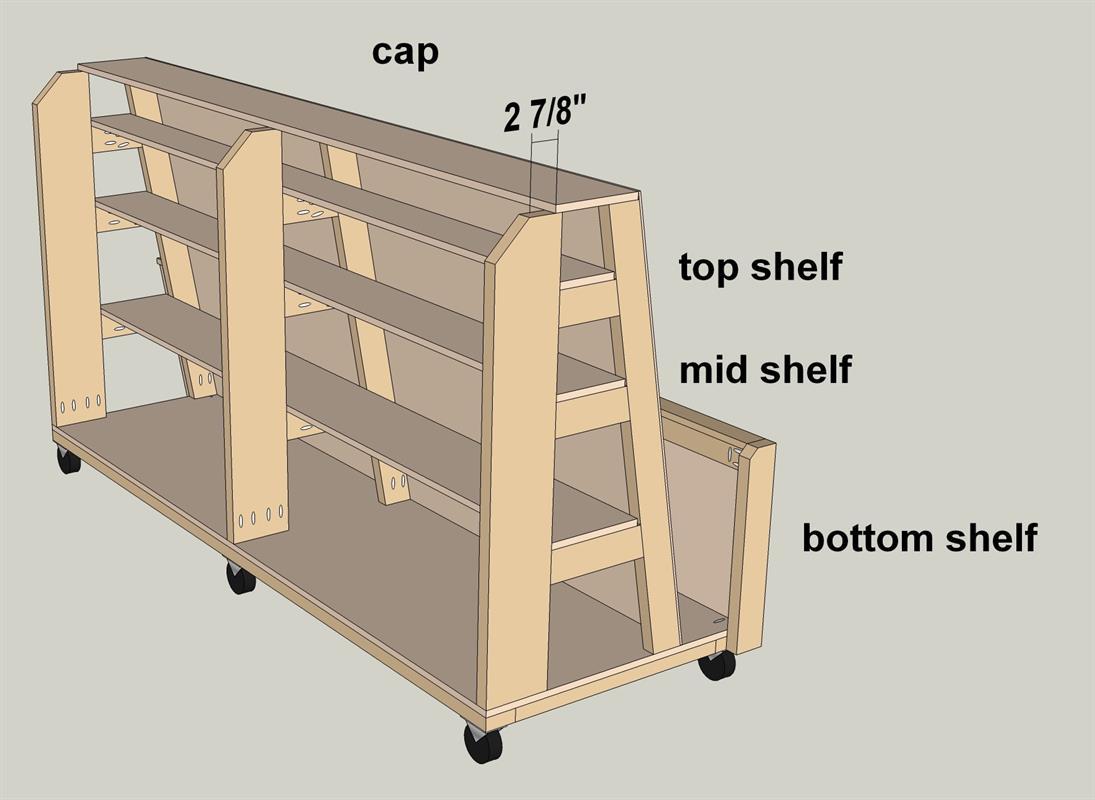
- 1 Bottom shelf , 3/4 ply x 10 1/2 x 96
- 1 Middle shelf , 3/4 ply x 8 1/8 x 96
- 1 Top shelf , 3/4 ply x 6 1/4 x 96
- 1 Cap , 3/4 ply x 9 1/2 x 96
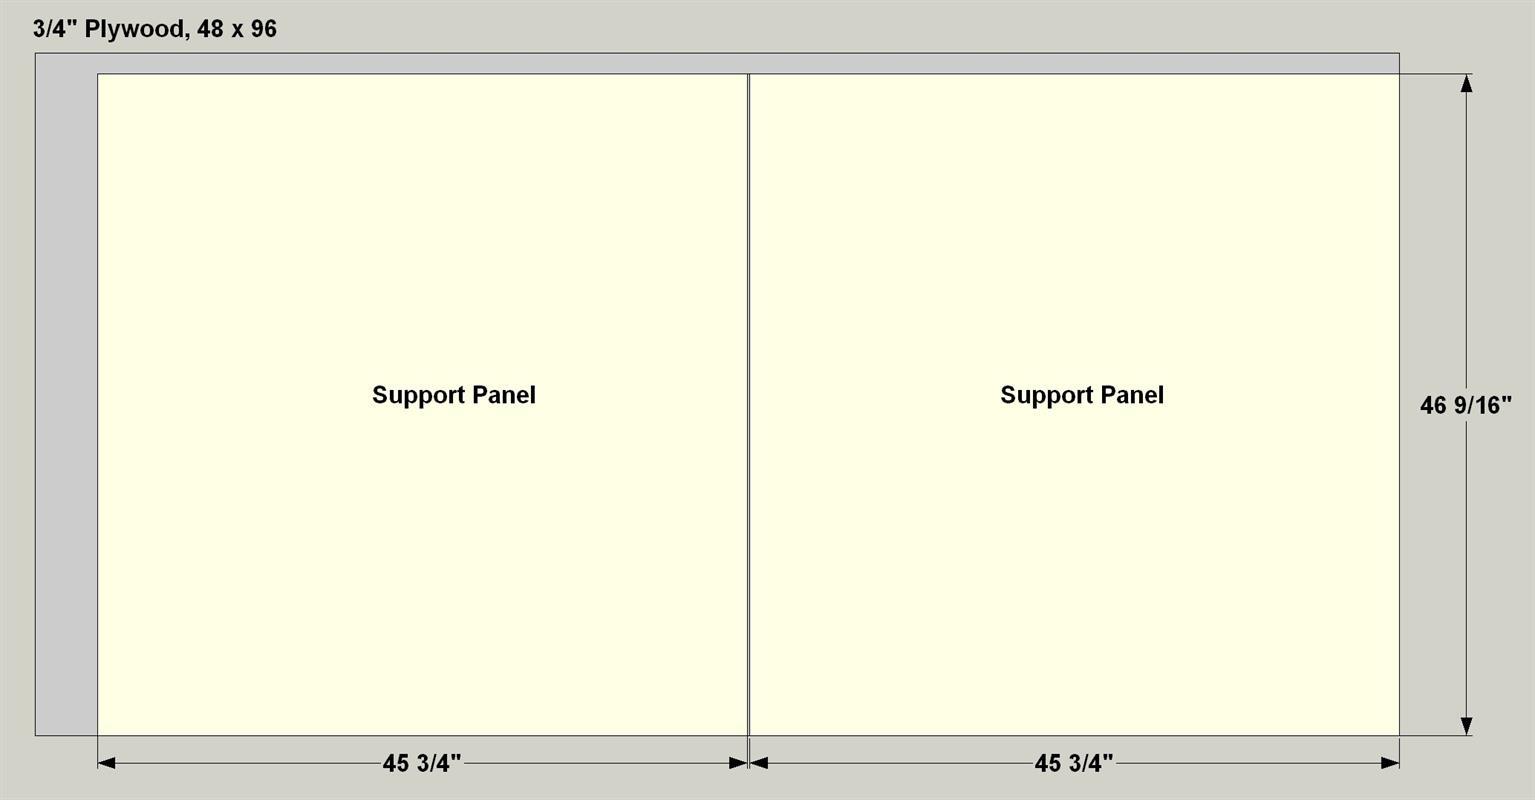
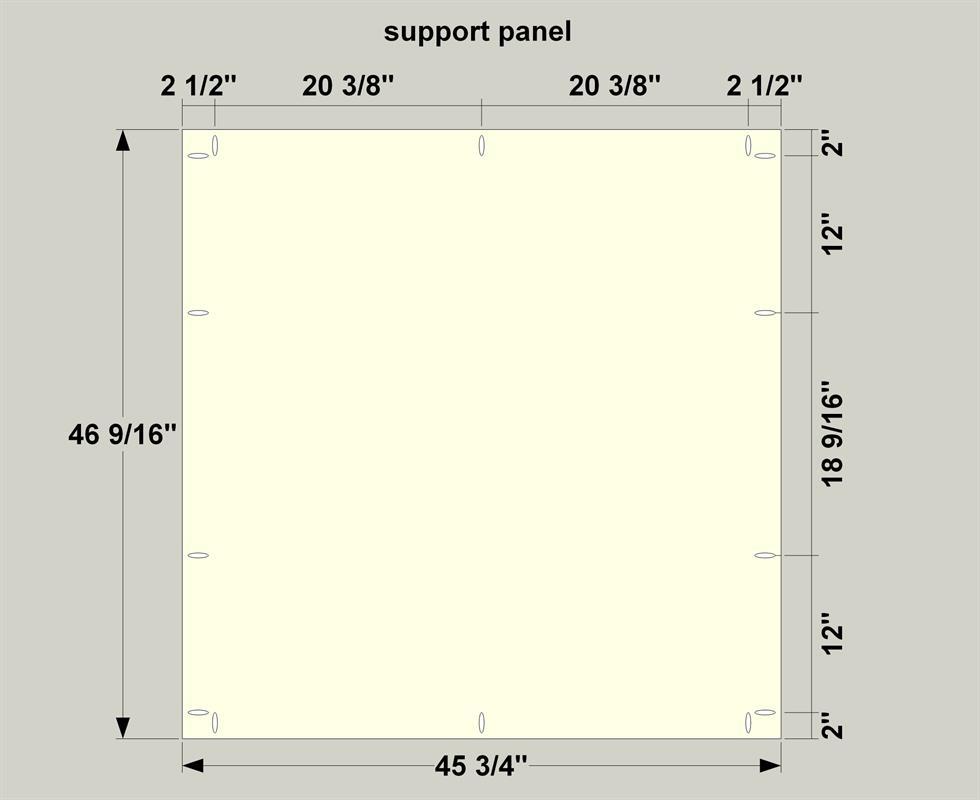
- 2 Support panels , 3/4 ply x 45 3/4 x 46 9/16
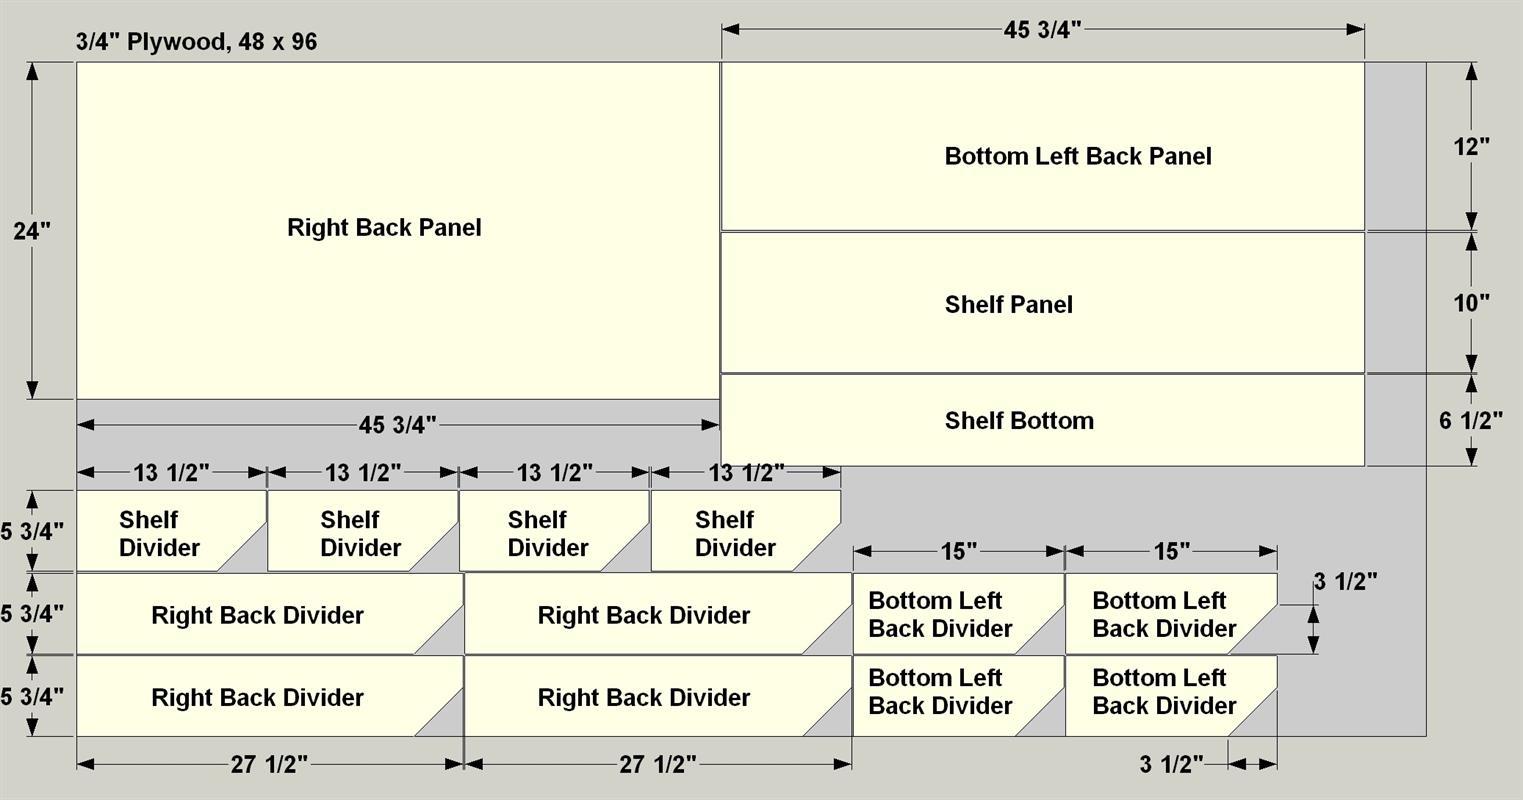
- 1 Right back panel , 3/4 ply x 45 3/4 x 24
- 4 Right back dividers , 3/4 ply x 5 3/4 x 27 1/2
- 1 Bottom left back panel , 3/4 ply x 45 3/4 x 12
- 4 Bottom left back dividers , 3/4 ply x 5 3/4 x 15
- 1 Shelf panel , 3/4 ply x 10 x 45 3/4
- 1 Shelf bottom , 3/4 ply x 6 1/2 x 45 3/4
- 4 Shelf dividers , 3/4 ply x 5 3/4 x 13 1/2
Directions
-
Create the Base Parts
Cut two Base Stiles to length from 2x4 boards, and five Base Rails to length from 2x6 boards, as shown in the cutting diagram. Then, with your jig set up for 1 1/2” stock, drill pocket holes in the base rails and in one of the base stiles, as shown. Note that the pocket holes are set toward one edge of the stile.

-
Assemble the Base
Screw the base rails to the base stiles using 2 1/2” coarse thread pocket hole screws. Note the position of the stile that has pocket holes.
-
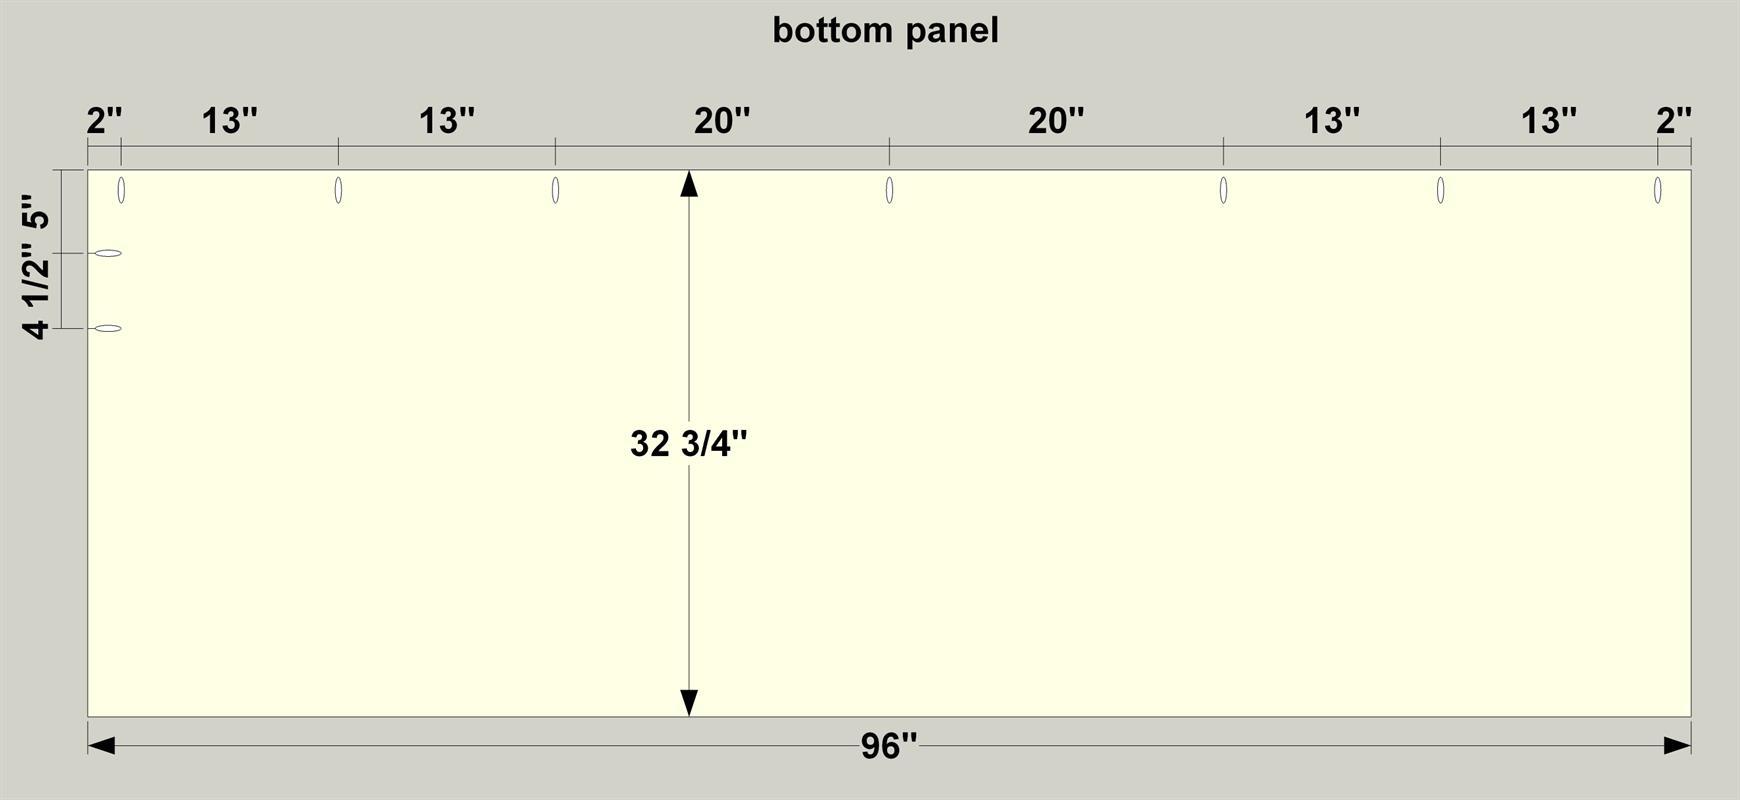
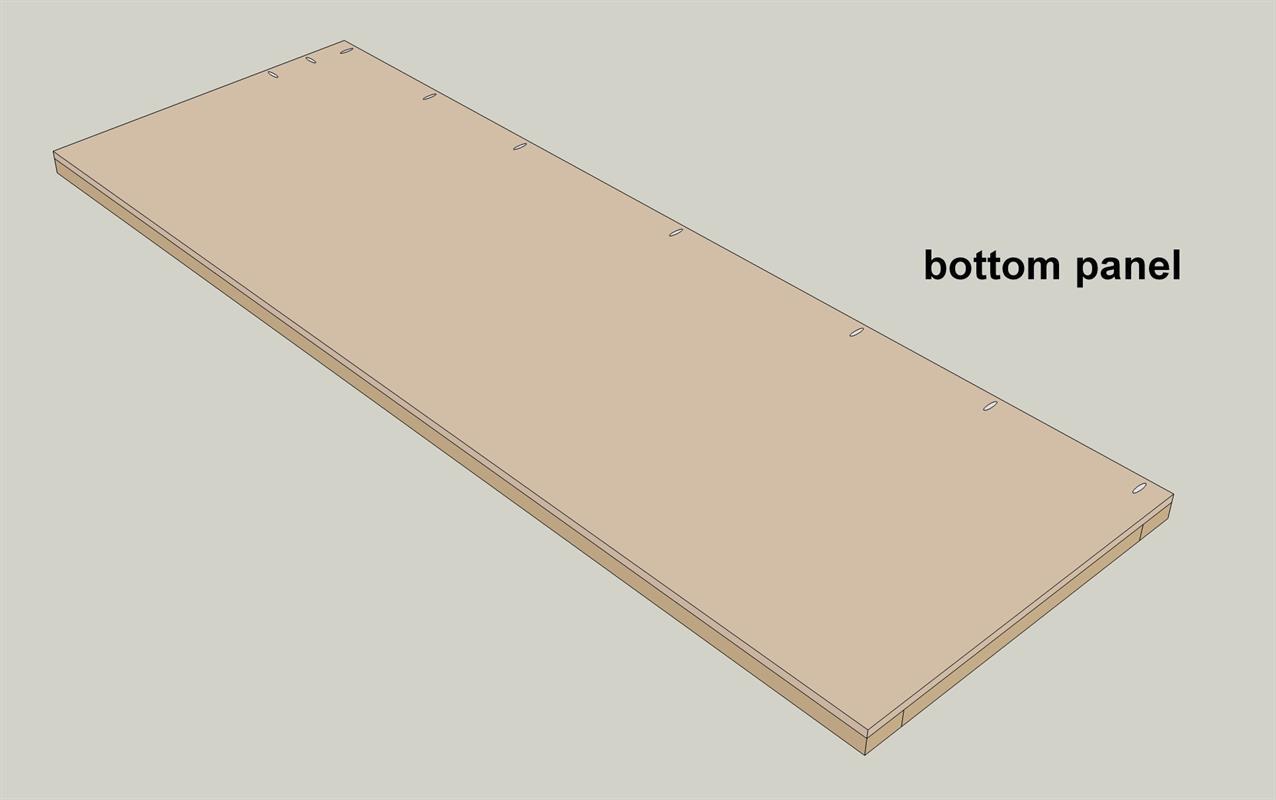
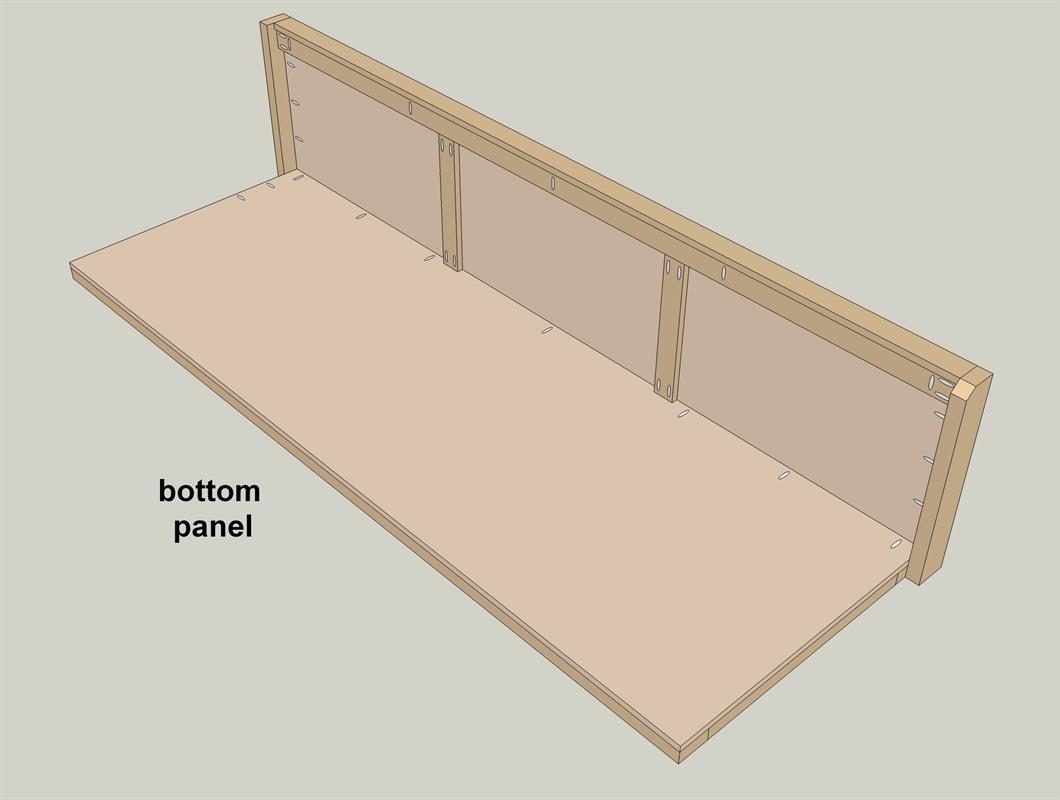
Make a Bottom Panel
Cut a Bottom Panel to size from 3/4” plywood, as shown in the cutting diagram. Then, with your jig set up for 3/4” stock, drill pocket holes in the Bottom Panel, as shown.
-
Attach the Bottom Panel
Flip the base stile/rail assembly over (so the pocket holes face down). Apply beads of glue to the rails and stiles, and then lay the Bottom Panel on the assembly so that the pocket holes in the bottom panel are over the base stile that has pocket holes. Attach the bottom panel using 4d finish nails every 6” to 8”.
-
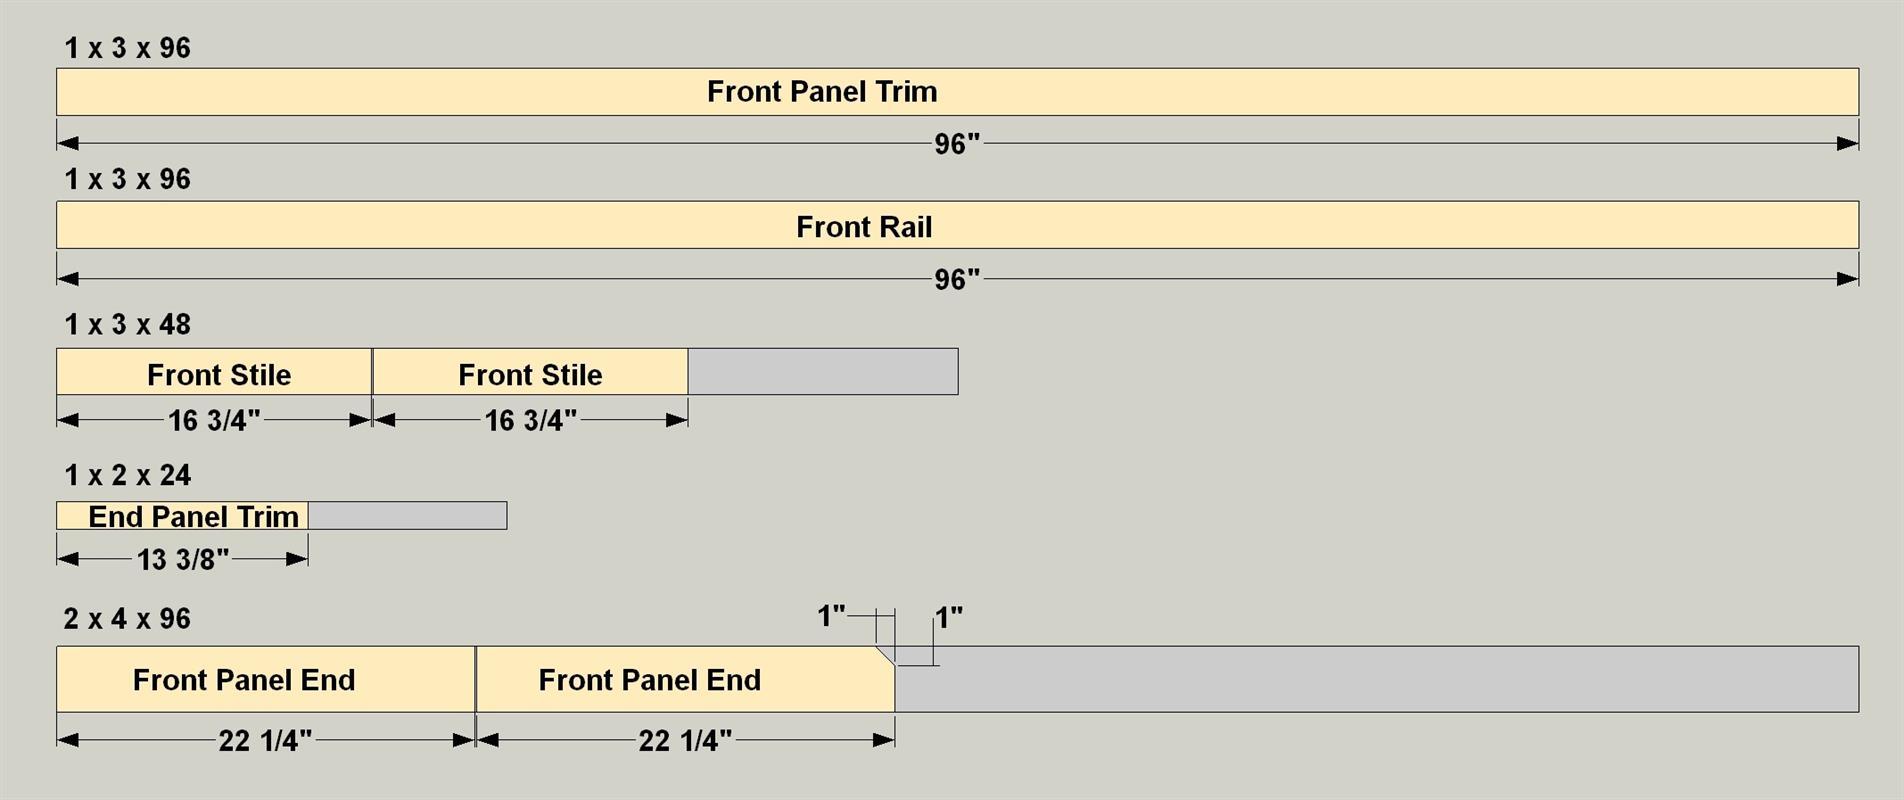
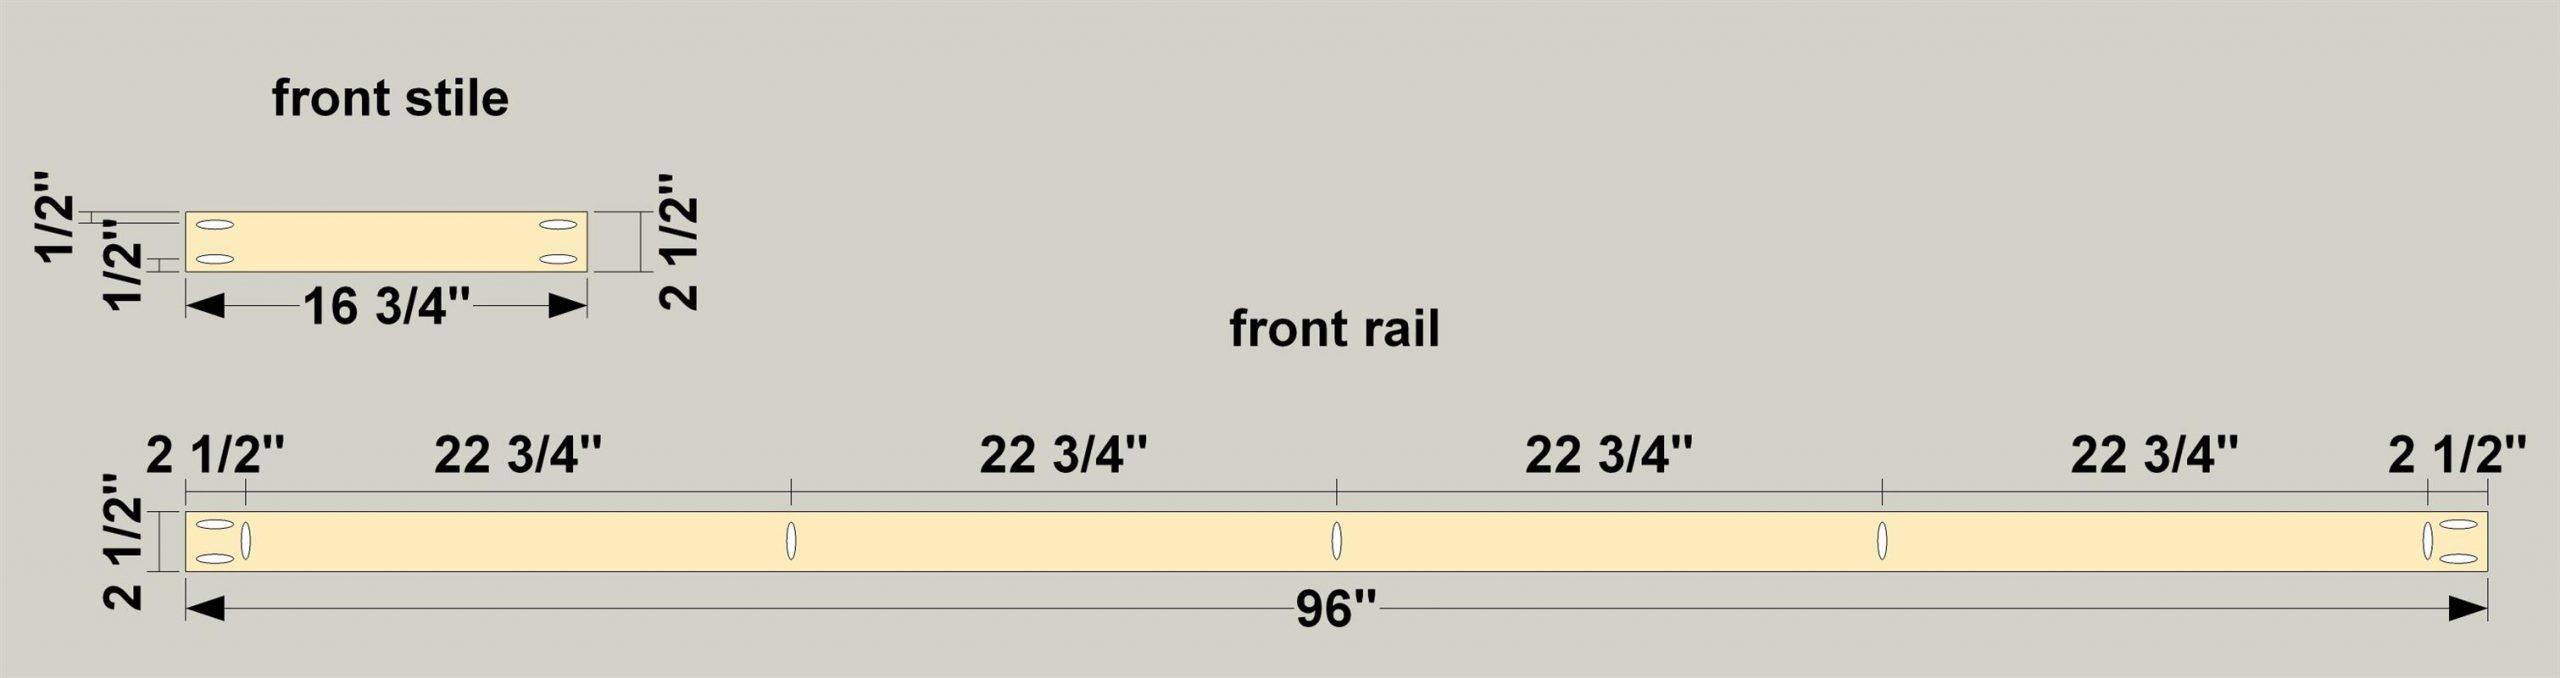
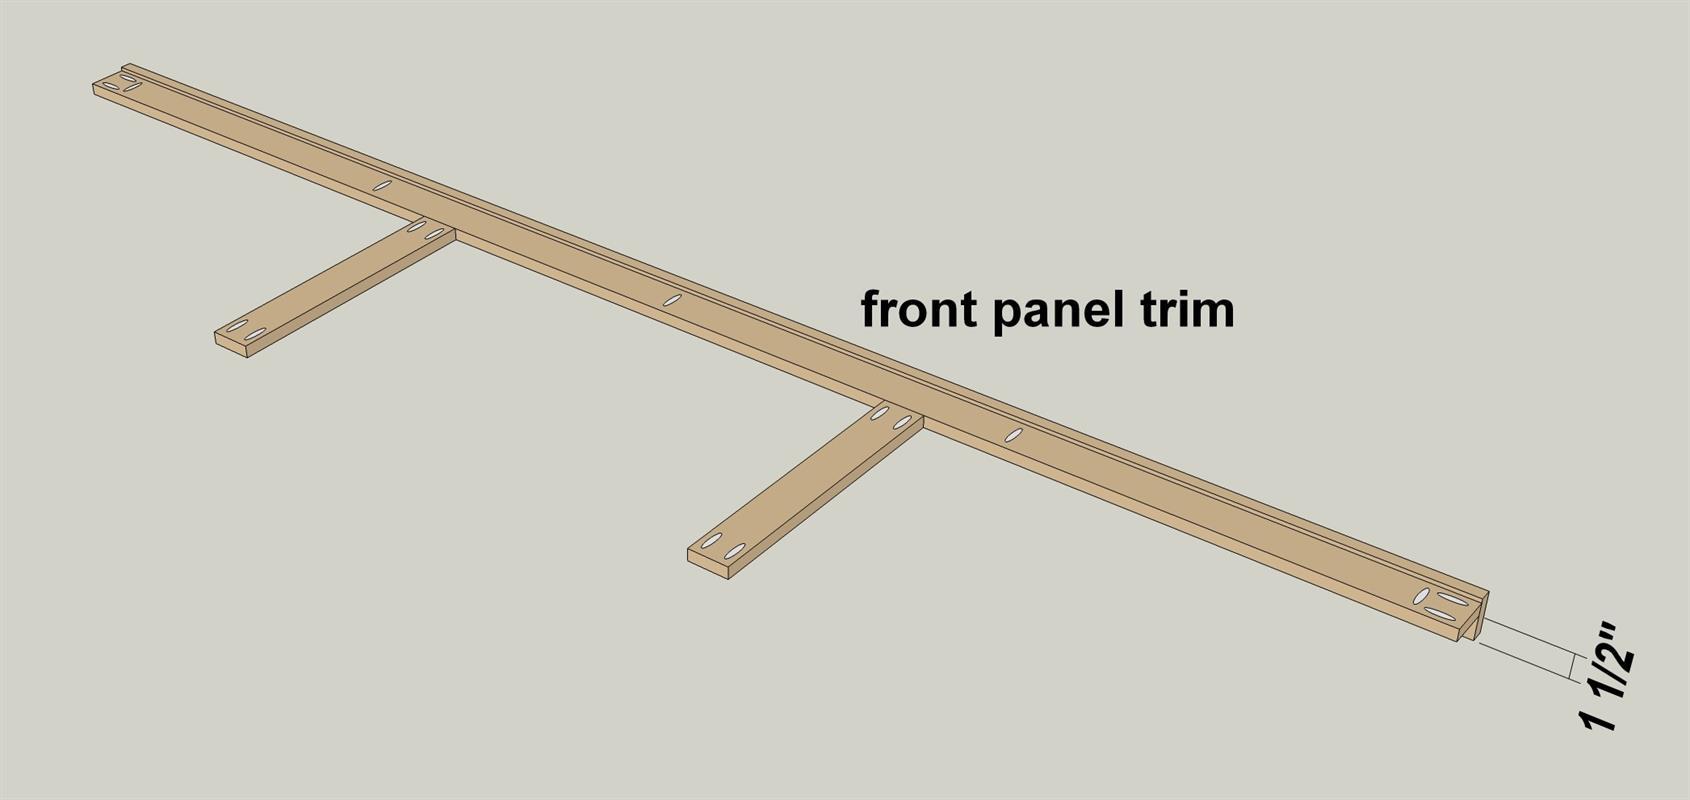
Create Front Rails, Stiles, Trim
Cut one Front Rail, and two Front Stiles to length from 1x3 boards, and create one Front Panel Trim from a 1x3 board, as shown in the cutting diagram. With your jig set up for 3/4” stock, drill pocket holes in the front rail and the front stiles, as shown.
-
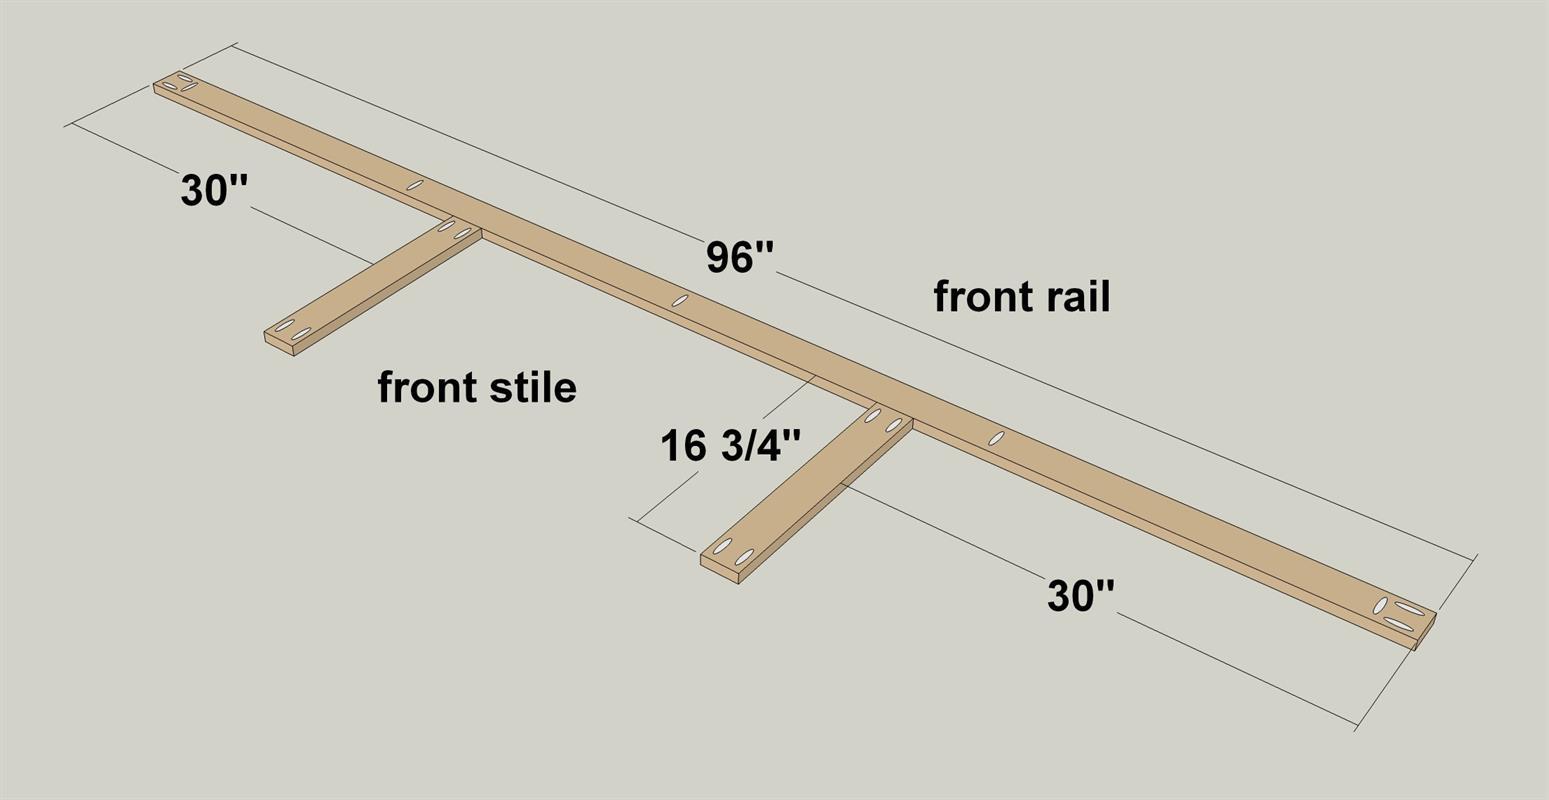
Assemble the Front Rail and Stiles
Screw the front rails to the front stile using 1 1/4” coarse-thread pocket hole screws.
-
Attach the Front Panel Trim
Attach the front panel trim using 1 1/4” coarse-thread pocket hole screws, making sure the trim overhangs the assembly by 1/4” on the pocket-hole side.
-
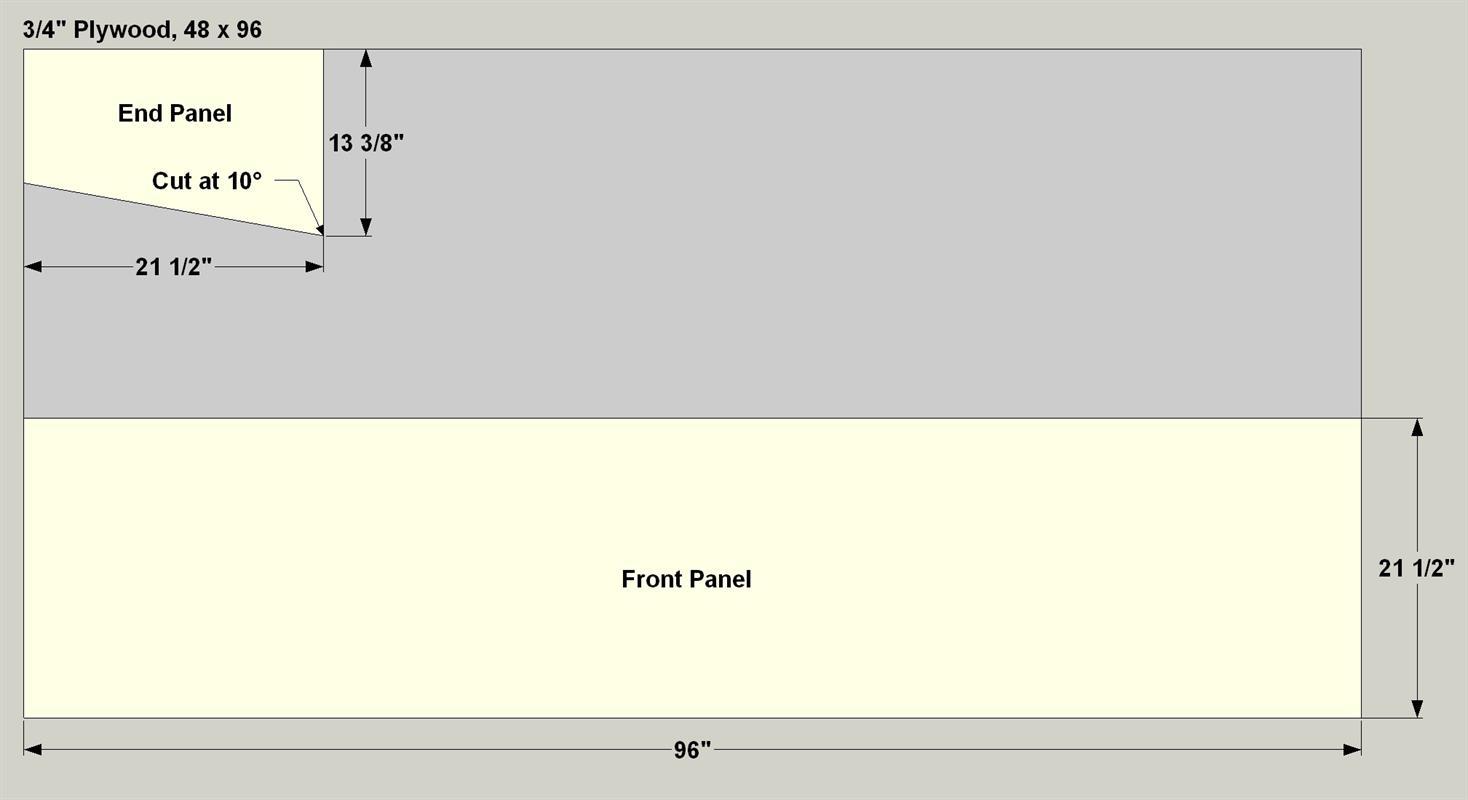
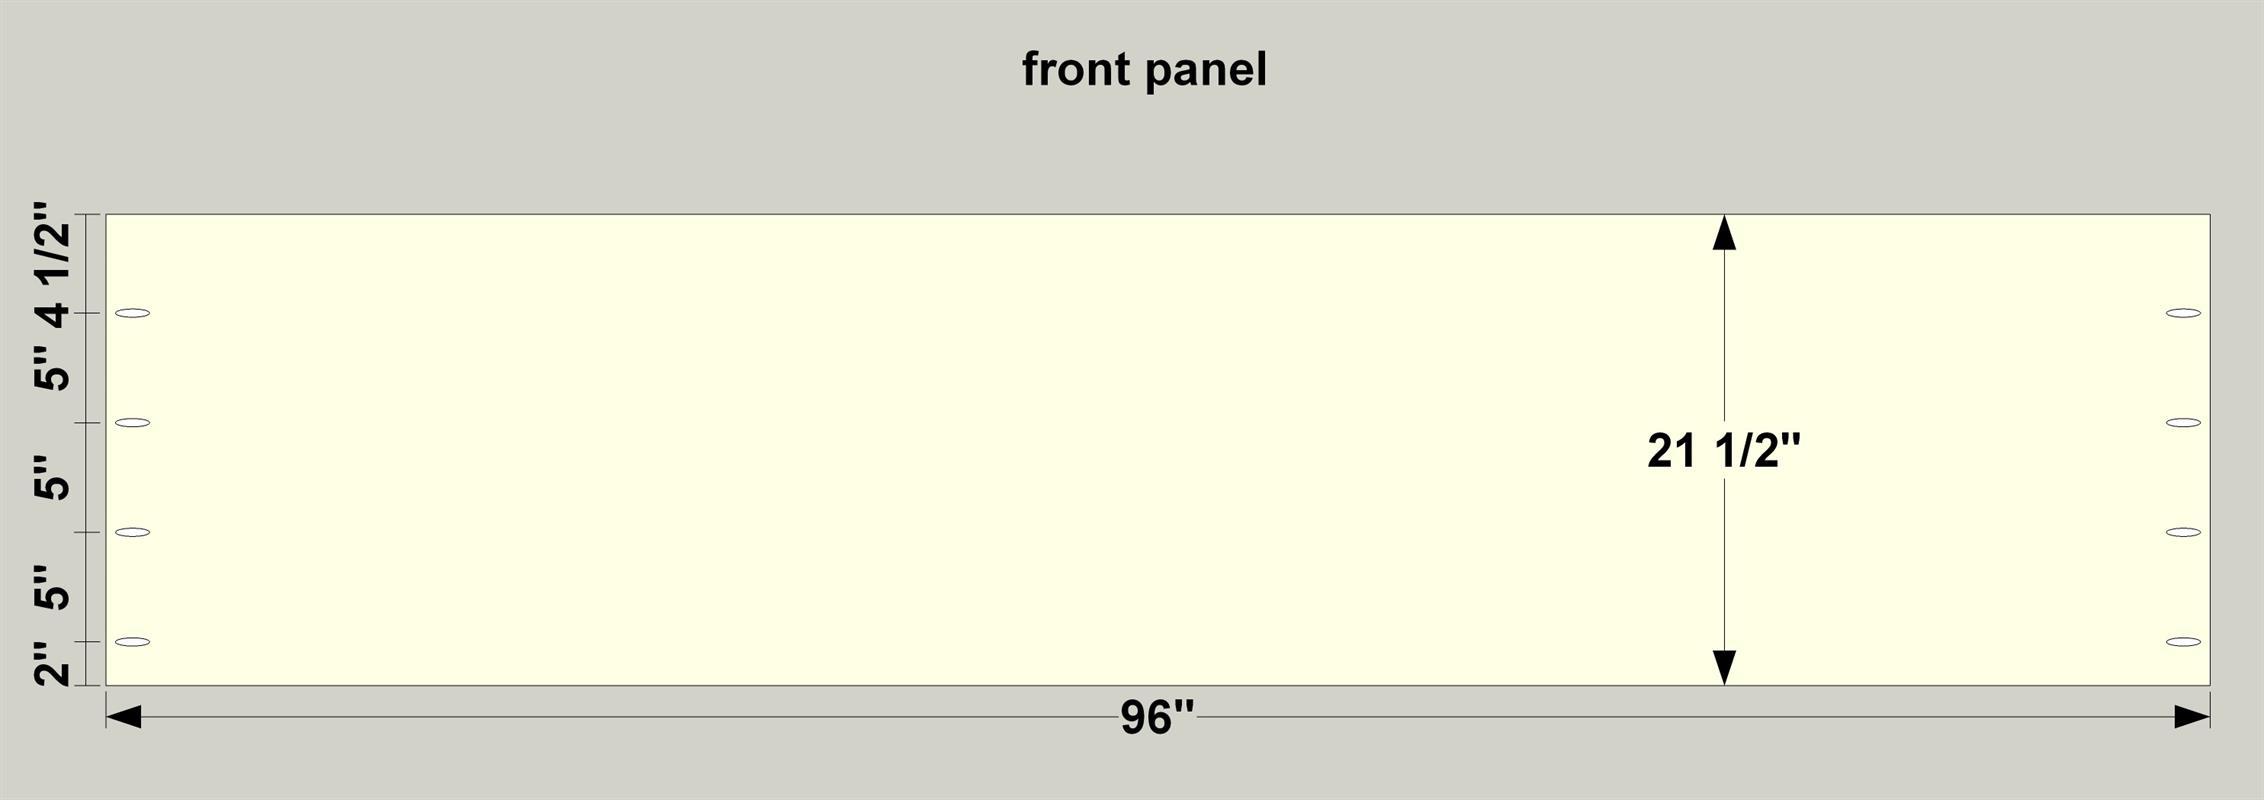
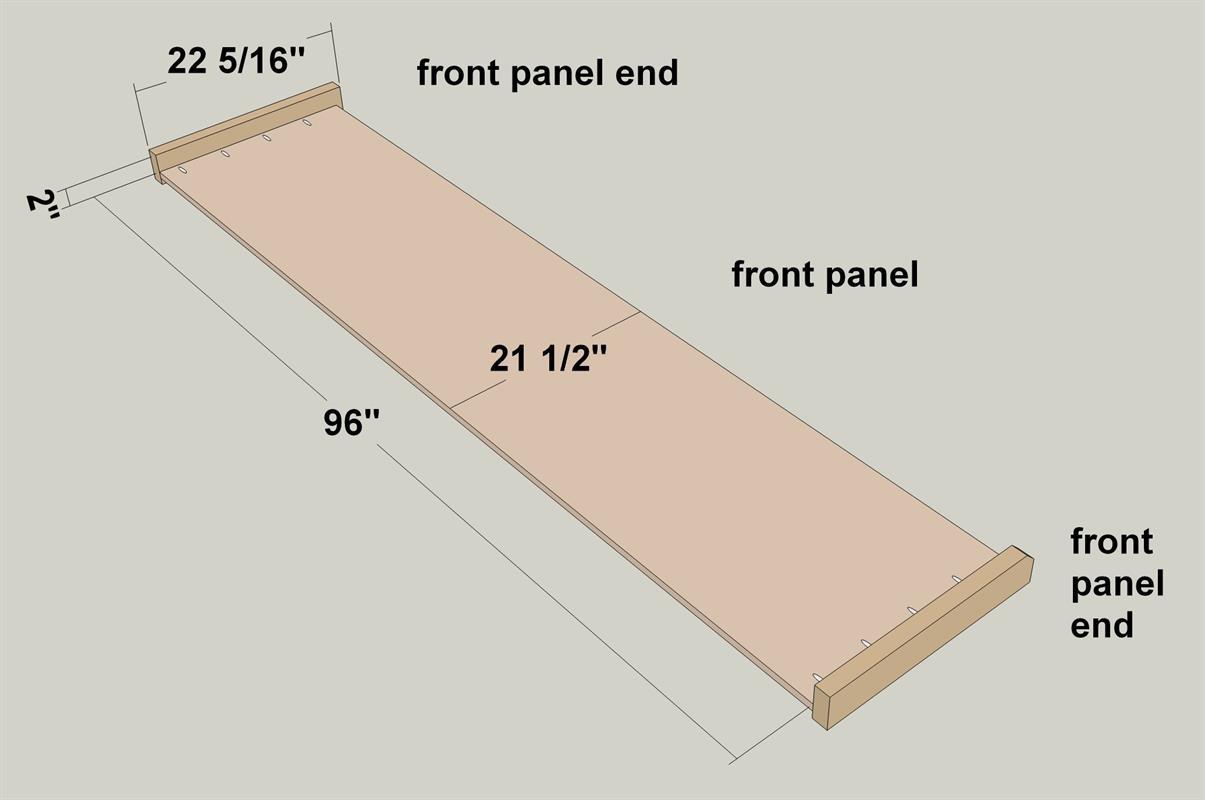
Make a Front Panel and Ends
Cut a Front Panel to size from 3/4” plywood, as shown in the cutting diagram. Cut two Front Panel Ends to length from a 2x4 board, as shown in the cutting diagram. Cut a 1 1/2” x 1 1/2” notch off one of the front panel ends, as shown. With your jig set up for 3/4” stock, drill pocket holes in the front panel, as shown.
-
Attach the Front Panel Ends
Attach the front panel ends to the front panel using 1 1/4” coarse-thread pocket hole screws, making sure the front panel ends are offset as shown.
-
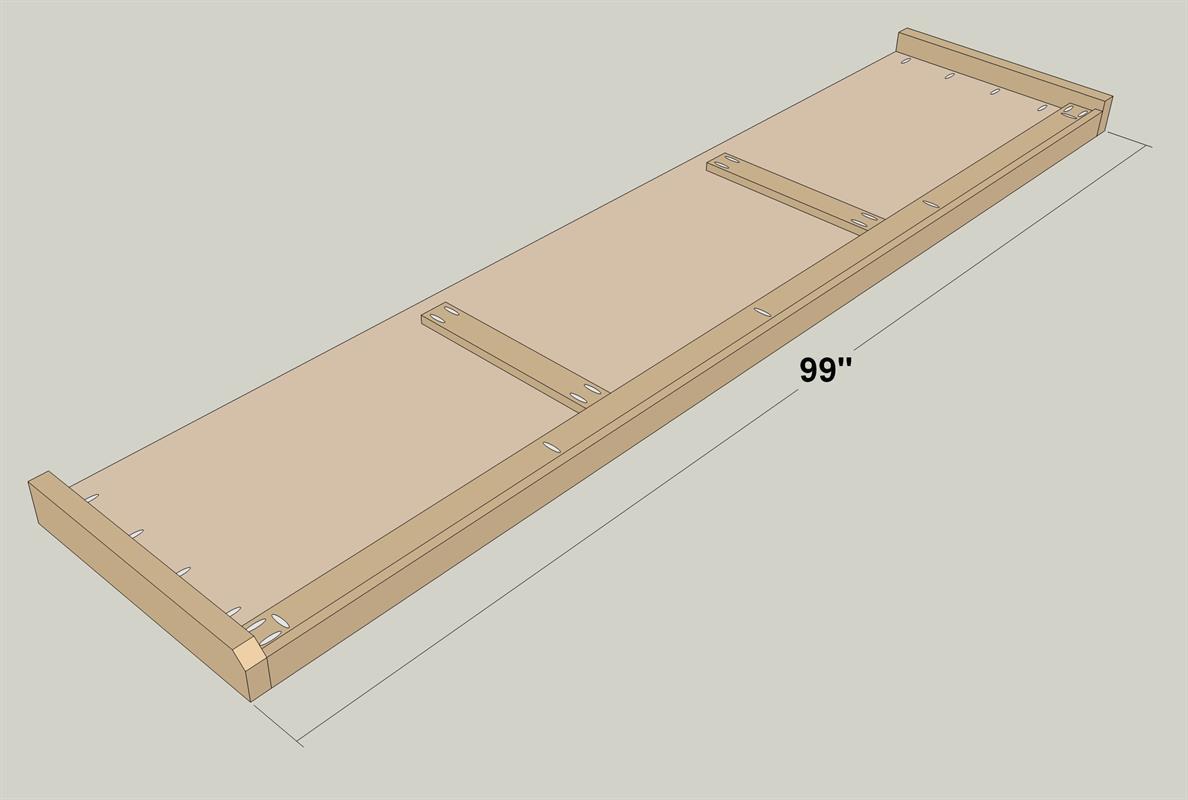
Complete the Front Assembly
Apply beads of glue on the face of the front rail/stile assembly that doesn’t have pocket holes. Then attach it to the front panel assembly to the using glue, 1 1/4” coarse-thread pocket hole screws, and 4d finish nails.
-
Joint the Front to the Base
Attach it to the front assembly to the base assembly using glue and 1 1/4” coarse-thread pocket hole screws. Also be sure to attach the base stile to the panel ends using 2 1/2” pocket screws. Check that the assembly is square as you do this. Also drive 4d finish nails through the front panel and into the base stile.
-
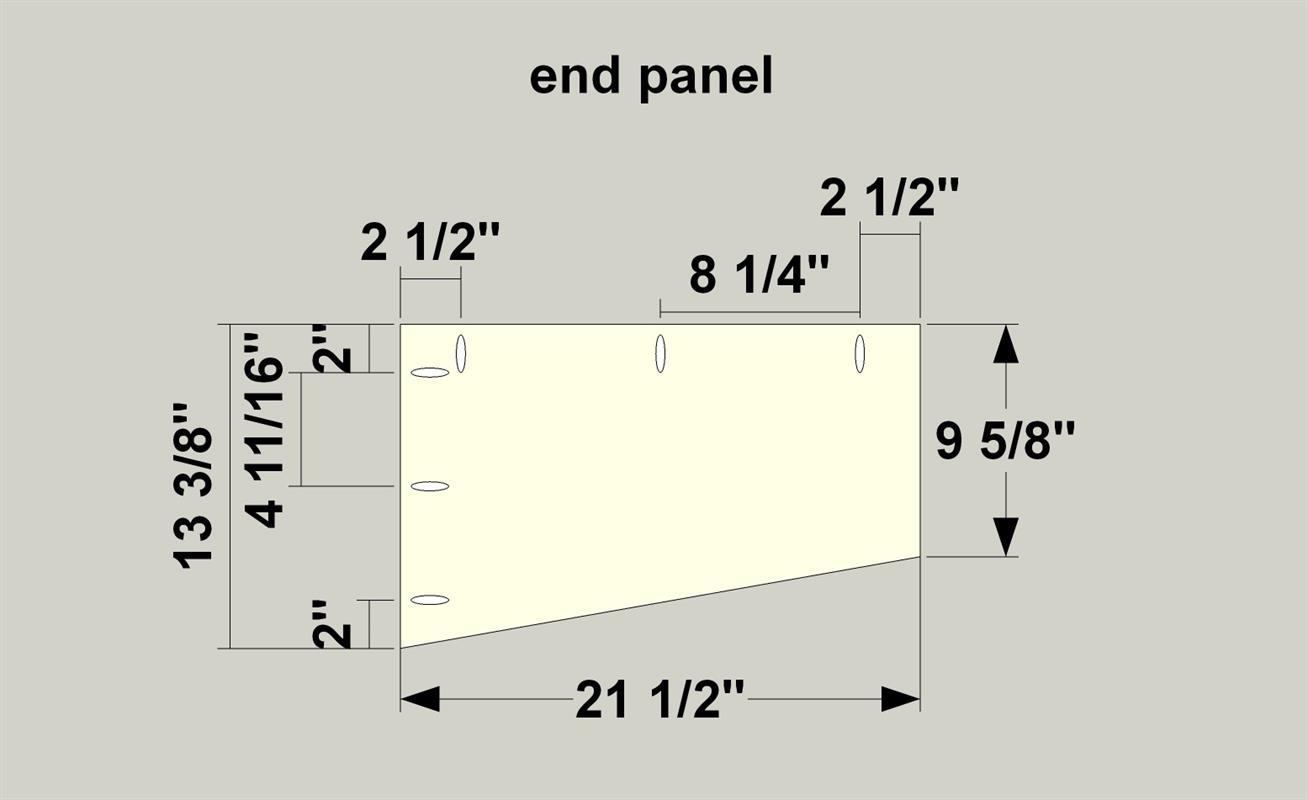
Make the End Panel Parts
Cut an End Panel to size from 3/4” plywood, as shown in the cutting diagram. Also cut one End Panel Trim to length from a 1x2 board, as shown in the cutting diagram. Then with your jig set up for 3/4” stock, drill pocket holes in the end panel, as shown.
-
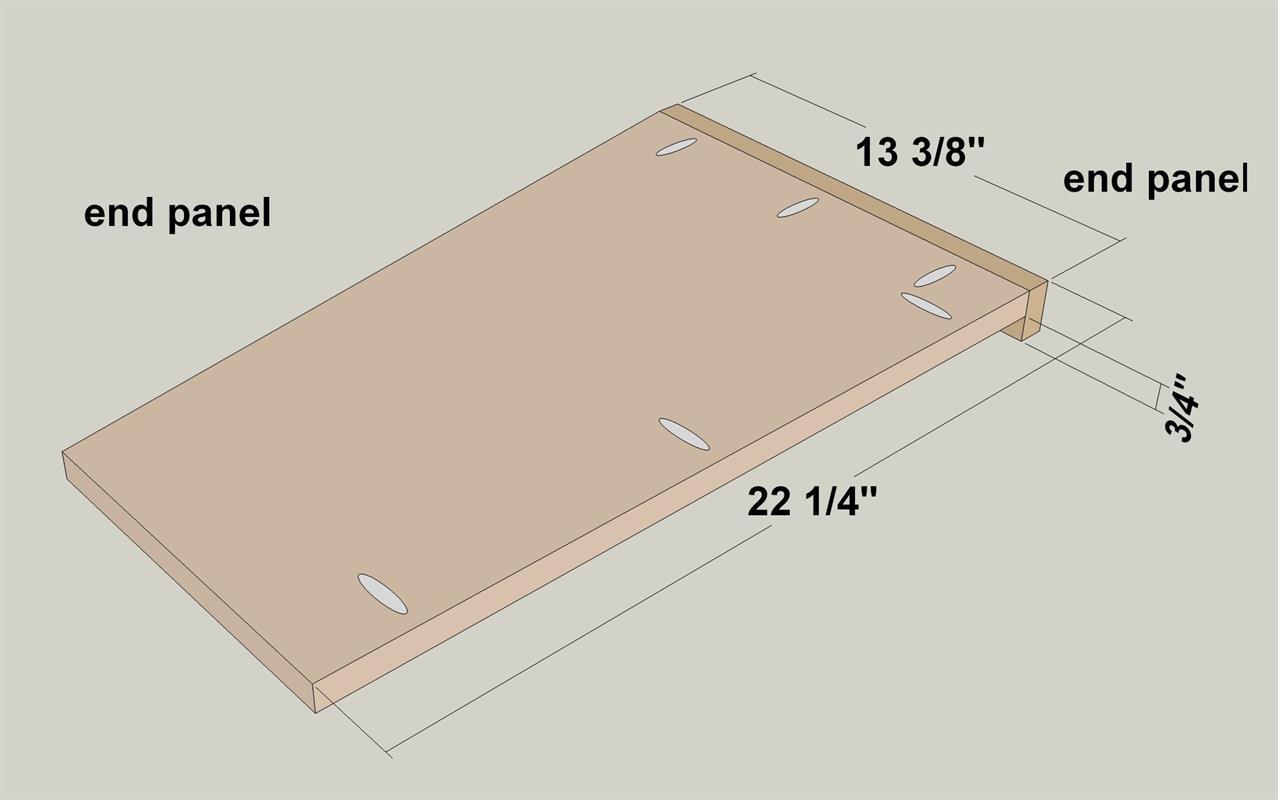
Attach the End Panel Trim
Attach the end panel trim to the end panel using glue and 1 1/4” coarse-thread pocket hole screws.
-
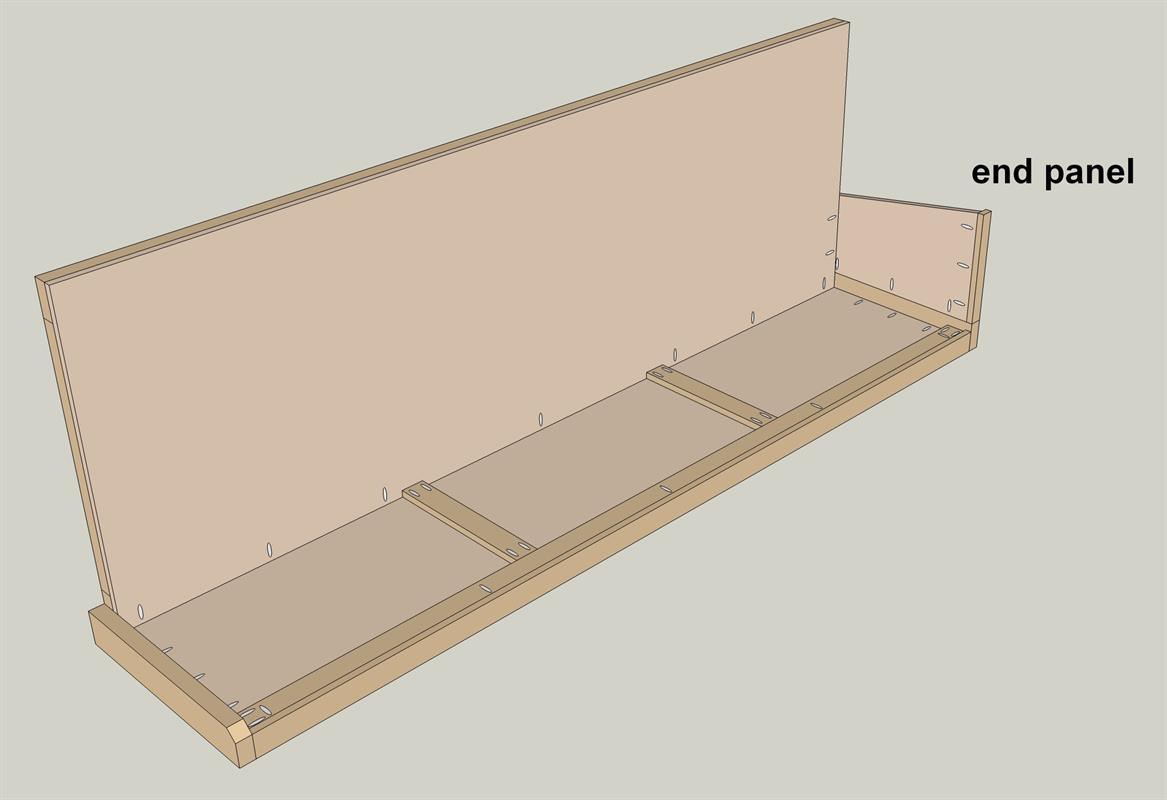
Add the End Assembly
Attach the end panel assembly to the base/front assembly using glue and 1 1/4” coarse-thread pocket hole screws. Also attach the casters to the underside of the bottom stiles by positioning them, drilling holes, and using bolts and washers. Our casters called for 3/8" bolts, as shown in the materials list. Check the mounting hole size in your casters.
-
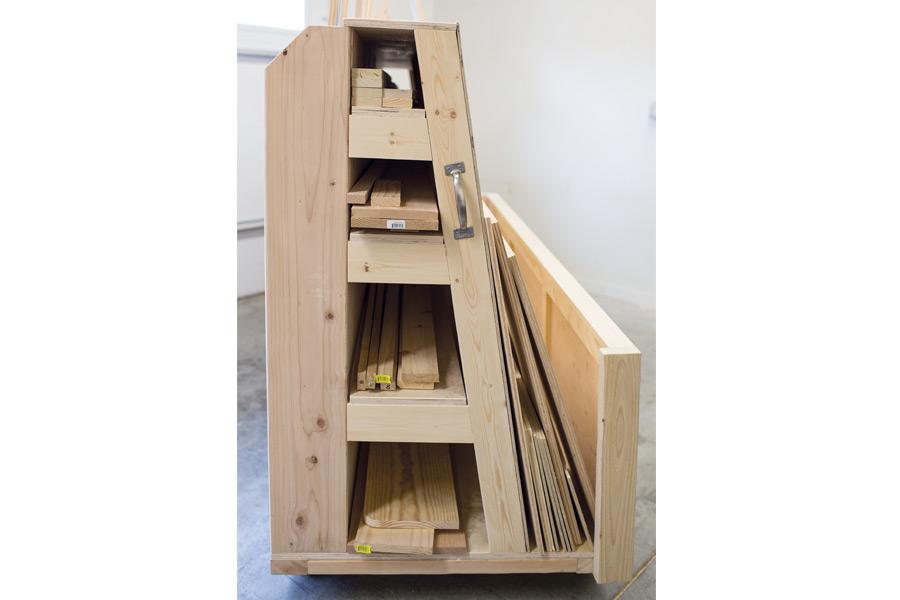
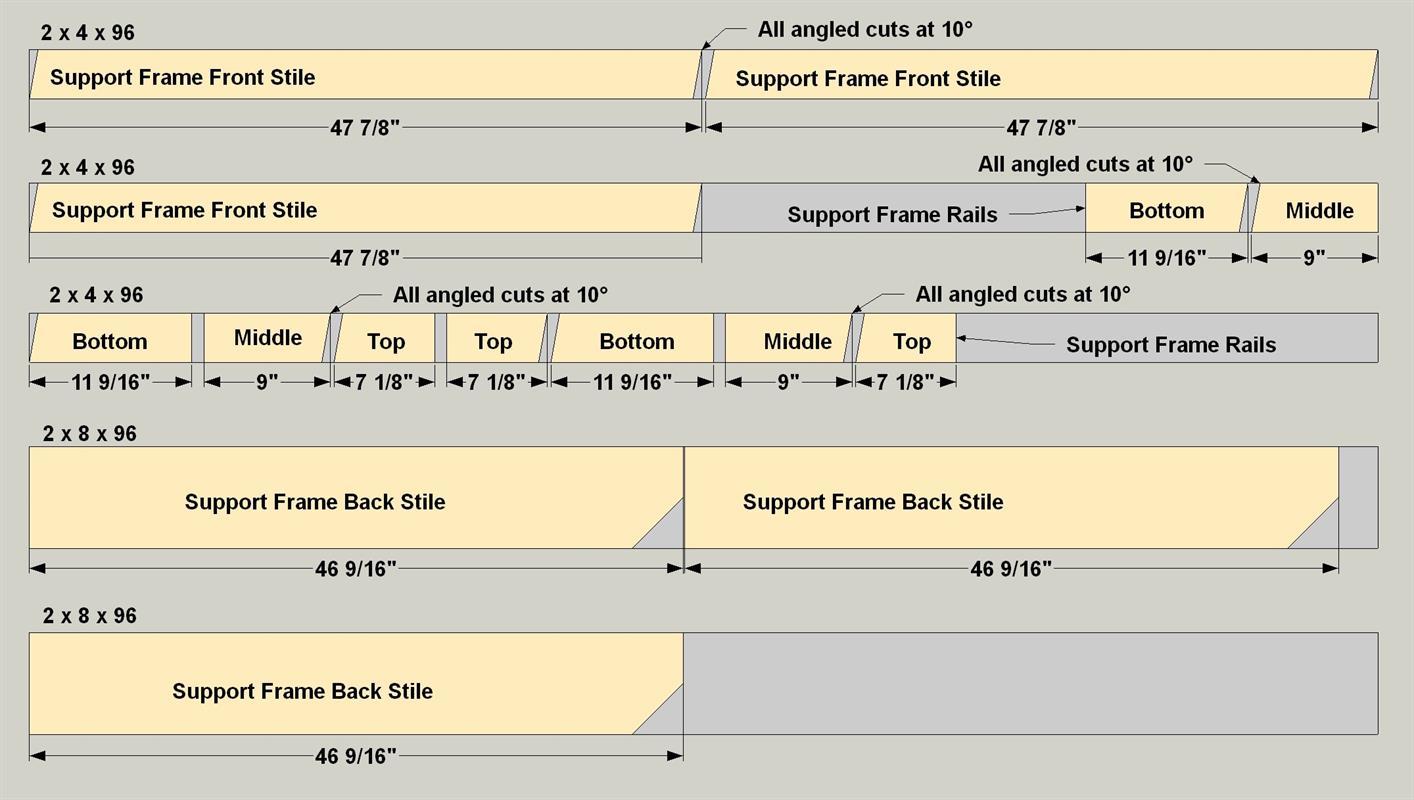
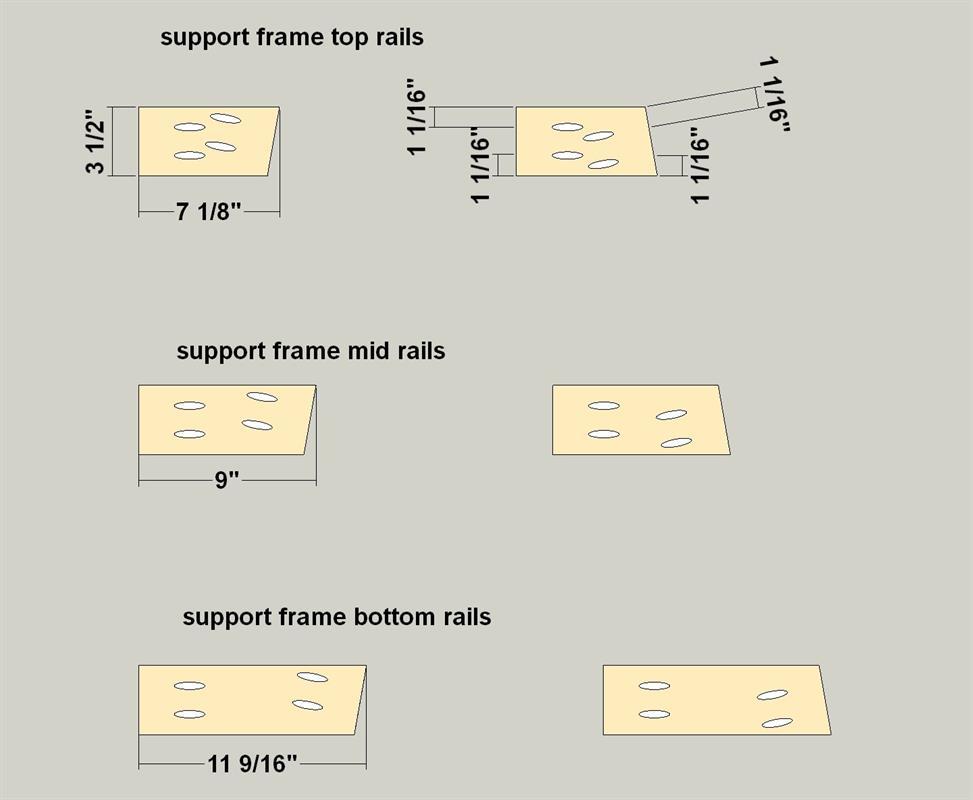
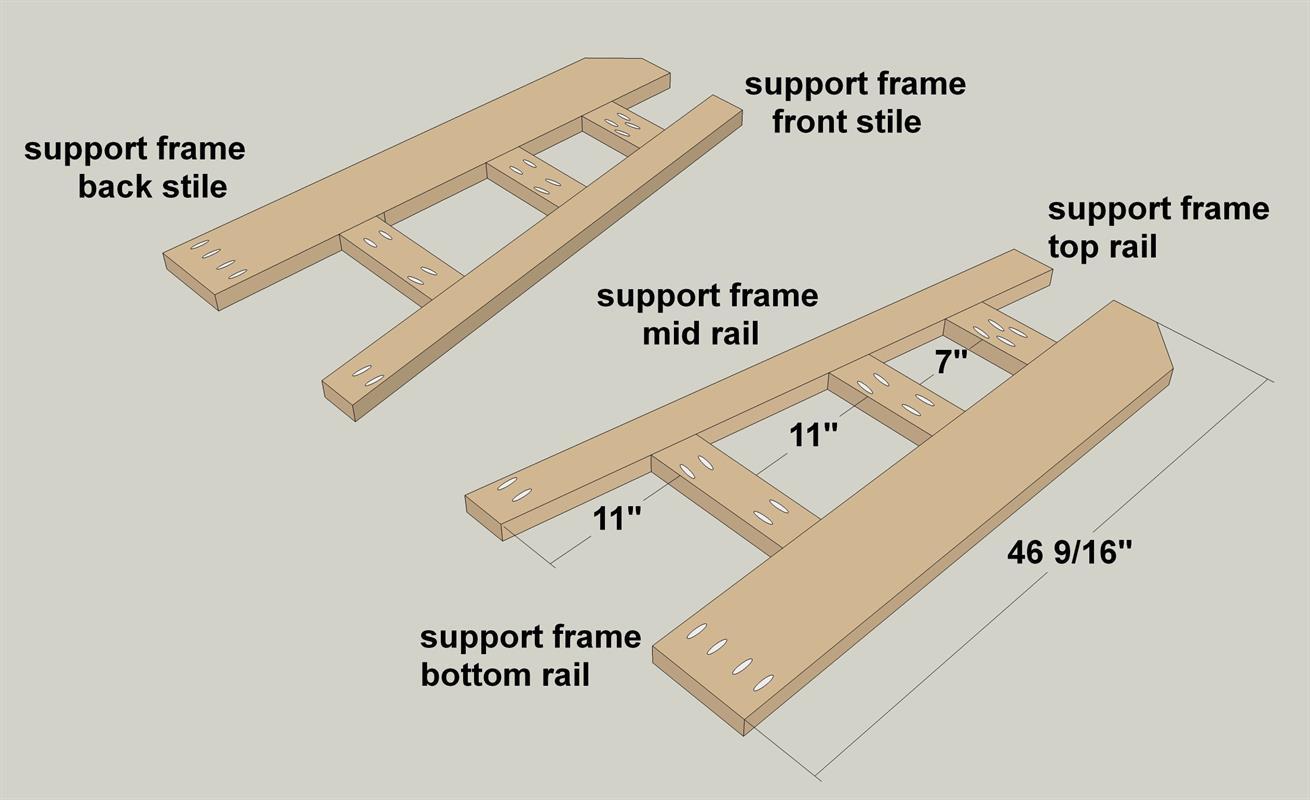
Cut the Support Frame Parts
Cut three Support Frame Front Stiles and nine Support Frame Rails to size from 2x4 boards, and then cut three Support Frame Back Stiles from 2x8 boards, as shown in the cutting diagram. Notch the top end of each back stile as shown.
-
Drill the Back Stiles
With your jig set up for 1 1/2” stock, drill pocket holes in one end of the back stiles, as shown.
-
Drill the Front Stiles
With your jig set up for 1 1/2” stock, drill pocket holes in the front stiles, as shown.
-
Drill the Frame Rails
With your jig set up for 1 1/2” stock, drill pocket holes in the rails, as shown.
-
Assemble the Frame Parts
Assemble all three support frames using 2 1/2” coarse-thread pocket hole screws.
-
Install the Frames
Attach the support frames to the cart base using 2 1/2” coarse-thread pocket hole screws.
-
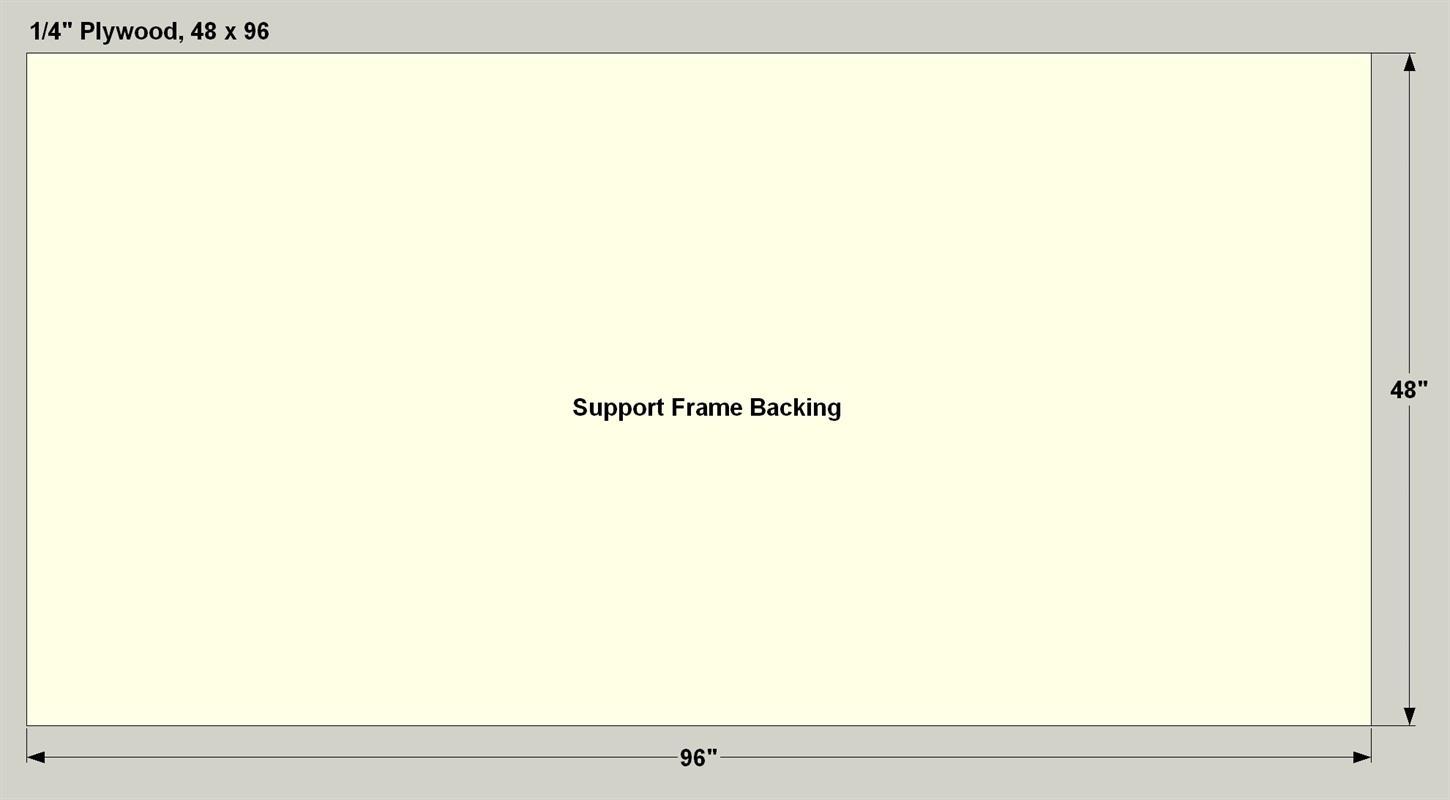
Add the Support Frame Backing
Attach a Support Frame Backing (made from a sheet of 1/4” plywood, as shown in the cutting diagram) to the support frames using glue and 4d finish nails.
-
Add the Cap and Shelves
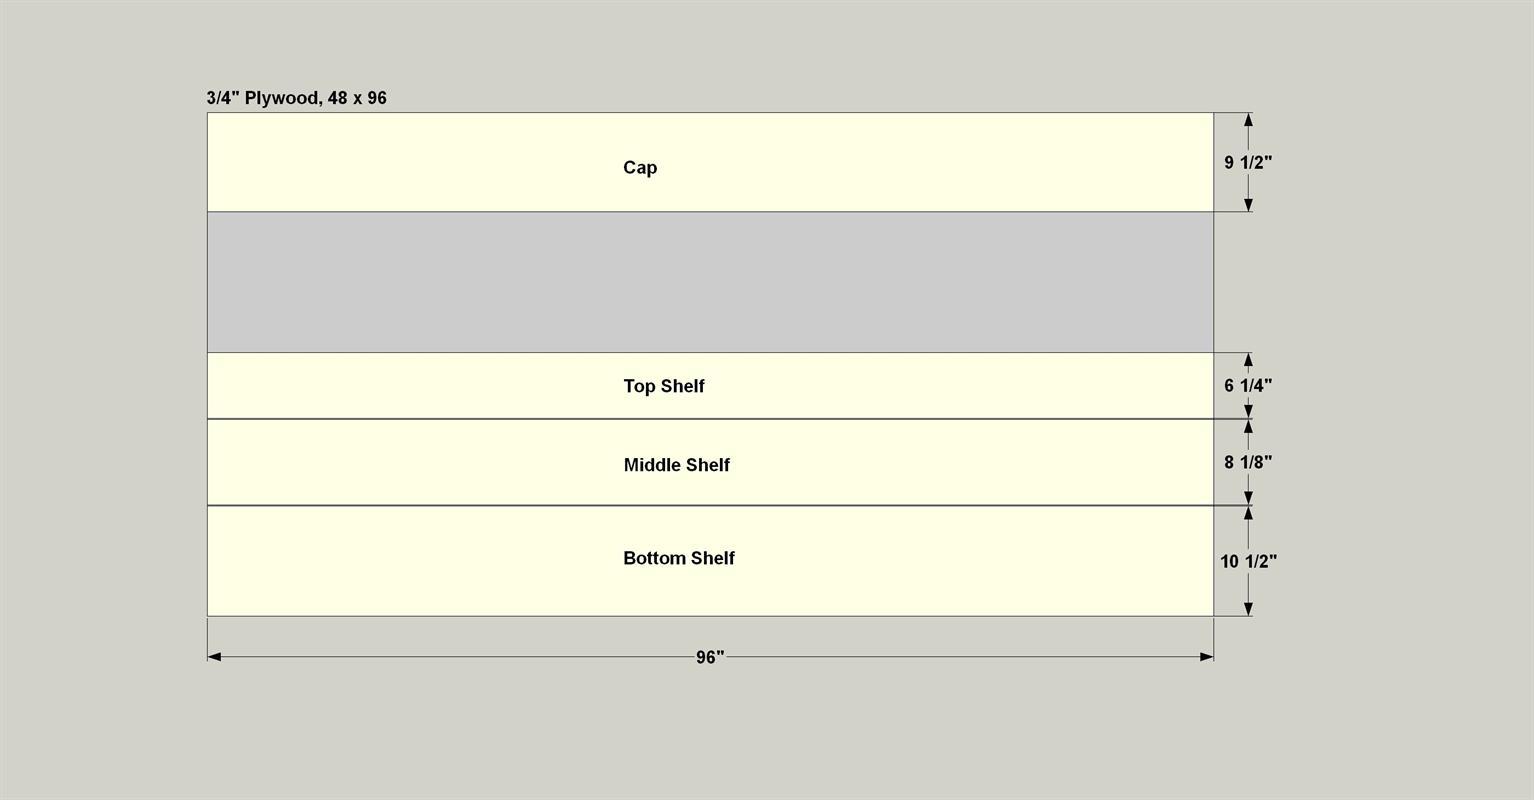
Cut one Cap, one Top Shelf, one Mid Shelf, and one Bottom Shelf to size from 3/4” plywood, as shown in the cutting diagram. Then attach the cap and shelves to the support frame rails using glue and 4d finish nails.
-
Create Two Support Panels
Cut two Support Panels to size, as shown in the cutting diagram. Then, with your jig set for 3/4” stock, drill pocket holes in the panels, as shown.
-
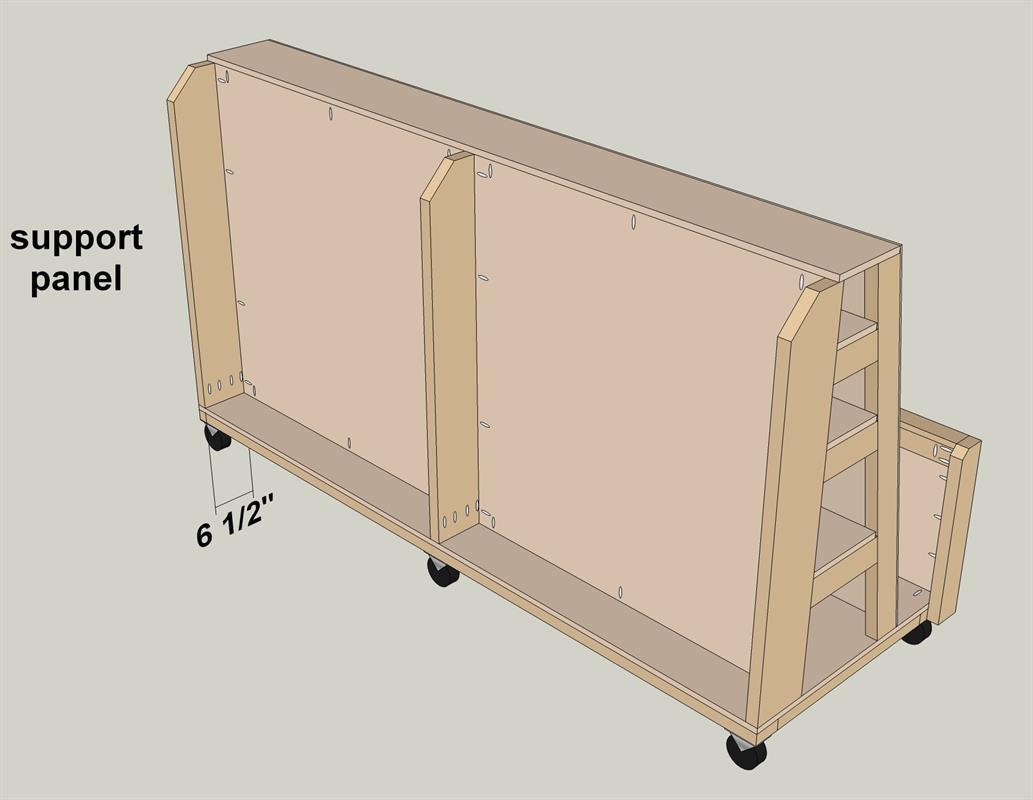
Attach the Support Panels
Attach the support panels using 1 1/4” coarse-thread pocket hole screws.
-
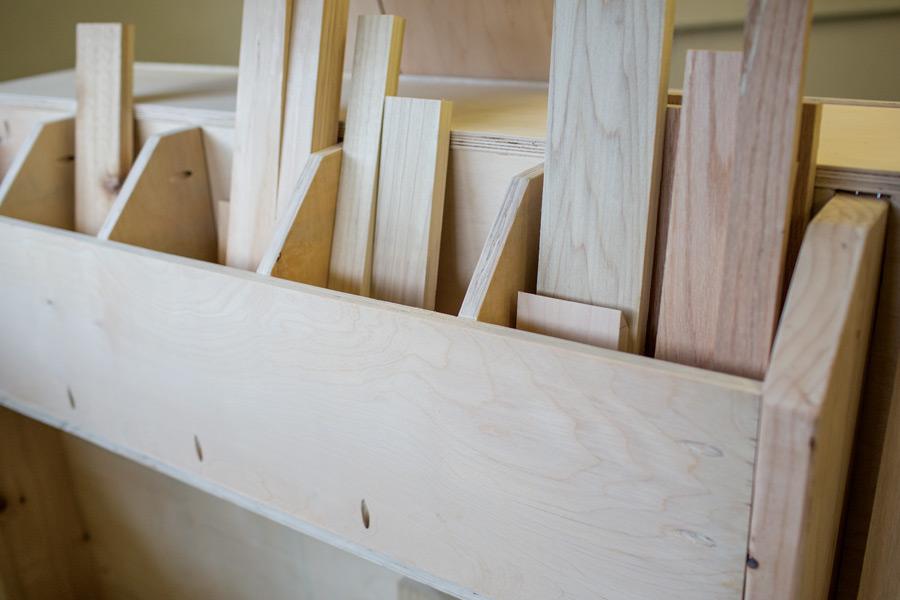
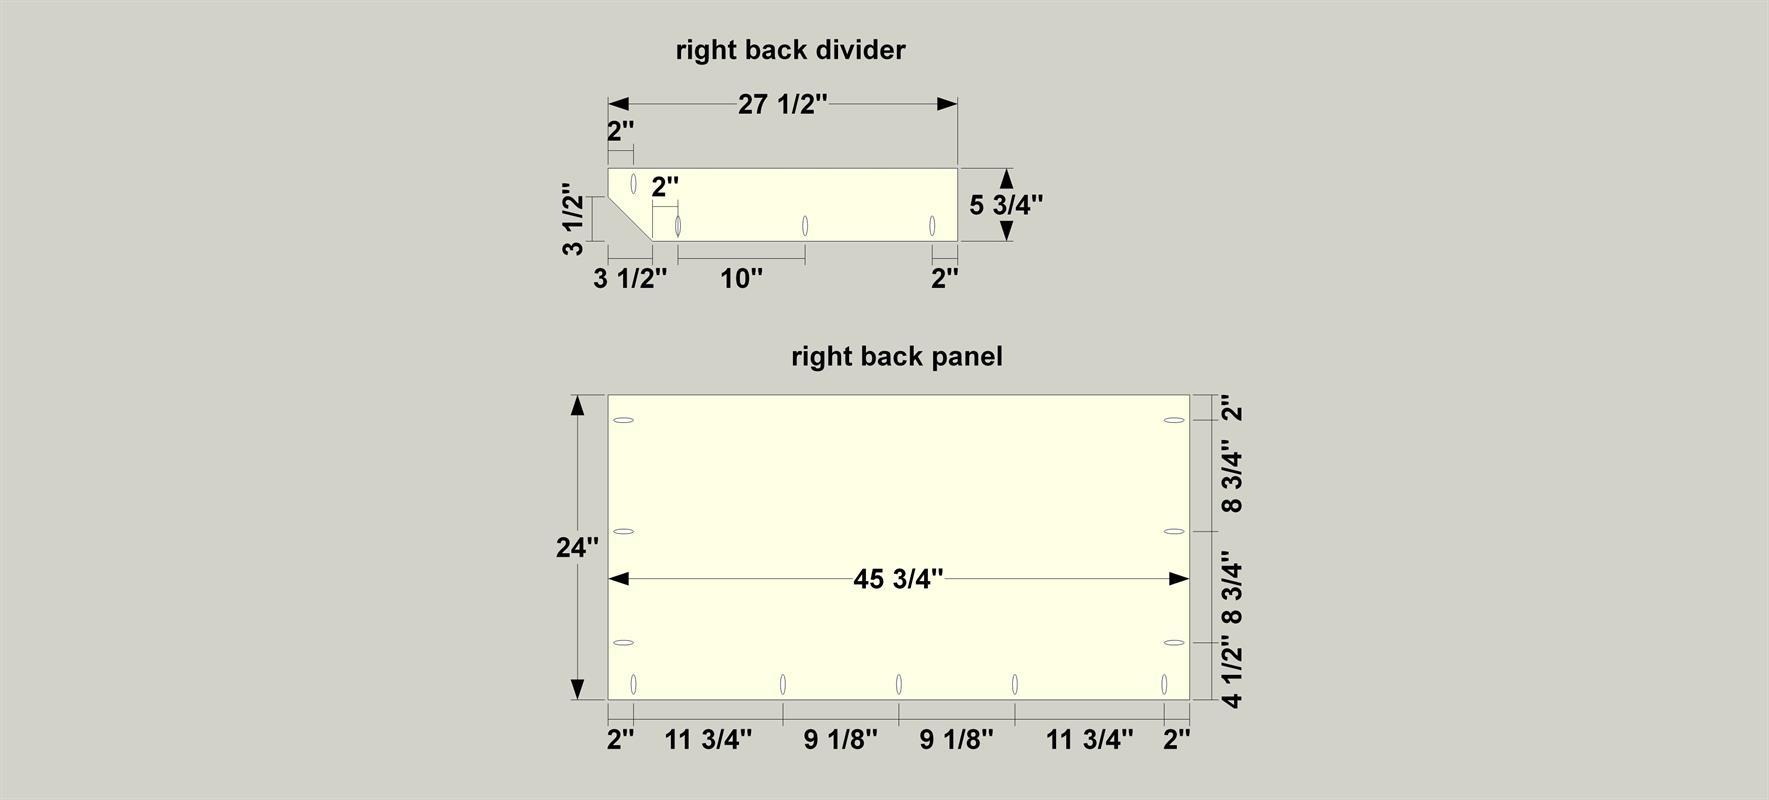
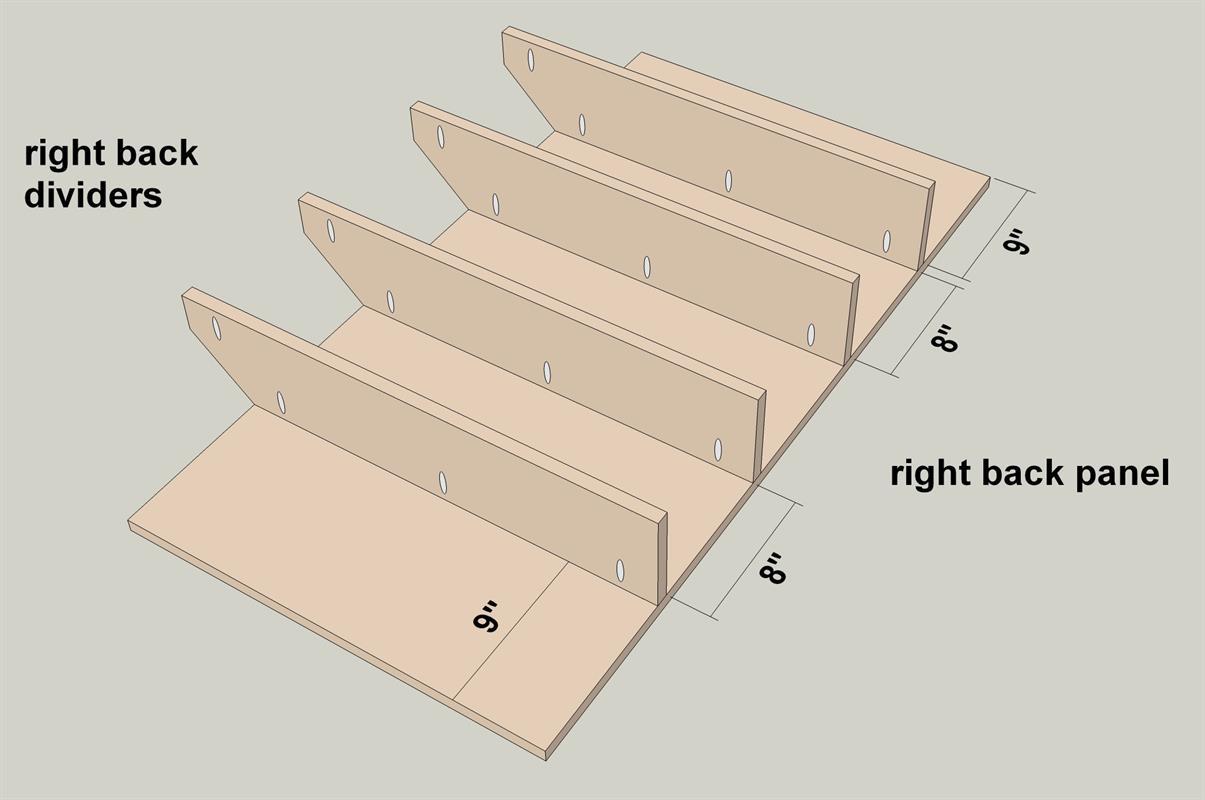
Create the Right Back Parts
Cut one Right Back Panel and four Right Back Dividers to size from 3/4” plywood, as shown in the cutting diagram. Then, with your jig set for 3/4” material, drill pocket holes in the back panel and the dividers, as shown.
-
Attach the Dividers
Attach the dividers to the back panel—on the face without pocket holes—using 1 1/4” coarse-thread pocket hole screws, as shown.
-
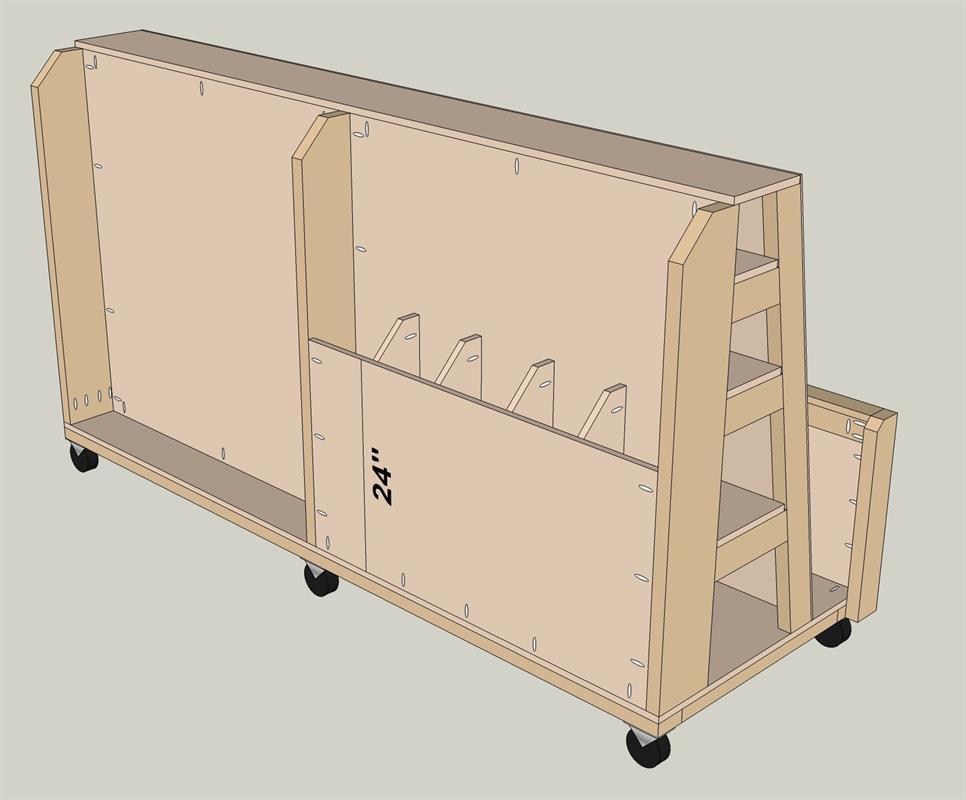
Install the Right Back Assembly
Attach the right back/divider assembly to the cart using 1 1/4” coarse-thread pocket hole screws, as shown.
-
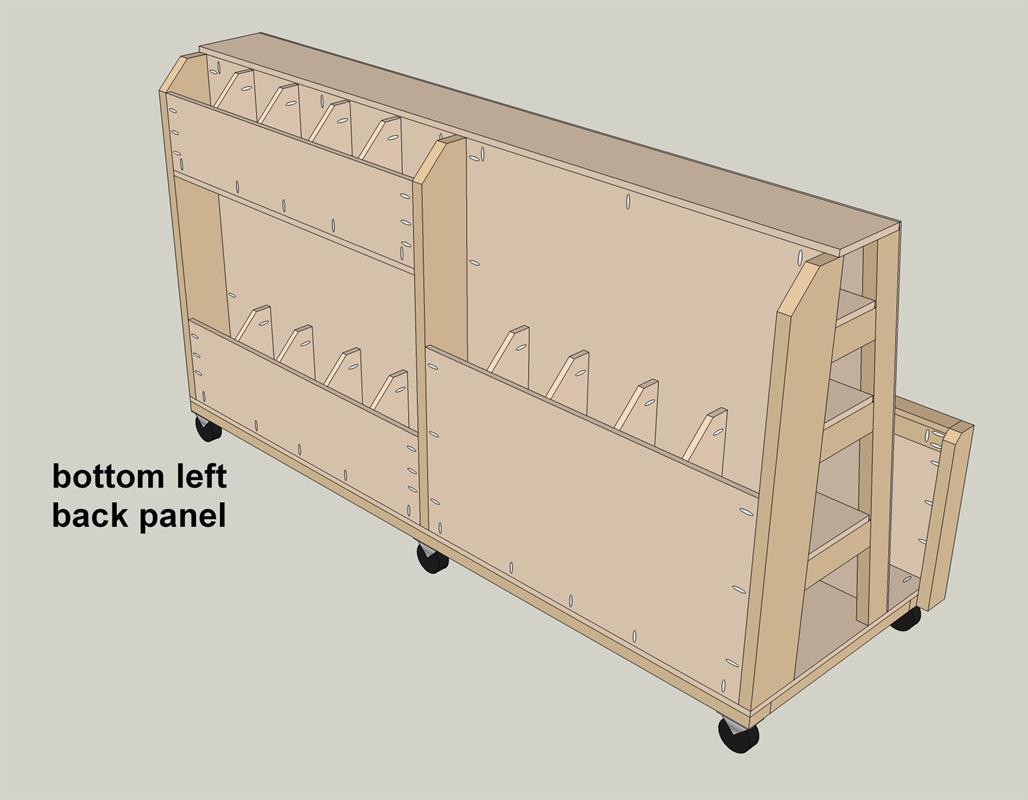
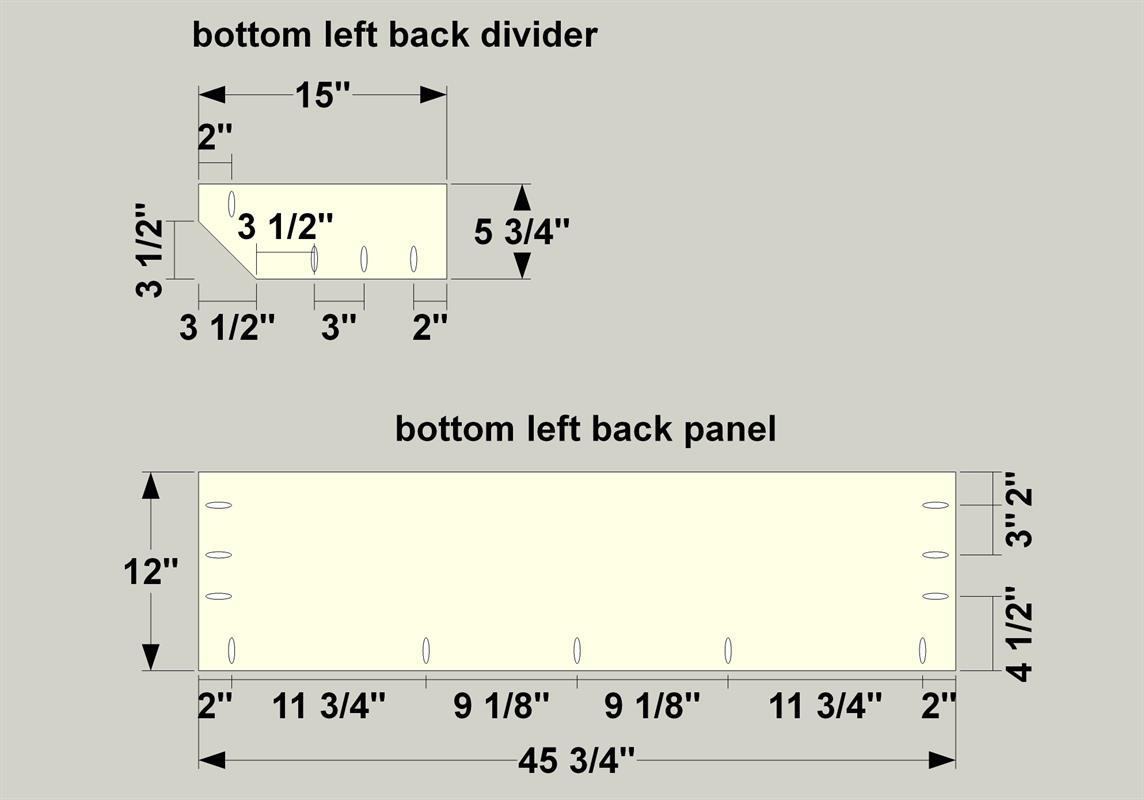
Cut the Remaining Back Parts
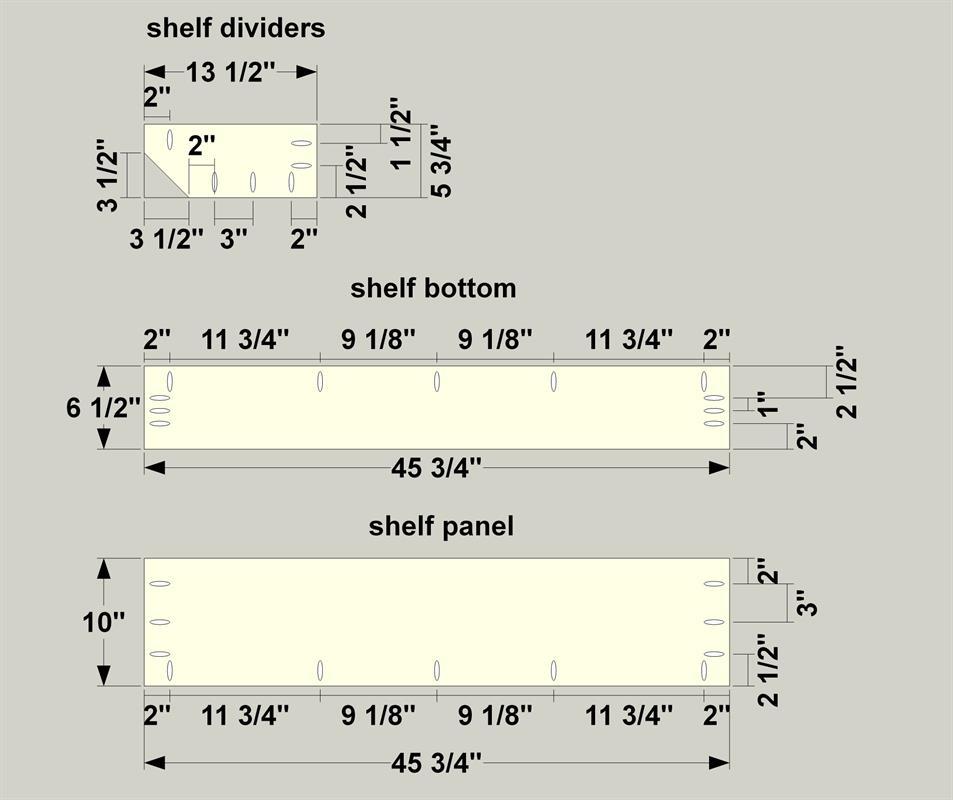
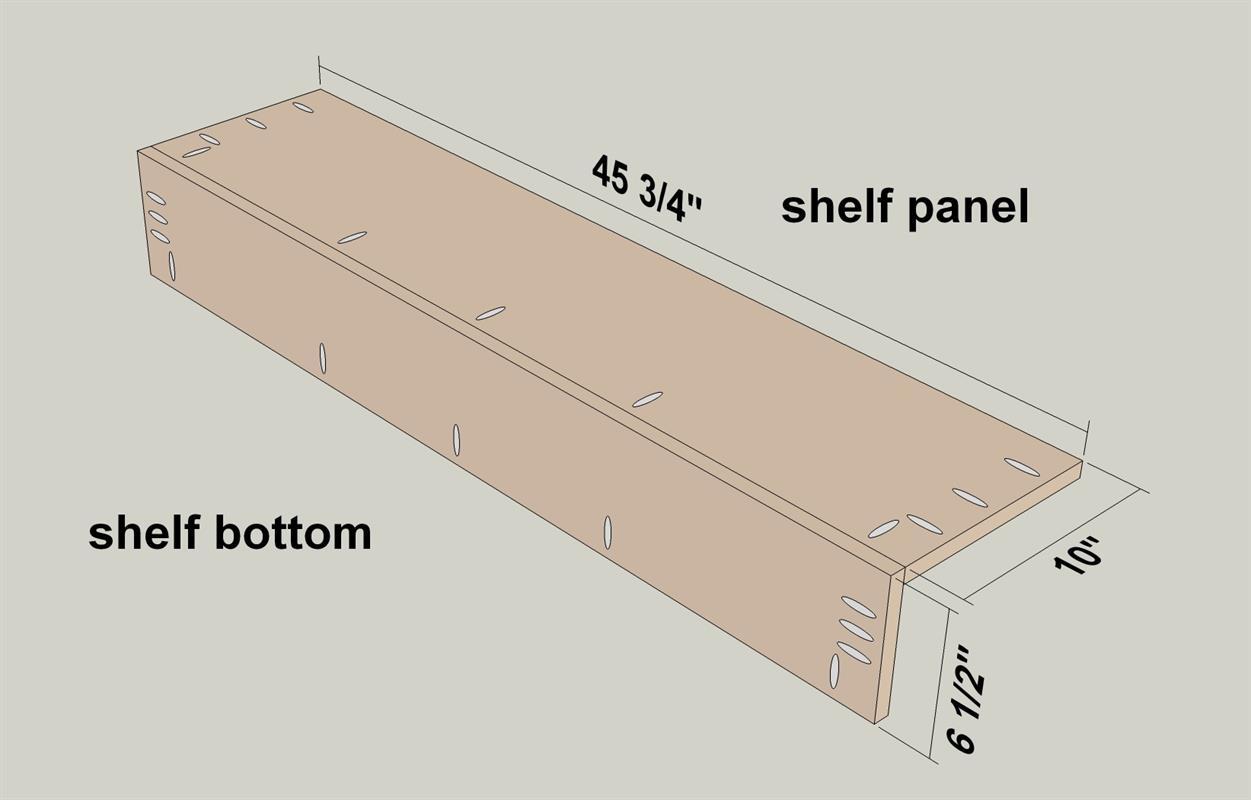
Cut one Bottom Left Back Panel and four Bottom Left Dividers to size from 3/4” plywood, as shown in the cutting diagram. Then cut one Shelf Panel, one Shelf Back, and four Shelf Dividers to size from the sheet, as well.
-
Drill the Shelf Parts
With your jig set for 3/4” material, drill pocket holes in the shelf dividers, shelf panel, and shelf back, as shown.
-
Assemble the Shelf and Back
Attach the shelf bottom to the shelf panel—with all pocket holes facing out—using 1 1/4” coarse-thread pocket hole screws, as shown.
-
Add the Shelf Dividers
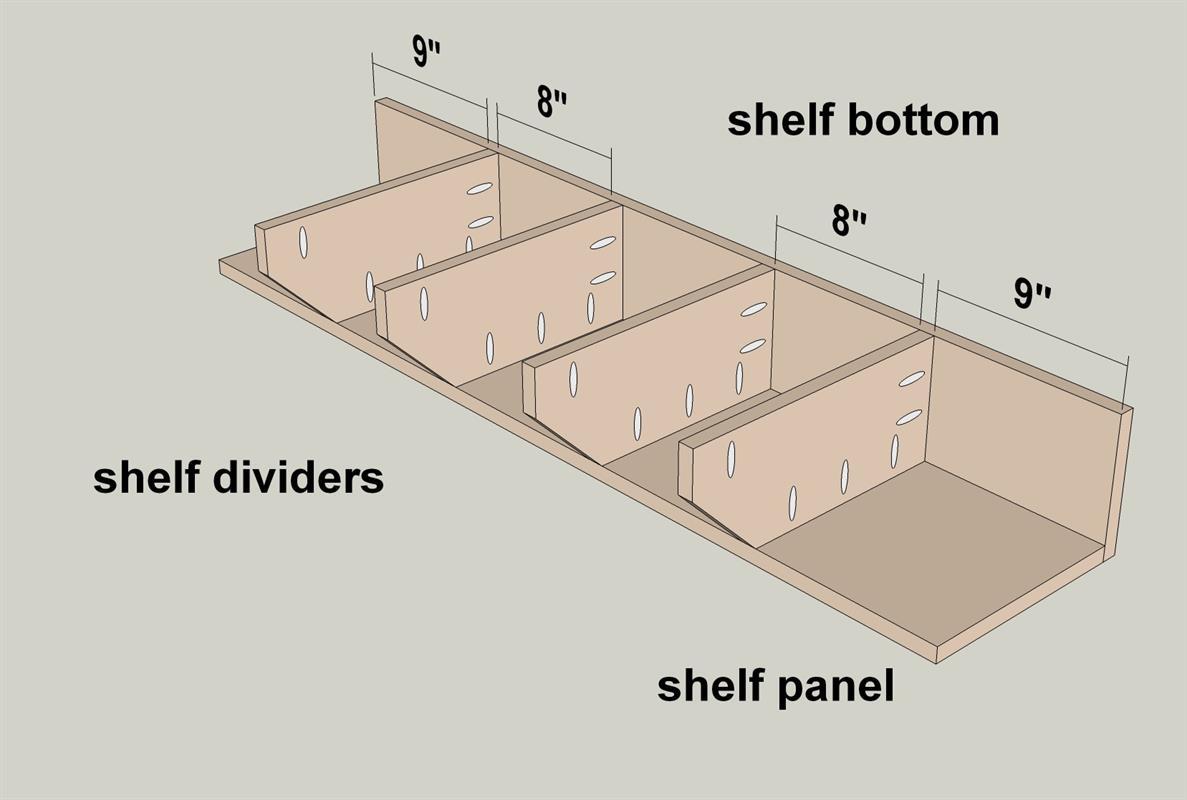
Attach the shelf dividers using 1 1/4” coarse-thread pocket hole screws, as shown.
-
Install the Shelf Assembly
Attach the shelf/divider assembly to the cart using 1 1/4” coarse-thread pocket hole screws, as shown.
-
Drill the Bottom Left Parts
With your jig set for 3/4” material, drill pocket holes in the left back panel and the left dividers, as shown.
-
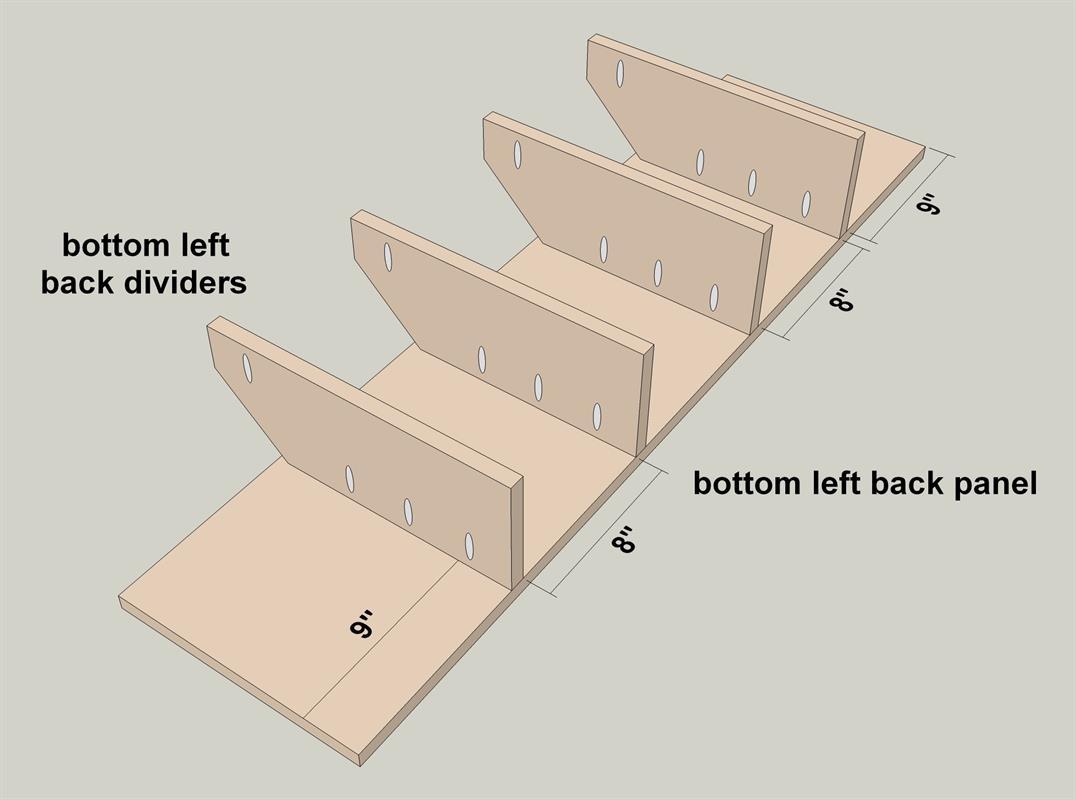
Attach the Dividers
Attach the bottom left dividers to the bottom left back panel—on the face without pocket holes—using 1 1/4” coarse-thread pocket hole screws, as shown.
-
Install the Last Assembly
Attach the left back panel/divider assembly to the cart using 1 1/4” coarse-thread pocket hole screws, as shown.