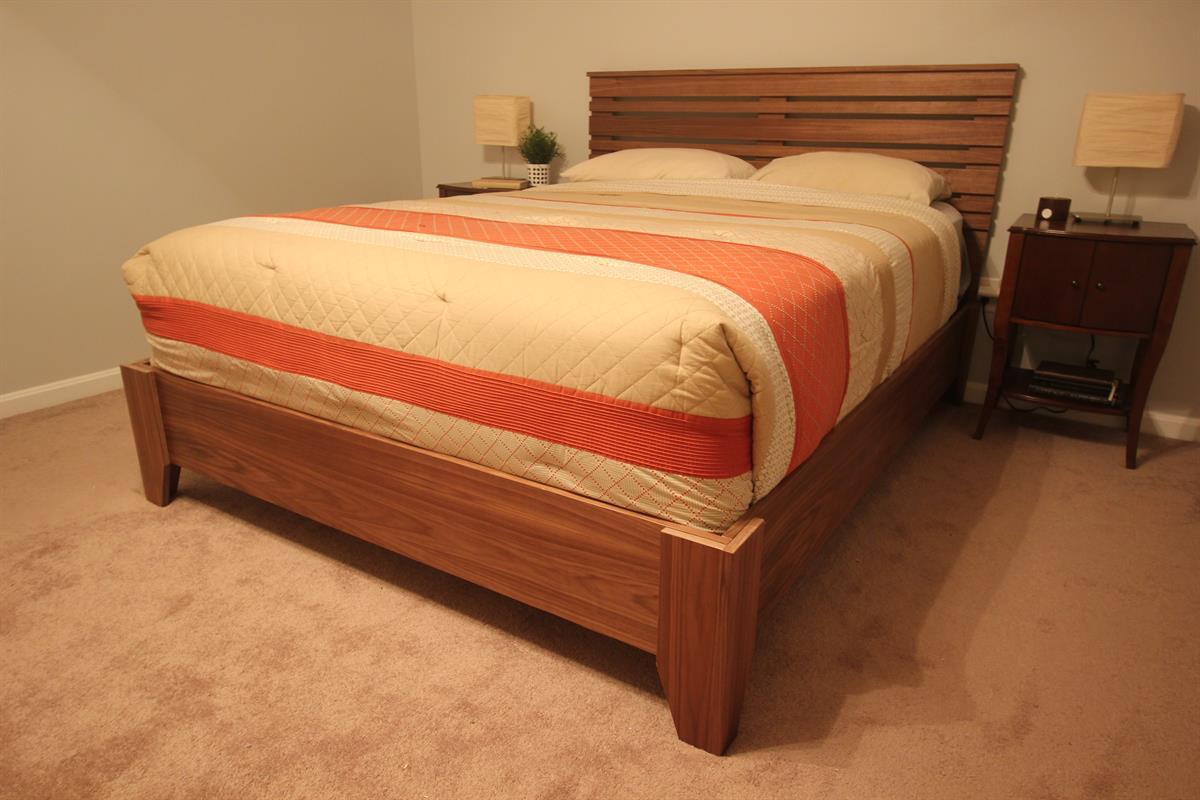


I set out to make a modern, queen-sized bed frame out of a sheet of 4’x8′ plywood, plus a few cheap furring strips to support the box spring. I used a sheet of walnut plywood, which is a bit more expensive, but any 4’x8′ sheet will do. This is a simple, one day project, so get building!
Tools
Kreg Tools


Other Tools
-
Circular Saw (cordless)

-
Jigsaw
-
Miter Saw
-
Square
-
Table Saw
-
Tape Measure
-
Clamps
-
Drill (cordless)
-
Sander
-
Shop Vacuum
Materials
Wood Products
- 1 Plywood , 3/4" Thick , Full Sheet
- 13 Board , 1x4 , 61"
- 2 Board , 2x2 , 80"
- 150 Edge Banding , 3/4" Thick , 150 feet
Hardware & Supplies
- 100 1 1/4" Pocket Hole Screws
- 1 Sheet of 220 grit sandpaper
- 3 Can of spray lacquer
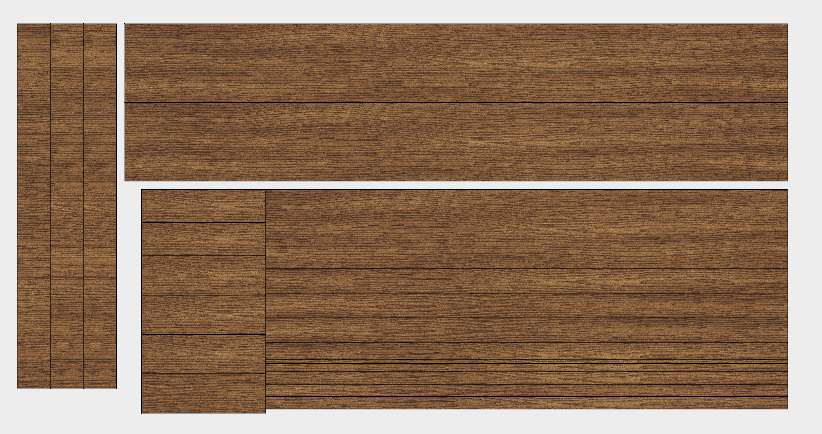
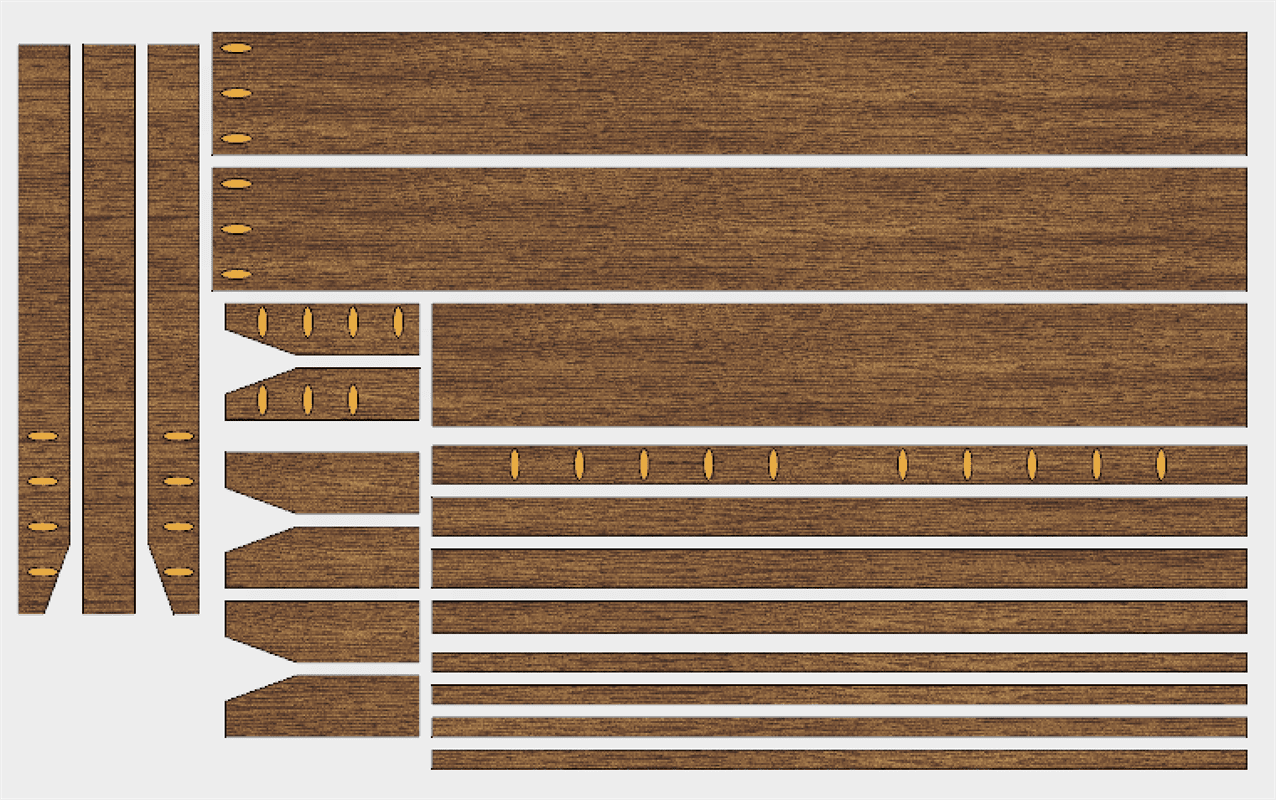
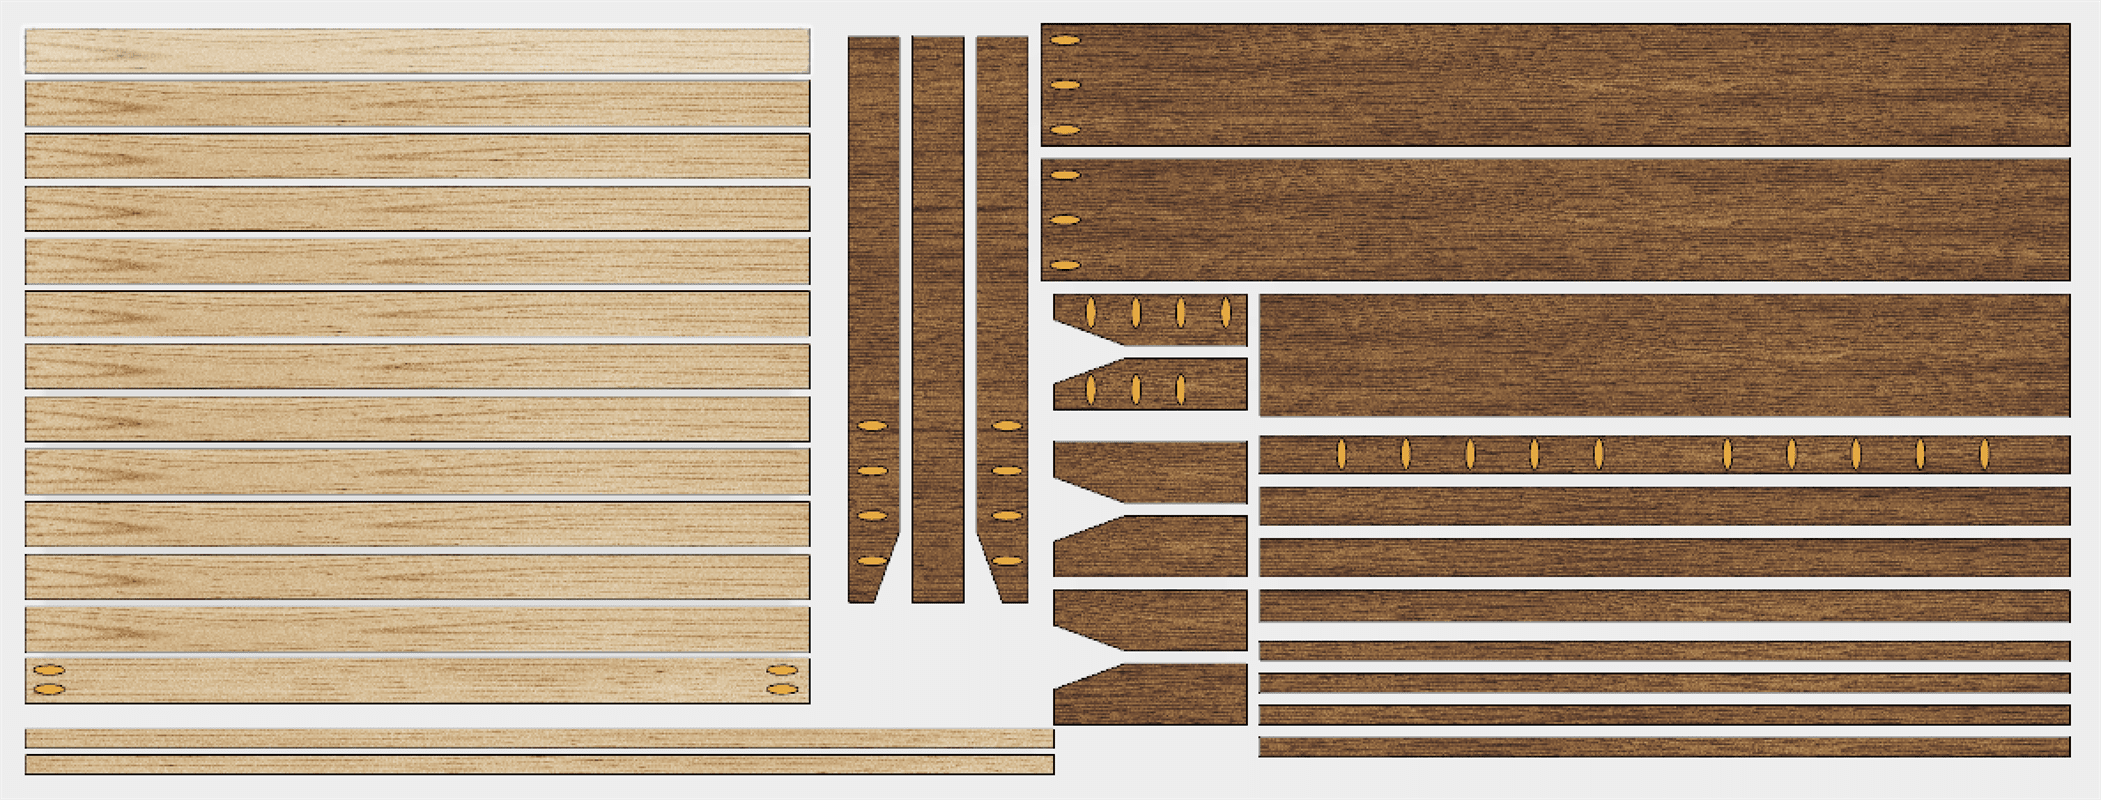
Cut List & Parts
- 2 Long Frame Rails , 3/4" x 9 1/2" x 80"
- 1 Short Frame Rail , 3/4" x 9 1/2" x 63"
- 4 Legs , 3/4" x 4 3/4" x 15"
- 3 Headboard Supports , 3/4" x 4" x 44"
- 3 Thick Headboard Rails , 3/4" x 3" x 63"
- 1 Headboard Cap , 3/4" x 2 1/2" x 63"
- 4 Thin Headboard Rail , 3/4" x 1 1/2" x 63"
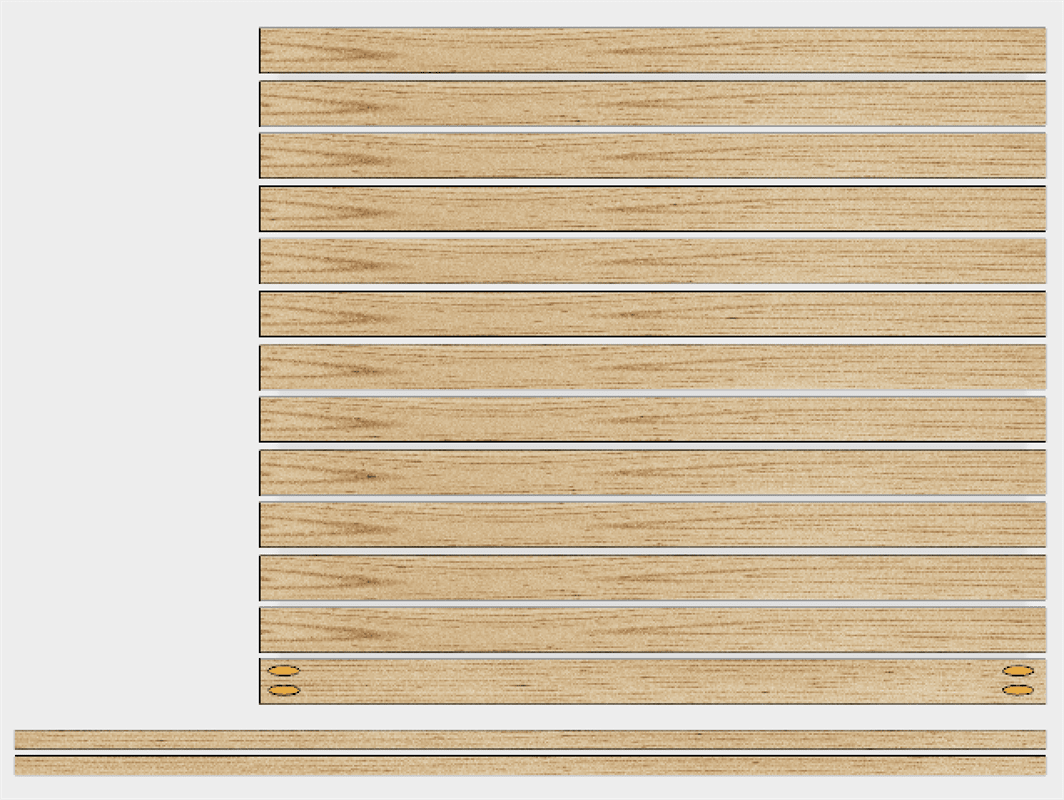
- 12 Mattress Slats , 1" x 4" x 61"
- 2 Mattress Slat Supports , 2" x 2" x 80"
- 2 Legs , 3/4" x 4" x 15"
Directions
-
Prepare the Individual Pieces
Now that you have small pieces of plywood, you should use a table saw to make quick, repeatable cuts at consistent widths. Because this bed is mostly made from geometric strips, making them look straight and parallel is visually important. If you don't have a table saw, the Kreg Accu-Cut will work just fine!
Now that have the individual pieces, go ahead and drill the pocket holes. I used the Kreg K5 Pocket Hole Jig to drill the holes marked in yellow in the diagram.
Once all the pieces are cut and drilled, you can apply edge banding to all of the flat surfaces, this ides the plywood's layers and gives the piece a clean look. Now apply two coats of spray lacquer and assemble the components.
-
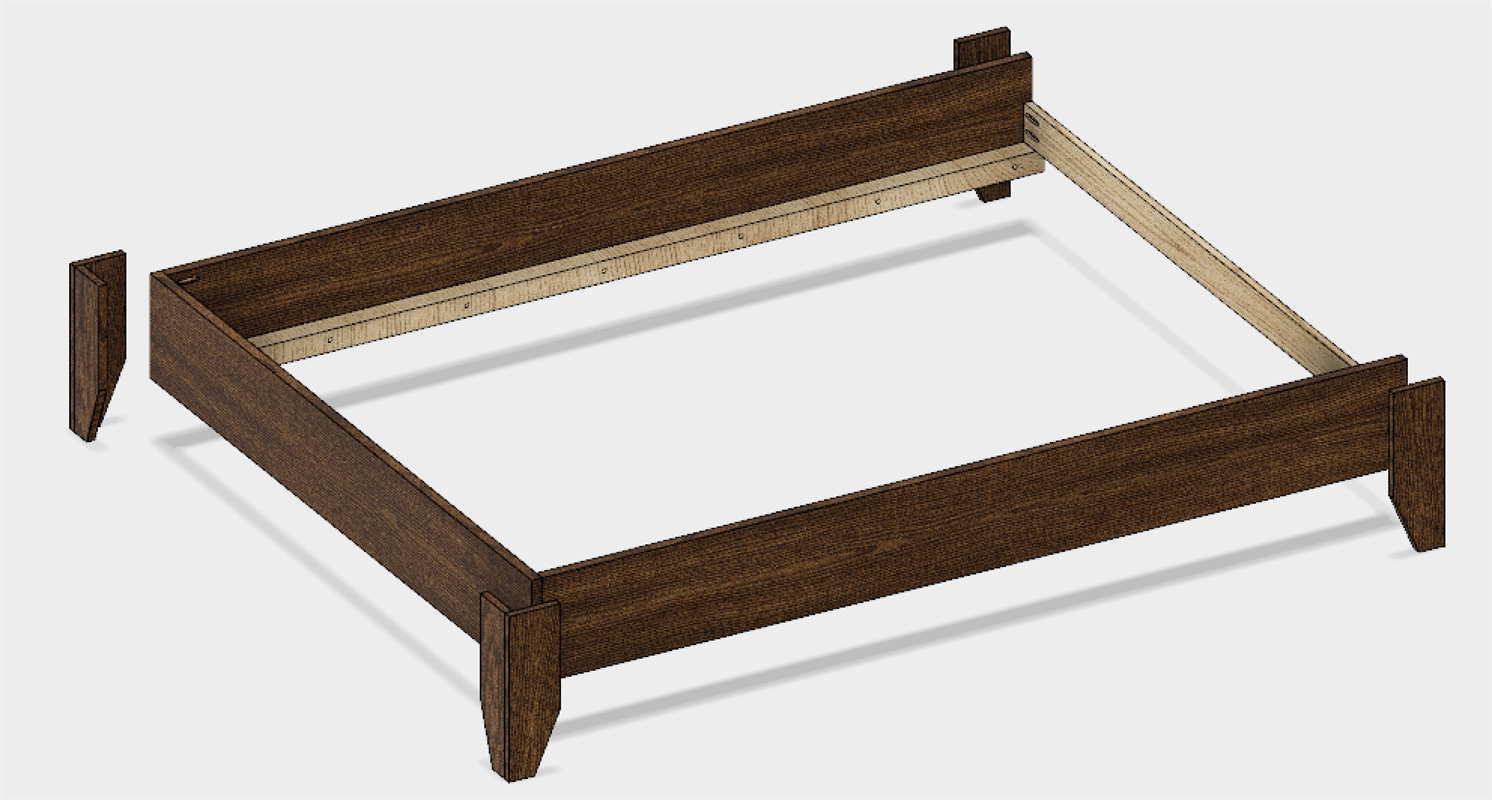
Build the Bed Frame
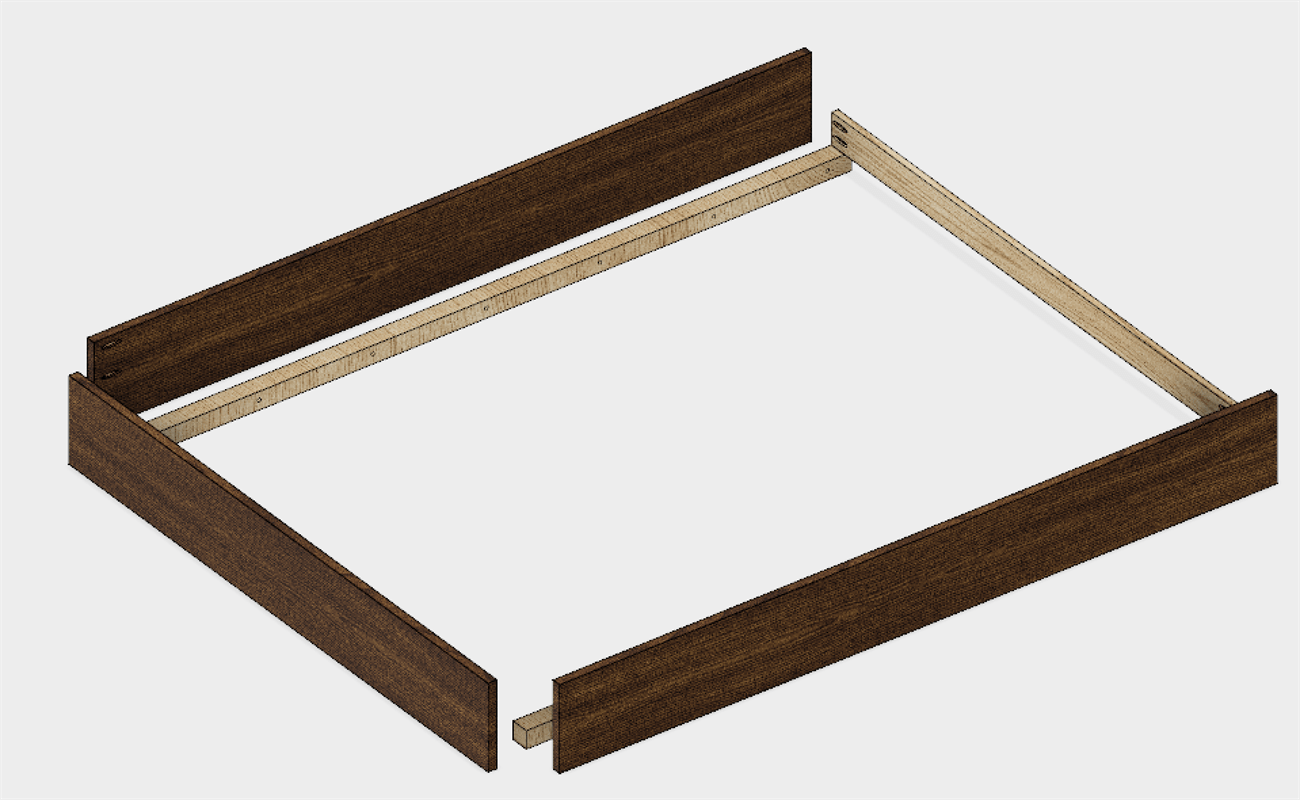
Attach the 2 Long Rails to the short Footboard Rail using 1 1/4" pocket screws. Add the 2x2 Slat Supports to the inside of the bed frame by pre-drilling some holes half-way through and along the length of piece. Use 1 1/4" pocket holes to attach the Slat Support along the bottom edge of the Long Rails.
Place the Mattress Slat with the pocket holes at the open end of the Bed Frame, vertically on top of the Slat Support. Using 1 1/4" pocket screws, attach this piece to the inside of the Long Rails along the back edge.
-
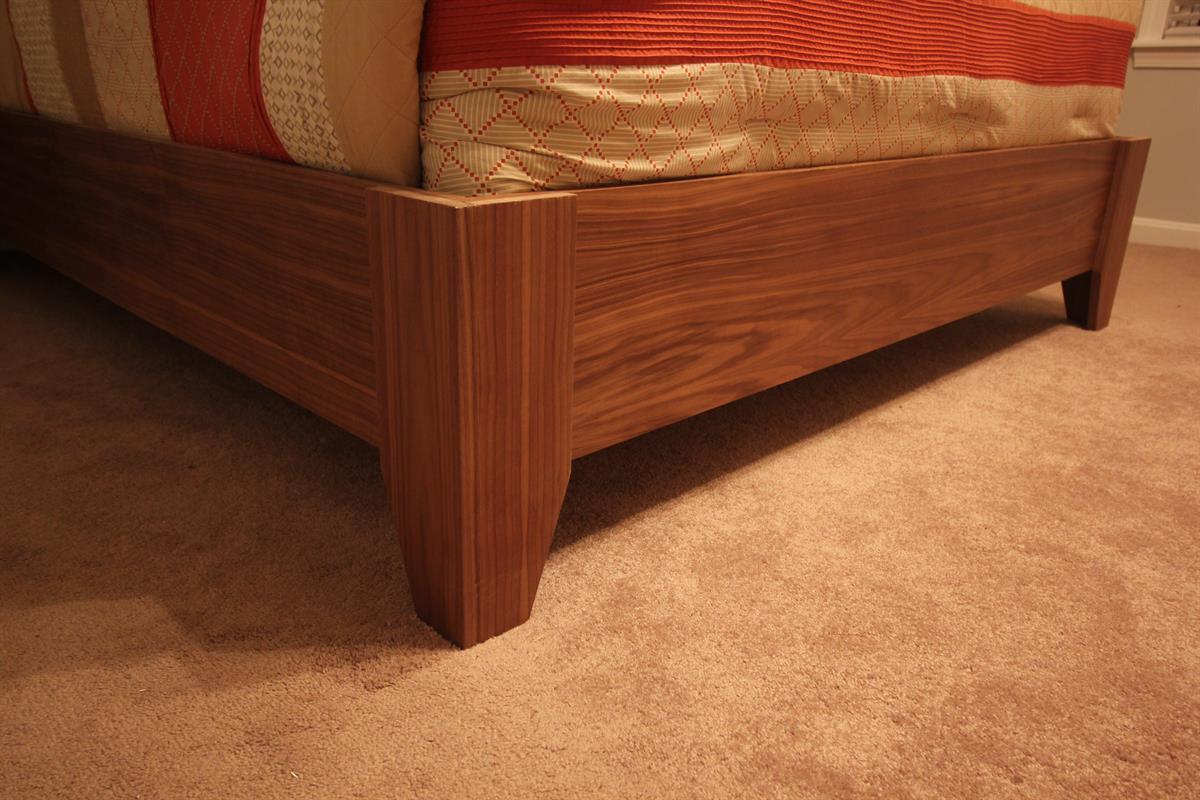
Attach the Legs
The tapers on the legs are 5 1/2" up the side and 2" in from the bottom, connect the lines and cut. Take the 4" leg piece with the pocket holes and place it on the longer edge of the 4 3/4" piece. Drive in 4, 1 1/4" pocket screws to make a 90 degree leg assembly. You'll make two of these.
From the inside of the bed frame, drive some screws through the rails and into the leg assemblies securing them flush with the top bed frame rails. Do the same thing to the two remaining wider leg pieces on the back of the bed frame, but make sure you extend them 3/4" passed the end of the Long Rails (you'll see why later).
-
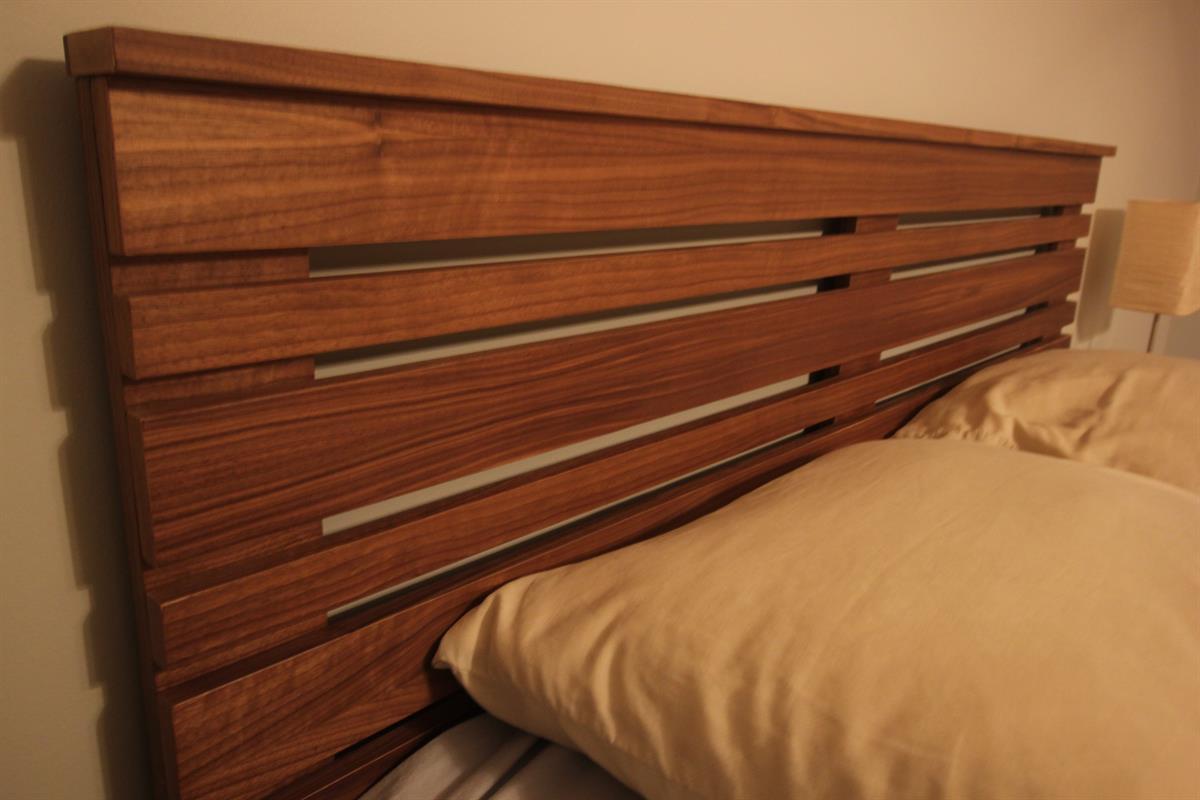
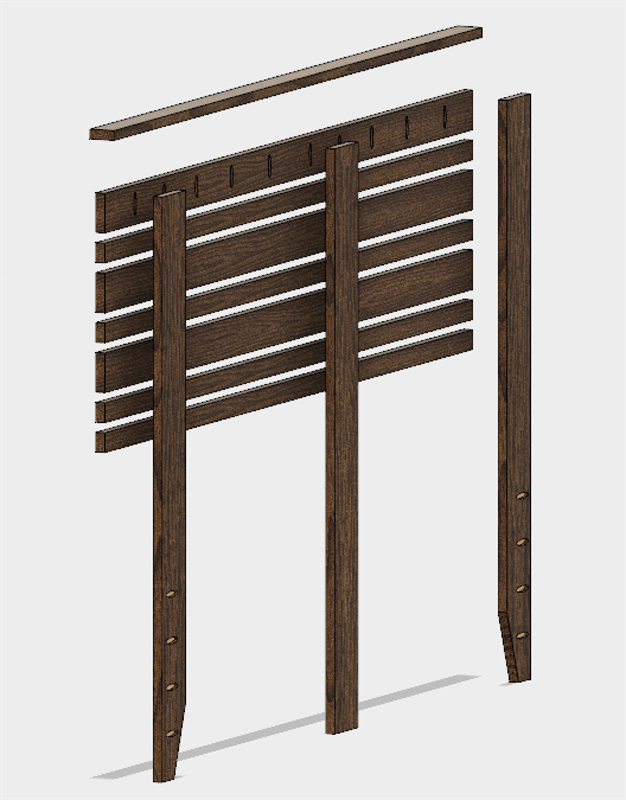
Build the Headboard
Place the Headboard Rails on the ground and arrange them in the pattern shown, and use a scrap 3/4" piece of plywood as a spacer. Make sure the Headboard Rail with the pocket holes is on top.
Sit one of the Vertical Supports (tapered leg facing inward) on the outer edge of the Headboard pieces and drive in some 1 1/4" pocket screws. Measure 25 1/2" from the inside edge of the Vertical Support and attach the middle support. Third, attach the remaining Vertical Support to the other edge. Lastly, place the 2 1/2" Headboard Cap on top of the assembly and attach with 1 1/4" pocket screws.
-
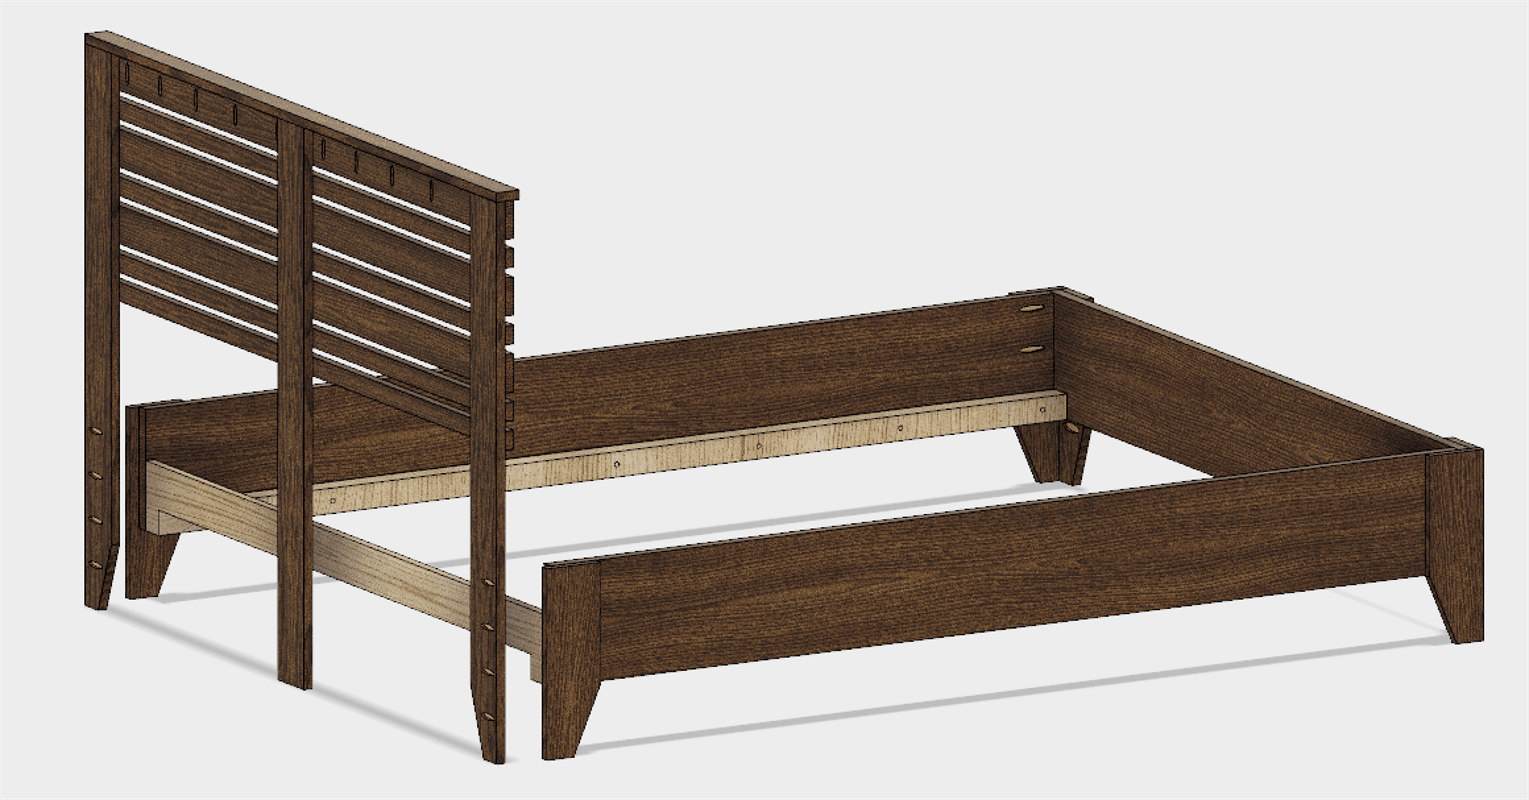
Attach the Headboard to the Frame
Slide the Headboard up to the back of the Bed Frame, it should fit inside the back 2 leg pieces. Secure the two outer Vertical Supports to the legs with 4 1 1/4" pocket holes each.
For additional stability, drive in some more 1 1/4" pocket screws from the back of the Vertical Supports into the Bed Frame.
-
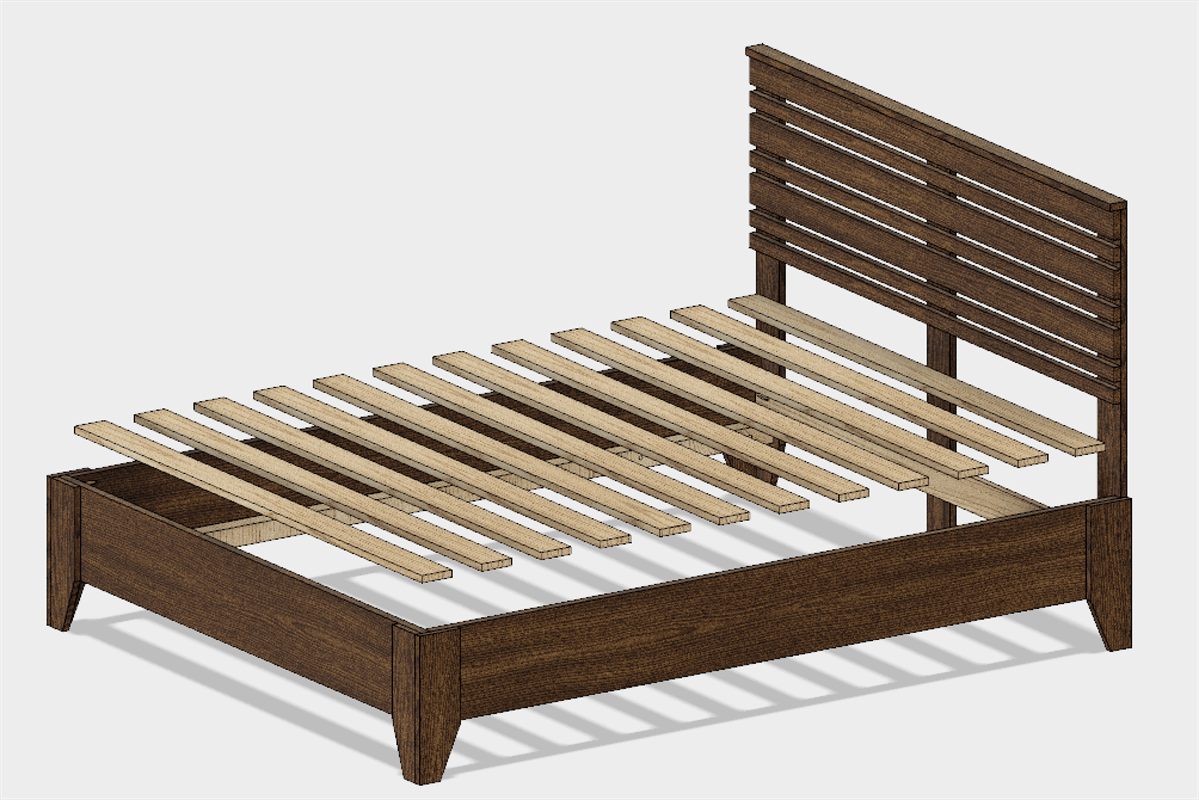
Add Mattress Slats
Lay in the 12 Mattress Slats evenly spaced apart and secure each one of them to the Slat Supports with 2 1 1/4" pocket screws per side.
Now plop down your box spring and your mattress and you're all done!
-
Break Down Plywood
I used the Kreg Accu-Cut and a circular saw to break down the 4' x 8' plywood sheet into three, more manageable pieces. I am not a fan of the circular saw, but this tool really made it easy to cut nice clean lines.