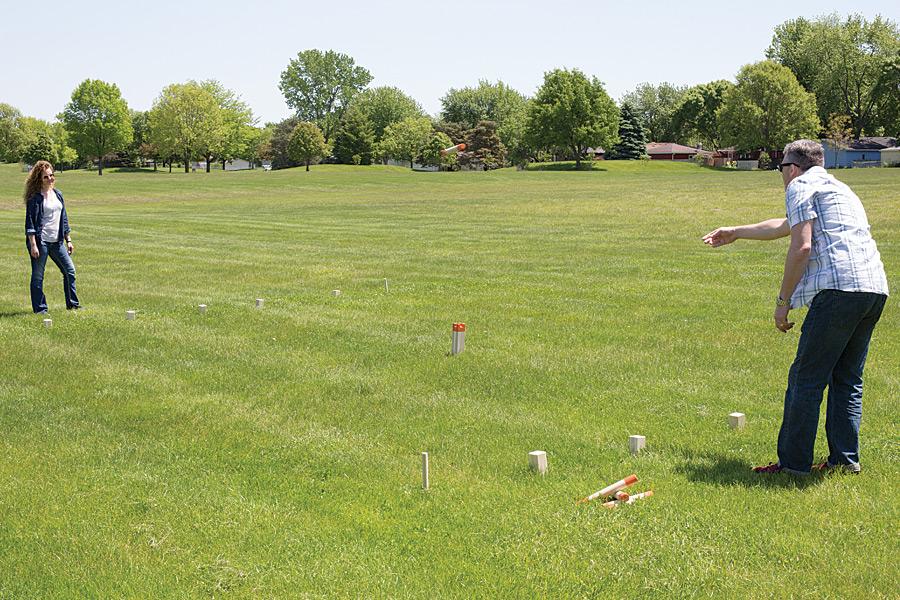


This fun, challenging outdoor game (pronounced “koob”) reportedly dates back to the Viking Ages. Today, it’s more popular than ever, for good reason. Our version is fun to build from simple materials, too, and includes a carrying box. We’ve even include links to official rules in the “extras” tab.
Tools
Kreg Tools


Other Tools
-
Jigsaw

-
Miter Saw
-
Tape Measure
-
Drill (cordless)
-
Sander
-
Right-Angle Drill Attachment
Materials
Wood Products
- 1 Board , 25mm x 184mm , 2400mm
- 3 Square Dowel , 25mm x 25mm , 914mm
- 1 Square Dowel , 16mm x 16mm , 914mm
- 2 Square Dowel , 64mm x 64mm , 914mm
- 2 Dowel , 38mm , 1220mm
- 2 Dowel , 25mm , 1220mm
Hardware & Supplies
- 1 32mm coarse-thread pocket hole screws
- 1 25mm Drill Bit
- 1 Square Drive Bits 6 inch and 3 inch
- 1 Wood Glue
Cut List & Parts
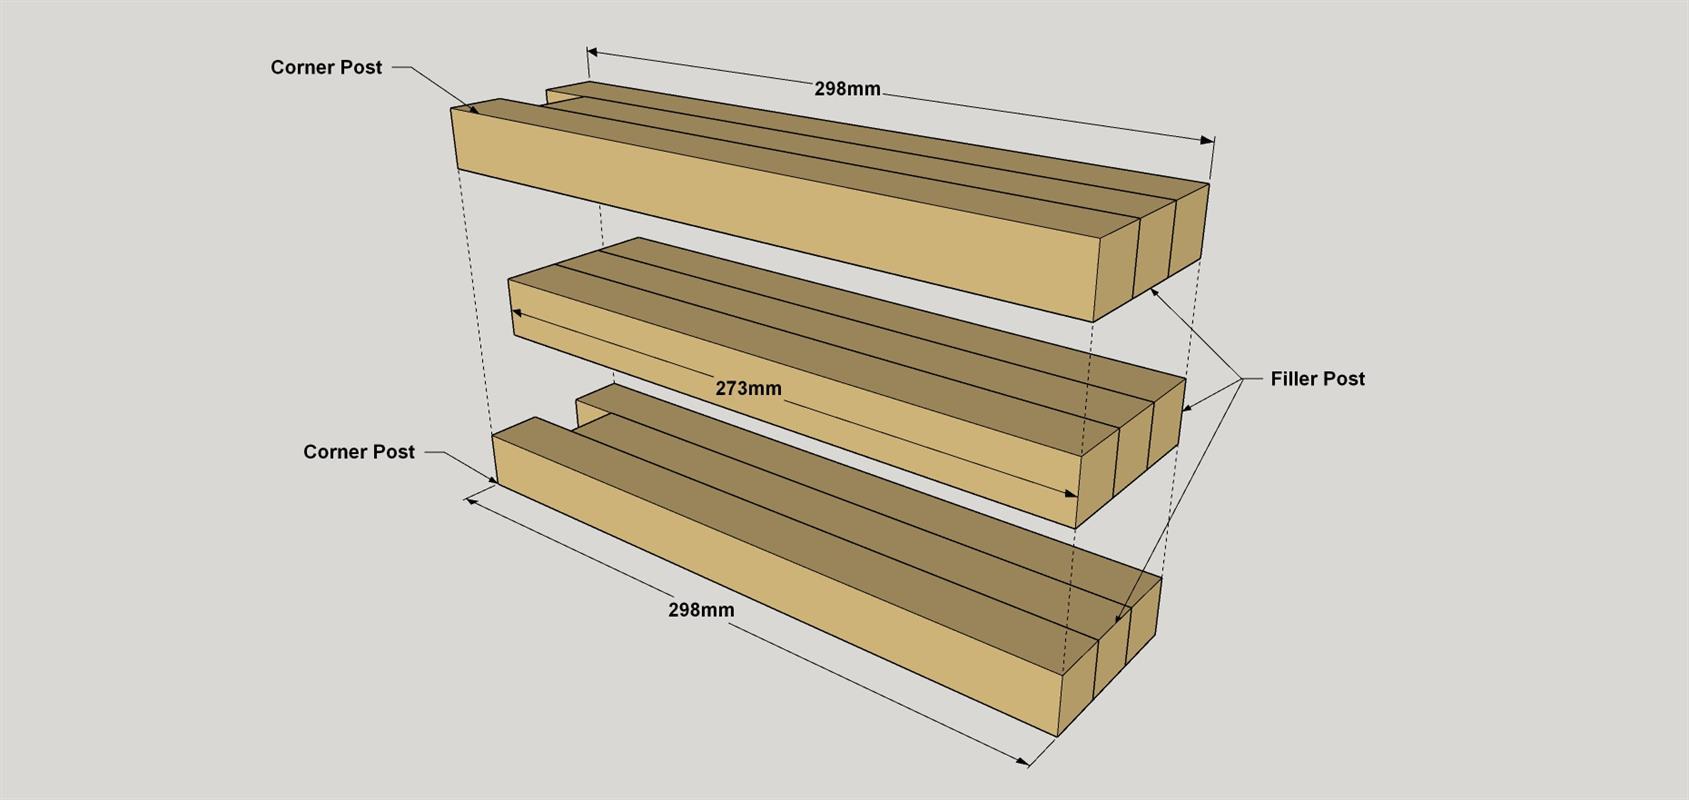
- 4 King Corner Post , 25mm x 25mm x 289mm square dowel
- 5 King Filler Post , 25mm x 25mm x 273mm square dowel
- 8 Baton , 38mm x 298mm dowel
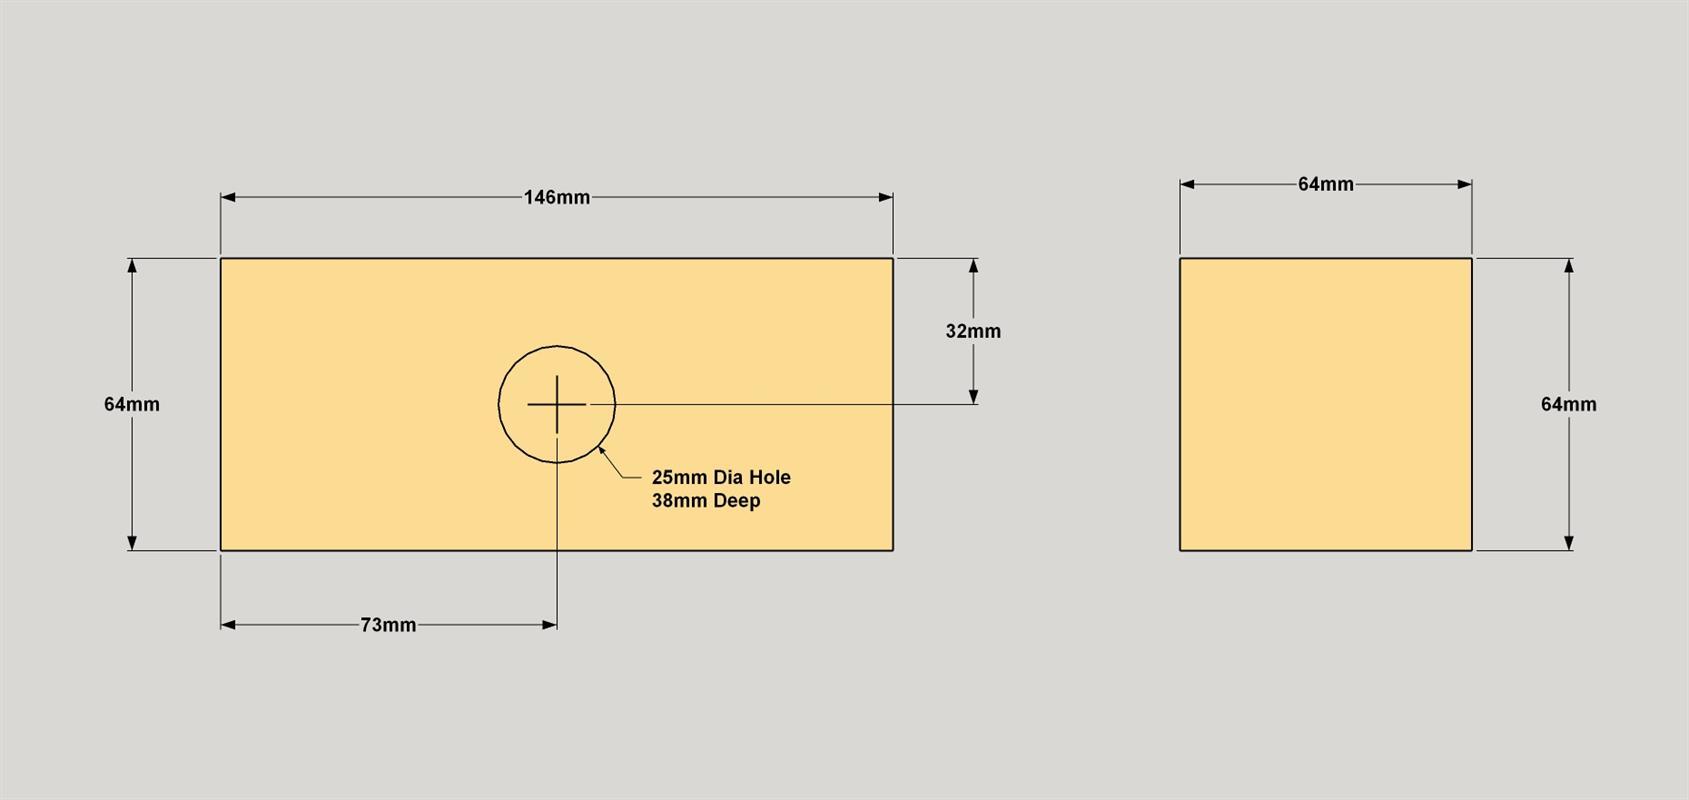
- 10 Kubb Block , 64mm x 64mm x 146mm poplar square
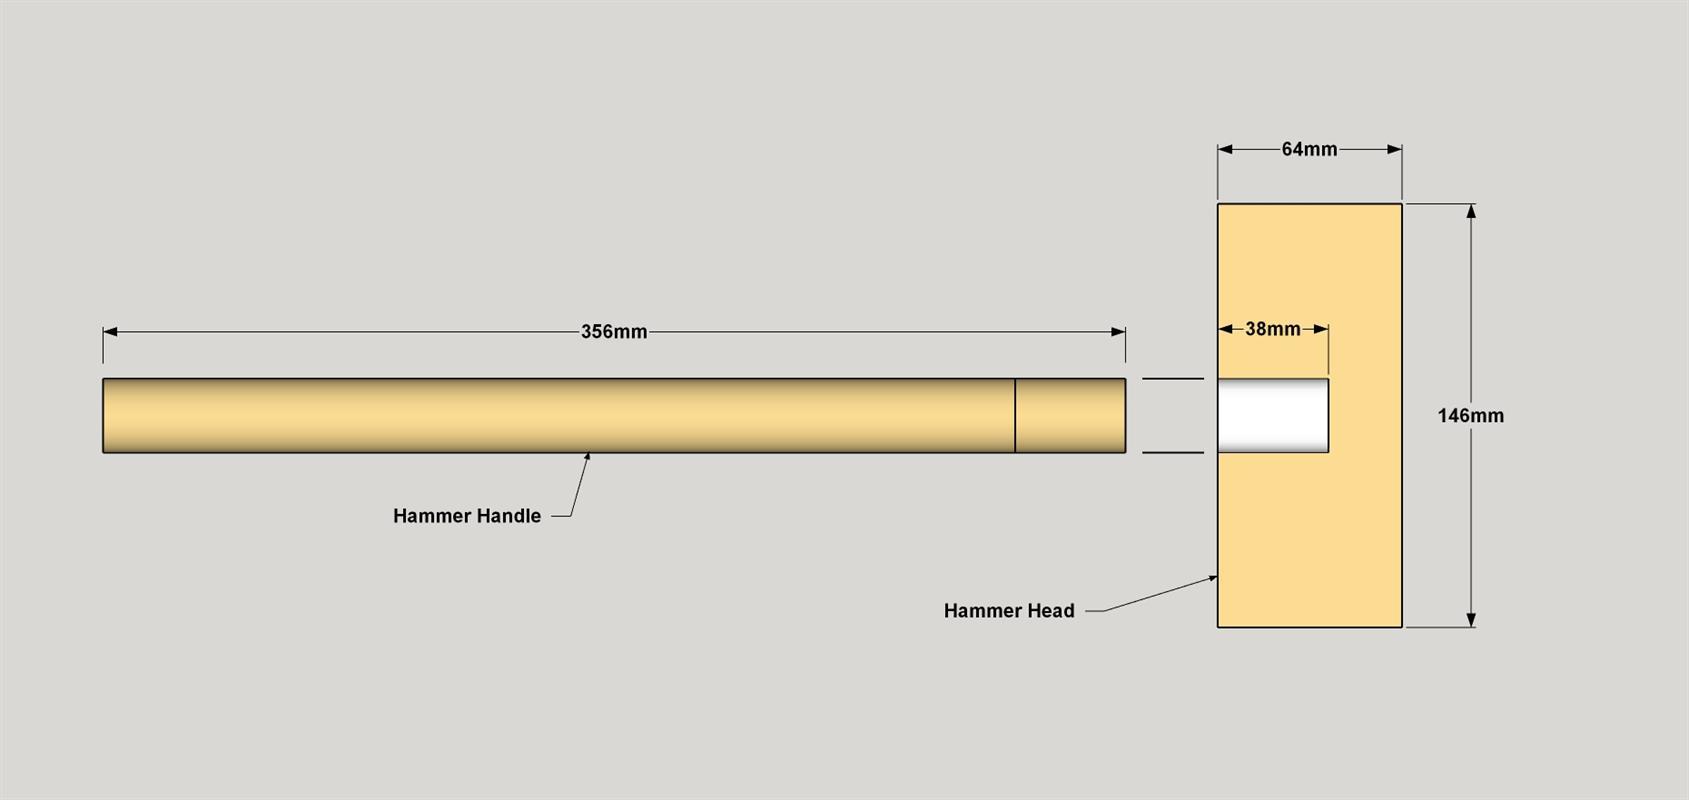
- 1 Hammer Head , 64mm x 64mm x 146mm poplar square
- 1 Hammer Handle , 25mm x 356mm dowel
- 4 Corner Stake , 25mm x 298mm dowel
- 1 Box Handle , 25mm x 438mm dowel
- 1 Kubb Spacer , 16mm x 16mm x 318mm square dowel
- 1 Stake Spacer , 16mm x 16mm x 127mm square dowel
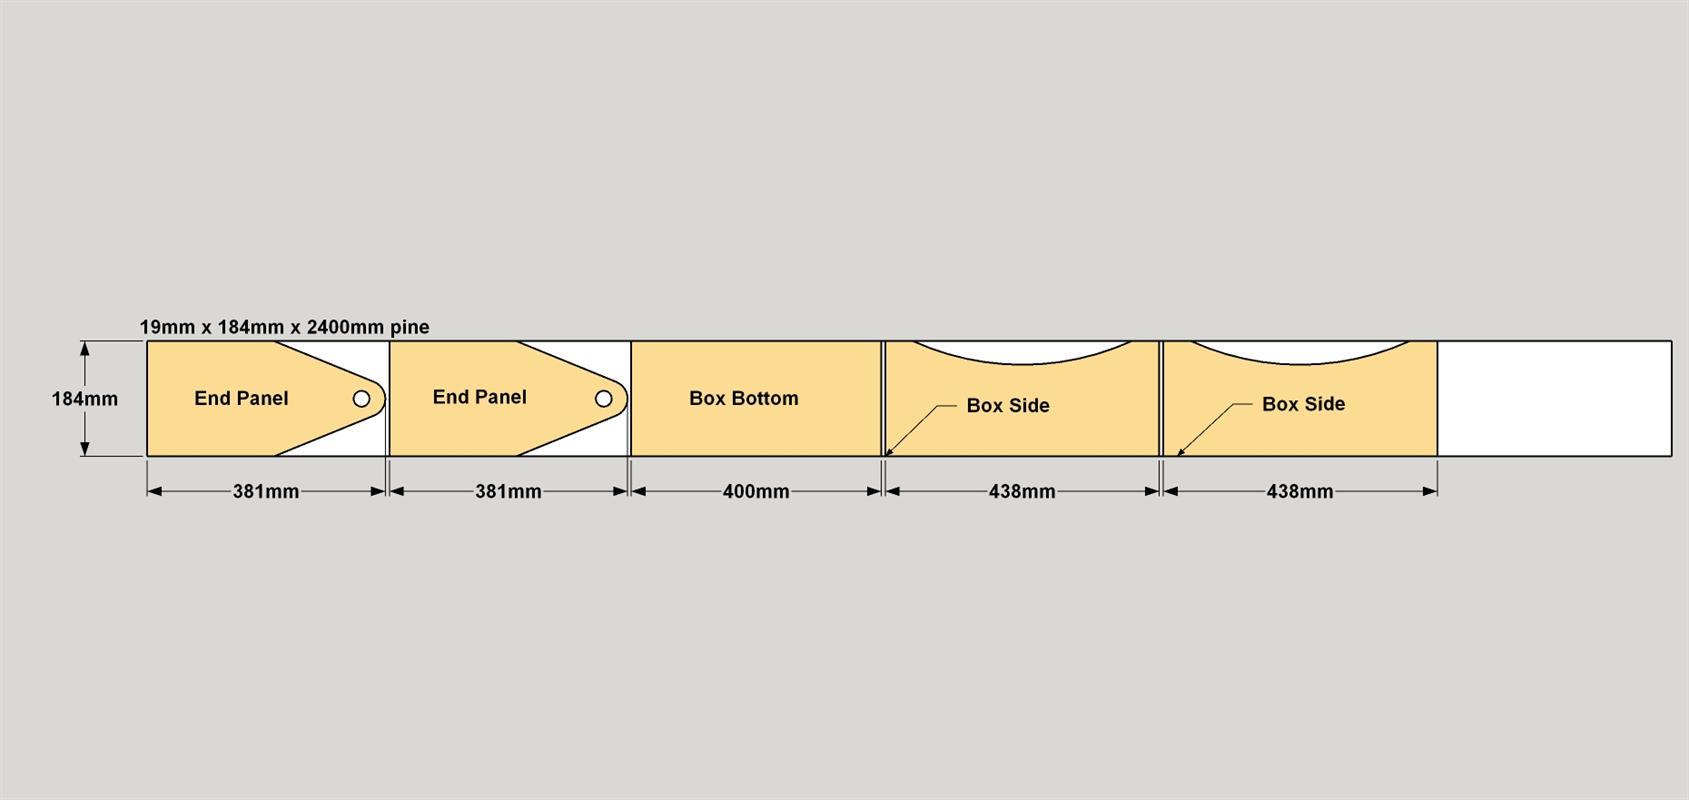
- 2 Box Side , 19mm x 184mm x 438mm pine
- 2 Box End , 19mm x 184mm x 381mm pine
- 1 Box Bottom , 19mm x 184mm x 400mm pine
Directions
-
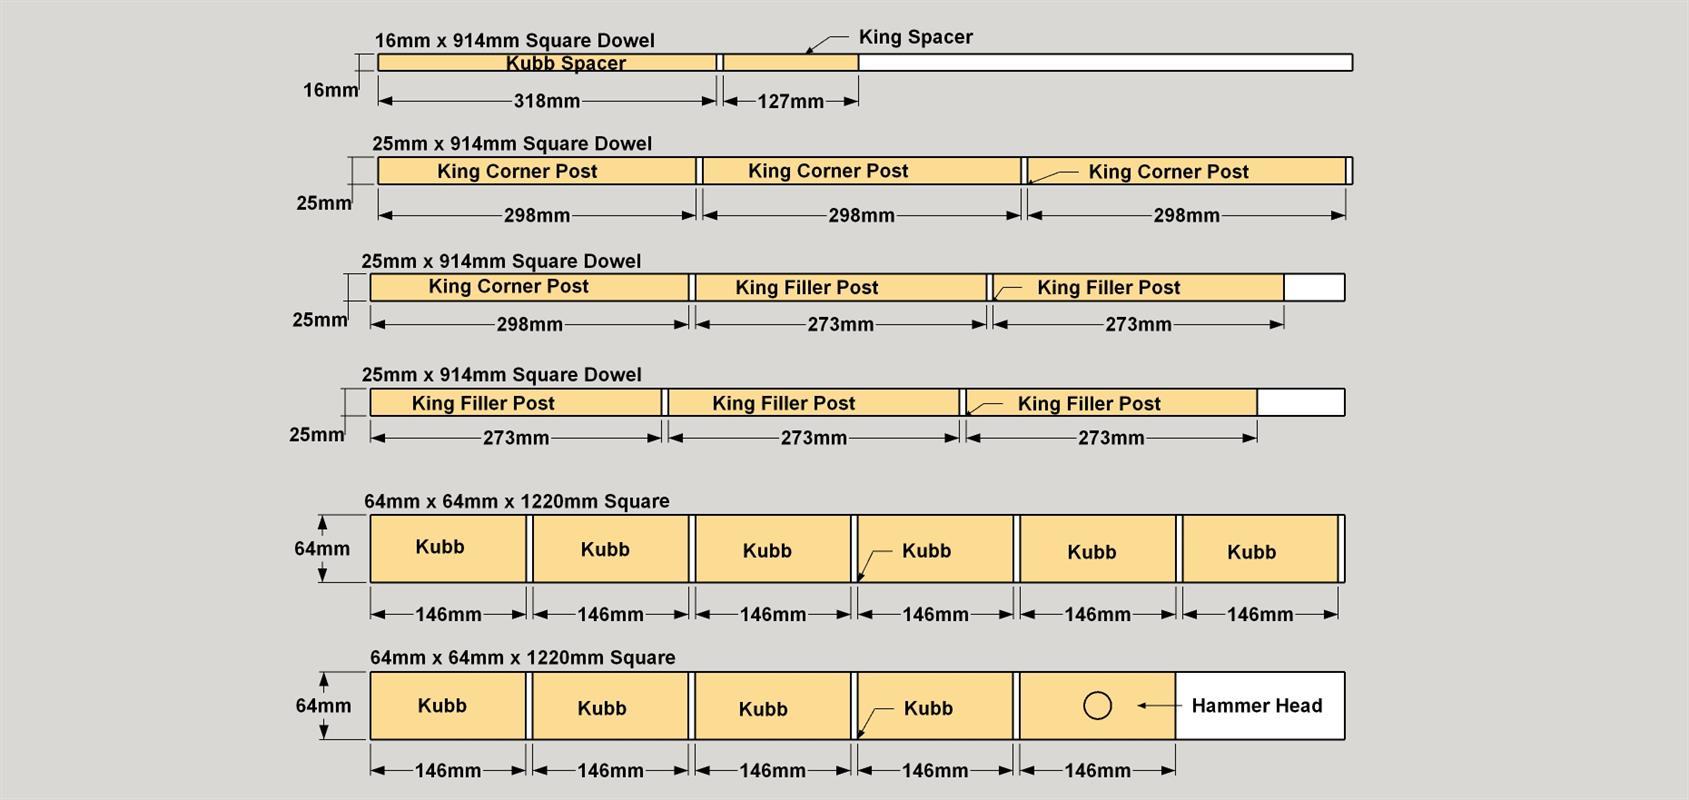
Cut the Game Pieces
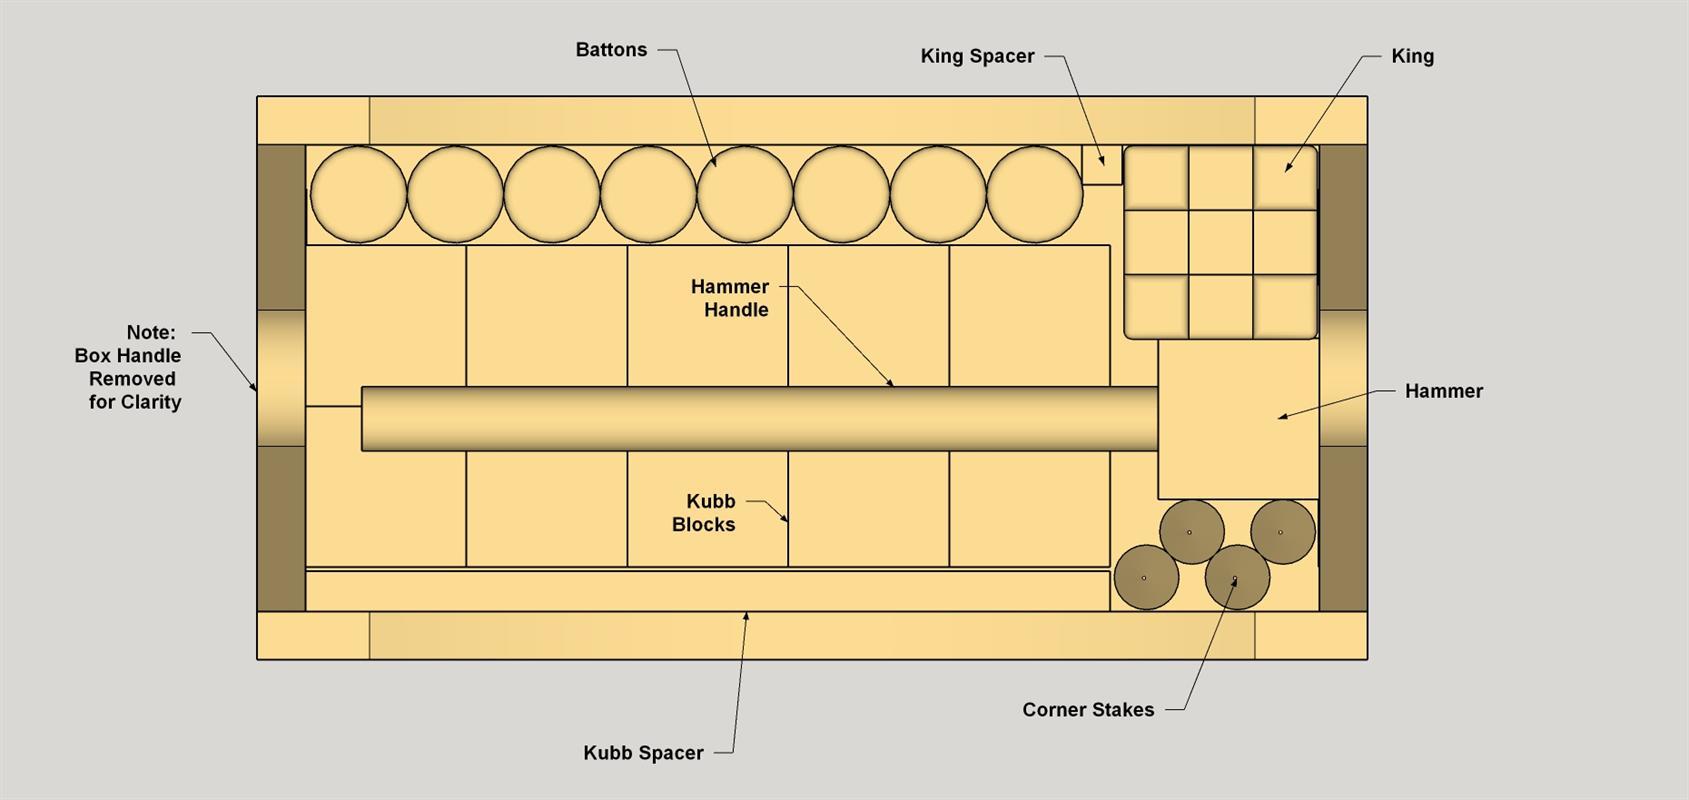
Since most of the game pieces are simply cut to length, it's easy enough to cut them all in groups at the same time. Just be sure to check your measurements first. As shown in the Dowel and Square Dowel cutting diagrams, cut the following parts; one Kubb Spacer and one King Spacer from a 16mm square Dowel. Next, cut four King Corner Posts and five King Filler Posts from 25mm square dowels. Now, cut 10 Kubb Blocks and one Hammer Head from a 64mm x 64mm poplar square.
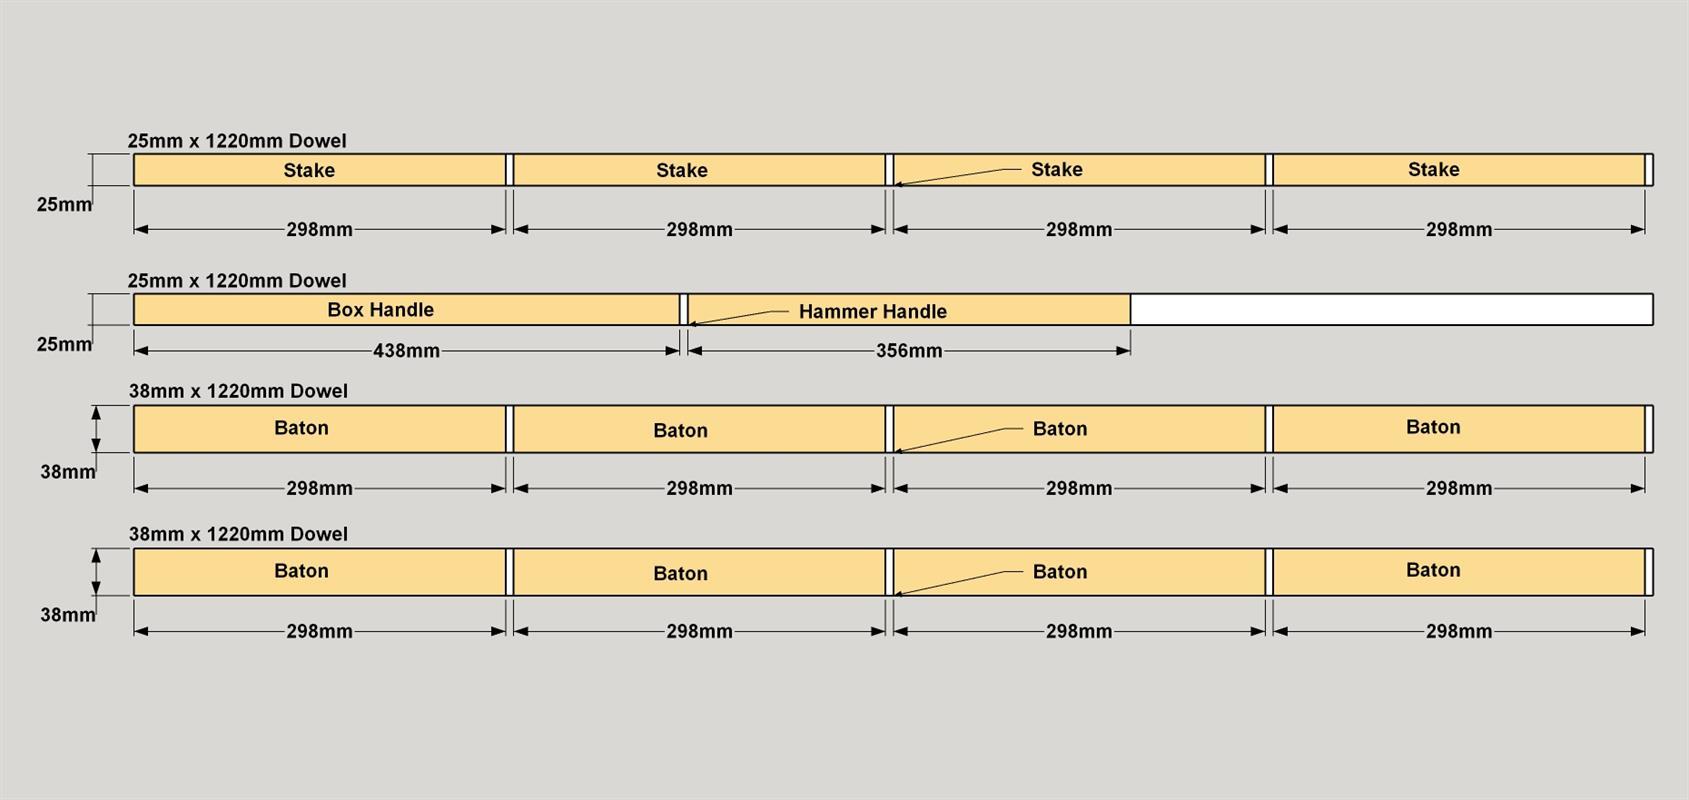
From 25mm round dowels, cut four Corner Stakes and one Hammer Handle. While you’re at it, you can cut one Box Handle from the 25mm dowel, as well. Finally, from 38mm dowels, cut eight Batons. Set these parts aside until needed. -
Make the King
Using the King parts you cut in the first step, glue and clamp two King Corner Posts with one Filler Post in between. Make sure to align the bottoms and faces of the posts. Make two of these assemblies. Then glue and clamp the last three King Filler Posts together. Set all three assemblies aside to dry.

-
Final King Assembly
When the King sub-assemblies are dry, sand the faces flat then glue the three assemblies together as shown. Again, make sure the bottoms and edges are flush. Clamp the assembly together and let it dry. When the glue is dry, remove the clamps and sand the faces and bottom flat as needed.
-
Drill the Hammer Head
On the Hammer Head you cut out earlier, mark the location of the handle hole as shown. Then drill a 25mm-diameter hole, 38mm deep. Hold your drill perpendicular to the block as you do this. You may want to clamp the block down, as well, to hold it steady as you drill.
-
Attach the Hammer Handle
To complete the Hammer, lightly sand one end of the Hammer Handle to make it slide into the hole easier. Apply some glue in both the Hammer Head hole and on the end of the Hammer Handle, and tap the handle into the head until it's fully seated in the hole. Set the Hammer aside for later.
-
Cut the Box Parts
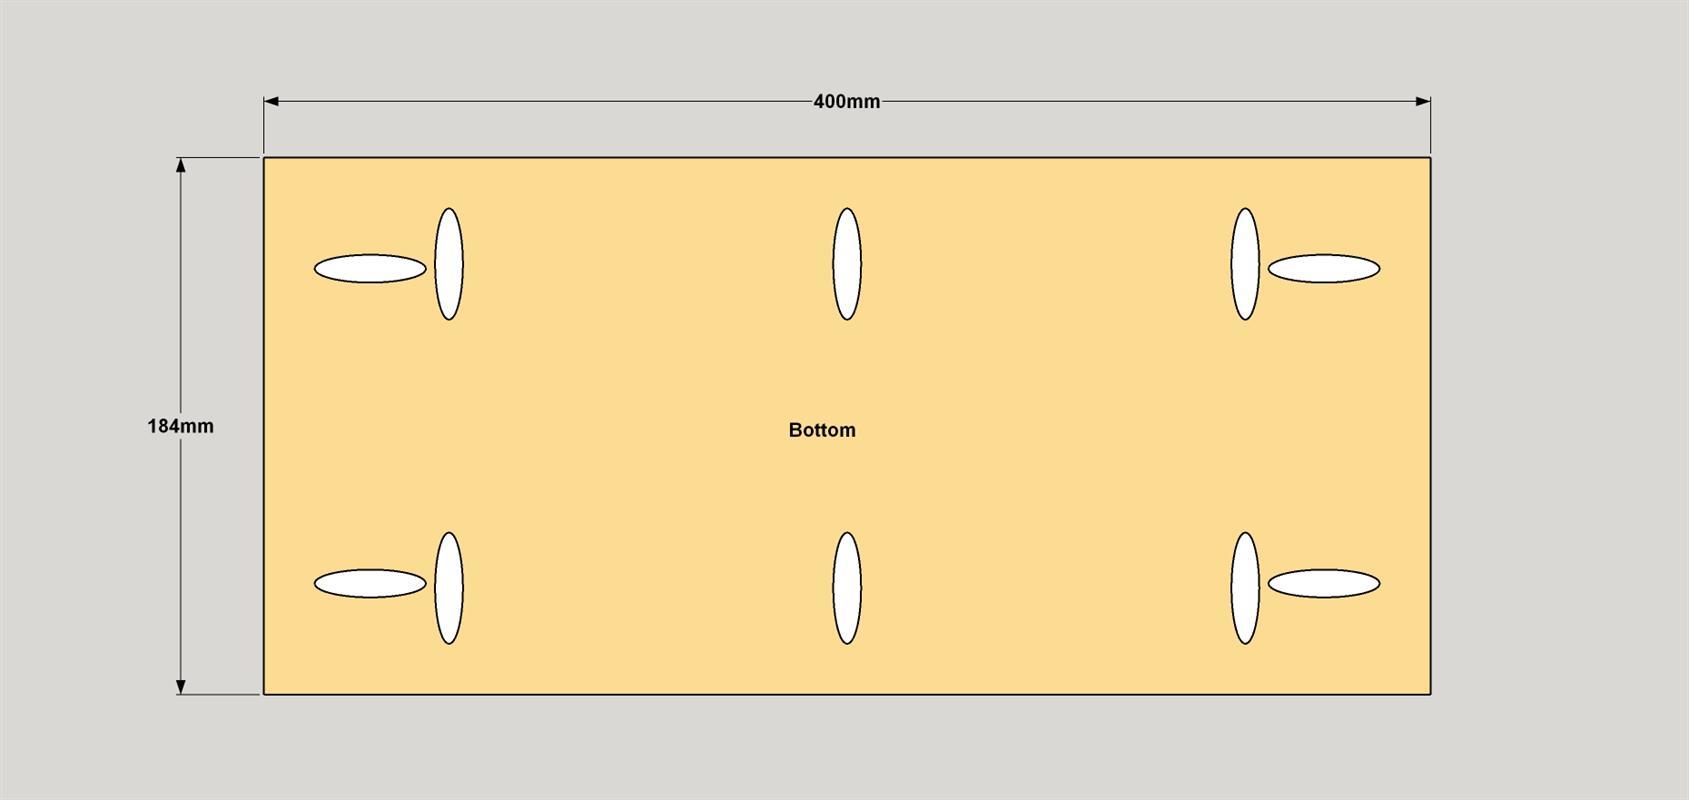
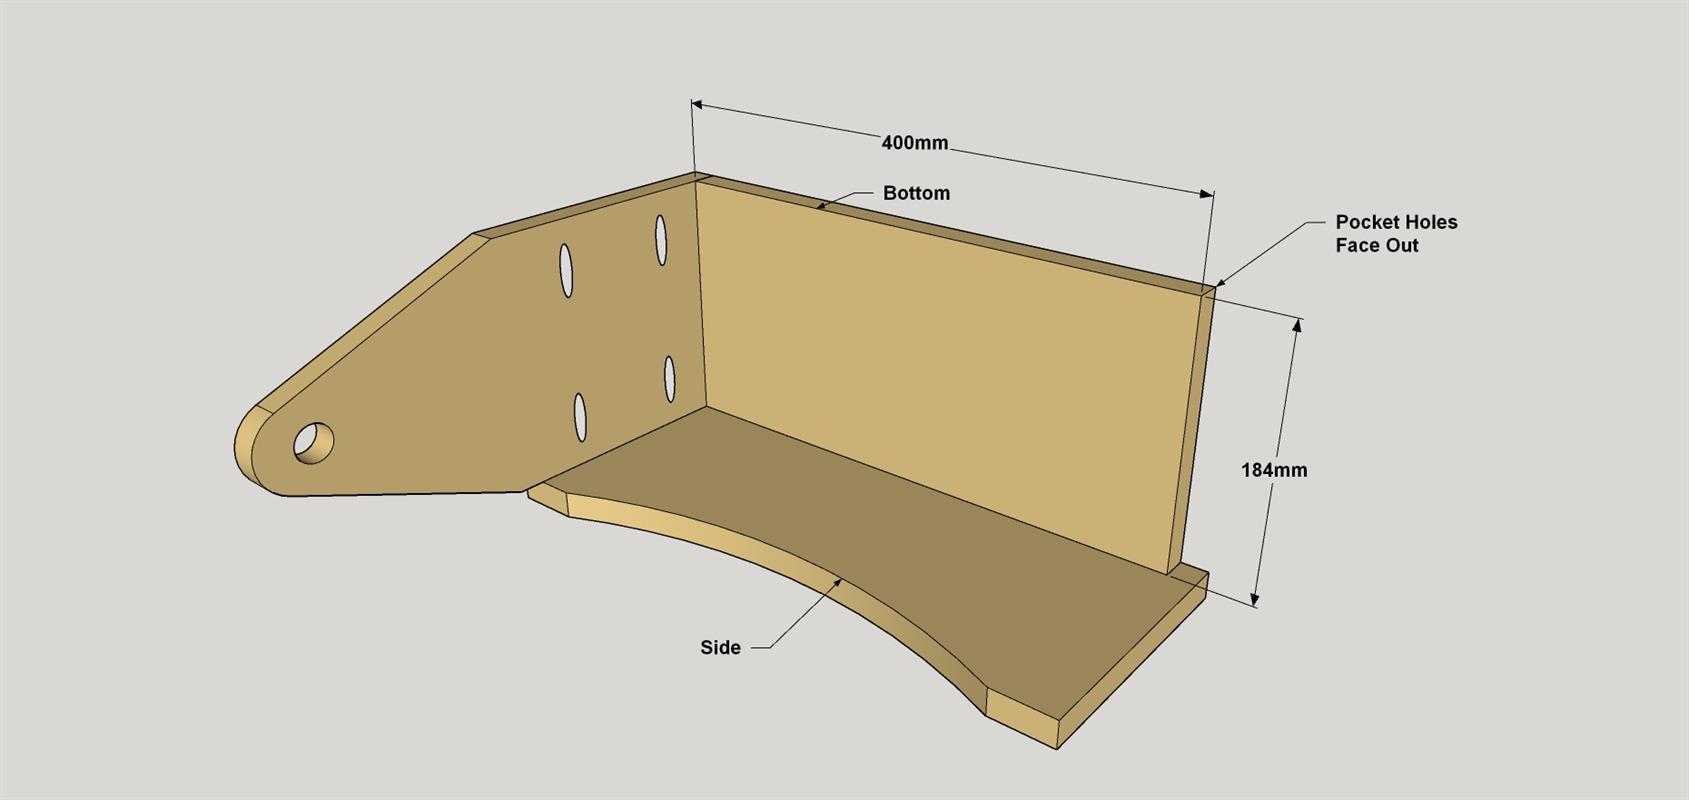
From a 19mm x 184mm board, cut two Box Sides to length. You’ll shape them later. Then cut two Box Ends and one Box Bottom to length as shown in the cutting diagram.
-
Complete the Box Bottom
Set your pocket-hole jig for 19mm thick material, and then drill pocket holes on the underside of the Box Bottom, as shown.
-
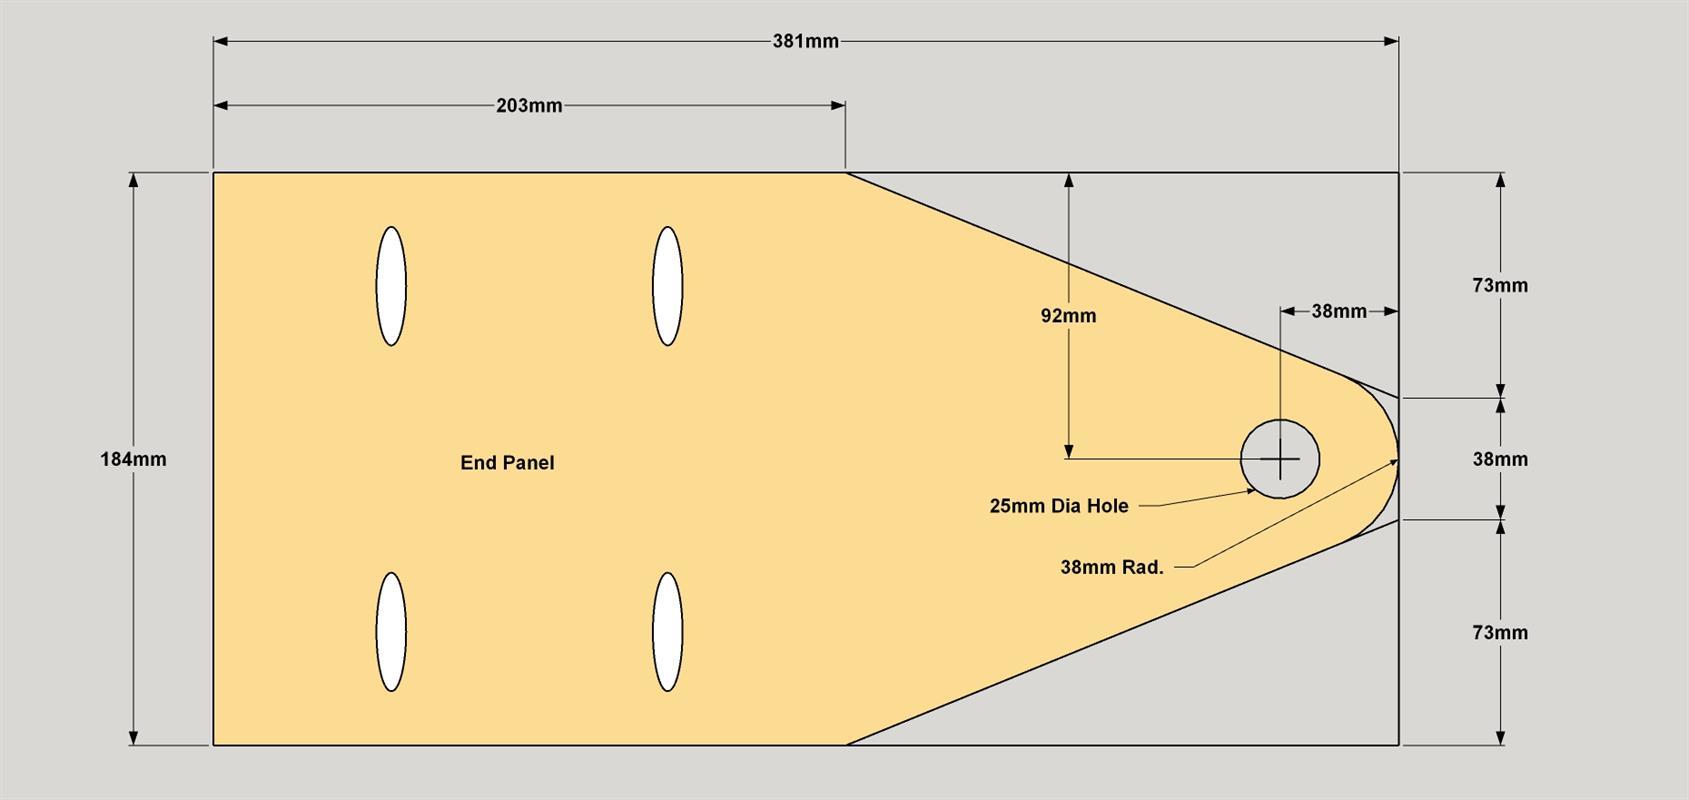
Shape the Box Ends
Tape the two box Ends together with painters tape, placing the tape toward one end. This way, you can do all of the shaping to both pieces at once so they will match. Mark out the location of the Handle hole and the side tapers. First, cut the tapers with a jigsaw, and then sand the two edges smooth. Apply additional tape around the top ends, clamp them to a scrap board on your work surface, and then drill the hole for he handle through both pieces. Remove the tape and drill four pocket holes on each Box End where shown.
-
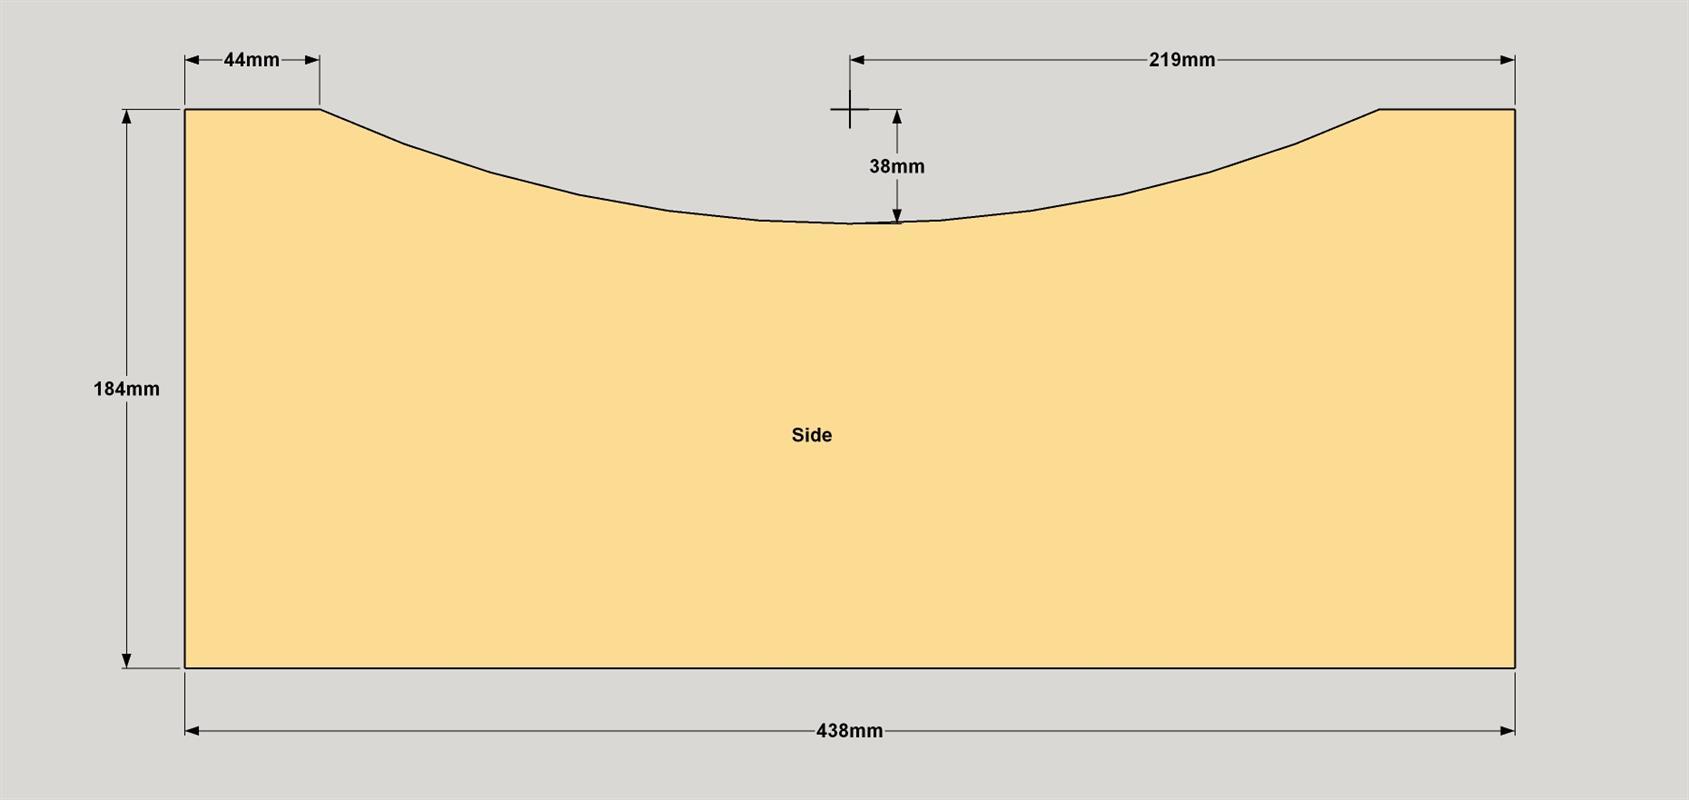
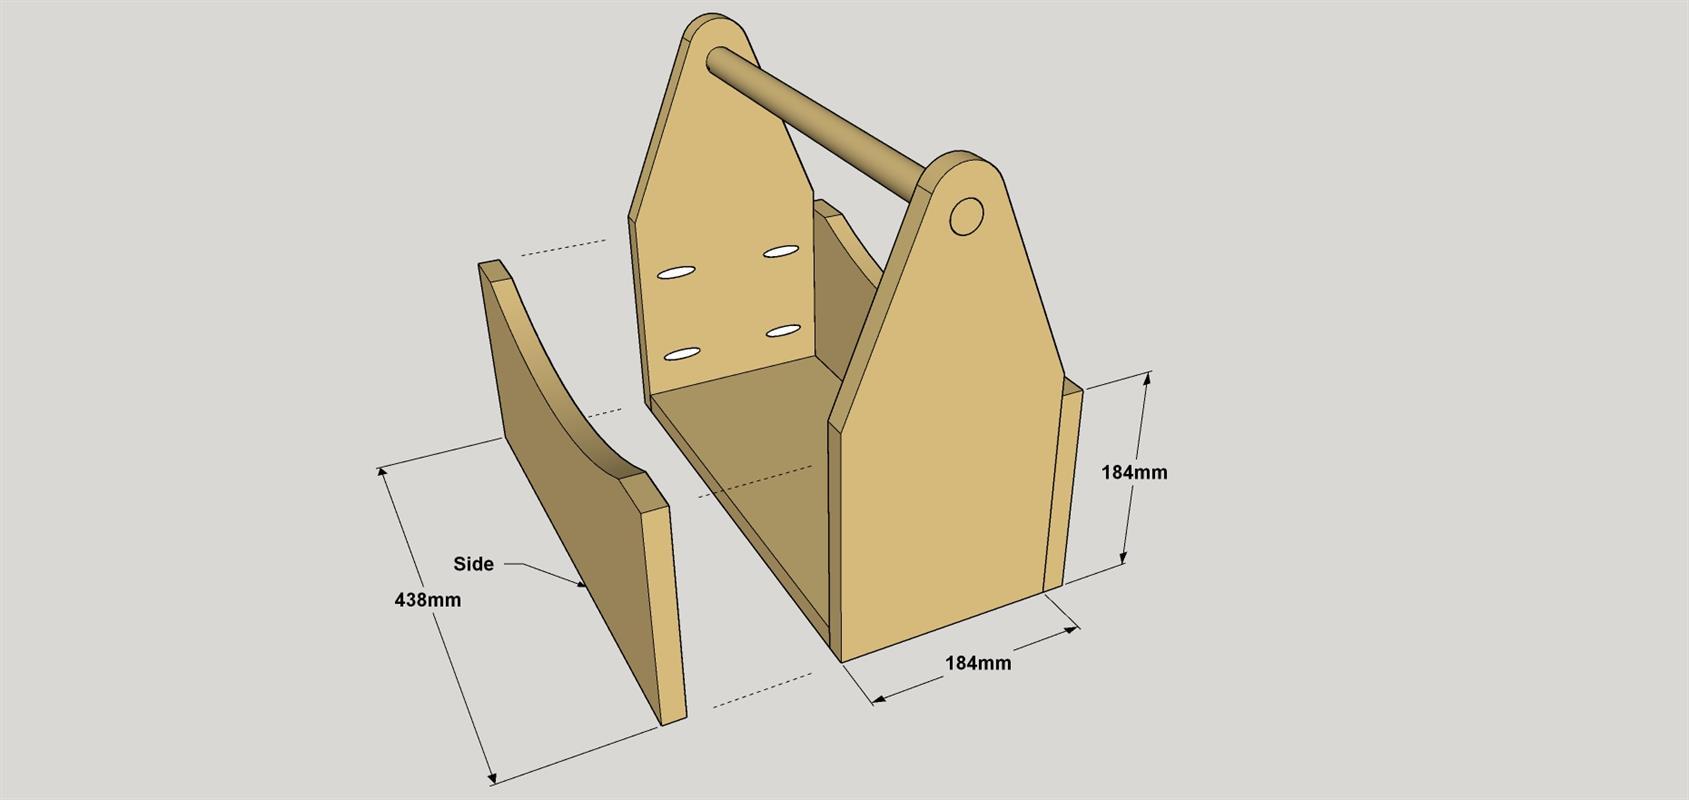
Shape the Box Sides
Tape the two Box Sides together with painters tape and lay out the curve lines as shown. Clamp the Box Sides to a work surface and cut the curves with a jigsaw. Sand the edges smooth then remove the tape to separate the two sides.
-
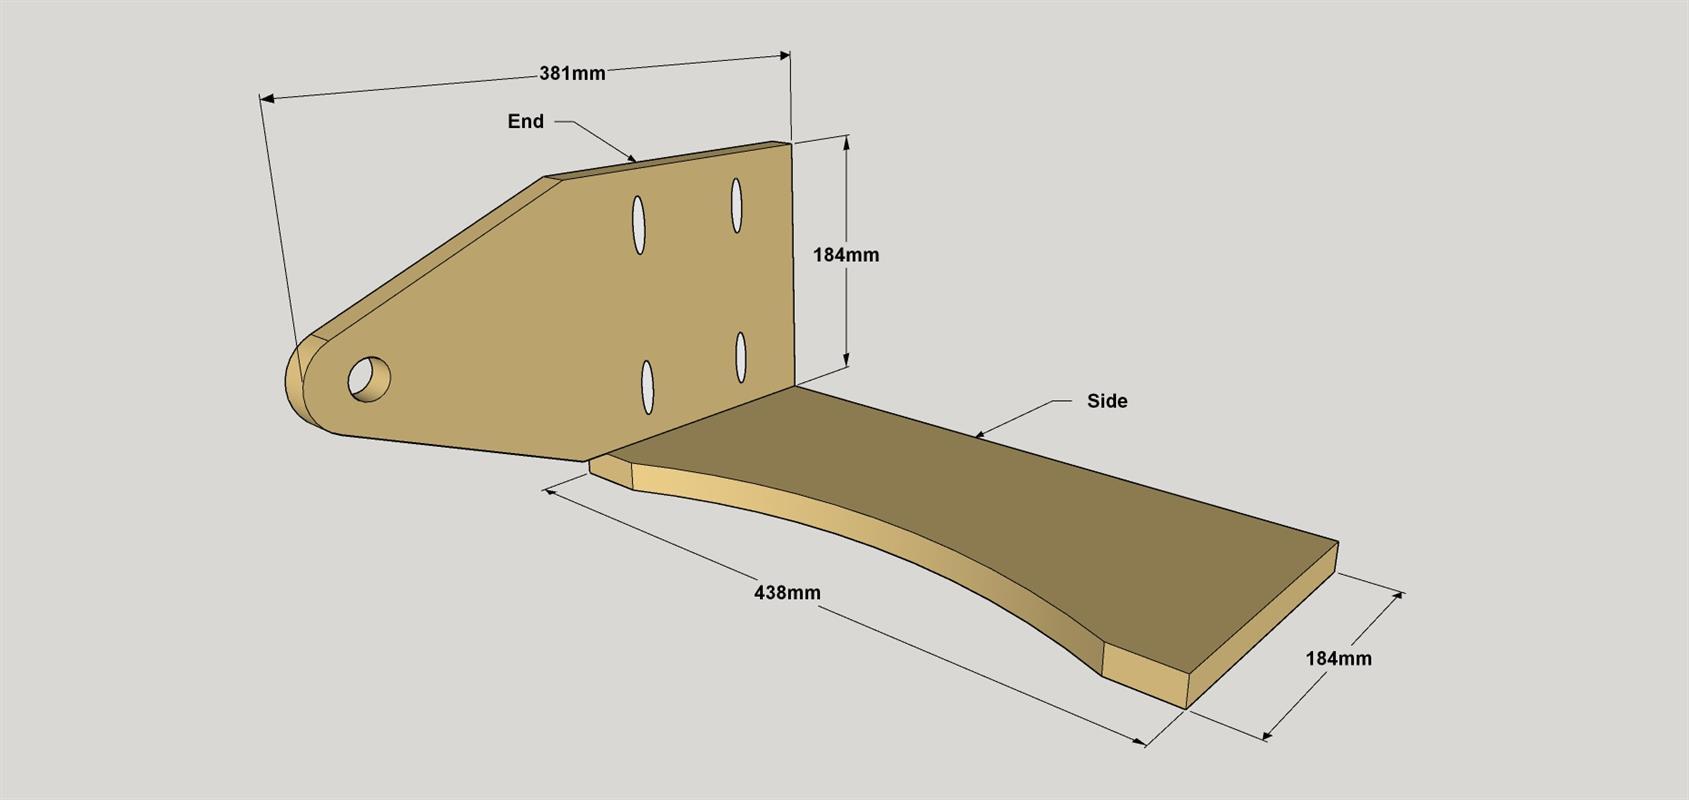
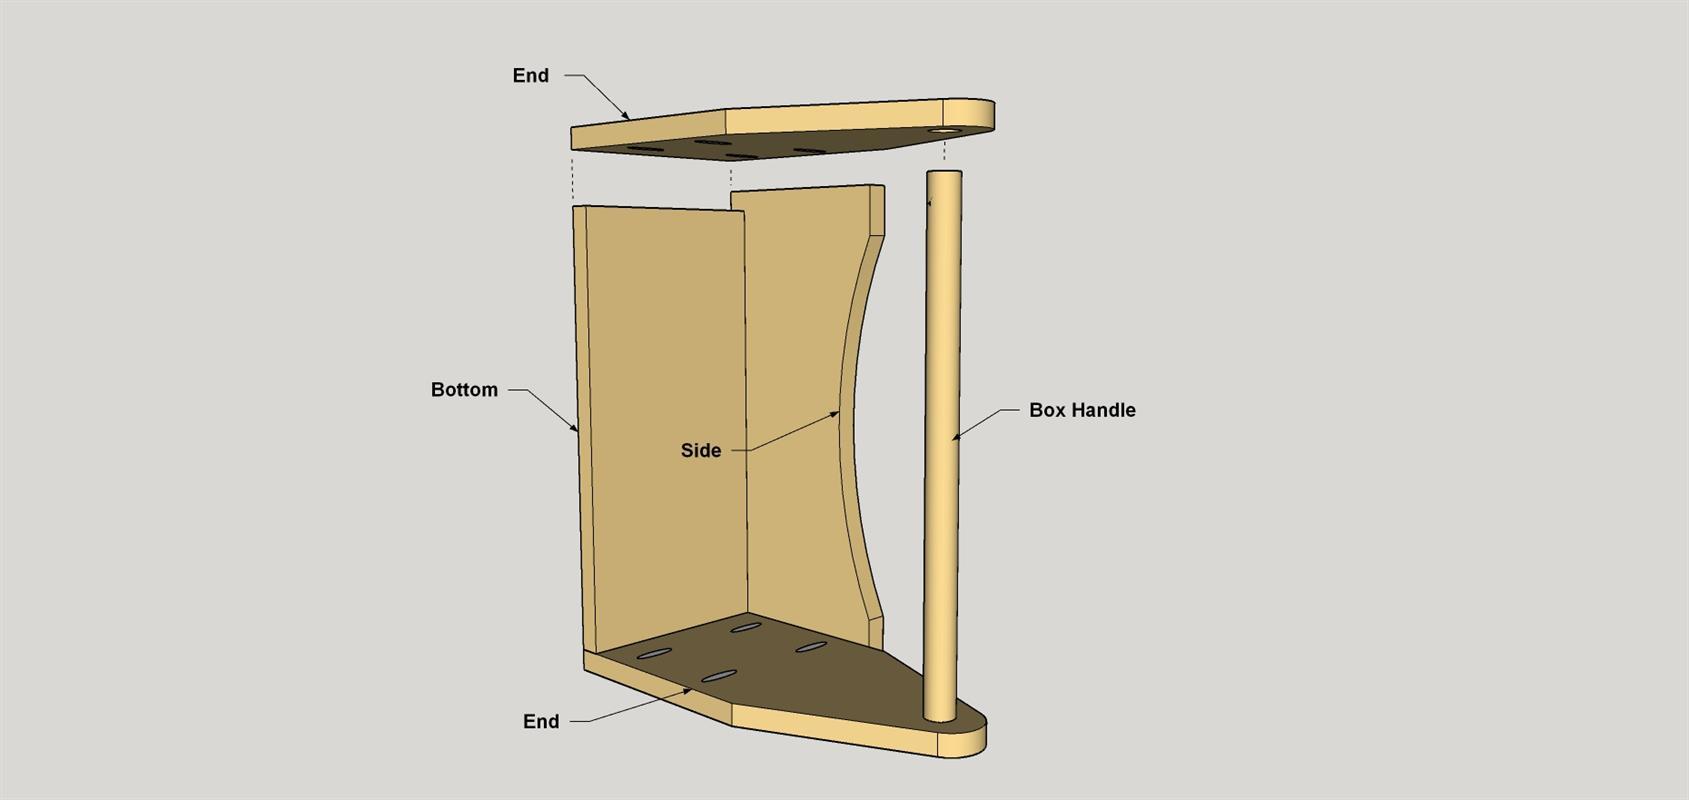
Start Box Assembly
Start assembling the box by attaching one Box Side to one box End with 32mm coarse-thread pocket-hole screws as shown. Make sure the End is flush with the Side end and bottom.
-
Add the Bottom
Attach the Box Bottom to the Box Side/Box End assembly you just created by using 32mm coarse-threaded pocket-hole screws, as shown.
-
Attach the Handle and Second End
Apply some glue to the Handle hole in the Box End on your assembly, and then tap the Box Handle in place. Next, apply glue to the hole in the unattached Box End and Tap this End onto he handle. Then align this Box End to the box assembly and secure it with 32mm coarse-threaded pocket screws.
-
Add the Second Side
Attach the last Side to the two Ends with 32mm course-threaded pocket screws. For this you’ll need a right-angle drill attachment and a shorter (76mm-long) square-drive bit. See the Tip below.
-
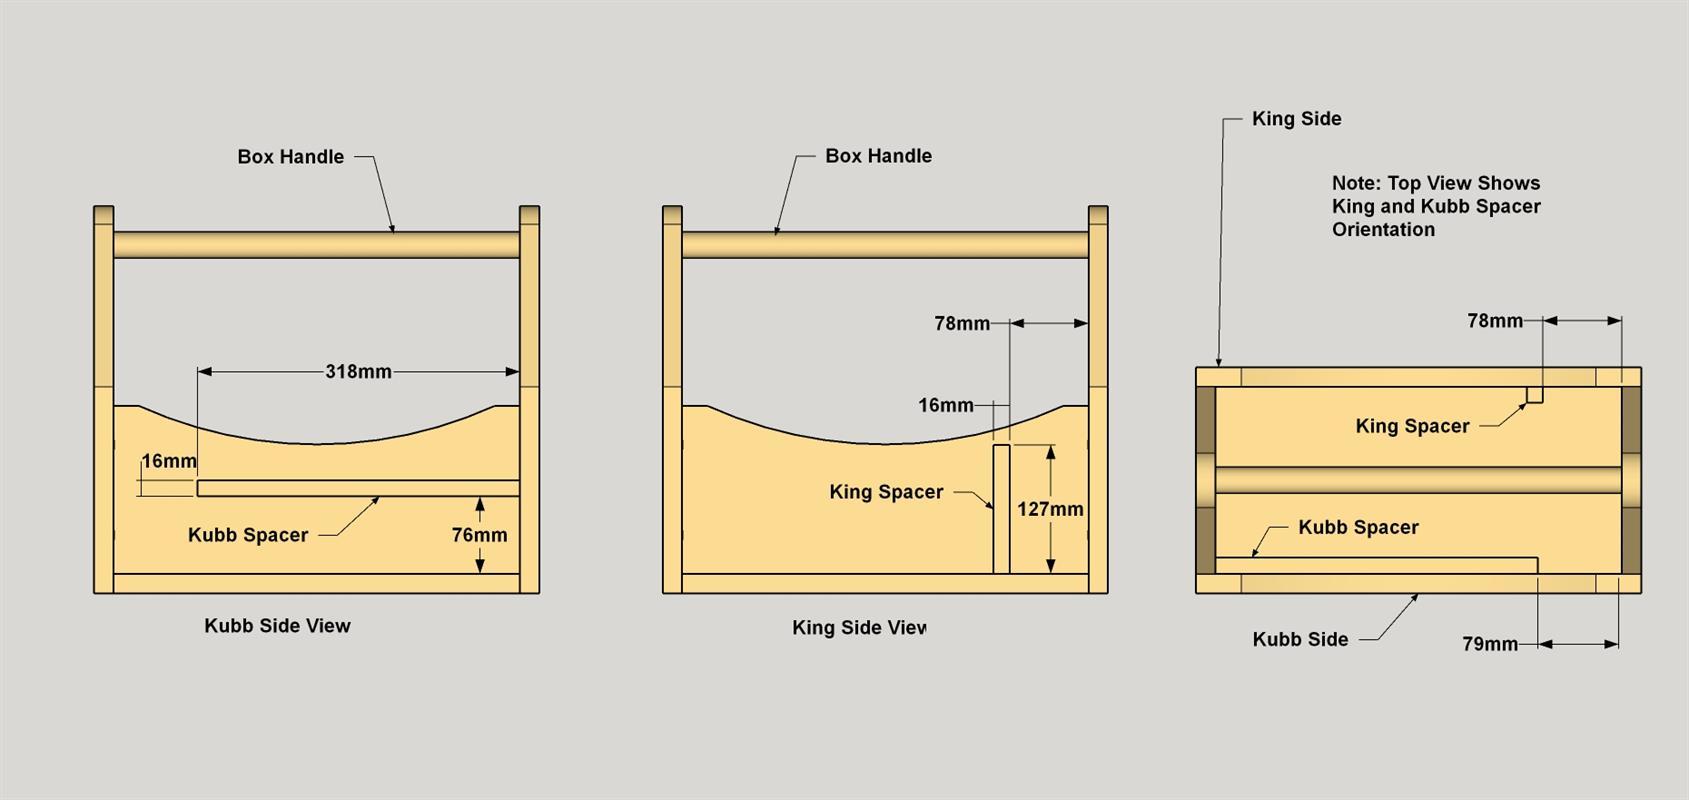
Add the King Spacer and Kubb Spacer
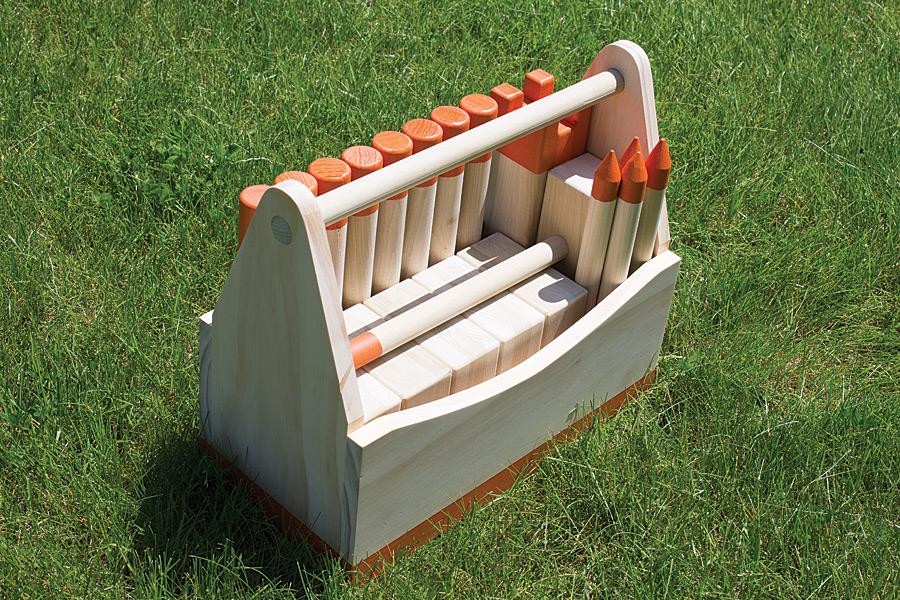
Now you can add the King Spacer and Kubb Spacer to the box. These simply help the pieces fit more tightly into the box to keep them from rattling around. Secure the Spacers to the inside of the box with glue at the locations shown. Clamp them in place (or use tape) until the glue dries.
-
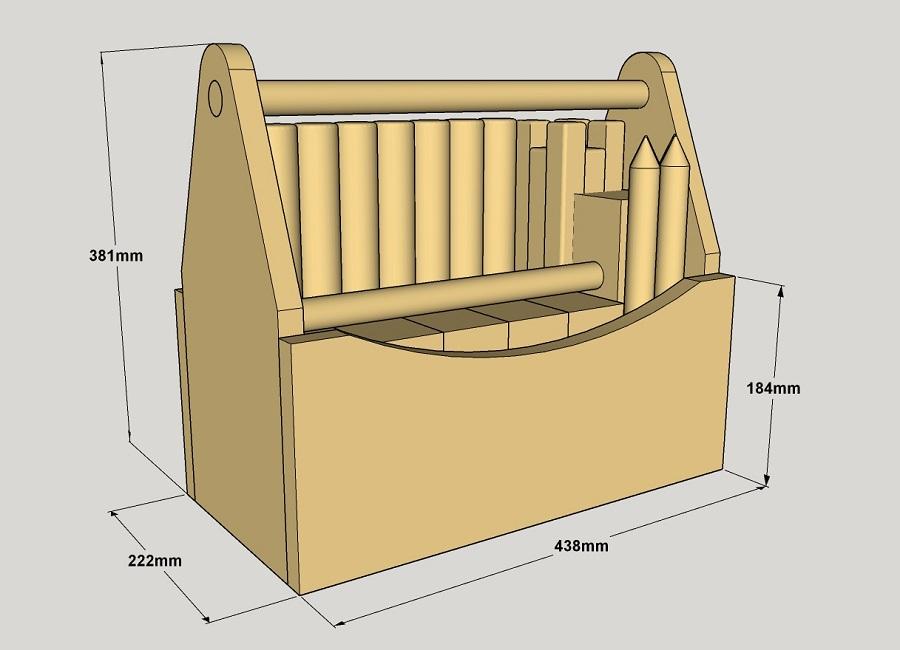
Finish Up and Learn To Play
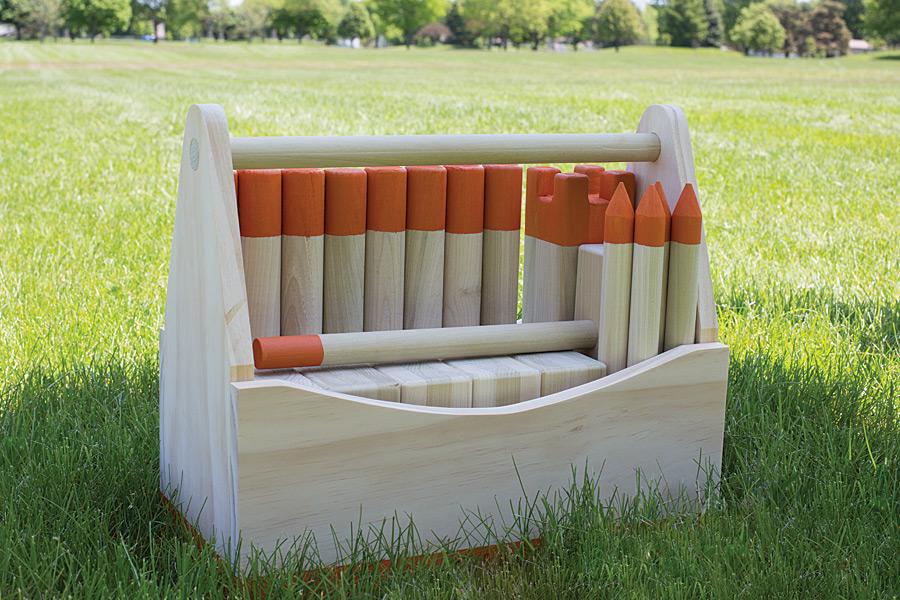
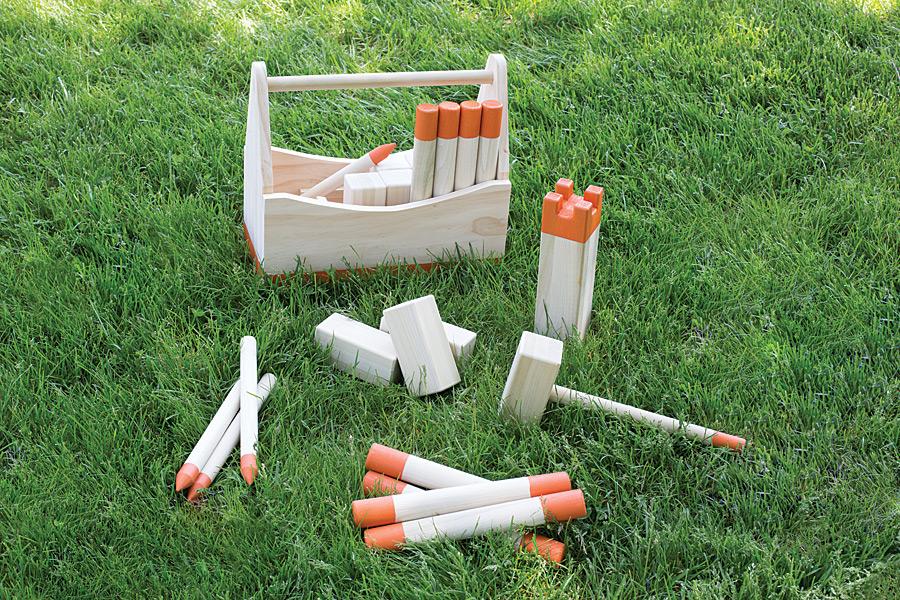
With all of the pieces done, you can sand as needed. Then finish your Kubb Game pieces as you’d like. We simply dipped the ends of some pieces in colorful paint. Once the paint dries, you can place them in the Box as shown. Then it’s time to learn the rules. You’ll find a couple of links for that by clicking on the “Extras” tab. After that, you’re ready to discover the fun of playing Kubb.