

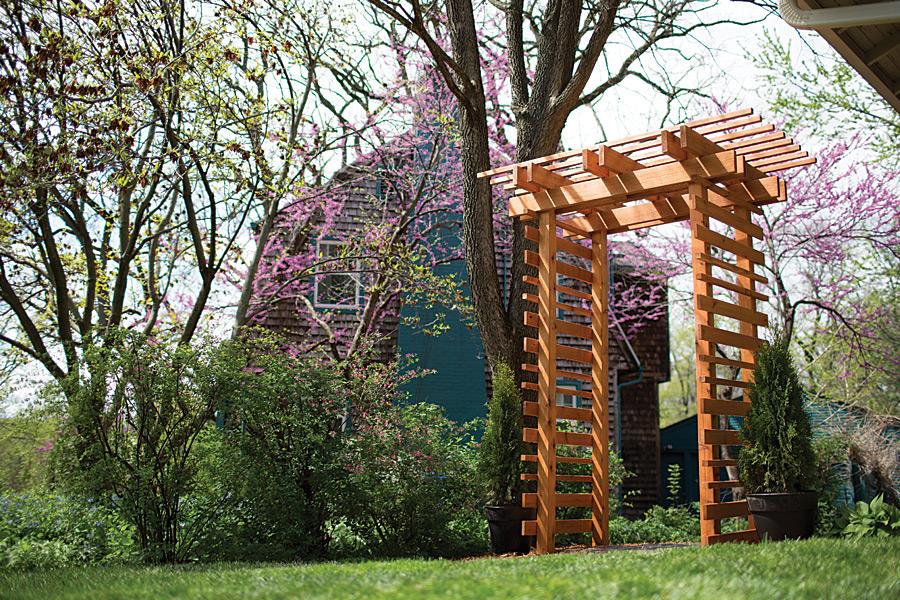
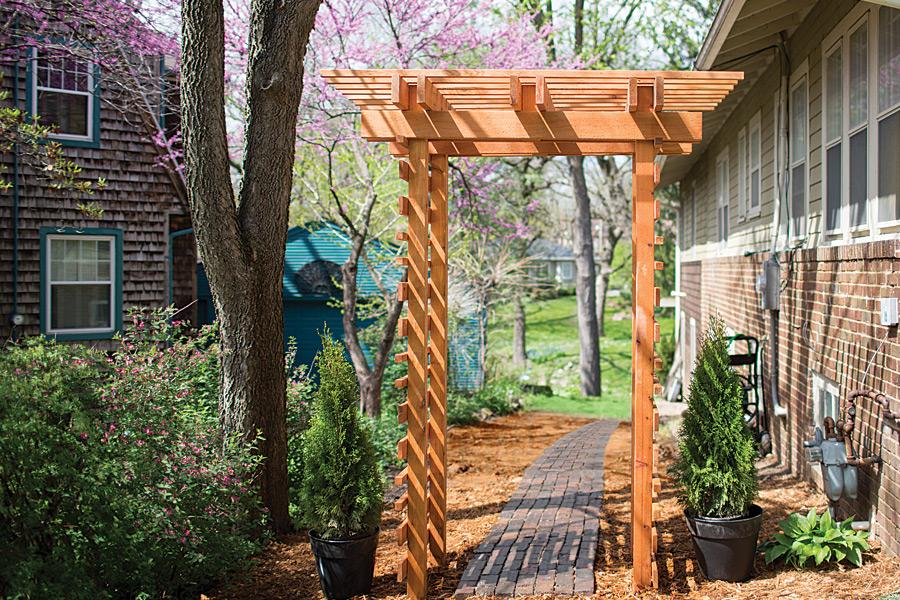


There’s something about an arbor that makes any outdoor space look warm and inviting. This arbor is built entirely from cedar by simply cutting boards to length, and then screwing them together. Home centers stock a good supply of cedar, though you may have to special-order the long 4×4 posts.
Tools
Other Tools
-
Miter Saw

-
Tape Measure
-
Drill (cordless)
-
Sander
Materials
Wood Products
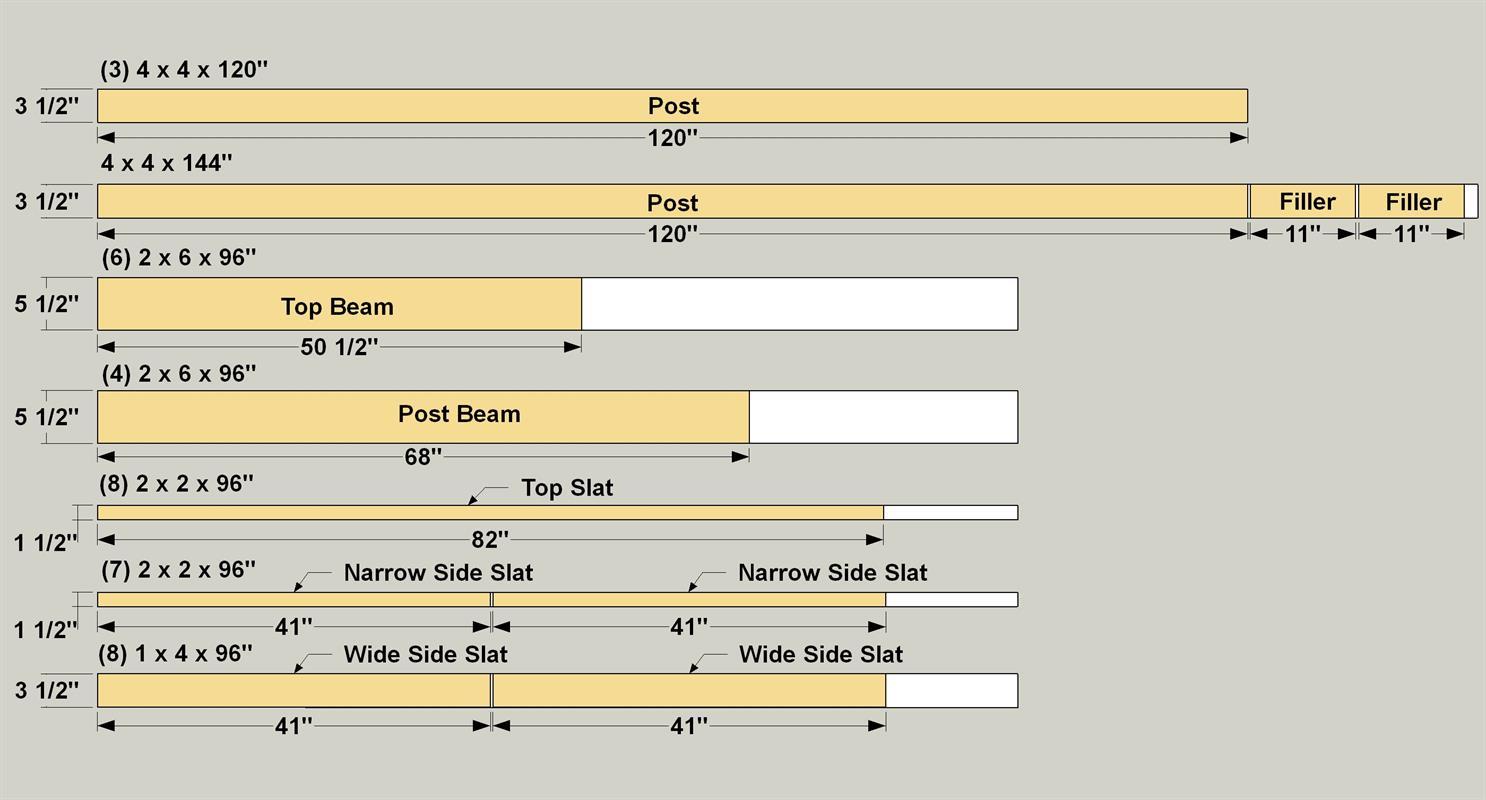
- 3 Board , 4x4 , 120"
- 1 Board , 4x4 , 144"
- 15 Board , 2x2 , 96"
- 8 Board , 1x4 , 96"
- 10 Board , 2x6 , 96"
Hardware & Supplies
- 232 #8 x 2 1/2" exterior trim-head woodscrews
- 71 1/4" x 3" exterior construction lag screw
- 1 Star-drive bit set (optional)
- 1 Exterior stain or wood finish
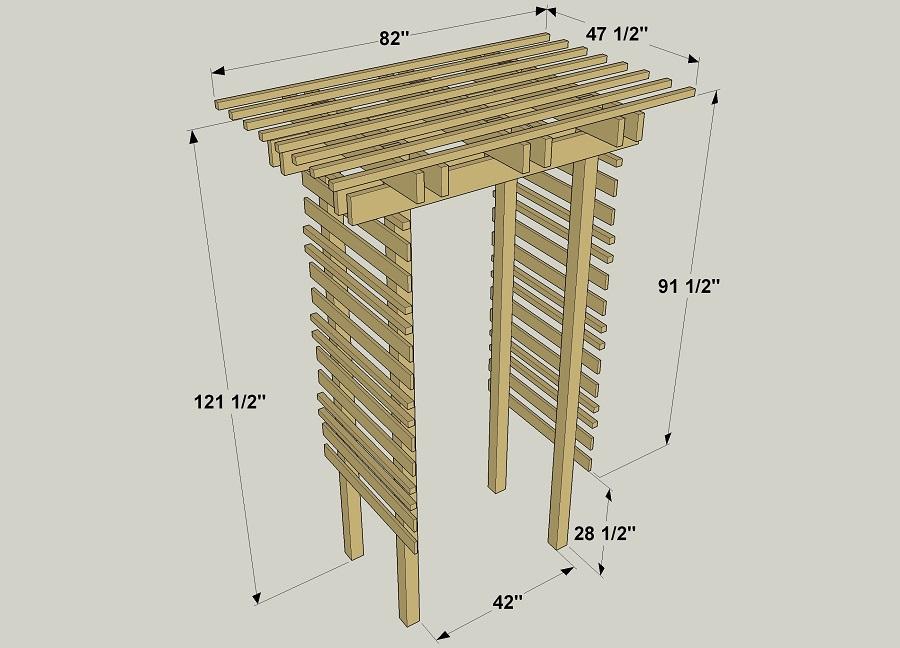
Cut List & Parts
- 4 Post , 3 1/2" x 3 1/2" x 120" cedar
- 2 Post Filler , 3 1/2" x 3 1/2" x 11" cedar
- 14 Narrow Side Slat , 1 1/2" x 1 1/2" x 41" cedar
- 16 Wide Side Slat , 3/4" x 3 1/2" x 41" cedar
- 8 Top Slat , 1 1/2" x 1 1/2" x 82" cedar
- 4 Post Beam , 1 1/2" x 5 1/2" x 68" cedar
- 6 Top Beam , 1 1/2" x 5 1/2" x 50 1/2" cedar
Directions
-
Cut the Posts
Cut four Posts to length from cedar 4x4s, as shown in the cutting diagram. Also cut two Filler Posts. The Filler Posts will be used later so set them aside for now.
-
Cut the Side Slats
Cut 14 Narrow Side Slats to length from 2x2 cedar boards, and cut 16 Wide Side Slats to length from 1x4 cedar boards, as shown in the cutting diagram.
-
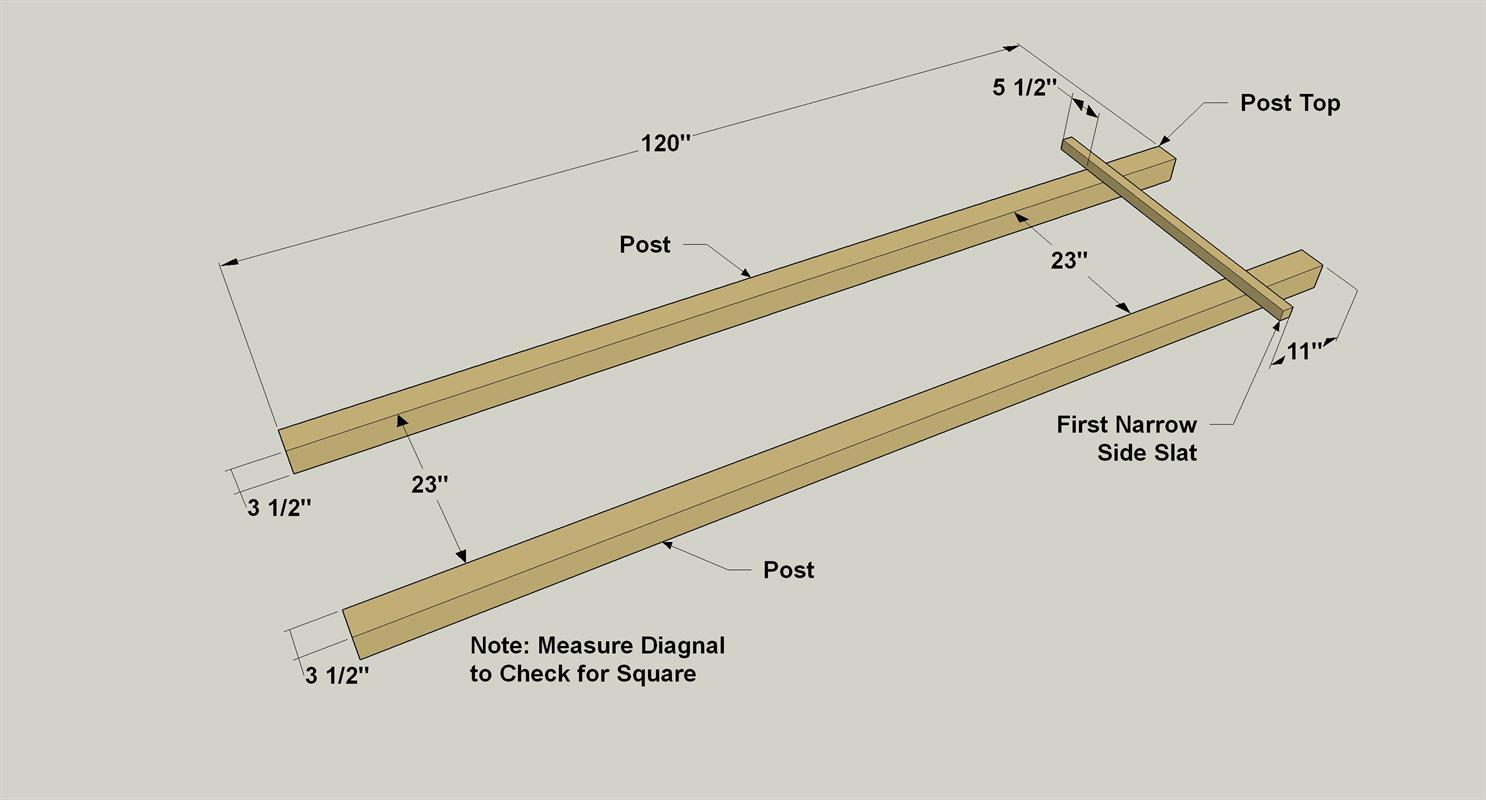
Lay Out the Side Panel
On a flat work surface, lay two Posts parallel to one another, making sure they are spaced 23" apart, as shown. Make sure the ends of the posts are aligned so you’ll end up with a square assembly. A great way to check is to measure from the top corner of one post to the bottom corner of the other. Then take the same measurement at the opposite corners. If the panel square, the dimensions will be equal. Measure from the top of each Post down 11" to locate where the highest Narrow Side Slat will be positioned. Place the first Narrow Side Slat so it overhangs each post equally, drill two pilot holes at each post, then secure the Narrow Side Slat to the Post with four 2 1/2" exterior trim-head screws (two screws at each Post location).
-
Complete the Side Panels
With the first Narrow Side Slat in place, set a scrap 1 x 4 spacer next to it, then place the first Wide Side Slat. Drill pilot holes and attach the Wide Slat to the Posts with eight 2 1/2" exterior trim screws (four at each Post location).
Repeat the pattern adding Narrow Side Slats and Wide Side Slats as shown. When the first panel is complete, assemble the second Panel in the same manner.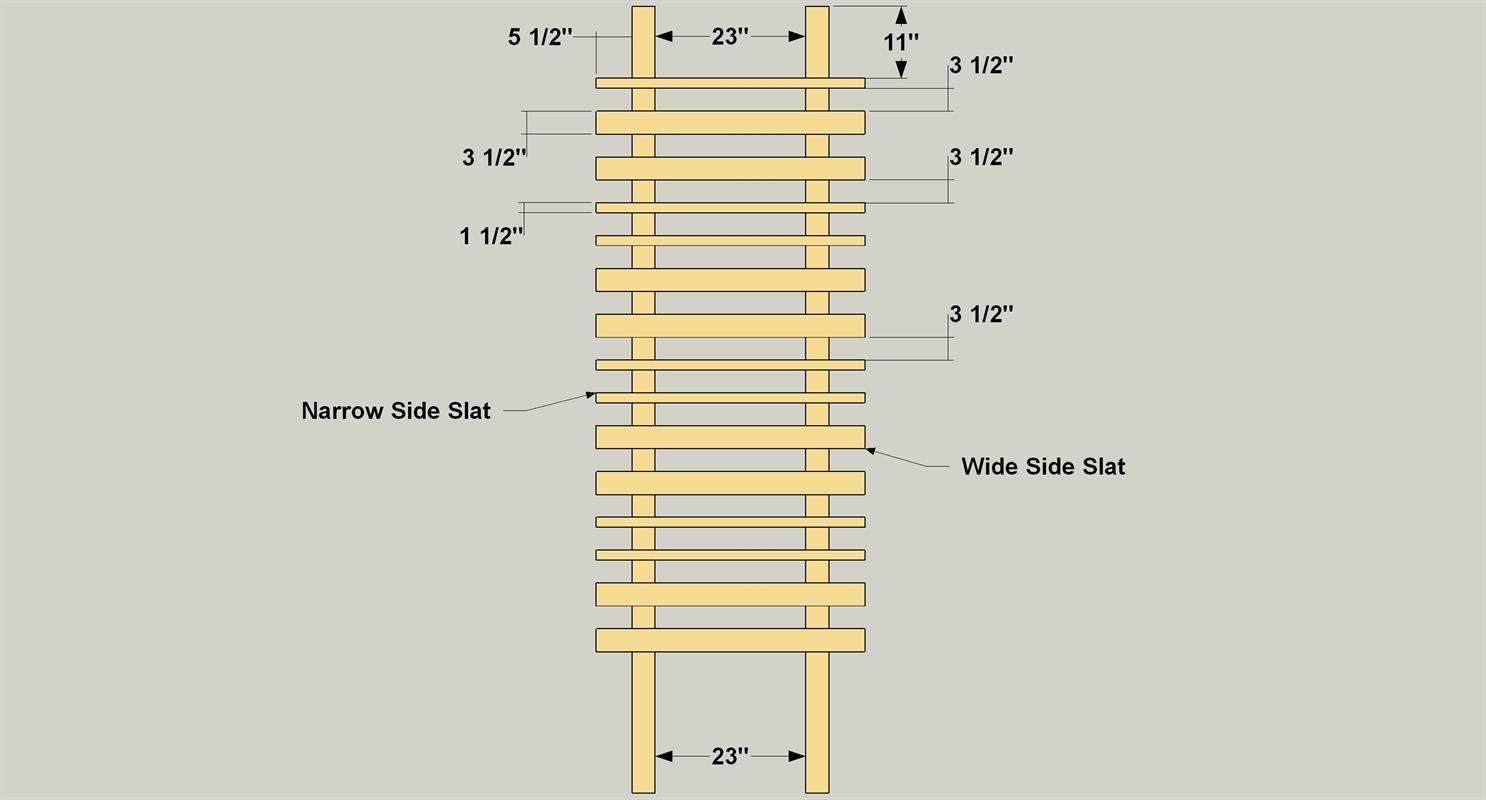
-
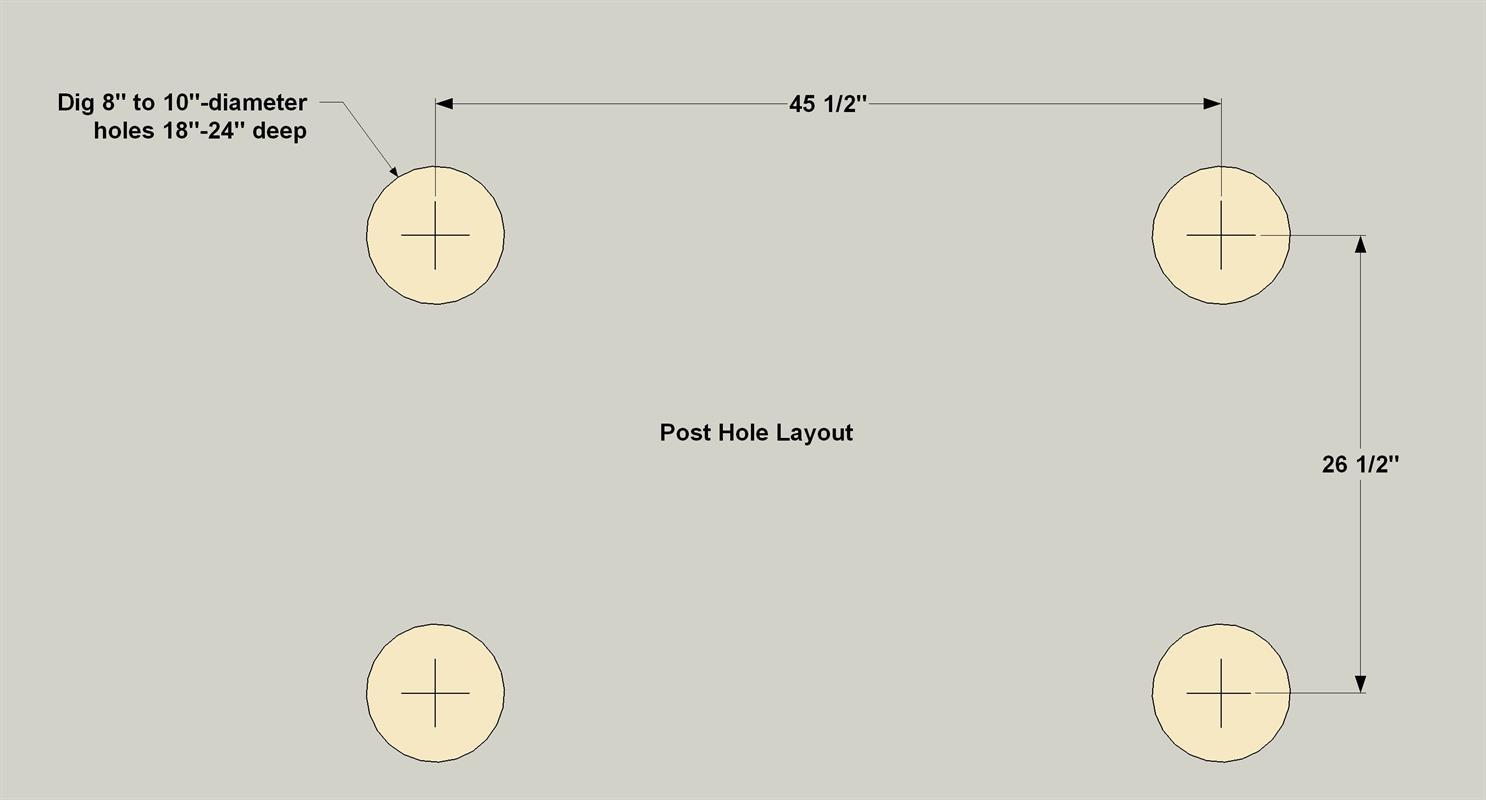
Dig the Holes and Set the Panels
Dig four posts holes in the configuration shown. Place a few inches of pea gravel or rock in the bottom of each hole for drainage, then set one of the panels into a pair of the holes. Check for level, plum, and depth, then add or remove rock accordingly. When the panel is set in position, temporarily secure it in place with some scrap bracing. Set the second panel in the same manner. You’ll need to make sure this panel is level and plumb, as well. But you also need to make sure this panel sits at the same height as the other panel. Brace this side panel once its position is set.
-
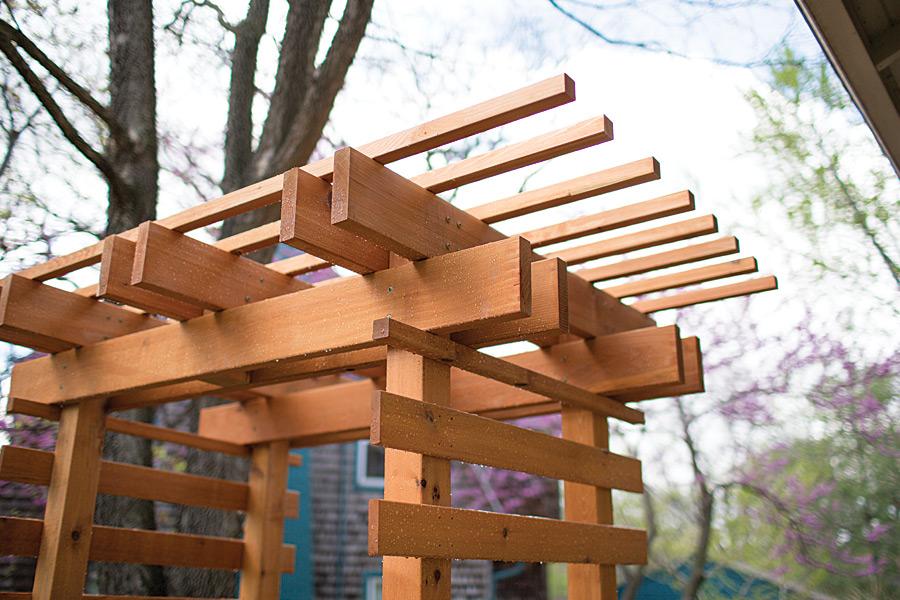
Cut the Beams
Cut four Post Beams and six Top Beams to length from 2x6 cedar boards, as shown in the cutting diagram. With the Panels set level and plum, it’s time to connect them with the Post Beams. Start by taking a look at the Beam Layout to see how each of the beams overhangs the posts and one another.
-
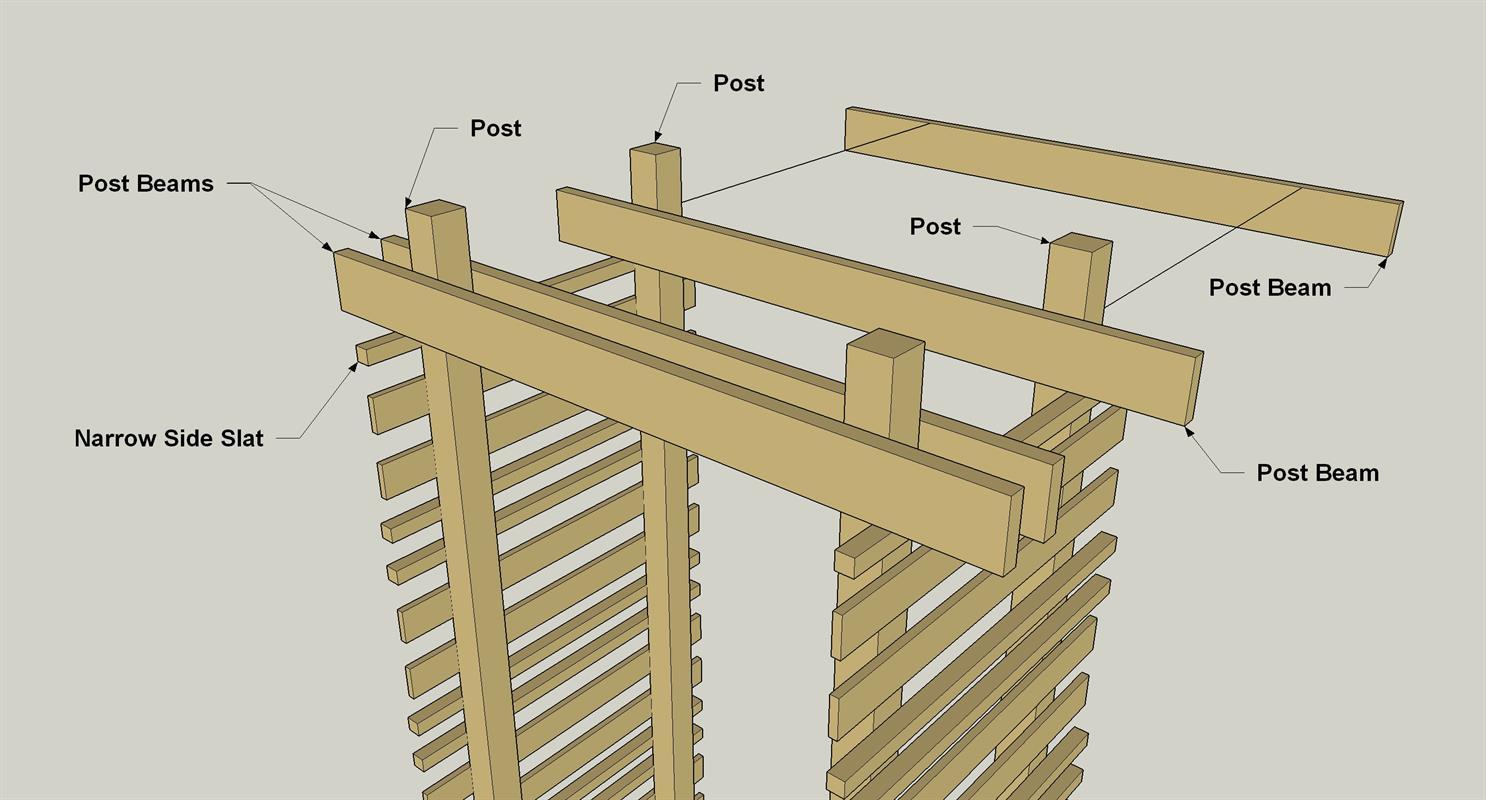
Attach the Post Beams
Start Assembly with the first outside Post Beam and set it directly on top of the Narrow Side Slats. Make sure the Beam overhangs each side panel equally, and then clamp it in place. Drill four pilot holes, and secure the Beam with eight 1/4" x 3" exterior construction lag screws. Set the other three Post Beams the same way. Now that the two side panels connected with the Post Beams, double check level and plum, then backfill the post holes with rock, or with concrete for a more permanent anchor.
-
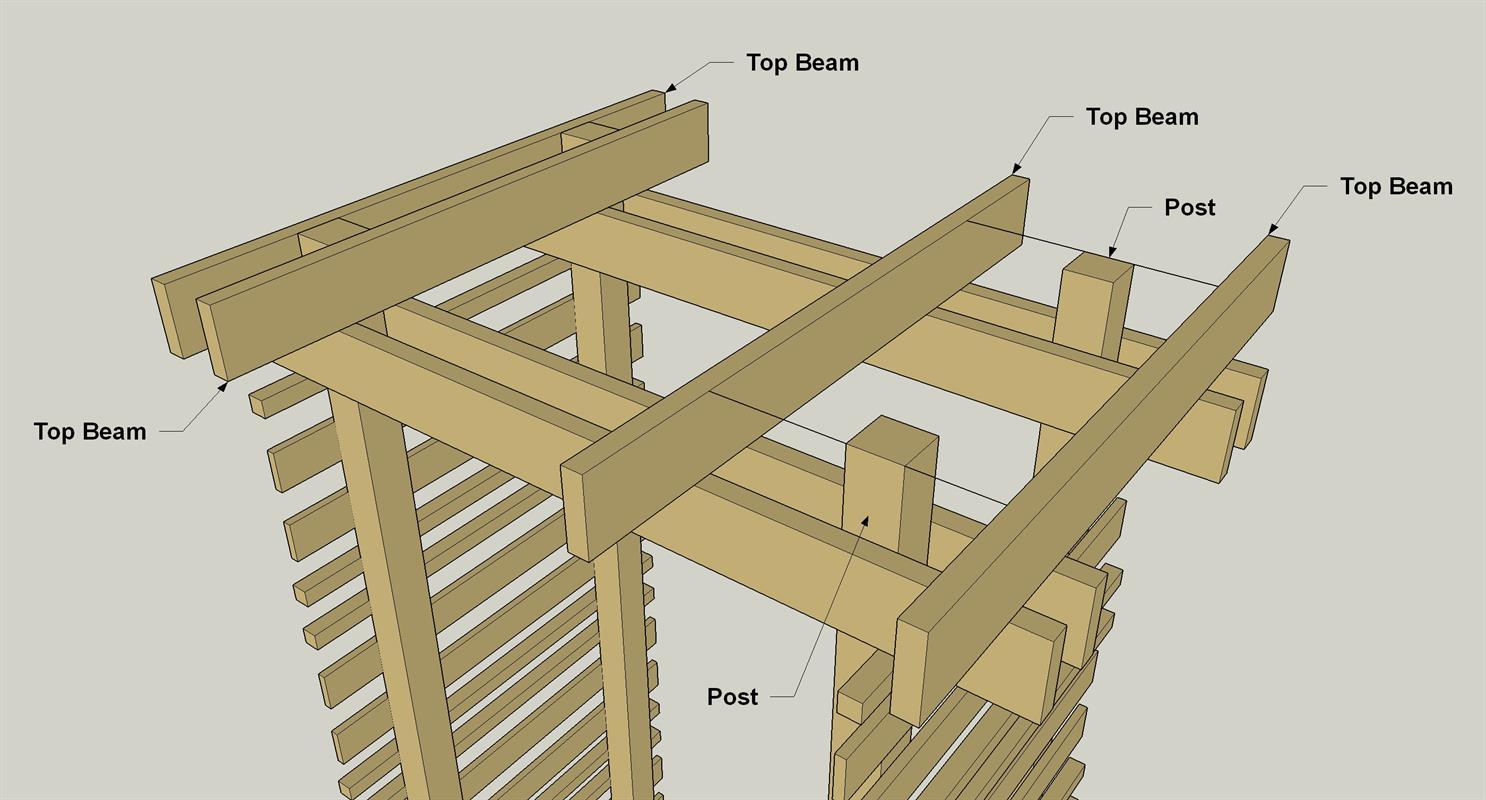
Add the Four Outer Top Beams
Now, set the first Top Beam on the top of the Post Beams and on the outside of the Post. Again, make sure the Beam overhangs equally on each side of the Posts. Drill four pilot holes for each Post and secure with 1/4" x 3" exterior construction lag screws. Set the other three outside Top Beams the same way.
-
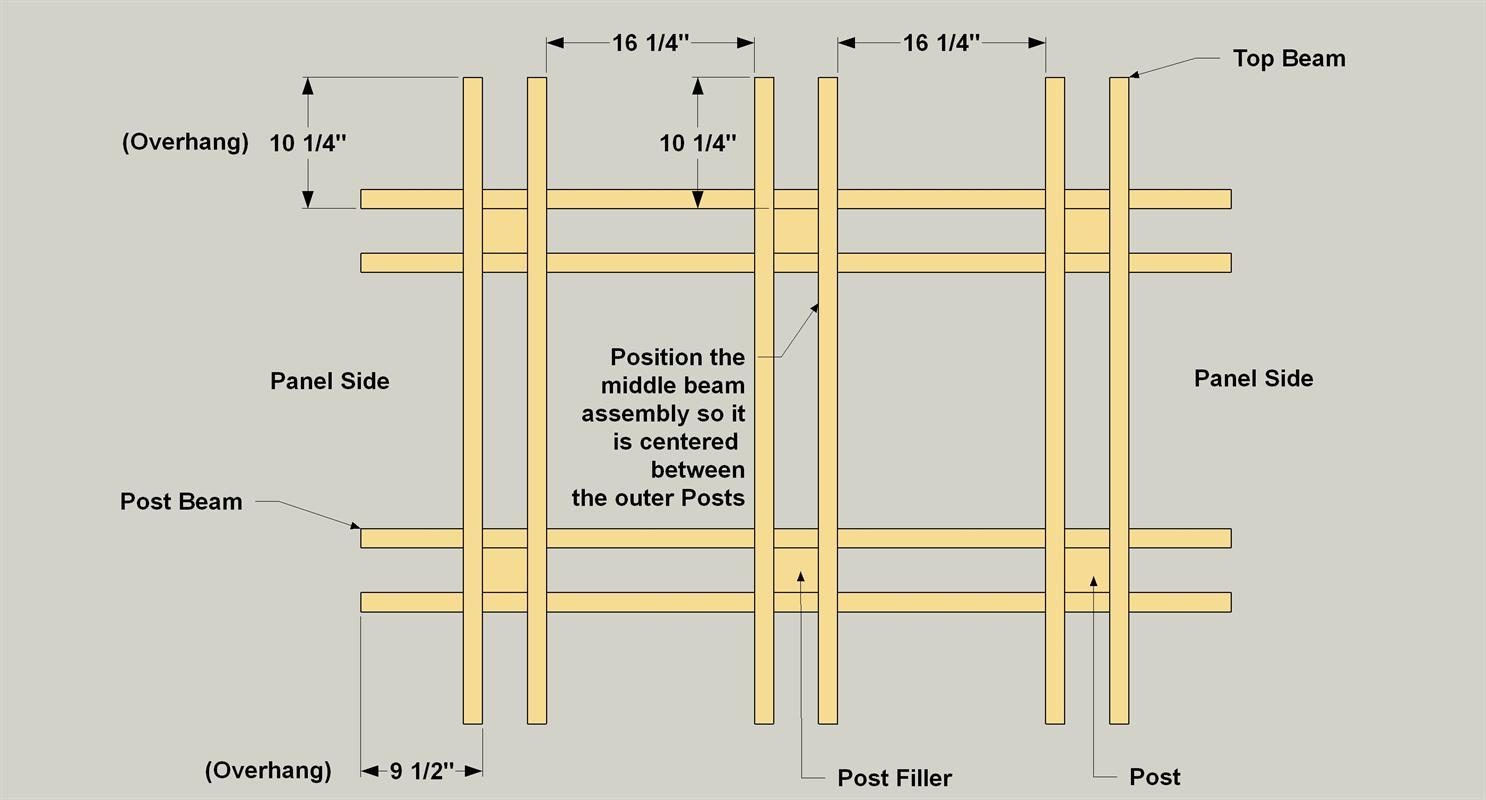
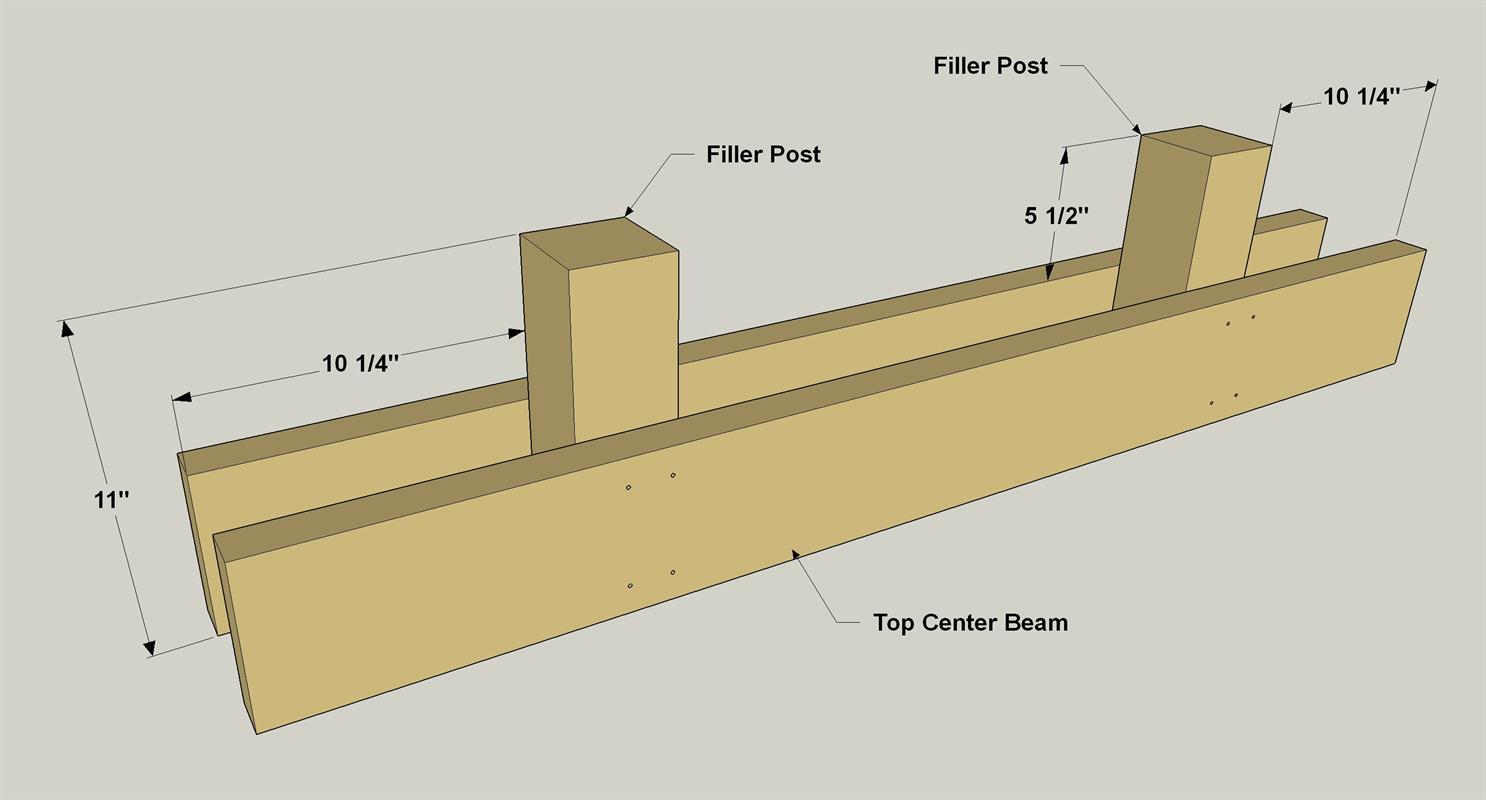
Create the Middle Beam Assembly
On a flat work surface, attach the last two Top Beams to the Filler Posts with 16 - 1/4" x 3" exterior construction lag screws, as shown. Then position the middle beam assembly so it is centered on the arbor. Secure the Filler Posts to the Post Beams with 16 - 1/4" x 3" exterior construction lag screws.
-
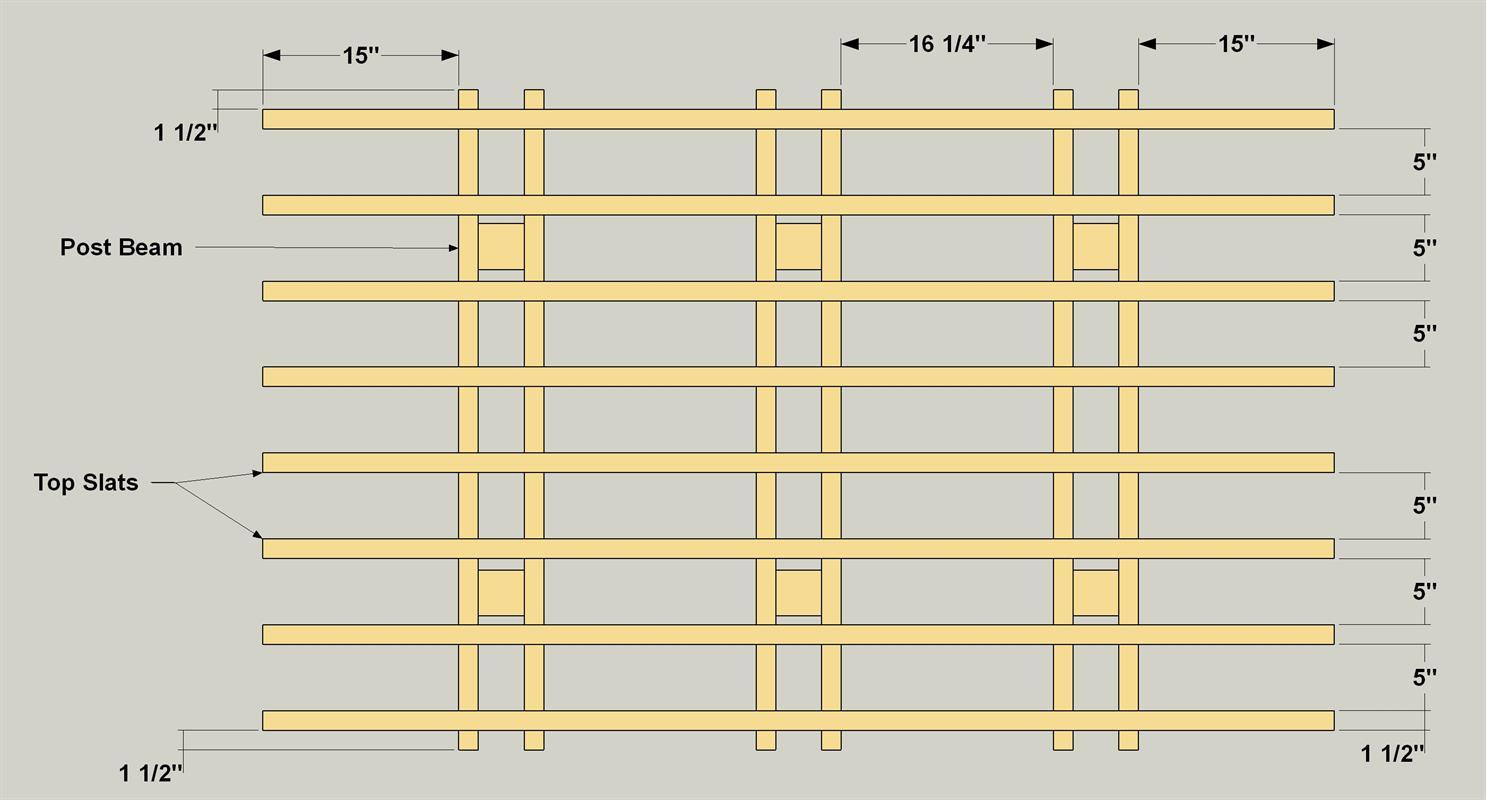
Cut and Attach the Top Slats
Cut eight Top Slats from 2 x 2 boards, as shown in the cutting diagram. Position the first Top Slat 1 1/2" inset from the end of the Post Beams, and then secure this Top Slat to the Top Beams with six 2 1/2" exterior trim screws. Set the rest of the Top Slats spaced equally and secure them to the Post Beams in the same manner.
-
Apply a Stain
Apply an exterior stain of your choice—we used a “natural redwood” deck stain. Or, if you like the weathered gray look of cedar, just leave the wood bare. It will change to the weathered color over a couple of years.