

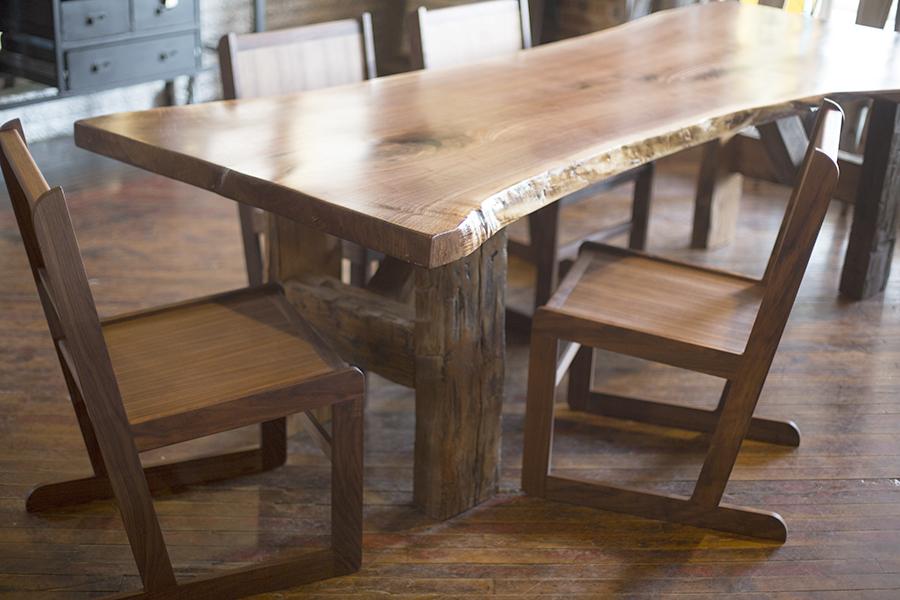
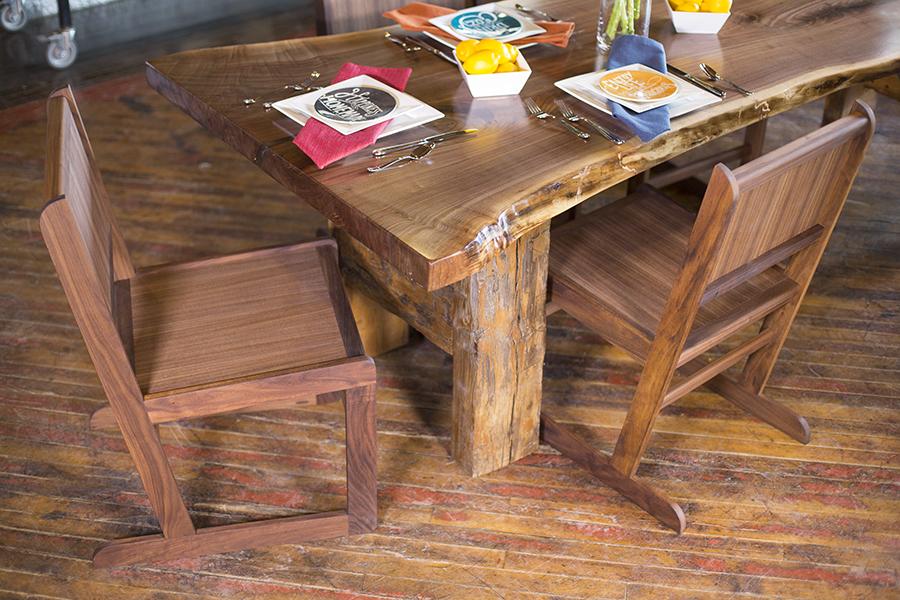
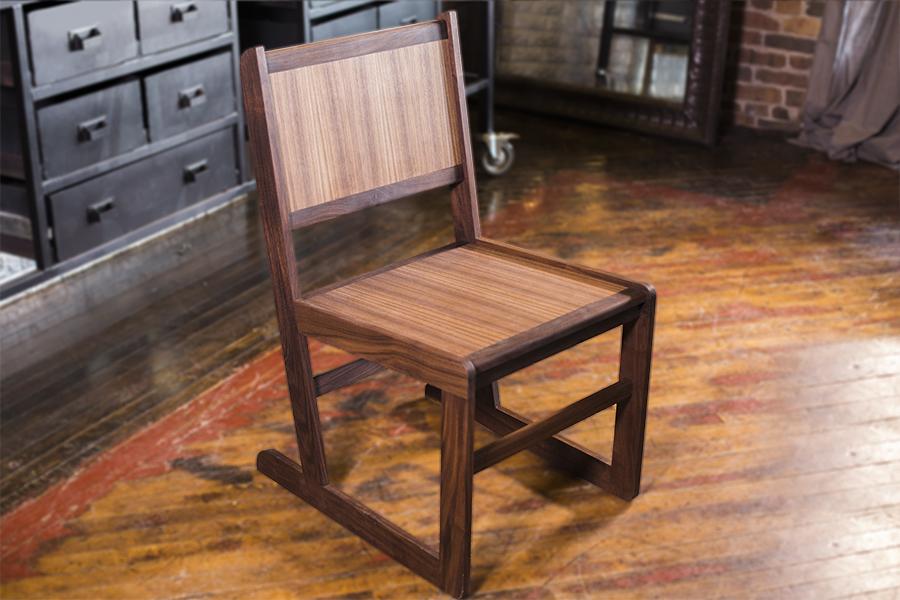


These dining room chairs are surprisingly easy to build. They’re made from dimensional boards—walnut in our case—that get cut with a miter saw. The panels are birch plywood covered in veneer. You could use poplar boards, forego the veneer, and stain or paint the chairs to simplify them, if desired.
Tools
Kreg Tools


Other Tools
-
Jigsaw

-
Miter Saw
-
Square
-
Tape Measure
-
Utility Knife
-
Drill (cordless)
-
Router
-
Sander
-
Veneer Scraper (optional)
-
Shop Vacuum
Materials
Wood Products
- 1 Plywood , 3/4" Thick , Quarter Sheet
- 2 Board , 1x3 , 96"
- 2 Board , 1x2 , 96"
- 1 Self-Adhesive Veneer (optional) , 3-Mil thick , 24" x 48"
Hardware & Supplies
- 60 1 1/4" pocket hole screws
- 24 Wood pocket hole plugs
- 1 3/8" roundover router bit
- 1 Wood glue
- 1 Quart Tried & True Varnish Oil
Cut List & Parts
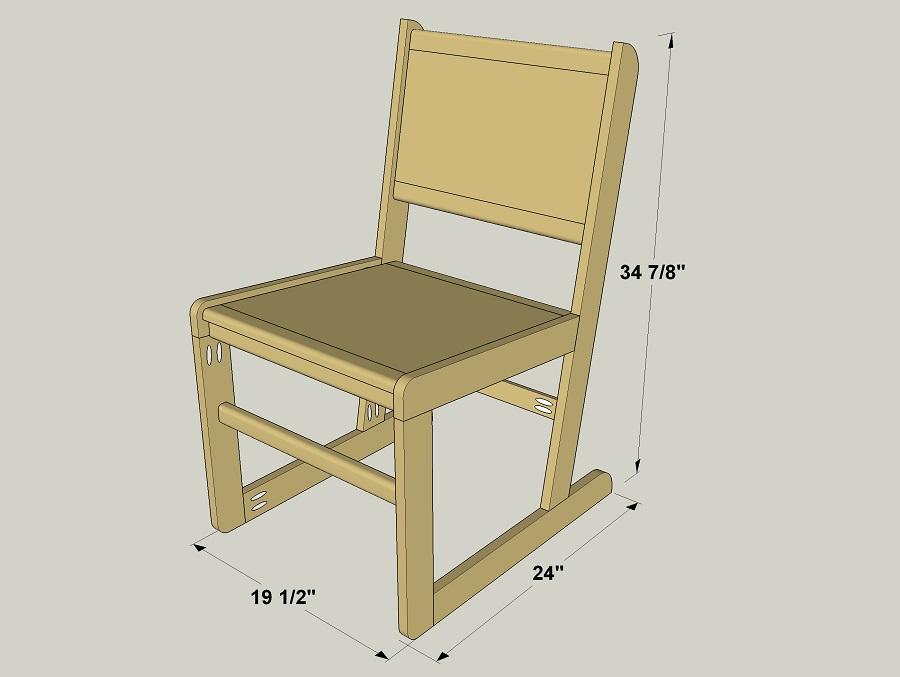
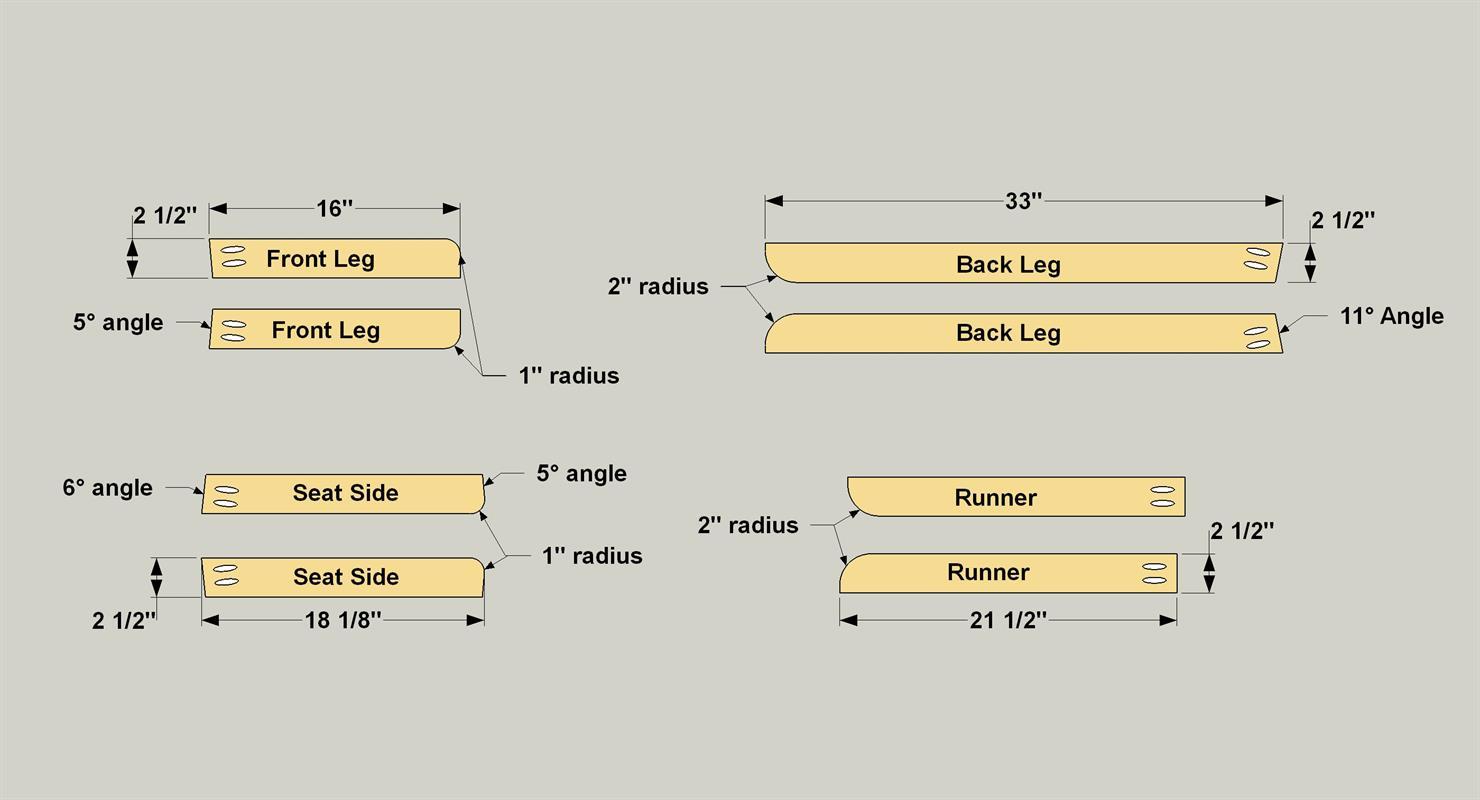
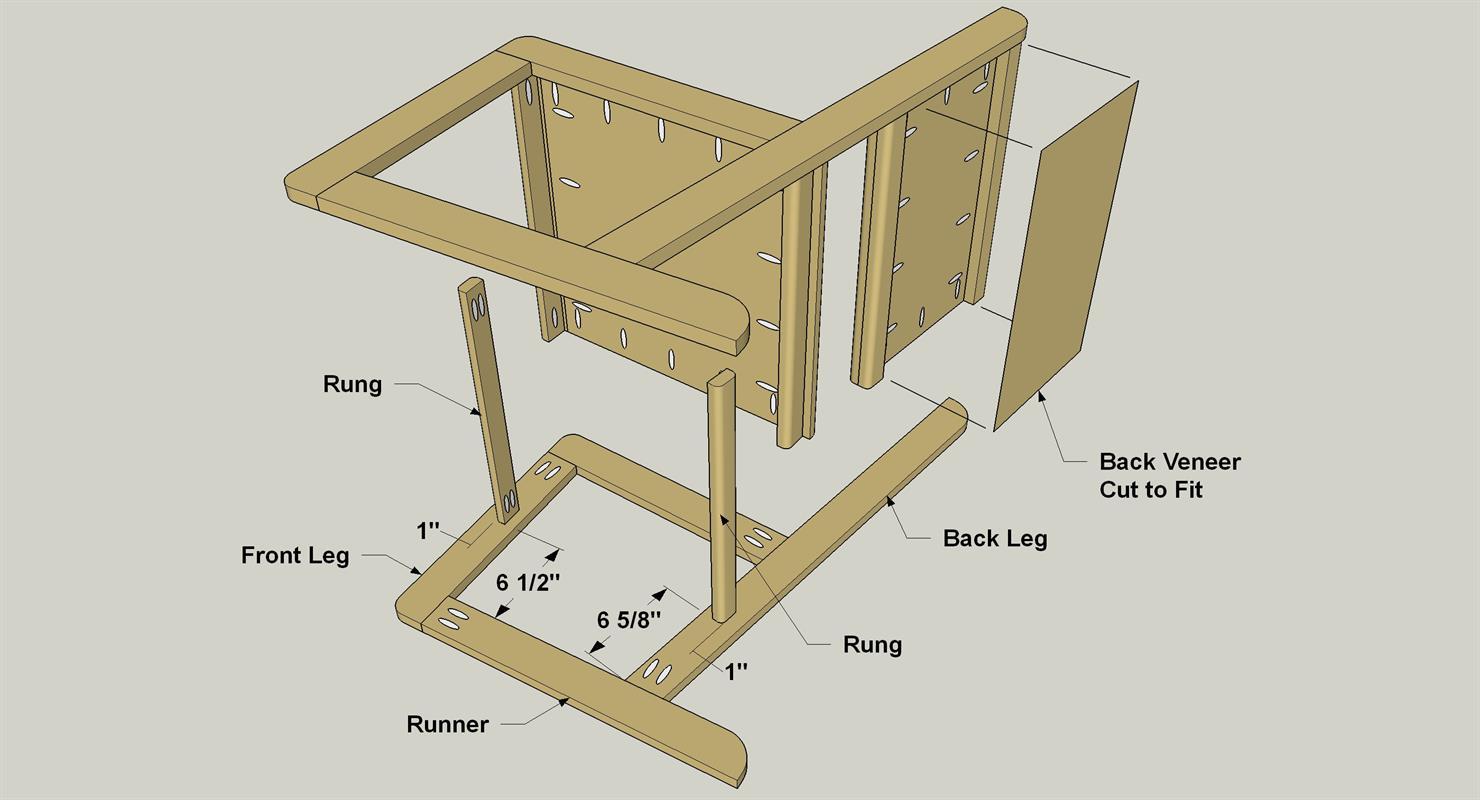
- 2 Runner , 3/4" x 2 1/2" x 21 1/2"
- 2 Front Leg , 3/4" x 2 1/2" x 16"
- 2 Seat Side , 3/4" x 2 1/2" x 18 1/8"
- 2 Back Leg , 3/4" x 2 1/2" x 33"
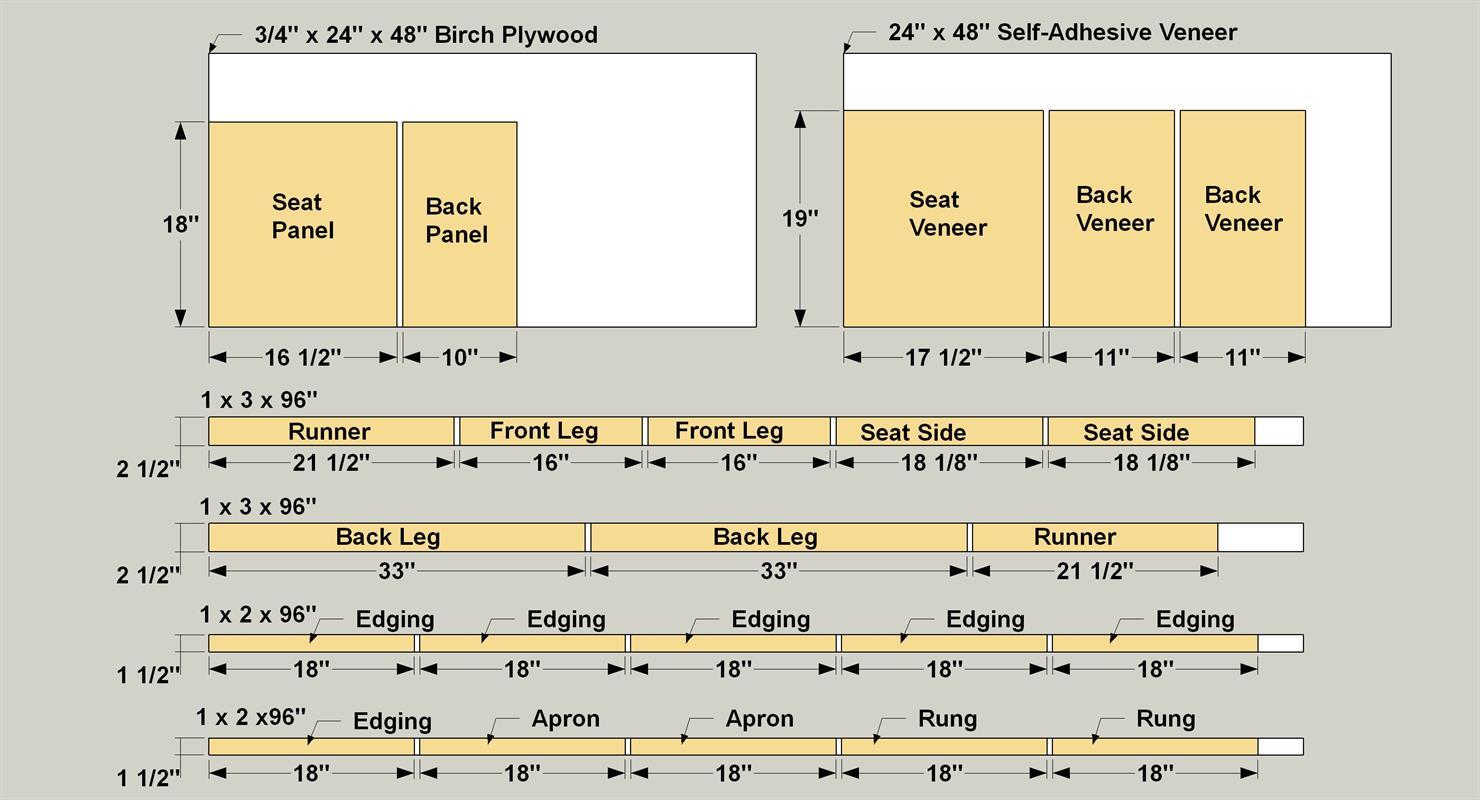
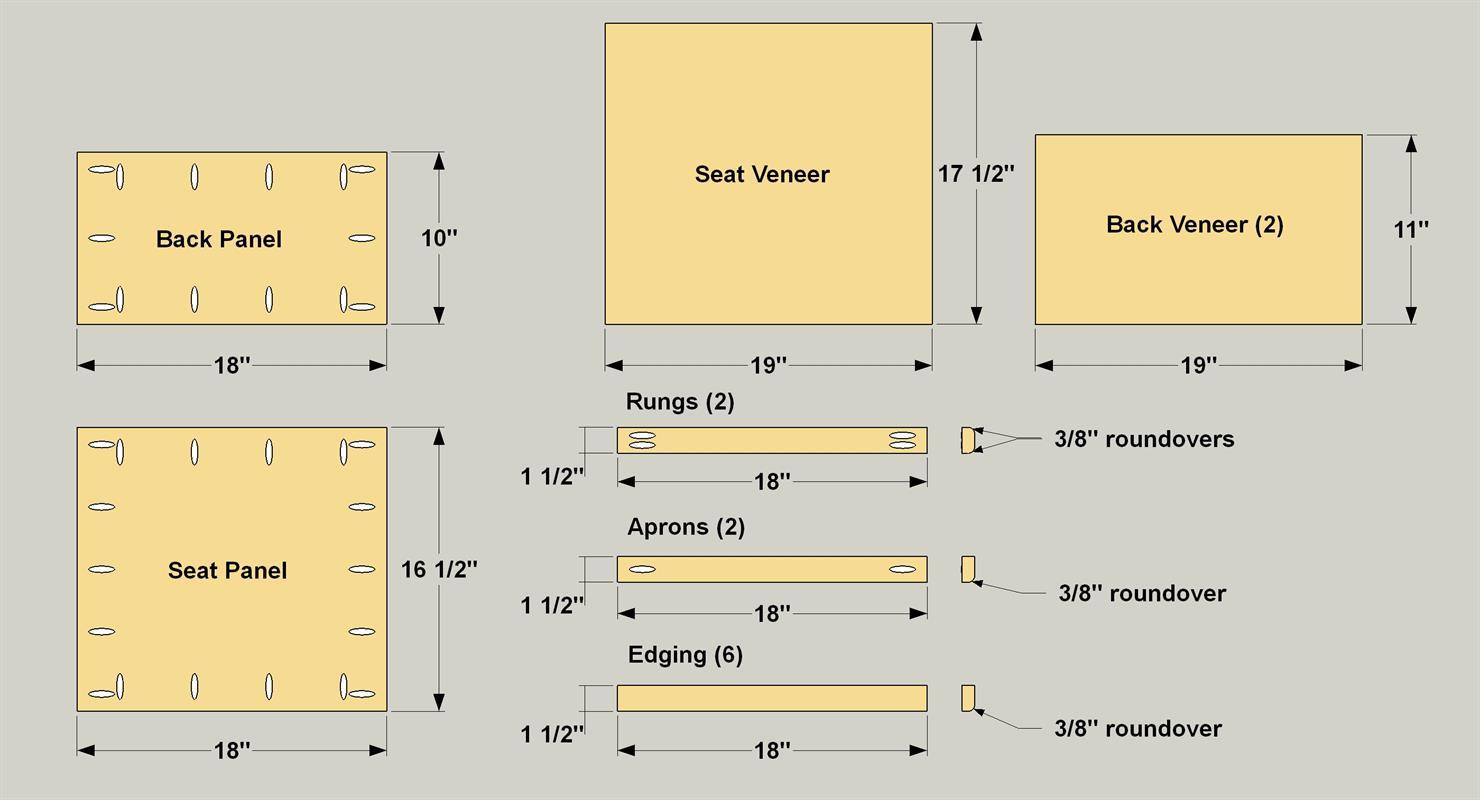
- 1 Seat Panel , 3/4" ply x 18" x 16 1/2"
- 1 Back Panel , 3/4" ply x 18" x 10"
- 1 Seat Veneer (optional) , 18" x 16 1/2" (start oversize, then trim to fit)
- 2 Back Veneer (optional) , 18" x 10" (start oversize, then trim to fit)
- 6 Edging , 3/4" x 1 1/2" x 18"
- 2 Apron , 3/4" x 1 1/2" x 18"
- 2 Rung , 3/4" x 1 1/2" x 18"
Directions
-
Look Over the Plan and Parts
Before you purchase your materials or start building. Take a close look at the plan. The chair is made with fairly simple cuts, but there are angles, radiused corners, and pieces that need to be carefully aligned. The key to success is keeping all of the parts marked and organized, and simply taking your time to make sure everything goes together correctly. Also note that we made the seat and back panels from ordinary plywood, and then applied veneer. You could use nicer veneered plywood instead. If you plan to paint your chairs, you don’t could use poplar boards and birch plywood. Also note that the instructions here and the materials list are for building one chair. Be sure to multiply by the number of chairs you intend to build.
-
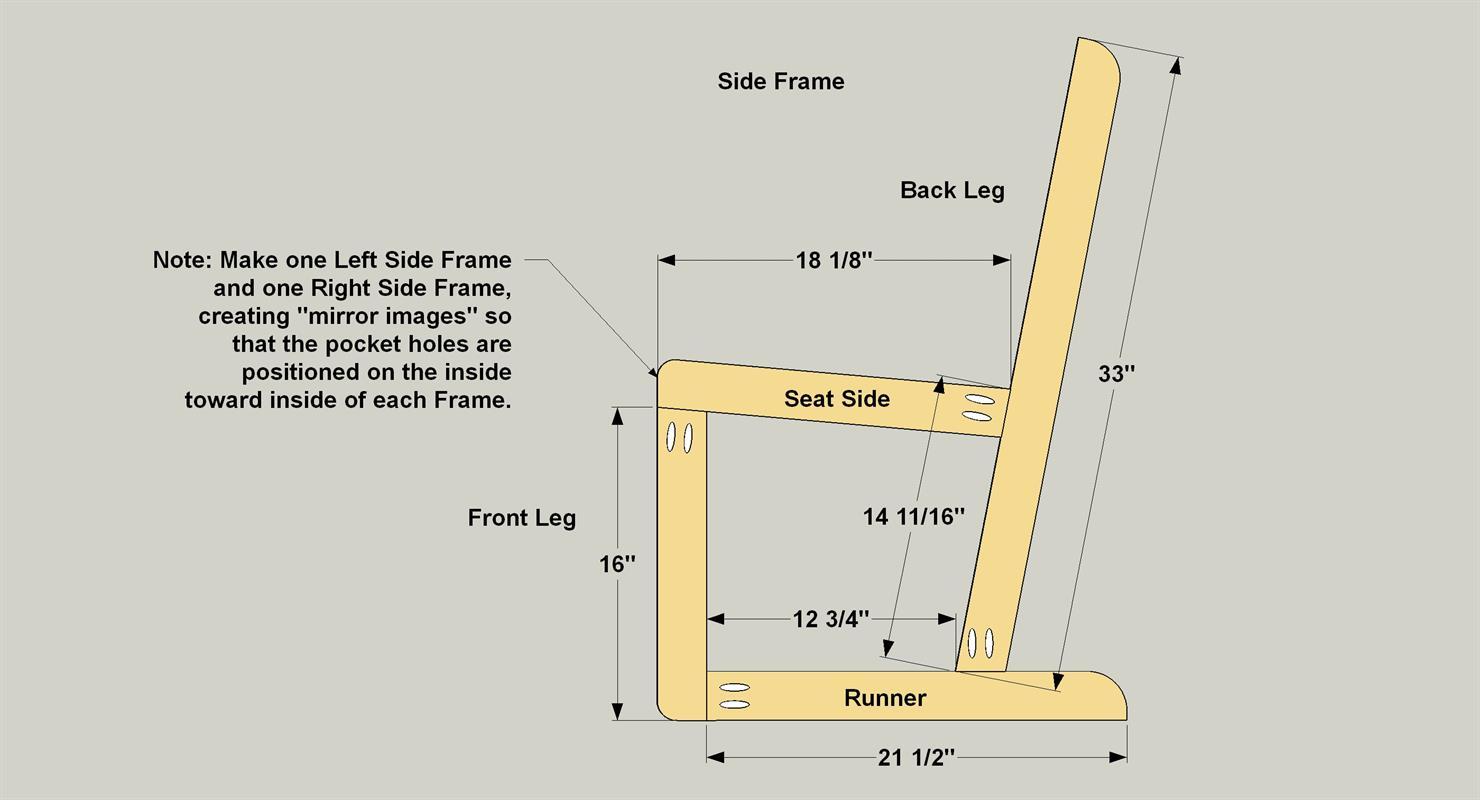
Create the Side-Frame Parts
Cut the Runners, Front Legs, Seat Sides, and Back Legs to length from 1 x 3 boards, as shown in the cutting diagram. Make the angled cuts on the ends of the Front Legs, Seat Sides, and Back Legs. Draw a 1" radius on each Front Leg and Seat Side where shown. Then mark a 2" radius on the each Runner and Back Leg. Cut just outside the lines using a jigsaw fitted with a fine-tooth wood-cutting blade. Sand the radii to the lines. Lay out the parts for each frame (remembering that you'll make mirror images. Then, with your pocket hole jig set up for 3/4" material, drill pocket holes in the INSIDE FACE, where shown, of the appropriate parts.
Tip: Mark Parts for Easy Identification
This chair requires multiple parts with angles, radii, and pocket holes. They’re not tough to make, but it could be easy to mix them up. Plus, when you assemble the chair frames, you’ll need to create side frame that are “mirror images” (a right-hand and a left-hand part). So, as soon as you cut the parts to length, lay them and mark the names and locations (such as “Runner Left” and “Runner Right”). Then note the locations of the angle cuts, radii, and pocket holes. When making more than one chair, also mark the chair number.
-
Build the Side-Frame Assemblies
Clamp one Runner and a Front Leg to your workbench, pocket-hole sides up, and align the parts. Place a clamp directly over the joint to make sure the faces of both pieces are flush. Then connect the Rail and Front Leg using 1 1/4" pocket-hole screws (fine-thread for hardwoods, coarse thread for softwoods). Clamp the Front Leg to a Seat Side, align the parts, and drive the screws. After that, add the Back Leg, aligning it as shown. Repeat these steps to build a second side-frame assembly. After assembly, glue pocket-hole plugs into the pocket holes and sand them flush. Sand the side-frame assemblies and ease all of the edges by sanding lightly.
-
Make the Seat and Back Parts
Cut the Seat Panel and Back Panel to size from 3/4" plywood, as shown in the cutting diagram. Drill pocket holes where shown. Cut the Edging, Aprons, and Rungs to length from 1 x 2 boards, as shown in the cutting diagram. Drill one pocket hole in each end of the Aprons and two pocket holes in each end of the Rungs. Rout 3/8" round-overs along one edge of the Edging and Aprons and along two edges of the Rungs. If you’re planning to veneer the panels, as we did, cut a piece of self-adhesive walnut veneer, 1" oversize in each dimension, for the Seat Veneer. (The grain runs in the 16 1/2" dimension.)
-
Assemble the Seat
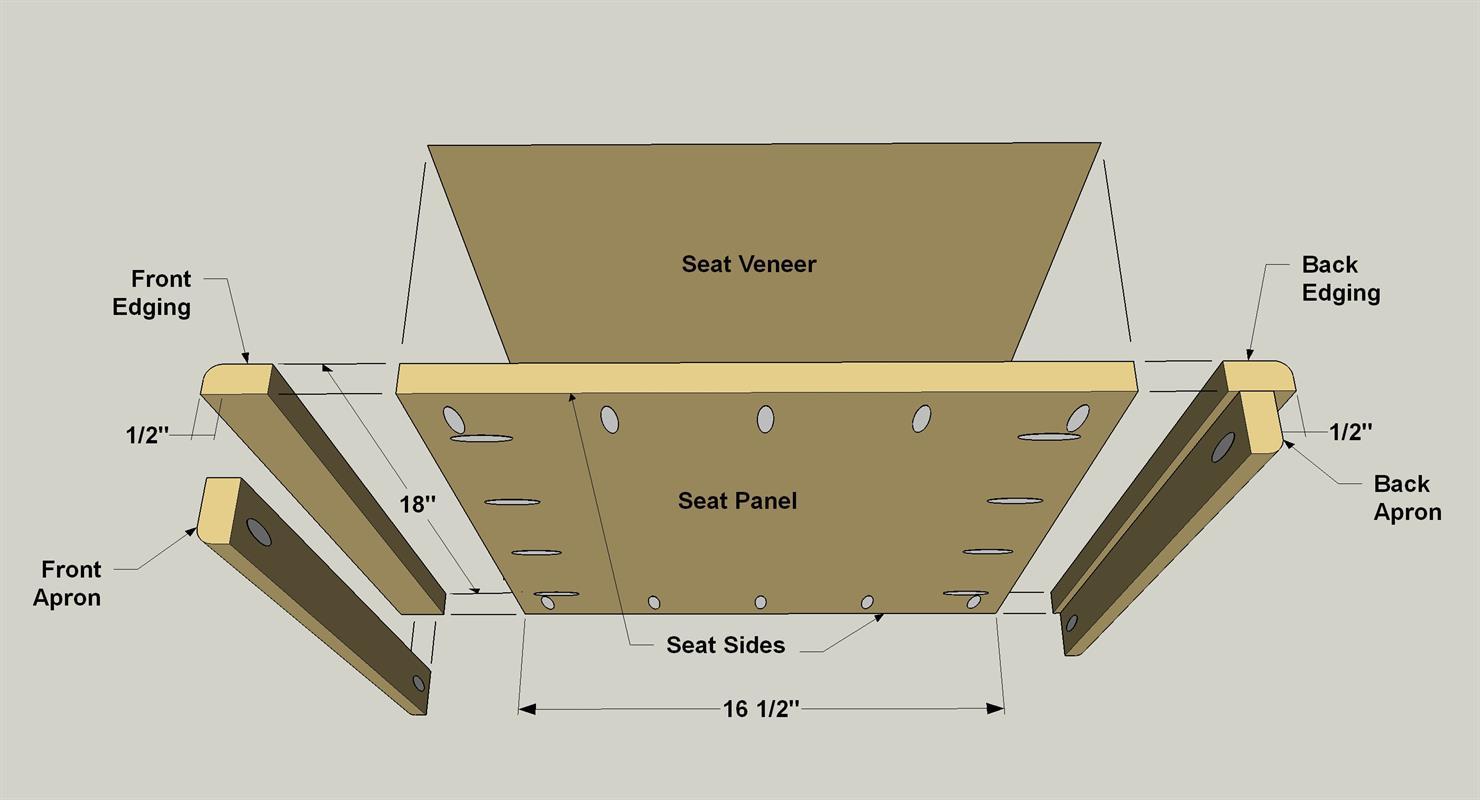
If you’re using veneer, remove all dust from the top face of the Seat Panel. Peel back the paper backing on the Seat Veneer about 2" along the front long edge. Position the veneer at the front edge of the seat panel, overhanging the edge and the sides by 1/2". Lightly press the veneer onto the panel. Slowly peel back the backing paper and smooth the veneer onto the panel using a veneer press or a 3"-wide stiff putty knife with masking tape wrapped around the blade. Then trim the veneer flus hwit hteh edges of the Seat Panel. Now attach Edging to the front and rear edges of the Seat Panel using 1 1/4" pocket hole screws. Glue and clamp the Aprons to the Edging, positioning them as shown. Then sand the seat assembly.
-
Assemble the Back
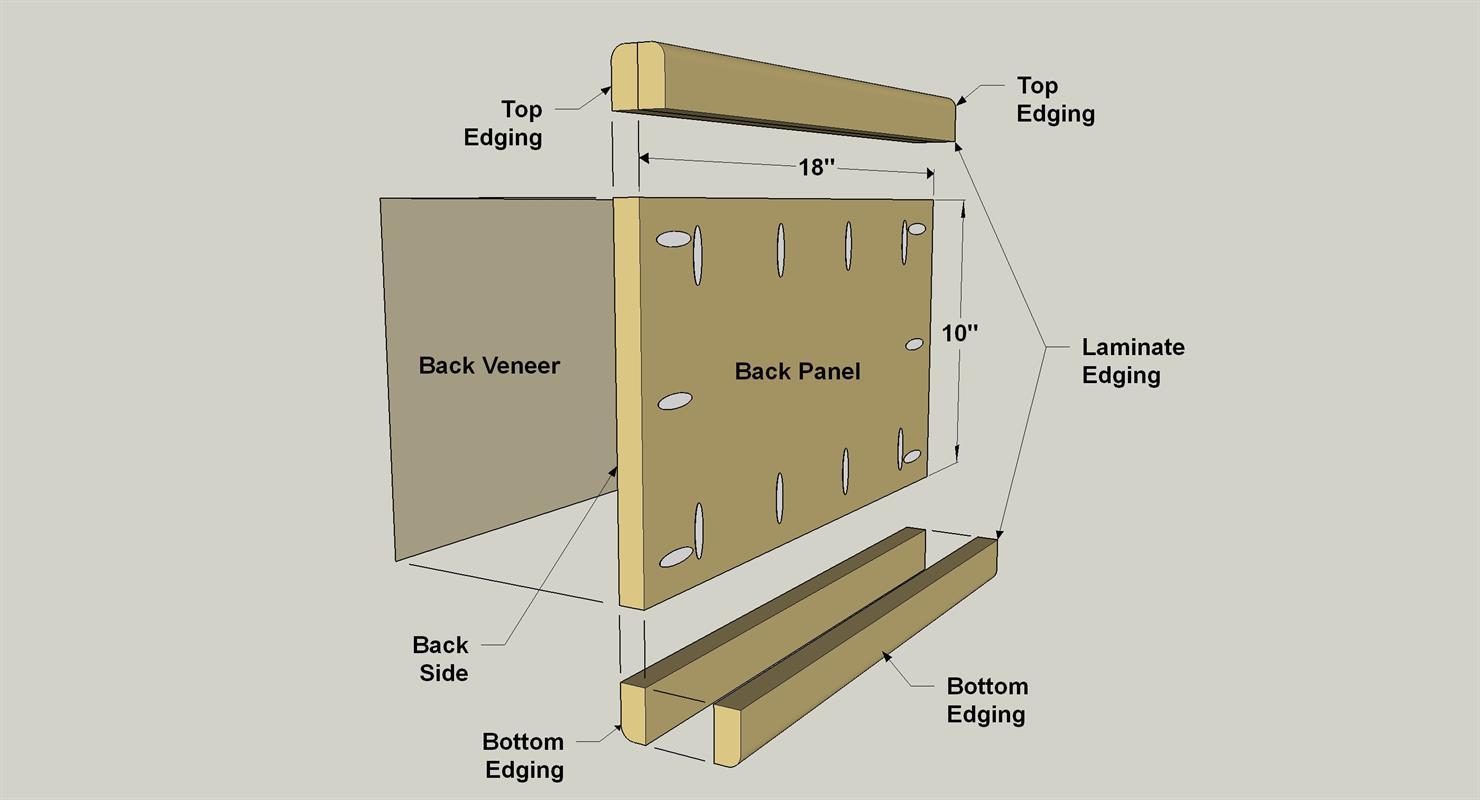
Once again, if you’re using veneer, start by cleaning all dust from the front face of the Back Panel. Cut one oversize Back Veneer. Using the same procedure you used to veneer the Seat Panel, apply veneer to the front face of the Back Panel. Attach the Edging to the upper and lower edges of the Back Panel. Glue and clamp two more pieces of Edging to the pocket-screwed Edging. Finish-sand the back assembly.
-
Attach the Seat and Back to a Frame
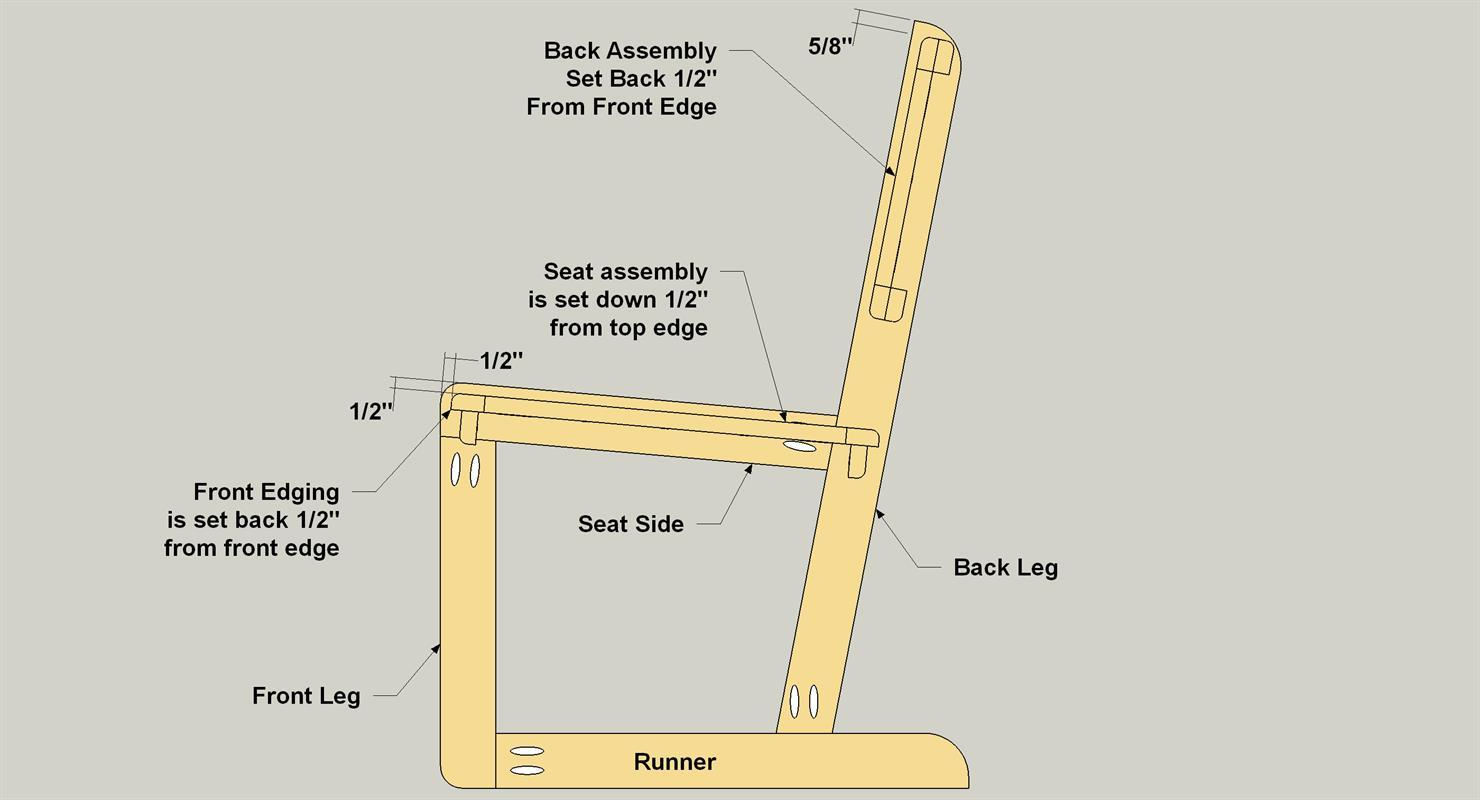
Lay one side frame on your bench, inside face up (the face with the plugged pocket holes). Position the seat assembly on it, inset 1/2" from the front and top edges of the Seat Side, and clamp it in place. Attach the seat assembly using 1 1/4" pocket-hole screws. In similar fashion, attach the back assembly. The back assembly is also inset 1/2" from the edge of the Back Leg, and set down 5/8" from the upper end of the Leg.
-
Complete the Assembly
Lay the second side frame on your bench. Position the side-frame/seat/back assembly you just created, and then clamp it in place. Attach this assembly to the second side frame using 1 1/4" pocket-hole screws. Position the Rungs where shown, and then attach them using 1 1/4" pocket-hole screws. Glue pocket-hole plugs into the pocket holes in the Rungs and sand them flush. If you’re not using veneer on your chair, you’ll want to plug the pocket holes in the Seat Back, as well. If you’re using veneer, skip the plugs, cut a piece of veneer to fit, and stick it to the rear face of the Back Panel.
-
Inspect, Sand, and Finish
With everything assembled, look over the chair and do any final sanding that’s needed. Ease any sharp edges with fine sandpaper. Then apply a clear finish. We applied two coats of Tried and True on oil finish, following the instructions on the can.