

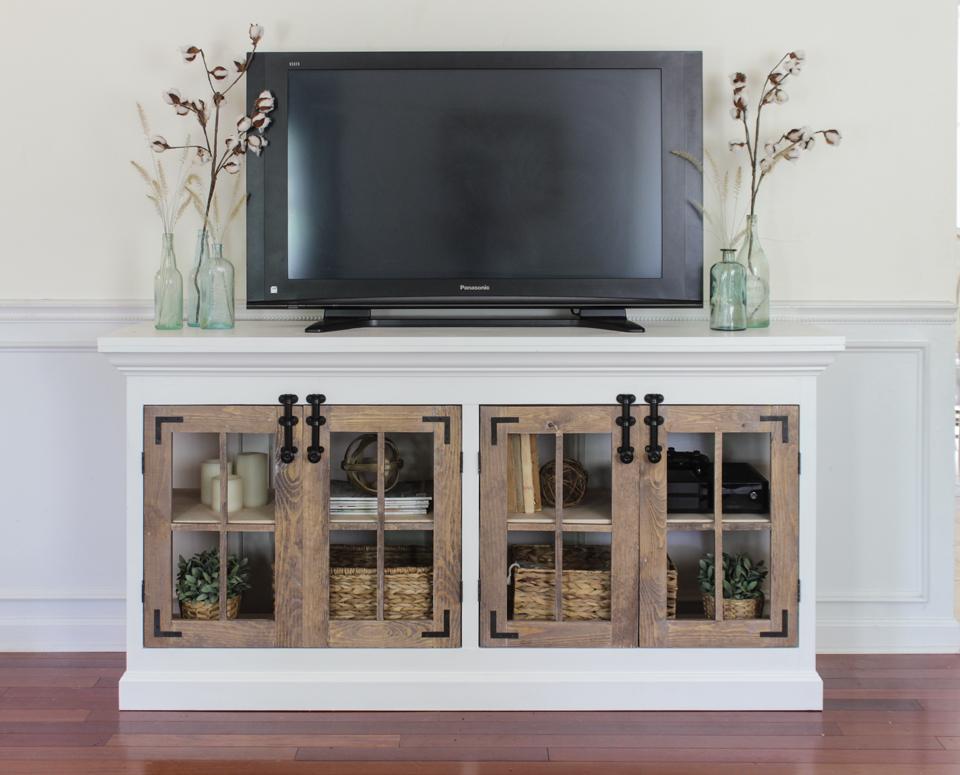


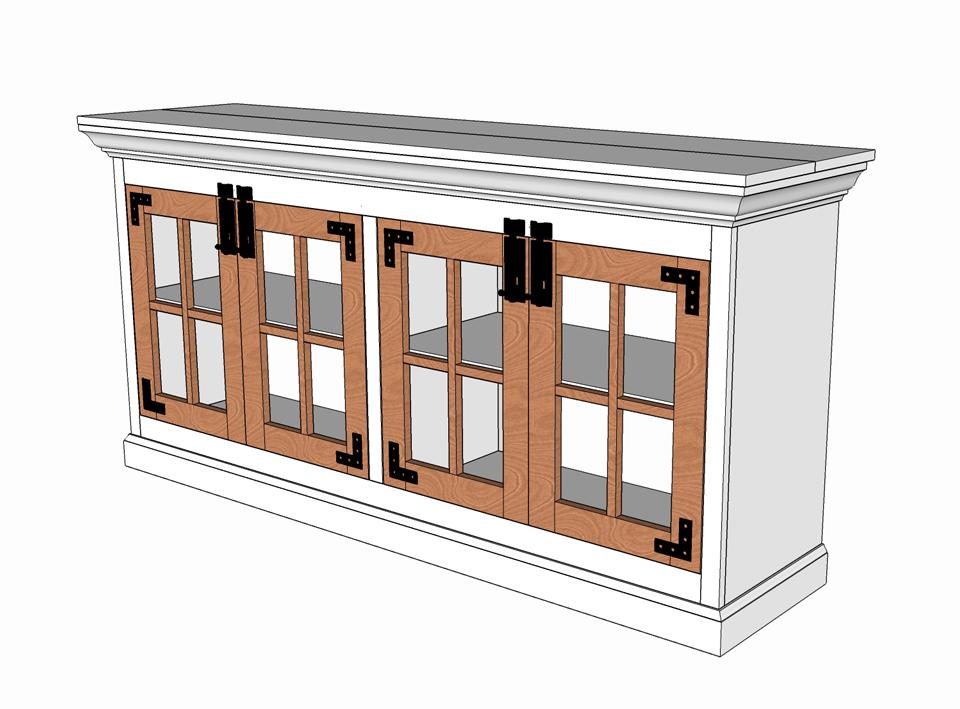
A large farmhouse style media cabinet with ample storage and shelving on the inside of double 4 pane doors on both sides. Finished with black right angle brackets and surface door latches for added character.
Tools
Kreg Tools


Other Tools
-
Miter Saw

-
Table Saw
-
Tape Measure
-
Drill (cordless)
-
Nail Gun
-
Router
-
Router Table
-
Sander
Materials
Wood Products
- 2 Plywood , 3/4" Thick , Full Sheet
- 2 Board , 1x10 , 72"
- 2 Board , 1x6 , 72"
- 3 Board , 1x3 , 96"
- 1 Board , 1x2 , 96"
- 4 Board , 5/8" square dowel , 36"
- 1 Primed pine crown moulding , 9/16 x 3 5/8 , 120"
- 1 Board , 9/16 x 3 1/4 , Primed pine base board
Hardware & Supplies
- 70 1 1/4" pocket hole screws
- 15 2" wood screws
- 75 1 1/4" nails, 18 gauge
- 32 1" nails, 18 gauge
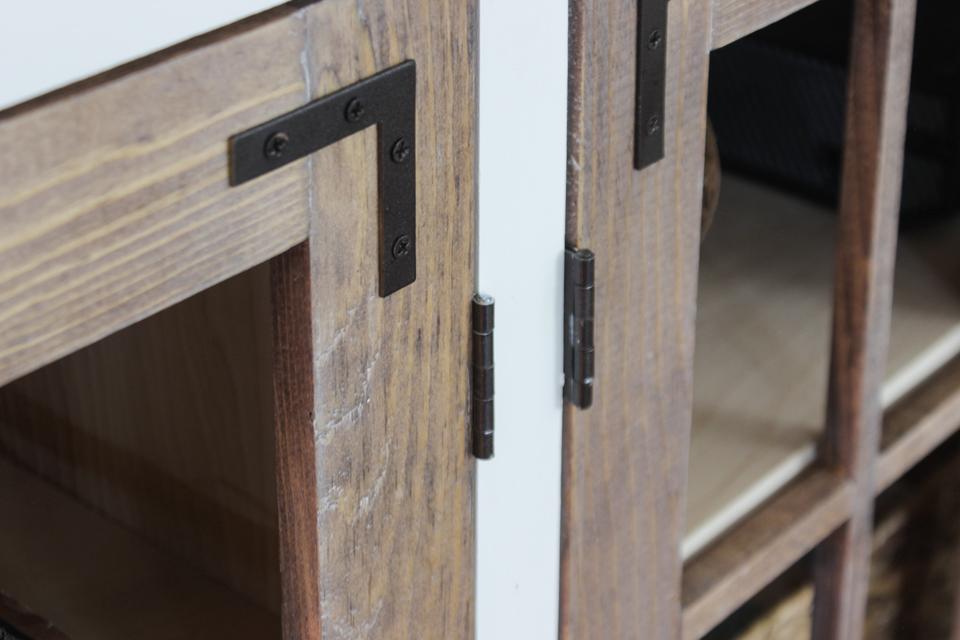
- 8 Right angle braces, 2 1/2" x 2 1/2"
- 4 Decorative surface bolts, 6" long
- 8 Flat hinges, 2" long
- 1 Wood glue
- 1 220 grit sandpaper
- 1 Wood filler
- 1 Interior caulk
- 1 Wood veneer roll
- 1 Wood conditioner
- 1 Wood stain (I used Minwax Special Walnut)
- 1 Poly topcoat
- 1 White satin-finish paint & primer in-one
- 1 Cotton rag
- 4 Custom glass panes, 1/8" thickness, 17 7/8" x 10 1/8" (optional)
Directions
-
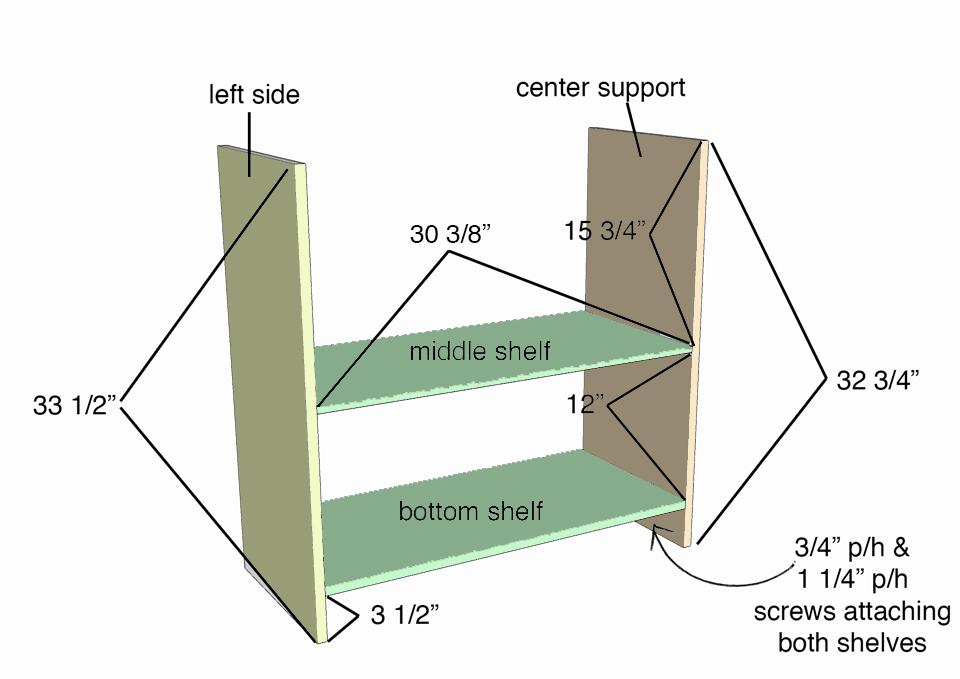
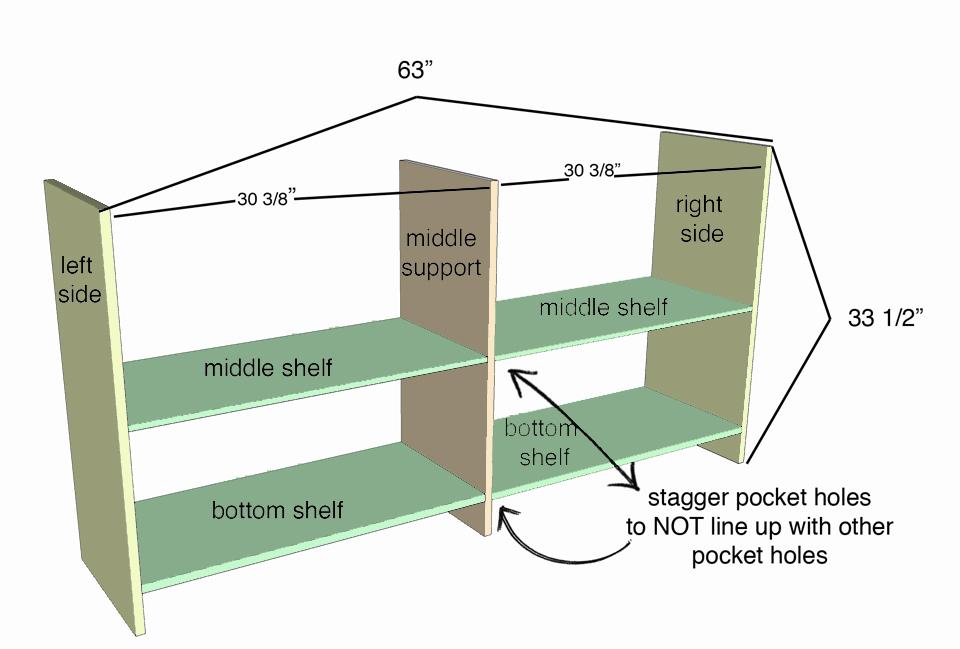
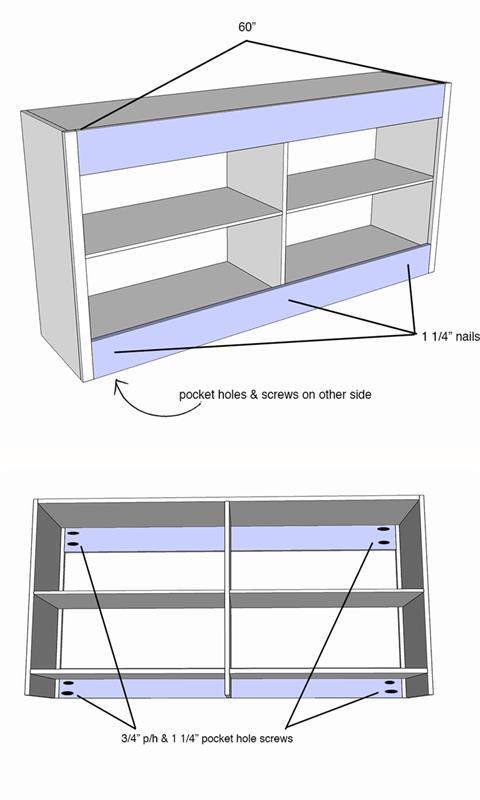
Build Left Side of Frame
Drill 3- 3/4" pocket holes on both short sides of all 4 shelves. Stagger the pocket holes on one side of all 4 shelves, so that when they are attached to the center support, the screws aren't going into the same spot on either side. Attach the bottom shelf, 3 1/2" from the bottom of the left side and the center support using 1 1/4" pocket hole screws and wood glue. Attach the middle shelf 12" above the bottom shelf in the same manner, but flush with the back edge of the sides and 1/2" space from the front edge of the sides. (This is necessary so that when glass inserts are glued in, there is space for the doors to shut without being too close to the shelf. The middle shelf should be 15 3/4" from the top of the center support.
-
Build Right Side of Frame
Attach the remaining 2 shelves to the center support and the right side in the same way that was done in step 1.
-
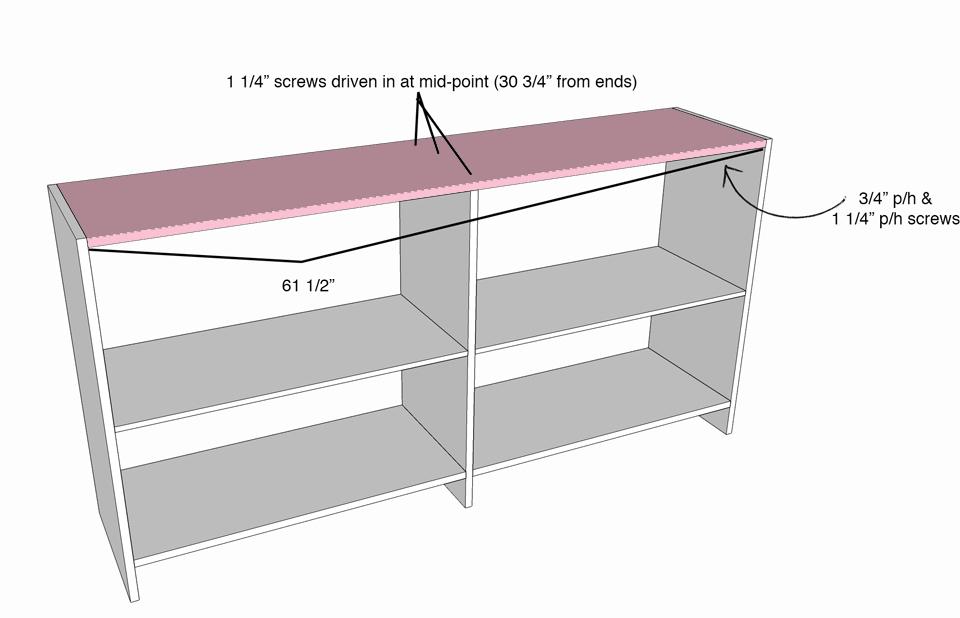
Attach Top Support
Drill 3- 3/4" pocket holes on either end of the top support piece of plywood. Place the top support between the two sides and on top of the center support and attach it to the sides using 1 1/4" pocket holes and wood glue. Stand the frame up and drive 2" screws from the top support into the center support. The screws at the center should be 30 3/4" from both ends of the top support, or exactly at the midpoint.
-
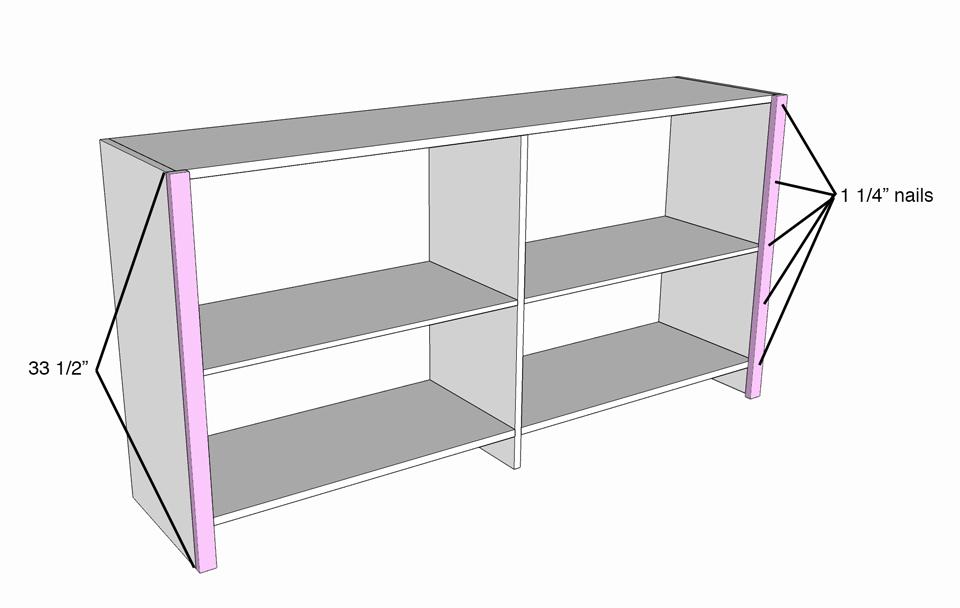
Attach Side Trim
Using wood glue and 1 1/4" nails, attach the 1x2 pieces of side trim, flush, on the edges of the right and left sides of plywood.
-
Attach Top & Bottom Aprons
Drill 2- 3/4" pocket holes on both ends of both the top and bottom apron 1x6s, making sure to space them closer to one side. Secure them flush with the top and in between the 1x2 trim pieces using wood glue and 1 1/4" nails (driving through into the plywood). Then, turn the media cabinet over so the back is facing up and using 1 1/4" pocket hole screws, attach the 1x6s aprons into the 1x2 side trim pieces.
-
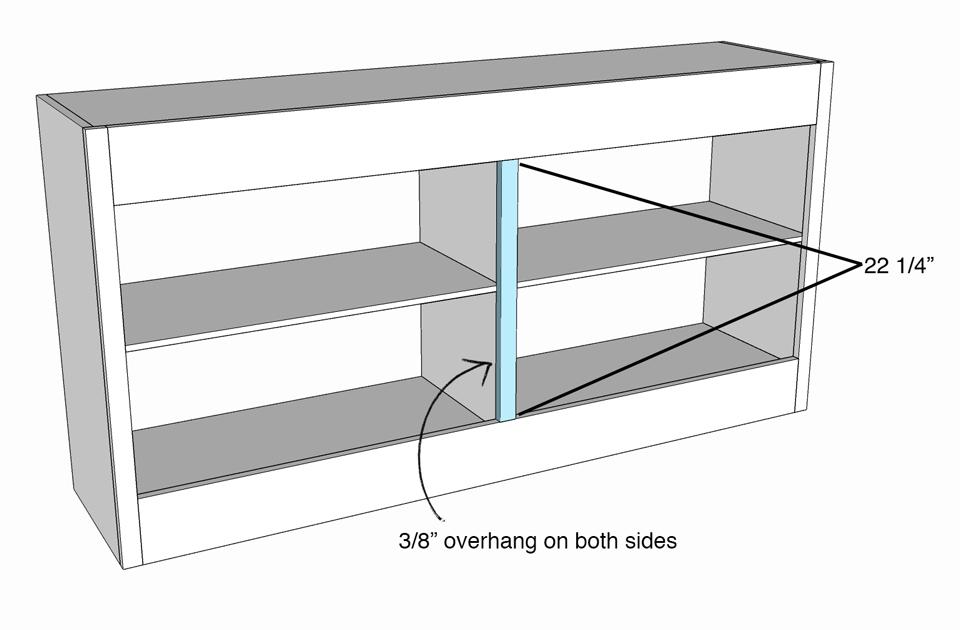
Attach Center Trim
Place the 1x2 center trim center directly over the center support, so that there is a 3/8" overhang on each side. Attach it using wood glue and 1 1/4" nails.
-
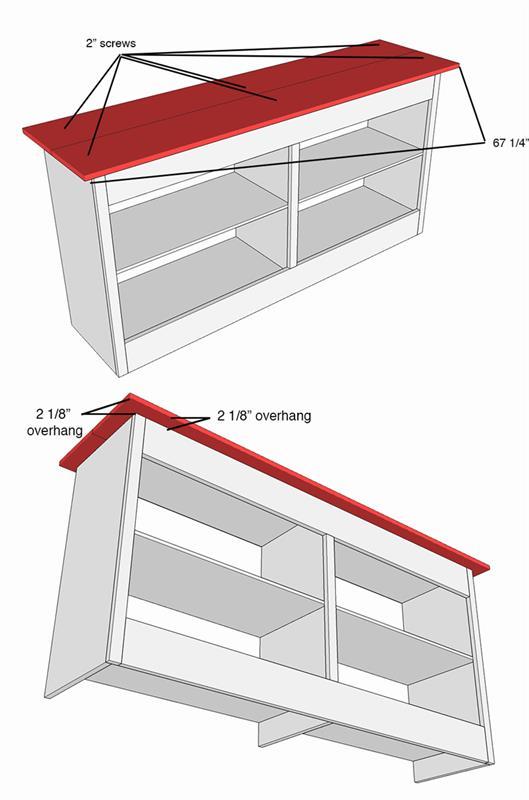
Attach Planked Top
Mark the first 1x10 board at 2 1/8" from both sides and from the front. Apply a generous amount of glue and place it on top of the media cabinet, so that edges of the cabinet line up exactly where the marks are on the board. Secure in place with a couple of 1 1/4" nails. Then, measure and mark where the center board lines up. Drill 2- 2" screws from the top of the board into each plywood sides and into the center support. Mark the second 1x10 board at 2 1/8" from both sides and place it on top of the cabinet, sitting flush with the first board, making sure the cabinet lines up underneath at the marks on the board. Attach it in the same manner that was done with the first board.
-
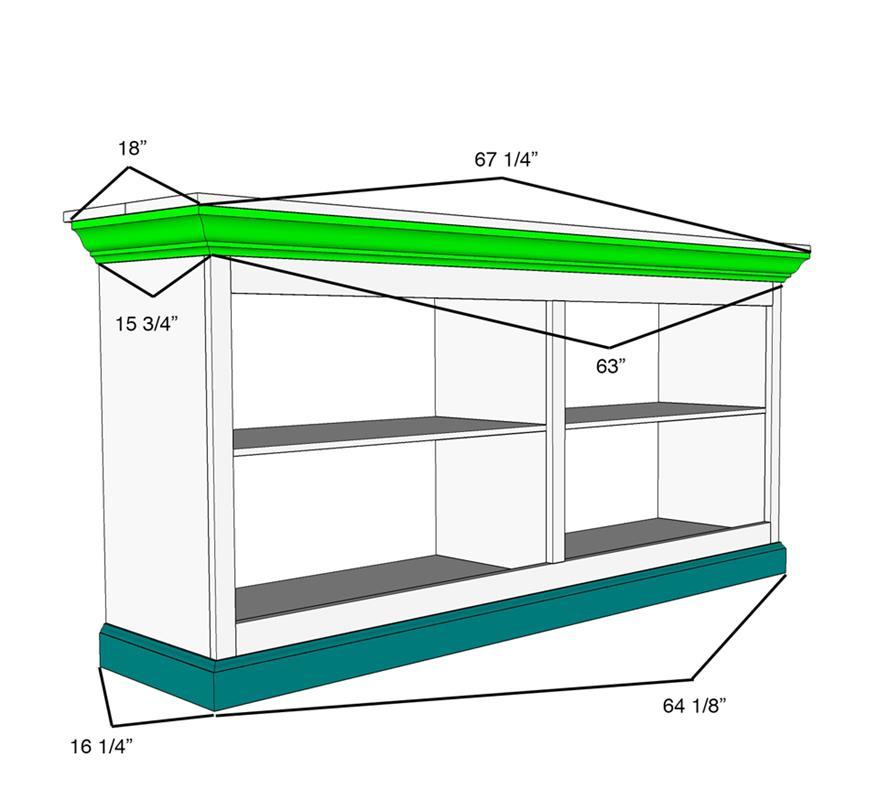
Attach Crown Moulding & Baseboard
Place wood glue on top and bottom edges of the crown moulding. Secure the long piece of crown moulding directly under the overhang of the planked top with nails, making sure that the mitered angles line up with the corner of the cabinet sides and the corner of the planked top. Drive nails up into the planked top and in, into the 1x6 and side trims pieces. Attach both sides in the same way.
Apply wood glue to the backside of the baseboard and secure the longest piece first with 1 1/4" nails, then attach the side pieces of baseboard.
-
Fill Holes, Sand, Paint
Fill screw holes, nail holes and cracks with wood filler. Fill seams along crown moulding and baseboard with caulk. Let everything dry and sand surfaces smooth with 220 grit sandpaper. Use an orbital sander for the flat surfaces and a square sponge sandpaper for the moulding and baseboard (anywhere that has curves). Paint exterior with 2 coats of satin finish pure white paint.
*Optional* Iron on wood veneer to the exposed edge of the inside plywood shelves to give a "finished" look.
-
Build Door Frames
Using 5/8" straight router bit on a router mounted to a router table, set the fence depth to 0 and the height to 1/8". This will actually carve out a routed groove that is 3/8" wide and 1/8" deep. Slide all of the 1x3 door frame pieces (16) through the router so that a groove appears on 1 side.
Drill 2- 3/4" pocket holes on both ends of all the short 1x3s. Using clamps, attach the short 1x3s to either end of the long 1x3s, flush with the ends, with 1 1/4" pocket hole screws and wood glue.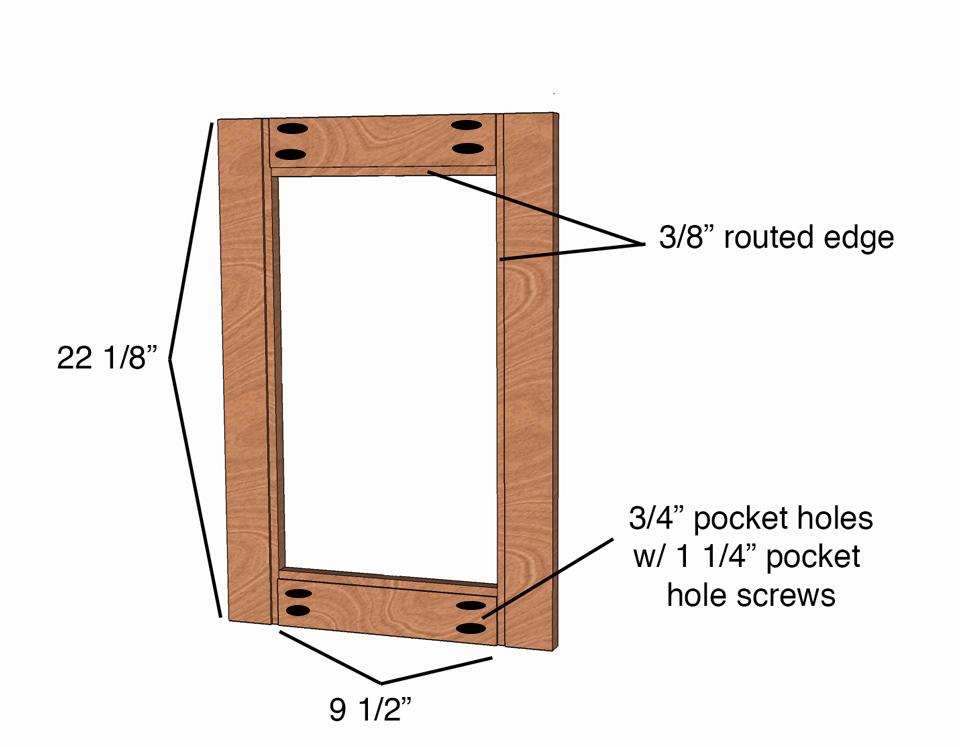
-
Notch Muntins & Attach to Frame
Mark each long 5/8" square dowel pieces at 8 1/4" from each end. Mark the short dowel pieces at 4 3/8" from each end. This should leave a space between the two marks that is 5/8" wide. Set your table saw height to 5/16" and carefully make several cuts between the two marks until the dowel is notched out. This should take about 4 cuts through the table saw.
Measure and mark center along the insides of the short and long sides of the door frame. Before placing the long muntin (square dowel pane divider) at the center marks (center lining up with the center of the dowel), glue the ends, then clamp into place, so that the notched side is facing the same side that has the pocket holes (in). Secure the dowel or munition by toenailing 1" nails.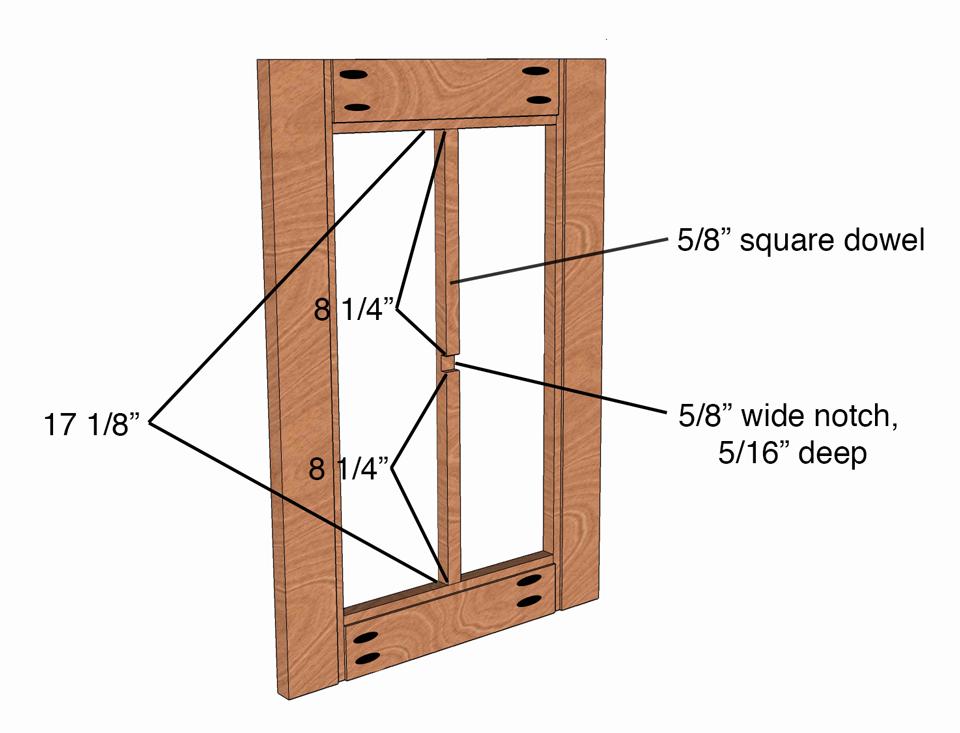
-
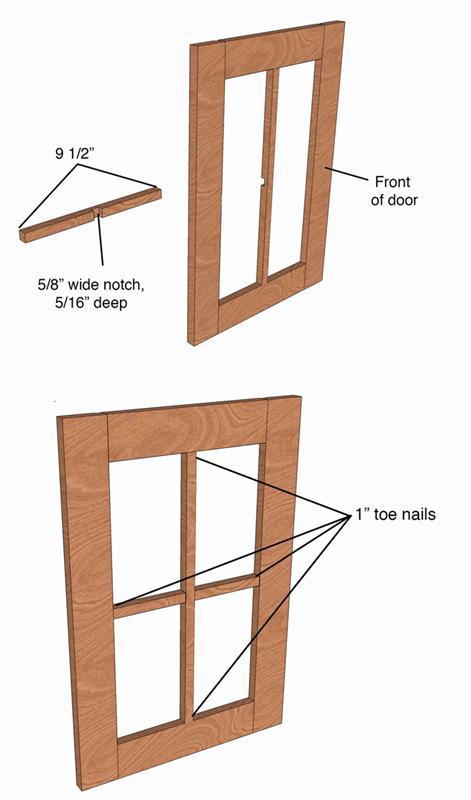
Attach Short Muntin to Frame
Place glue on the notch of the short muntin and on either ends, and fit it over the notch of the long (vertical) muntin. This short line up exactly at center on the stiles of the door frame, but measure to make sure. Clamp and secure them into the stiles by toenailing 1" nails from the muntin to the stiles..
-
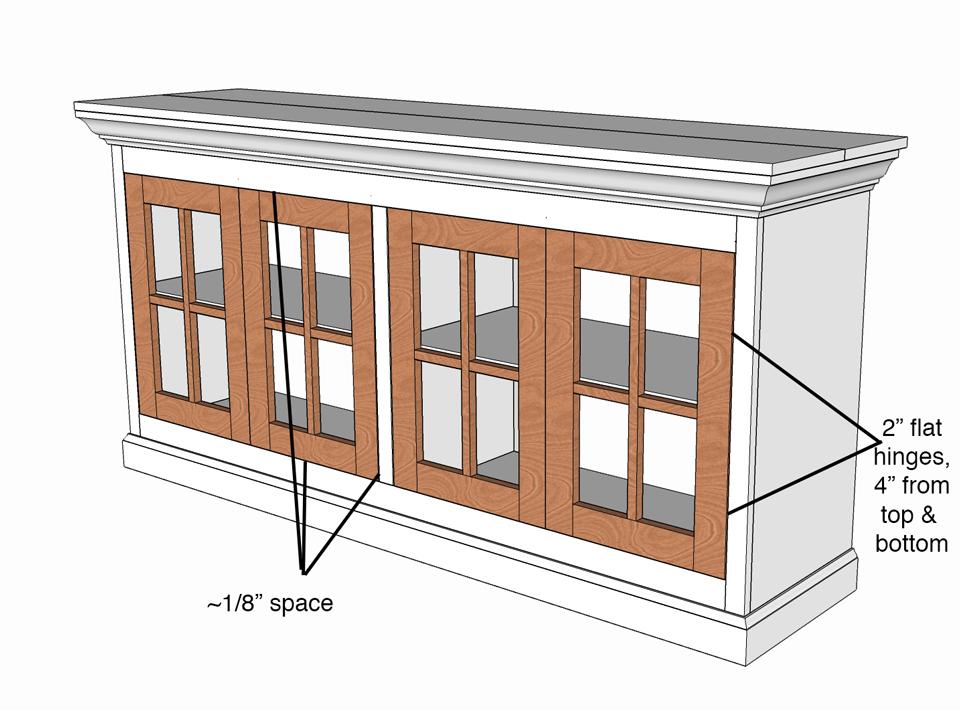
Hang Doors
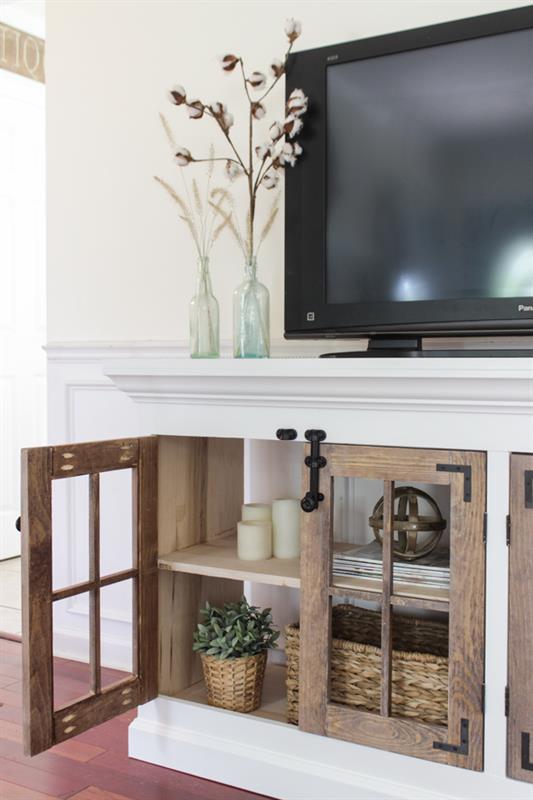
Measure 4" up and 4" down on one side of each door. Attach flat hinges lining up with the measurements, then measure the inside of the frame on the media cabinet, 4 1/8" from the top and bottom. Attach other side of hinges to the frame to hang doors. Make sure to work slowly and double check measurements and fitting before attach the doors, so adjustments can be made if needed. Doors should fit tight with 1/8" gap on the top and bottom.
-
Attach Hardware
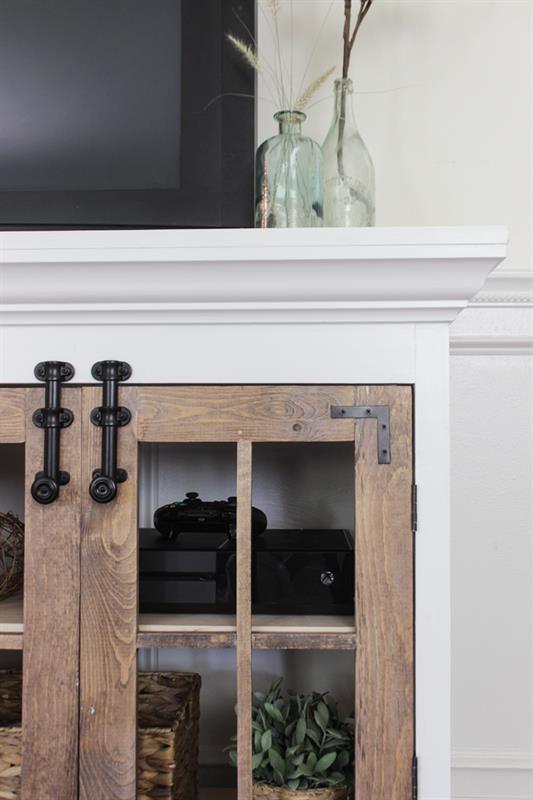
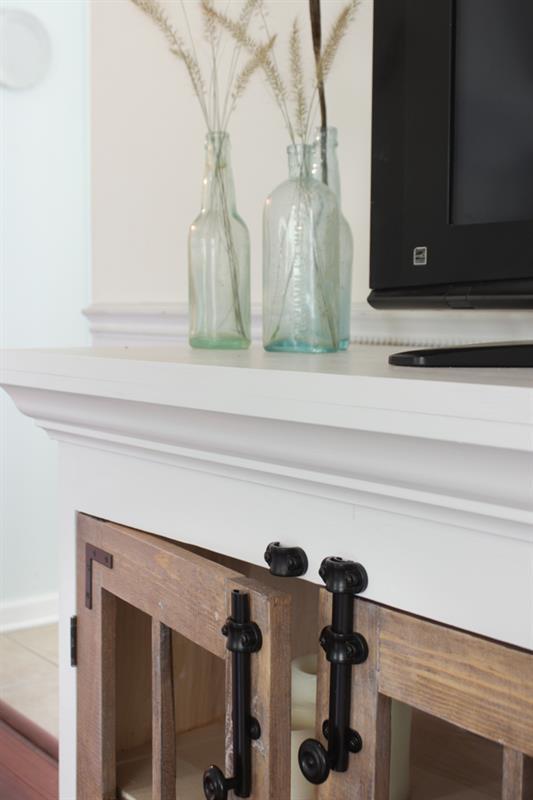
Pre-drill holes and attach right angle braces to the outer corners of each door (the corners closest to the hinges). Attach surface door bolts to each door, centered on the top of each stile, so that when the bolt slides up, it goes over the top of the 1x6 apron. Attach the bolt to the door first, then measure and attach the bracket that it slides into on the 1x6.
-
Stain Doors
Sand the doors smooth with 220 grit sandpaper, making sure to remove any glue residue. Wipe wood conditioner over the doors and let dry. Using stain of choice, stain both sides of the doors and seal with a poly or wax. I used Minwax Special Walnut, sealed with Shellac, then wiped a white wax on top to settle into grooves. To see demonstration of this technique, see link to my video tutorial in the "Extra" tab
-
Add Glass Panes (Optional)
Attach glass to the inside of each door, by applying a small bead of silicone adhesive to the routed edge of the door. Place the custom cut glass on top of the adhesive and let dry.