


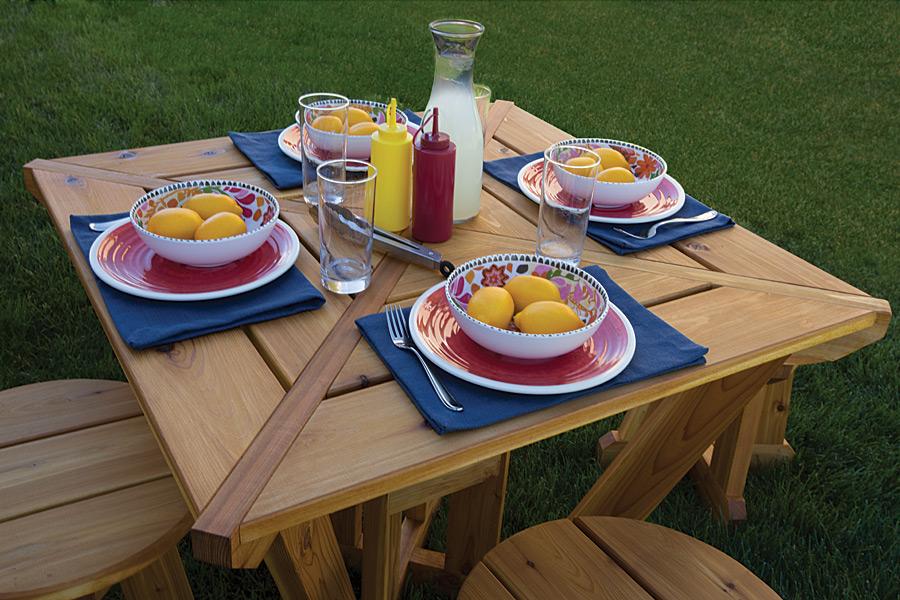


Here’s a different twist on the traditional picnic table. It’s perfect for smaller spaces or if you don’t need to seat more than four people. The table and stools both have a unique look that you won’t find in stores, and they’re made from cedar, which means they’ll last a long time outdoors.
Tools
Kreg Tools


Other Tools
-
Jigsaw

-
Miter Saw
-
Square
-
Tape Measure
-
Drill (cordless)
-
Sander
Materials
Wood Products
- 12 Board , 2x4 , 96"
- 6 Decking Board , 5/4 x 6" , 96"
Hardware & Supplies
- 48 1 1/2" exterior pocket-hole screws
- 216 2 1/2" exterior pocket-hole screws
- 2 Quart oil-based exterior toner/stain
- 20 Nylon chair glides
- 48 2" exterior pocket-hole screws
Cut List & Parts
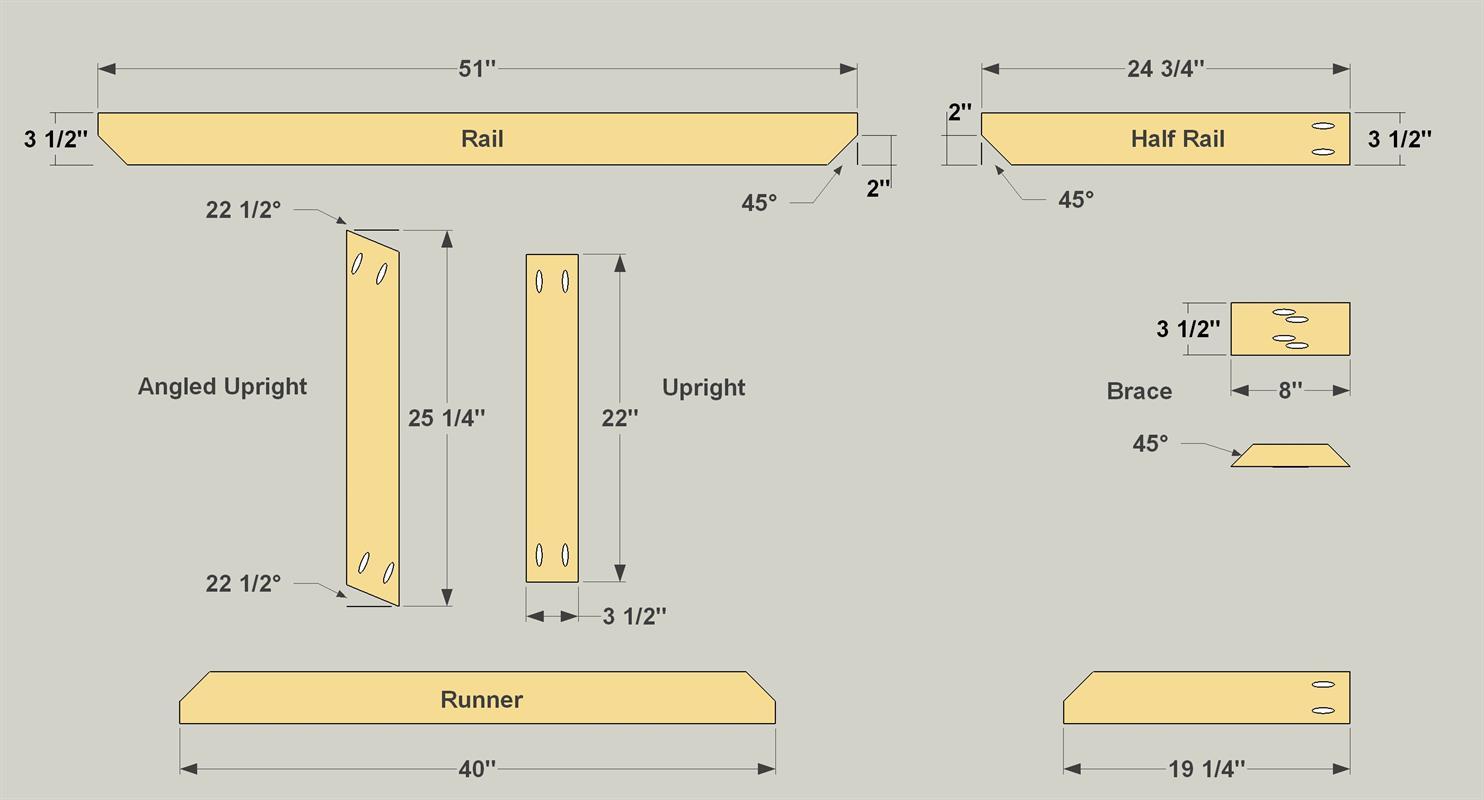
- 1 Table Runner , 1 1/2" x 3 1/2" x 40"
- 4 Table Upright , 1 1/2" x 3 1/2" x 22"
- 4 Table Angled Upright , 1 1/2" x 3 1/2" x 25 1/4"
- 1 Table Rail , 1 1/2" x 3 1/2" x 51"
- 2 Table Half Runner , 1 1/2" x 3 1/2" x 19 1/4"
- 2 Table Half Rail , 1 1/2" x 3 1/2" x 24 3/4"
- 4 Table Brace , 1 1/2" x 3 1/2" x 8"
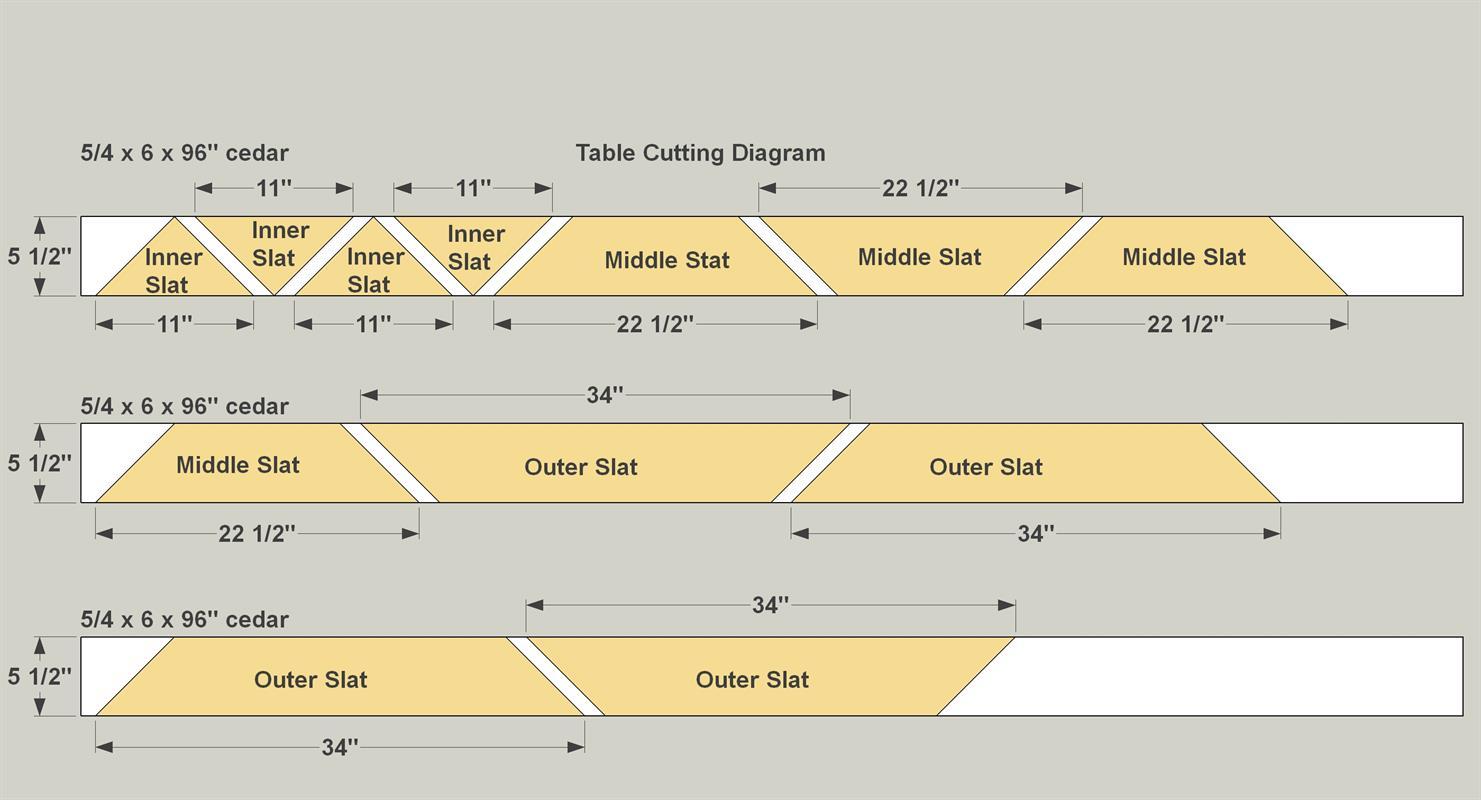
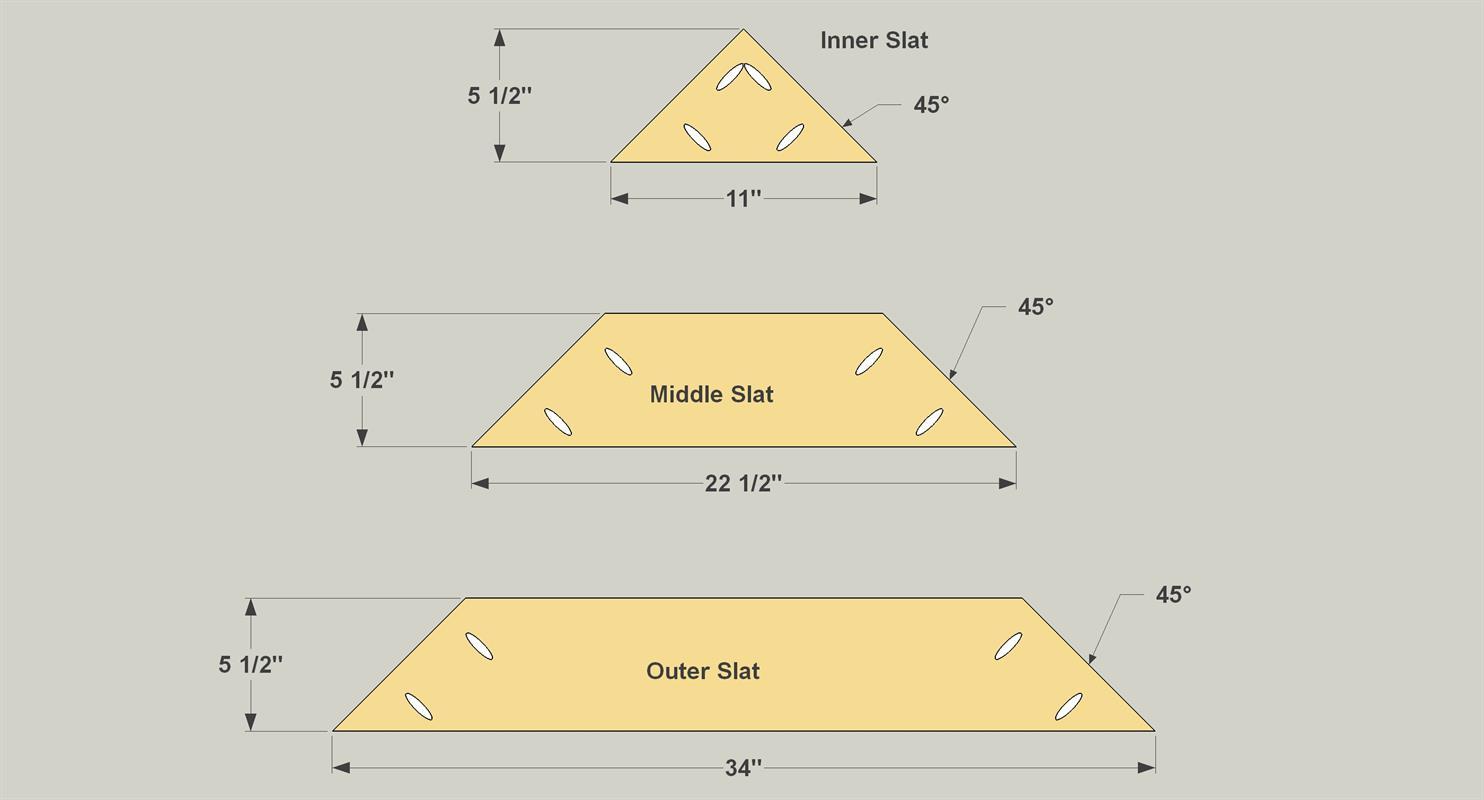
- 4 Table Inner Slat , 1" x 5 1/2" x 11"
- 4 Table Middle Slat , 1" x 5 1/2" x 22 1/2"
- 4 Table Outer Slat , 1" x 5 1/2" x 34"
- 4 Stool Runner , 1 1/2" x 3 1/2" x 18"
- 16 Stool Upright , 1 1/2" x 3 1/2" x 10 3/4"
- 4 Stool Rail , 1 1/2" x 3 1/2" x 16"
- 8 Stool Half Runner , 1 1/2" x 3 1/2" x 8 1/4"
- 8 Stool Half Rail , 1 1/2" x 3 1/2" x 7 1/4"
- 16 Stool Brace , 1 1/2" x 3 1/2" x 10"
- 12 Stool Slat , 1" x 5 1/2" x 18"
Directions
-
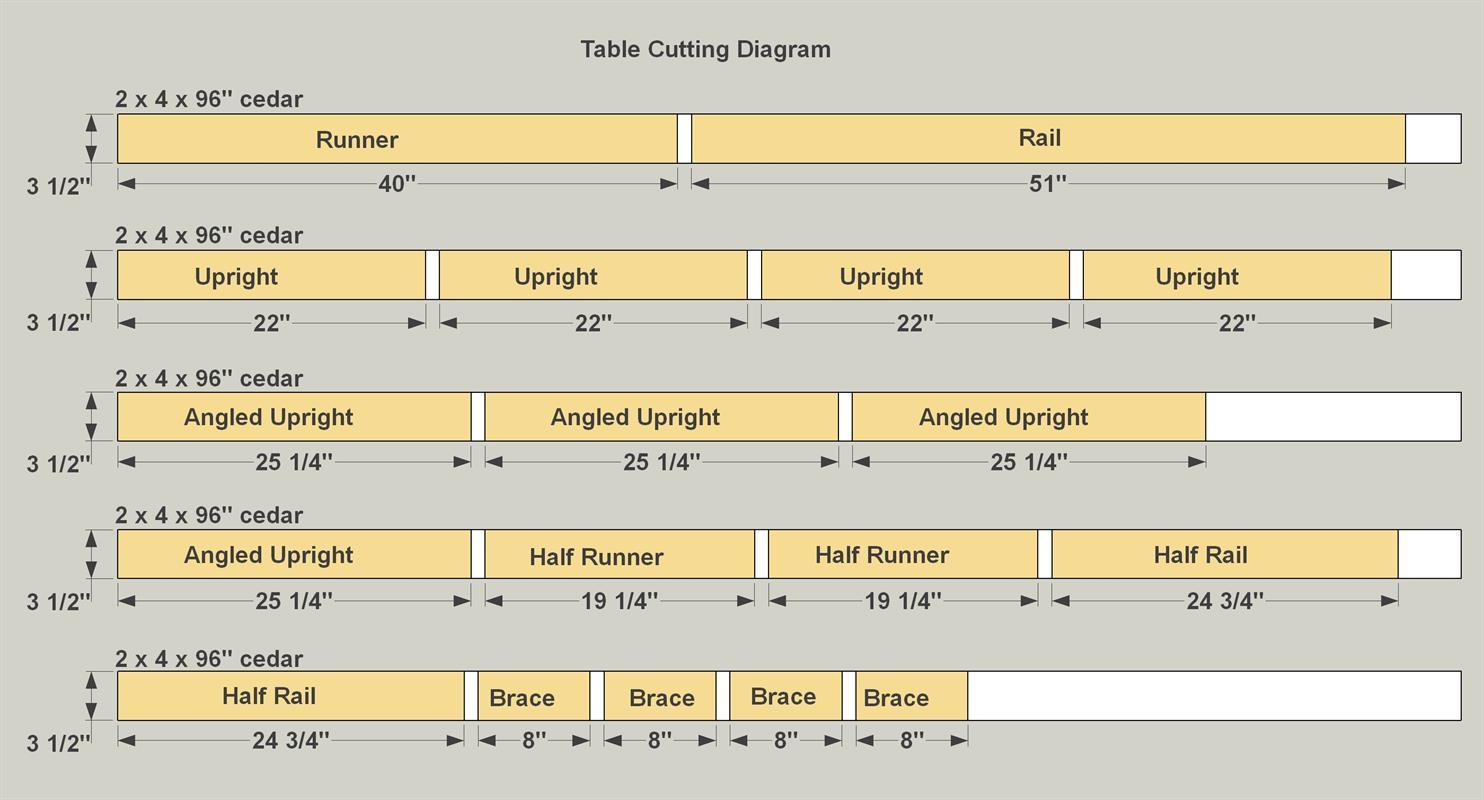
Cut the Table Base Parts
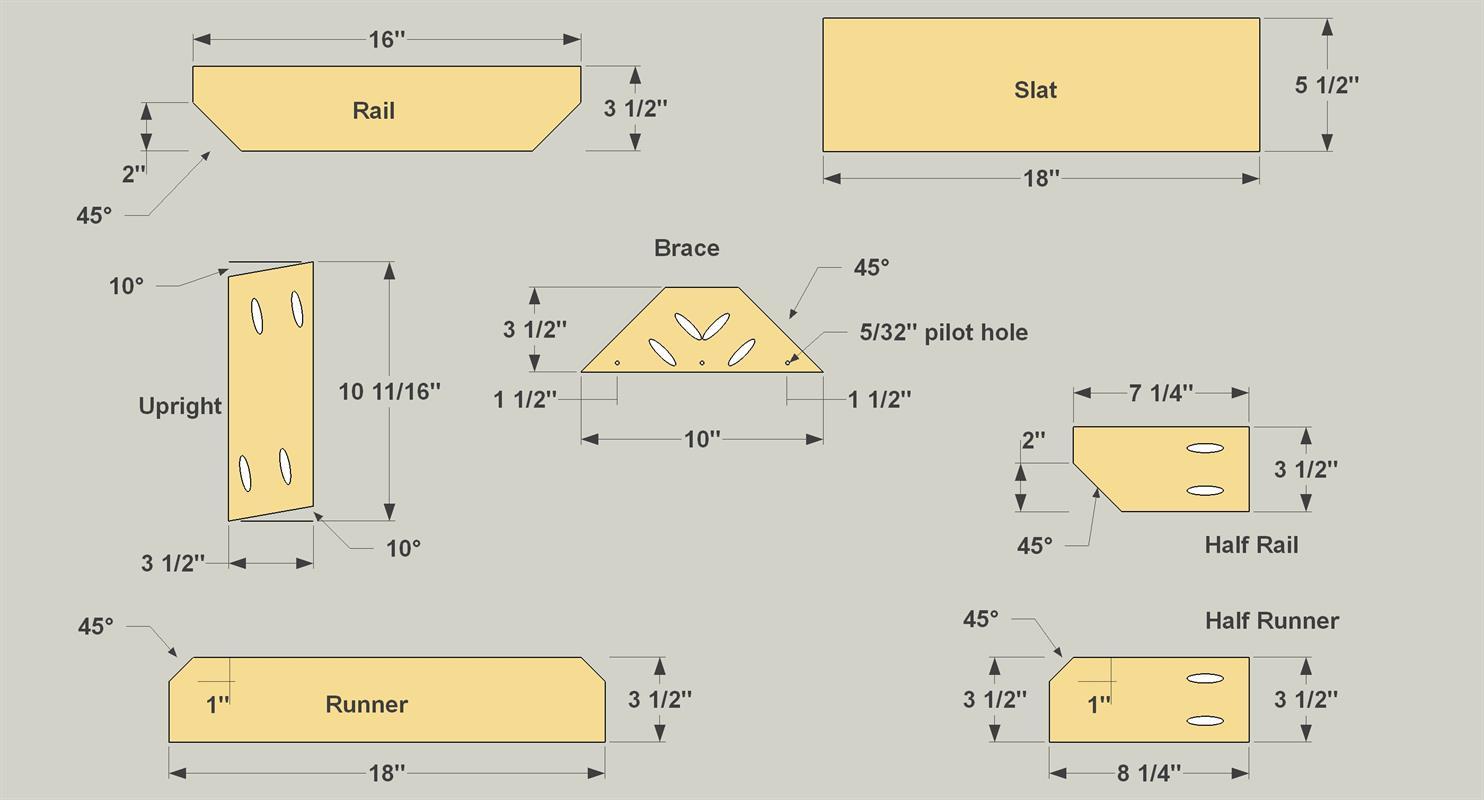
Cut the Runner, Uprights, Rail, Half Runners, and Half Rails to length from 2x4 cedar boards, as shown in the table cutting diagram. Cut the chamfers on the ends of the Runner, Rail, Half Runners, and Half Rails. Miter-cut the Angled Uprights and the Braces to length from 2x4 cedar boards. Adjust your pocket hole jig and drill bit for 1 1/2"-thick stock, and then drill pocket holes in all the parts (except the Braces) as shown.
Tip: Keep Parts Sorted As You Work
The picnic table and stools have a lot of parts. To make sure duplicate parts are exactly the same length, measure and mark carefully and use a stop block on your miter saw. To keep track of the parts, mark them with white chalk as you cut them to length. Also sort them into stacks as you work. Once the project is assembled and ready to finish, the chalk will wipe away easily with a damp rag.
-
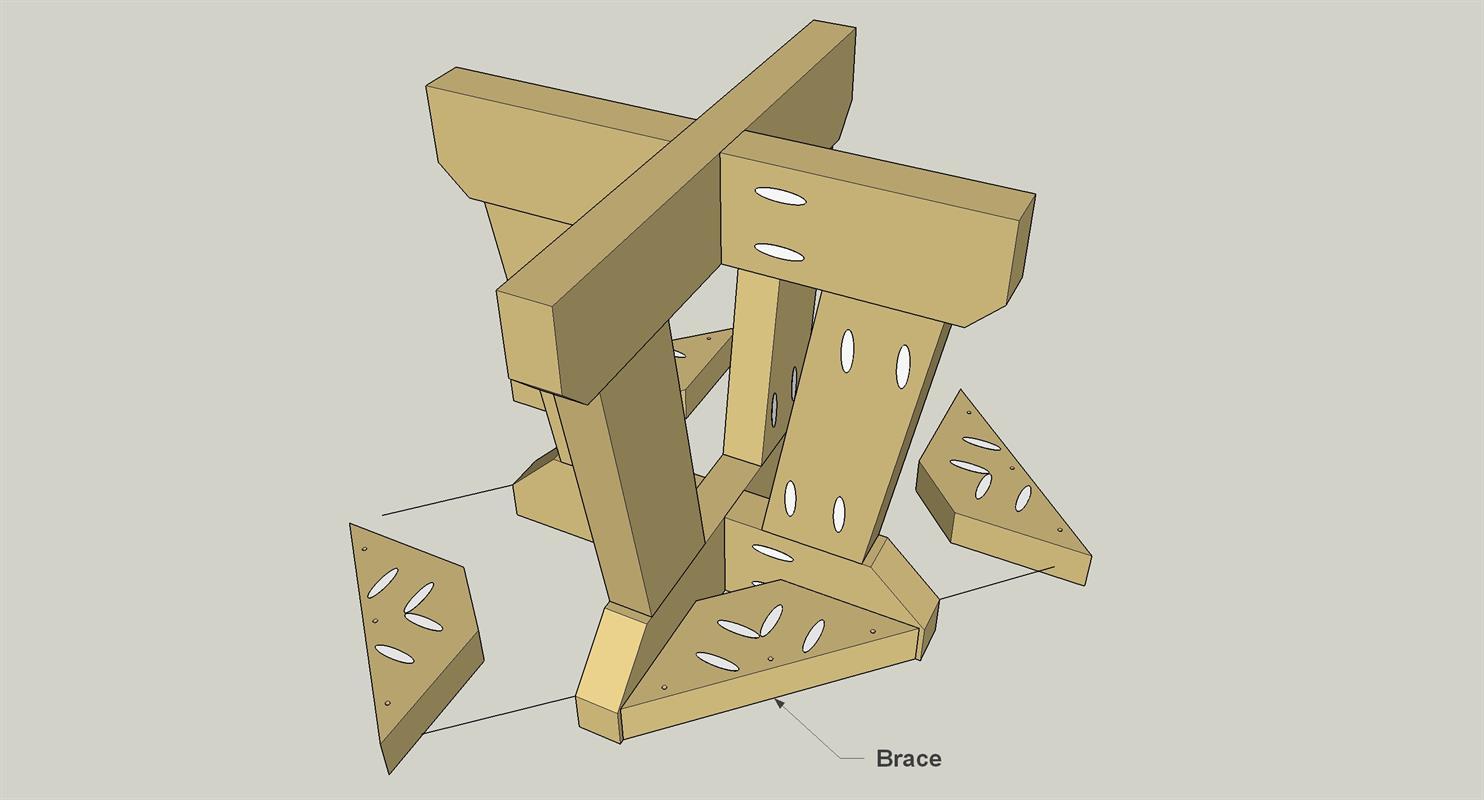
Drill Pocket Holes in the Braces
Remove the drill guide block from your pocket hole jig. Clamp it to a Brace with the end of the block 2 1/2" from the tip of the miter and the side of the block flush with the edge of the Brace, as shown. With the drill-bit stop collar positioned for 1 1/2"-thick stock, drill two pocket holes. Drill two additional pocket holes in the other end of the Brace, aligning the drill guide block with the opposite edge of the Brace. Drill pocket holes in the remaining braces in the same way.

-
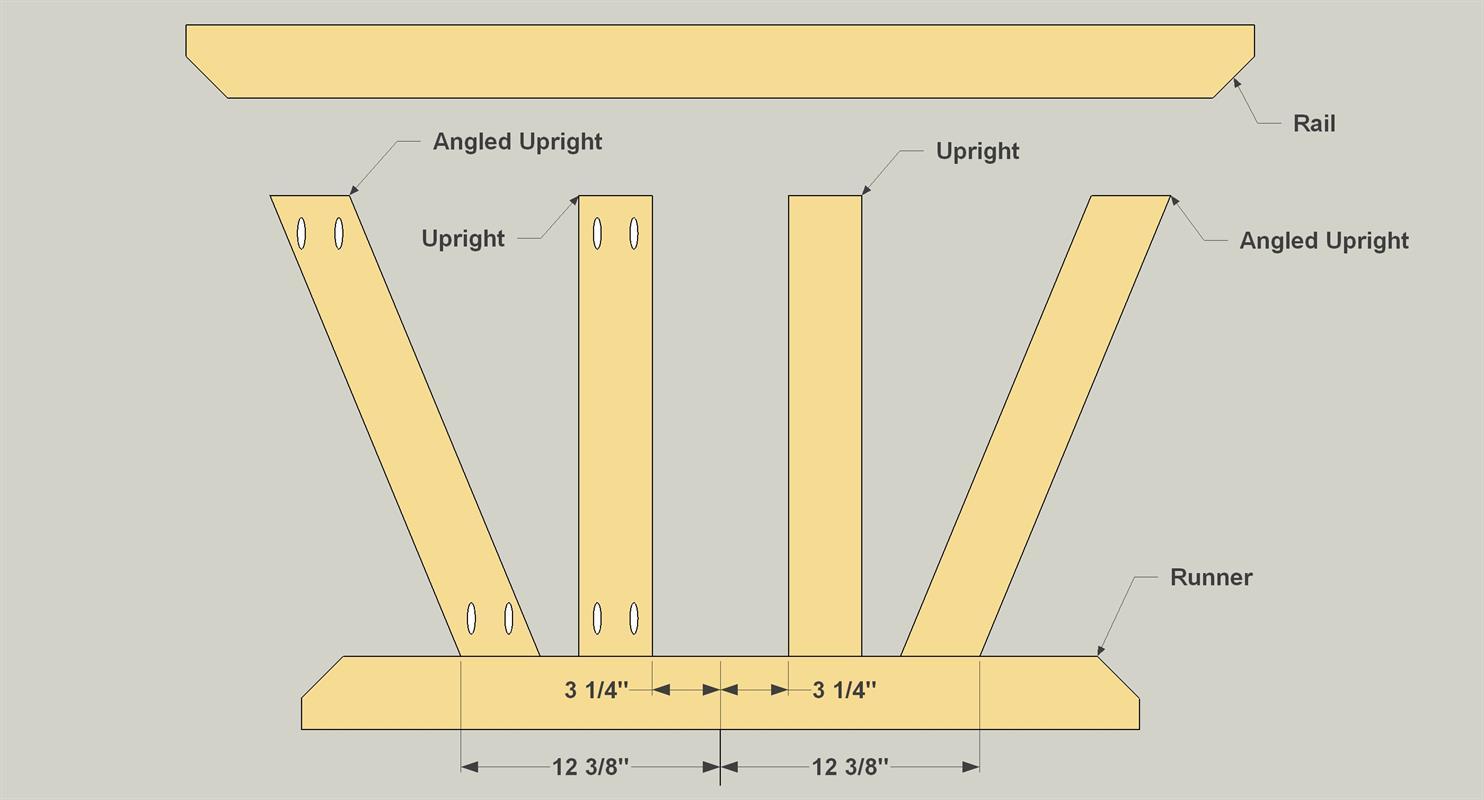
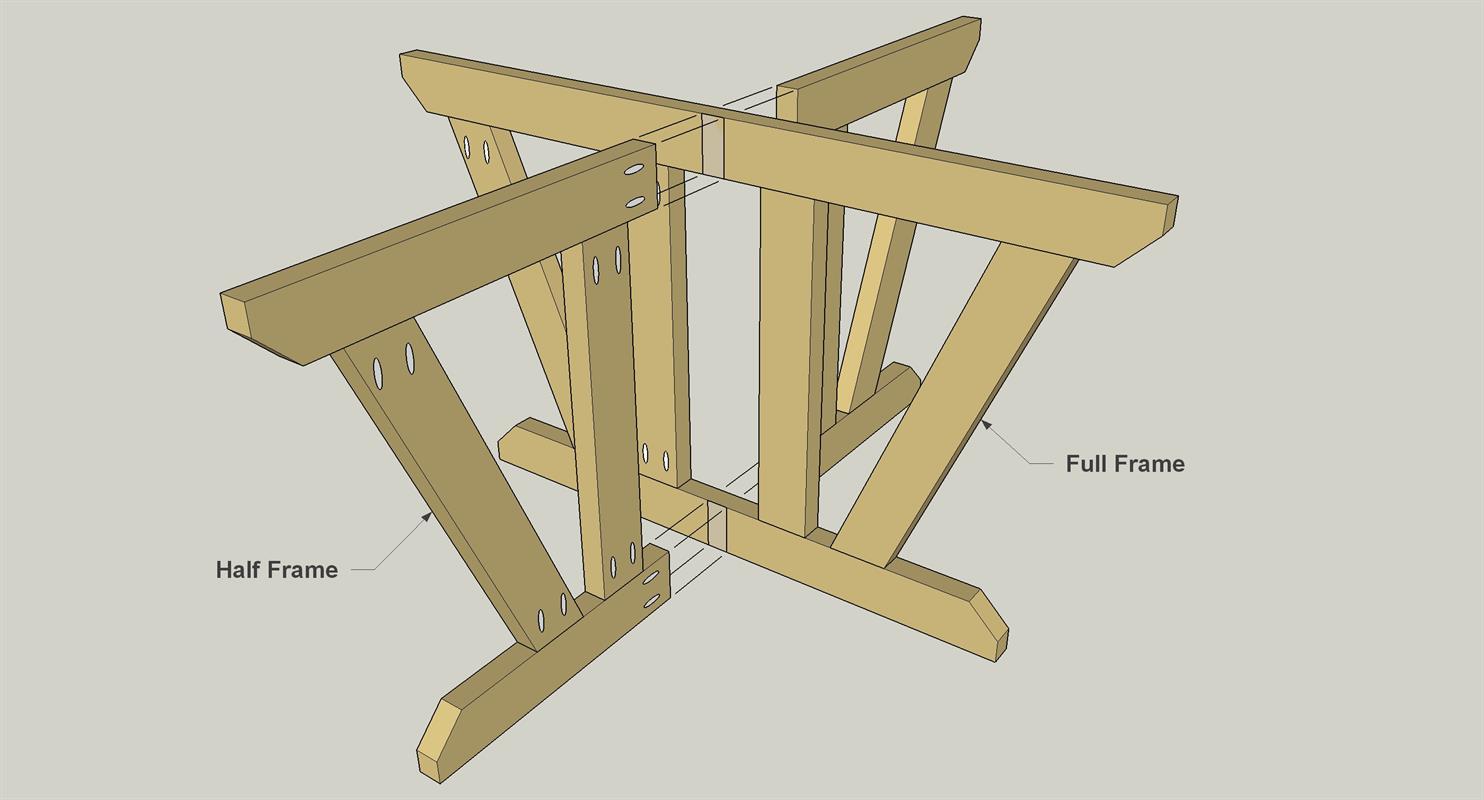
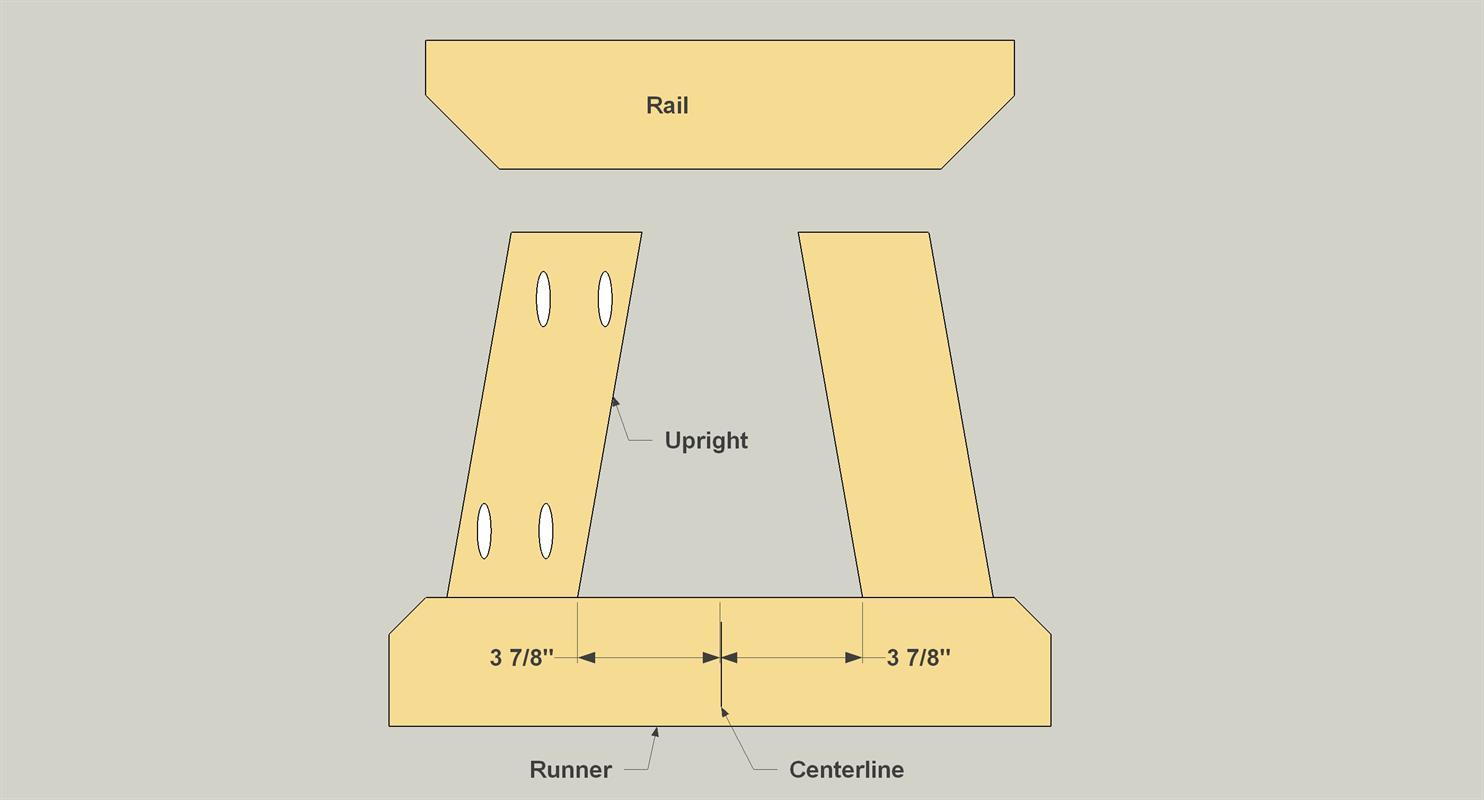
Build the Full Frame
Mark a centerline on the top edge of the Runner. Measuring from this line, mark the locations of the inside edges of the Uprights and the outside edges of the Angled Uprights, as shown. Also mark the locations of the outside edges of the Angled Uprights. Attach all of the Uprights and Angled Uprights to the Runner at these marks, and as shown, using 2 1/2" exterior pocket-hole screws. Next, center the Rail on the Uprights, and attach the Rail, again using 2 1/2" exterior pocket-hole screws.
-
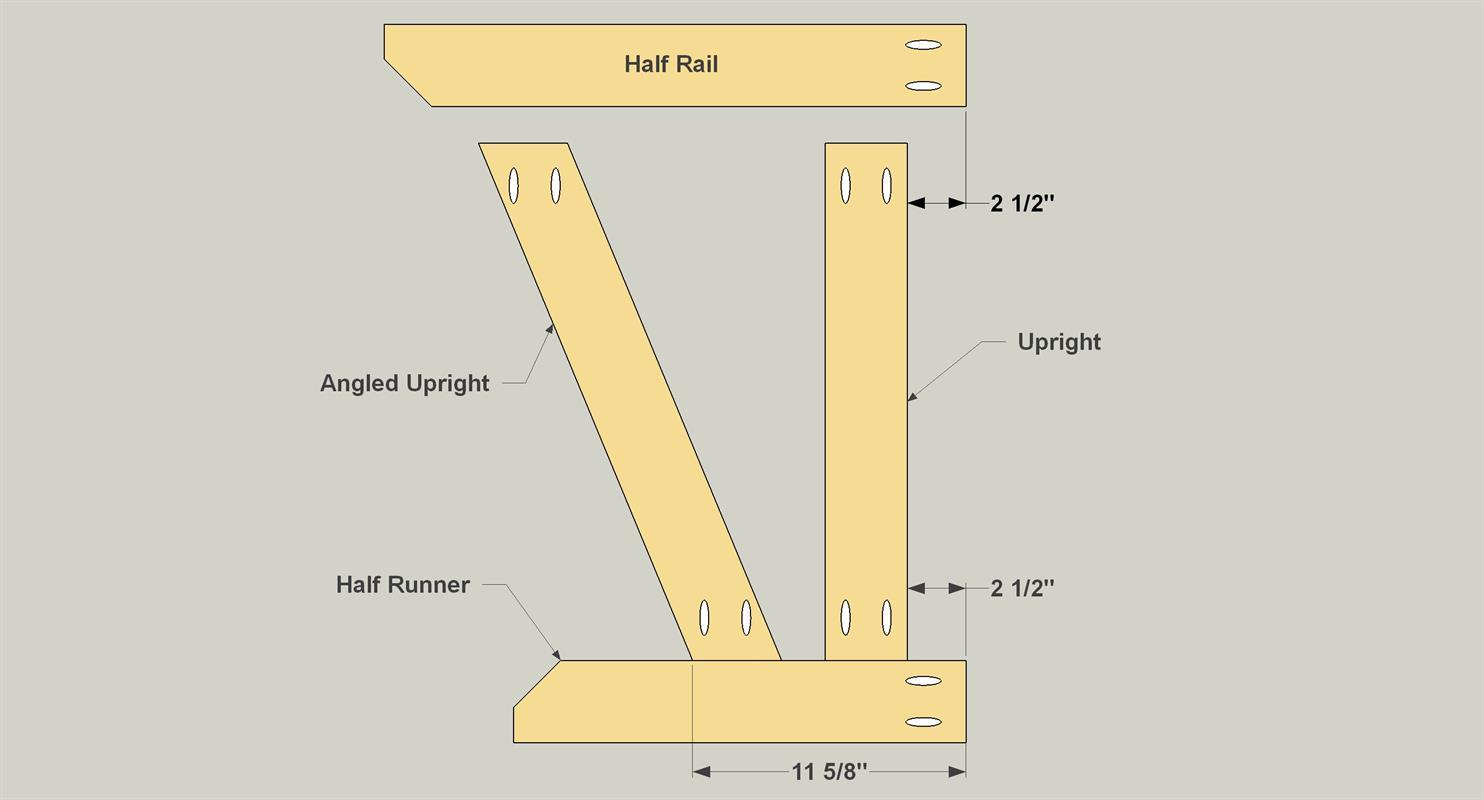
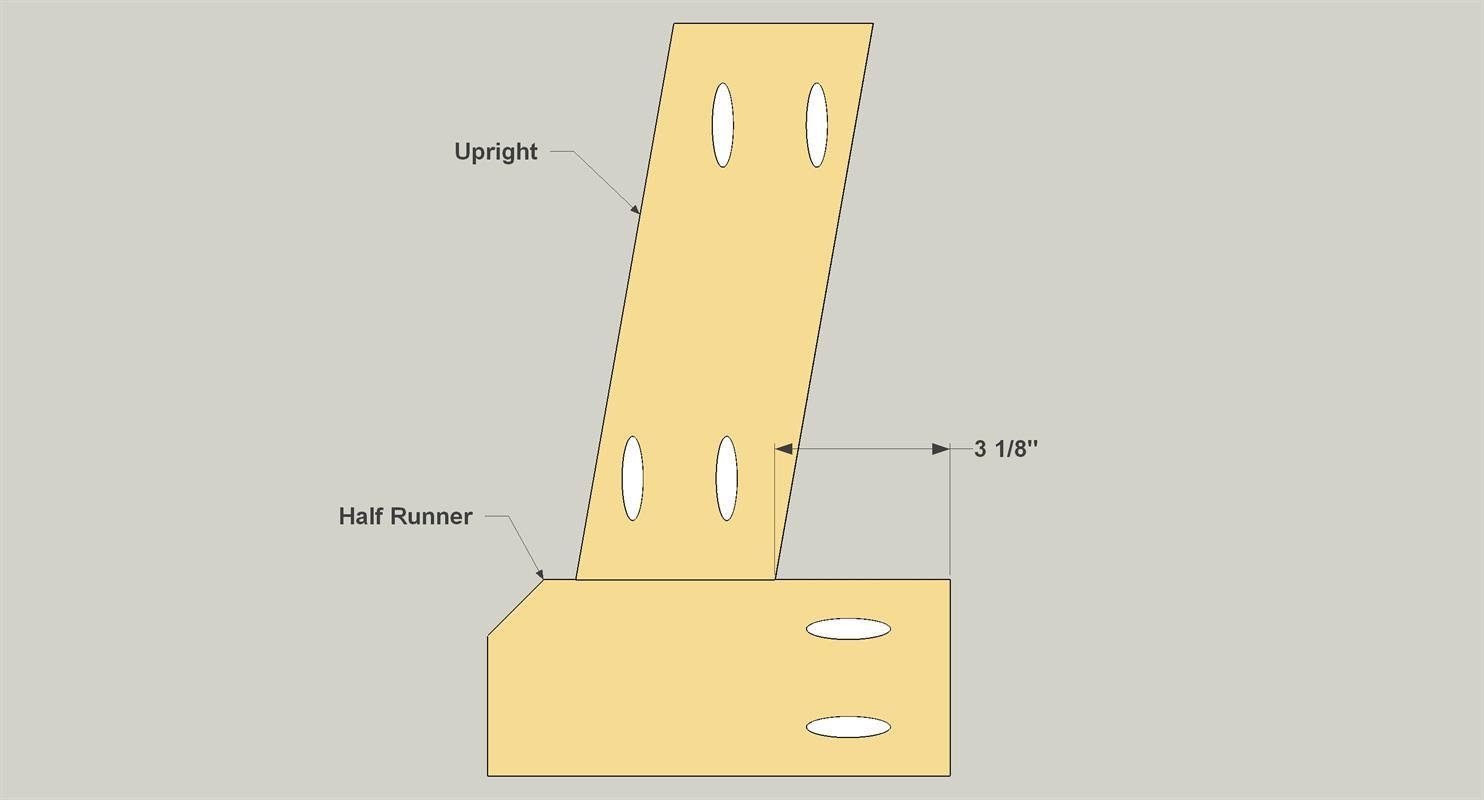
Build the Half Frames
Measuring from the inside end of the Half Runners, mark the locations of the inside edges of the Uprights as shown. Also mark the locations of the outside edges of the Angled Uprights. Attach the Uprights and the Angled Uprights to the Half Runners using 2 1/2" exterior pocket-hole screws. Position the Half Rails on this assembly with the inside ends of the Half Rails protruding 2 1/2" beyond the inside edges of the Uprights. Drive in 2 1/2" exterior pocket-hole screws to secure the assembly.
-
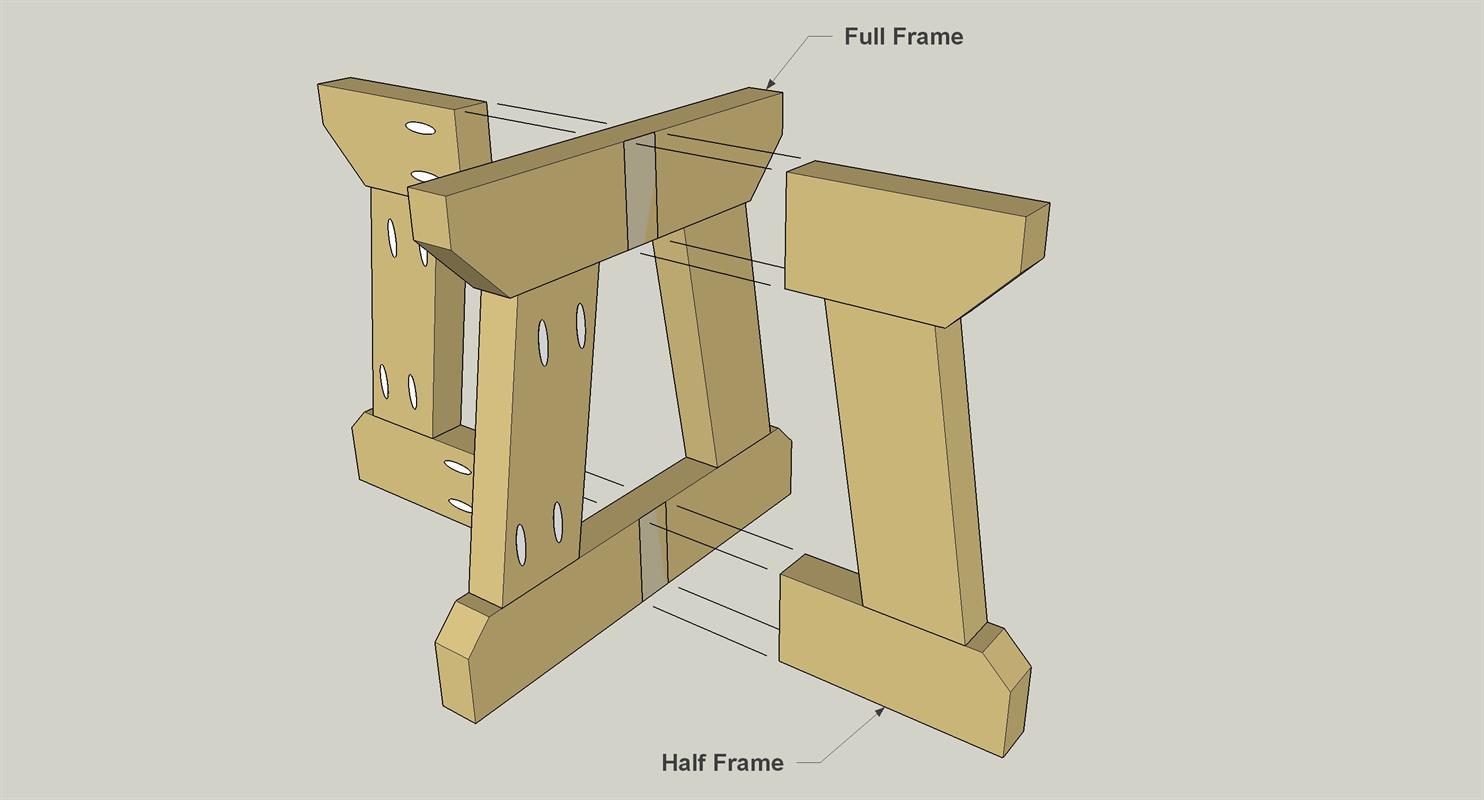
Assemble the Base
Center one half frame assembly on the full frame assembly, making sure that the edges of the runners are flush. Drive in 2 1/2" exterior pocket-hole screws. Repeat this to attach the second half frame assembly.
-
Add the Braces
Mark the locations of the top edges of the Braces on the Uprights. Position each Brace with equal space between the tips of the miters and the edges of the Uprights, and then drive in 2 1/2" exterior pocket-hole screws to attach the Braces.

-
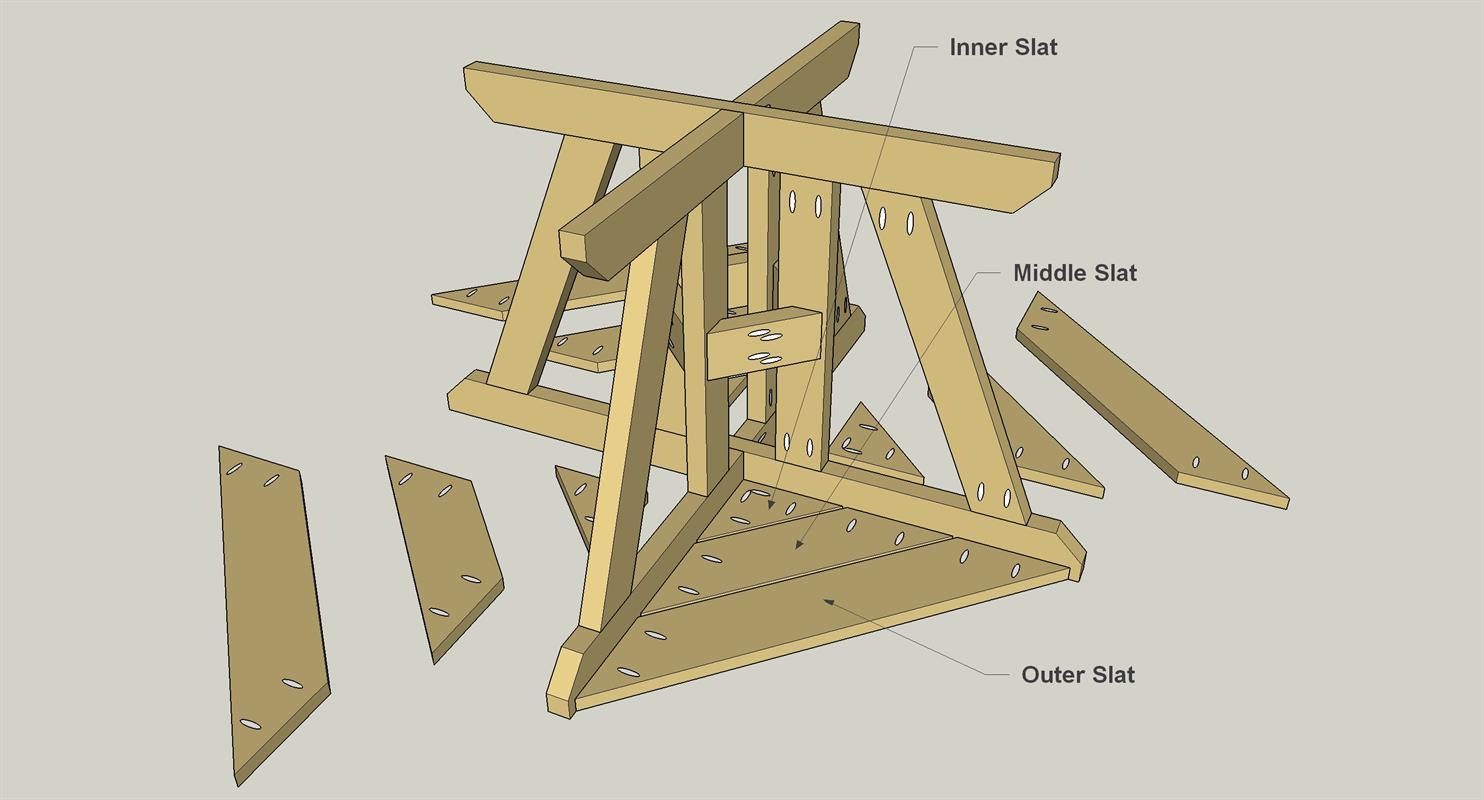
Cut the Slats
Miter-cut four Inner Slats, four Middle Slats, and four Outer Slats to length from cedar deck boards, as shown in the table cutting diagram. Adjust your pocket-hole jig and drill-bit stop collar for 1"-thick material, and then drill the pocket holes in the Slats, as shown.
-
Attach the Slats
Clamp the Base Assembly upside down to a flat surface. To make sure the Base Assembly is square, first screw all four Inner Slats in place with 1 1/2" exterior pocket-hole screws. Then Add the Middle Slats and then the Outer Slats. There will be slight gaps between the slats.
-
Finish Up the Table
Some of the pocket holes will be visible after final assembly. If desired, you can glue cedar pocket-hole plugs into these exposed holes, and then trim the plugs flush. This step is totally optional. Sand to slightly bevel or round over all of the exposed cut ends and edges. Also do any final sanding that’s necessary to prepare for finishing. Wipe away the sanding dust when done, and then apply an oil-based exterior toner/stain, taking extra care to fully coat exposed end grain. If you’ll be using the table on a deck or patio, screw nylon glides on to the bottom edges of the Runner and Half Runners.
-
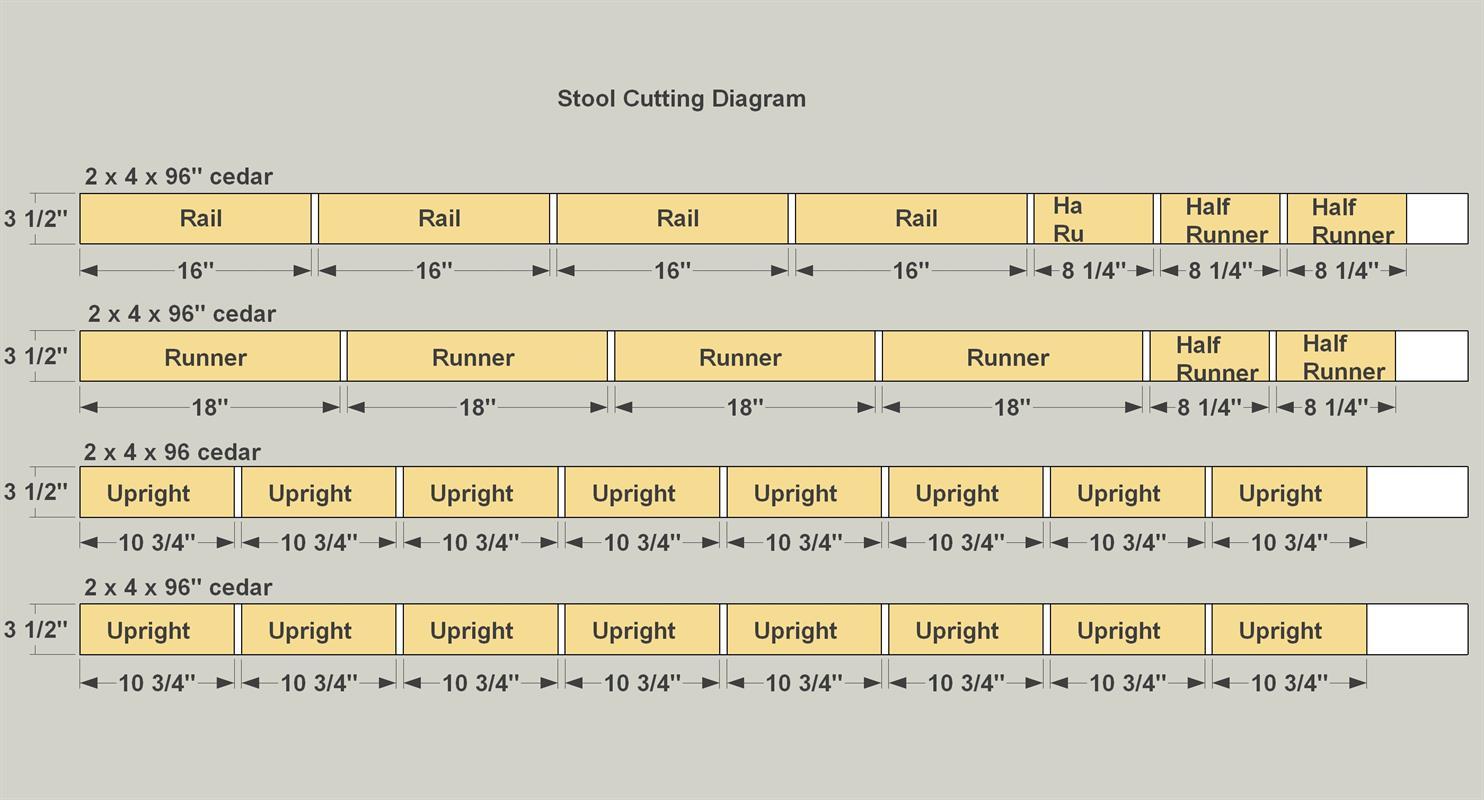
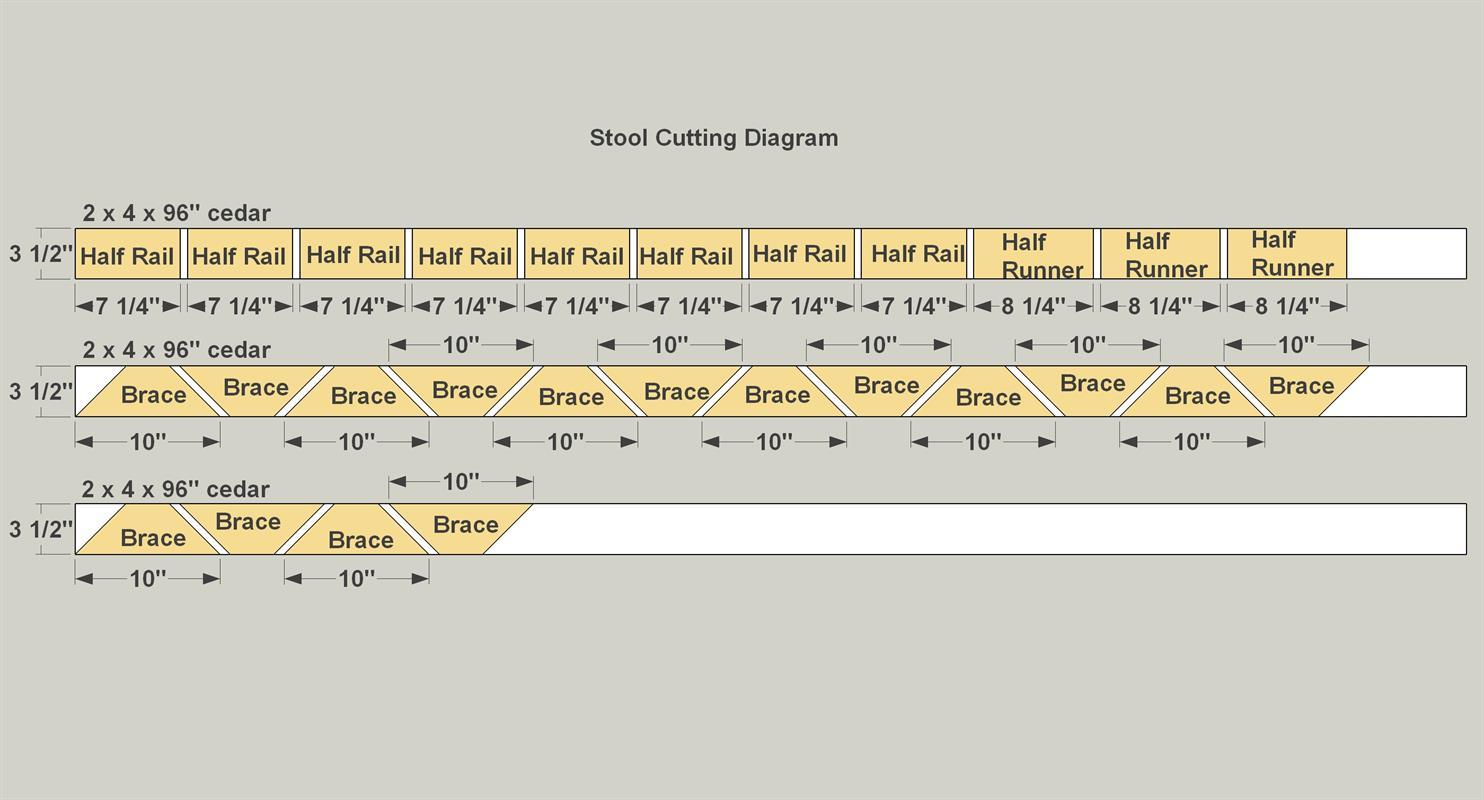
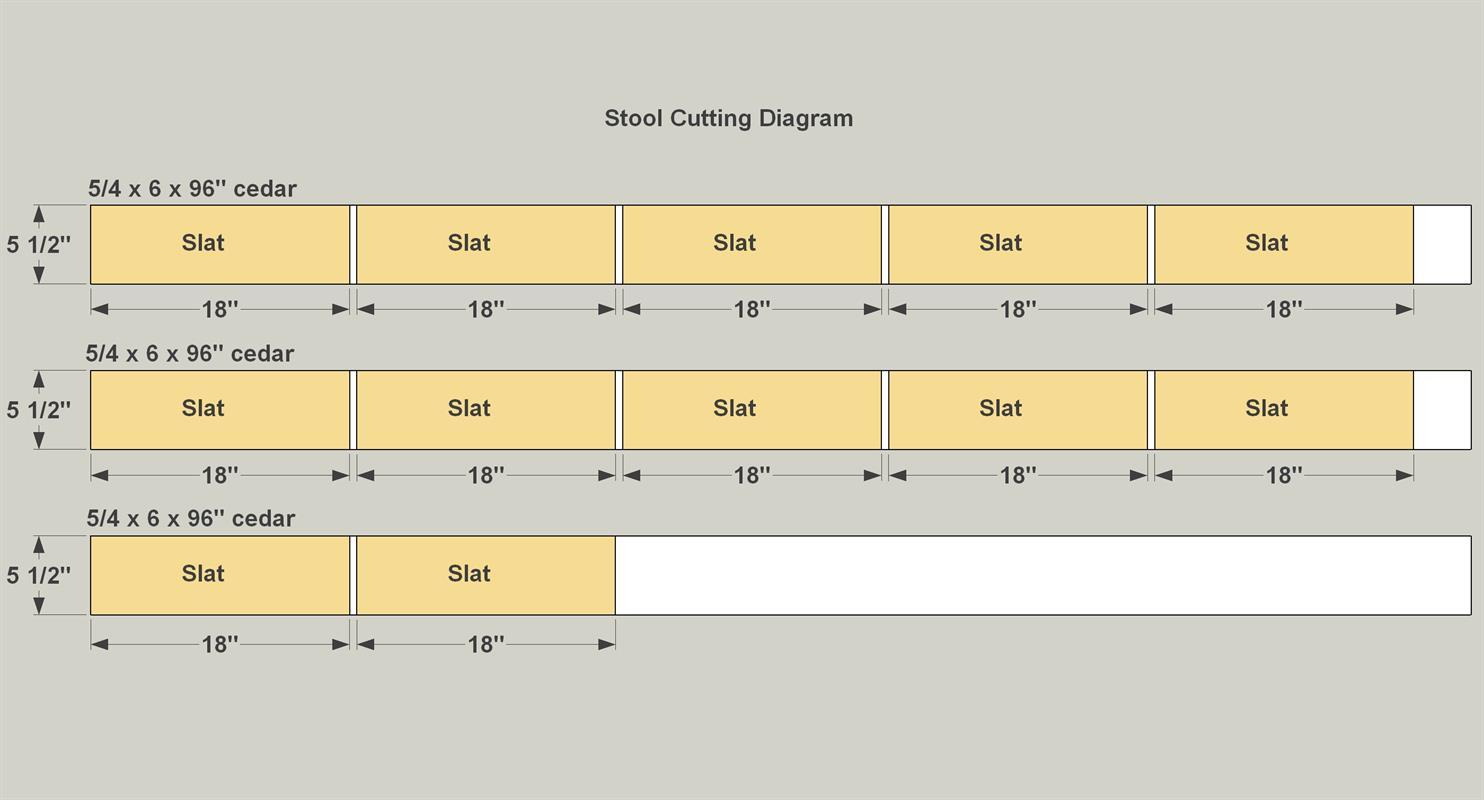
Cut the Stool Parts
Building the stools is very similar to building the tables. So, you can go ahead and cut all the parts. Just be sure to cut them consistently, and to keep them organized so you know what’s what. First, cut the Runners, Uprights, Rails, Half Runners, and Half Rails to length from 2x4 cedar boards, as shown in the stool cutting diagram. Cut the chamfers on the ends of the Runners, Rails, Half Runners, and Half Rails. Miter-cut the Uprights and Braces to length from 2x4 cedar boards. Cut the Slats to length from cedar deck boards. Adjust your pocket hole jig and drill bit for 1 1/2"-thick stock and drill pocket holes in all the parts except the Slats. Also drill the pilot holes through the Braces. These will be used for fastening the Slats.
-
Build the Full Frames
Mark a centerline on the top edge of each Runner. Measuring from this line, mark the locations of the inside edges of the Uprights. Attach the Uprights to the Runners using 2 1/2" exterior pocket-hole screws. Note the opposing pocket-hole locations on each pair of Uprights. Center the Rails on the Uprights, clamp, and drive the pocket screws.
-
Join the Half Runners and Uprights
Measuring from the inside end of the Half Runners, mark the locations of the inside edges of the Uprights. Then use 2 1/2" exterior pocket-hole screws to attach the Uprights to the Half Runners.
-
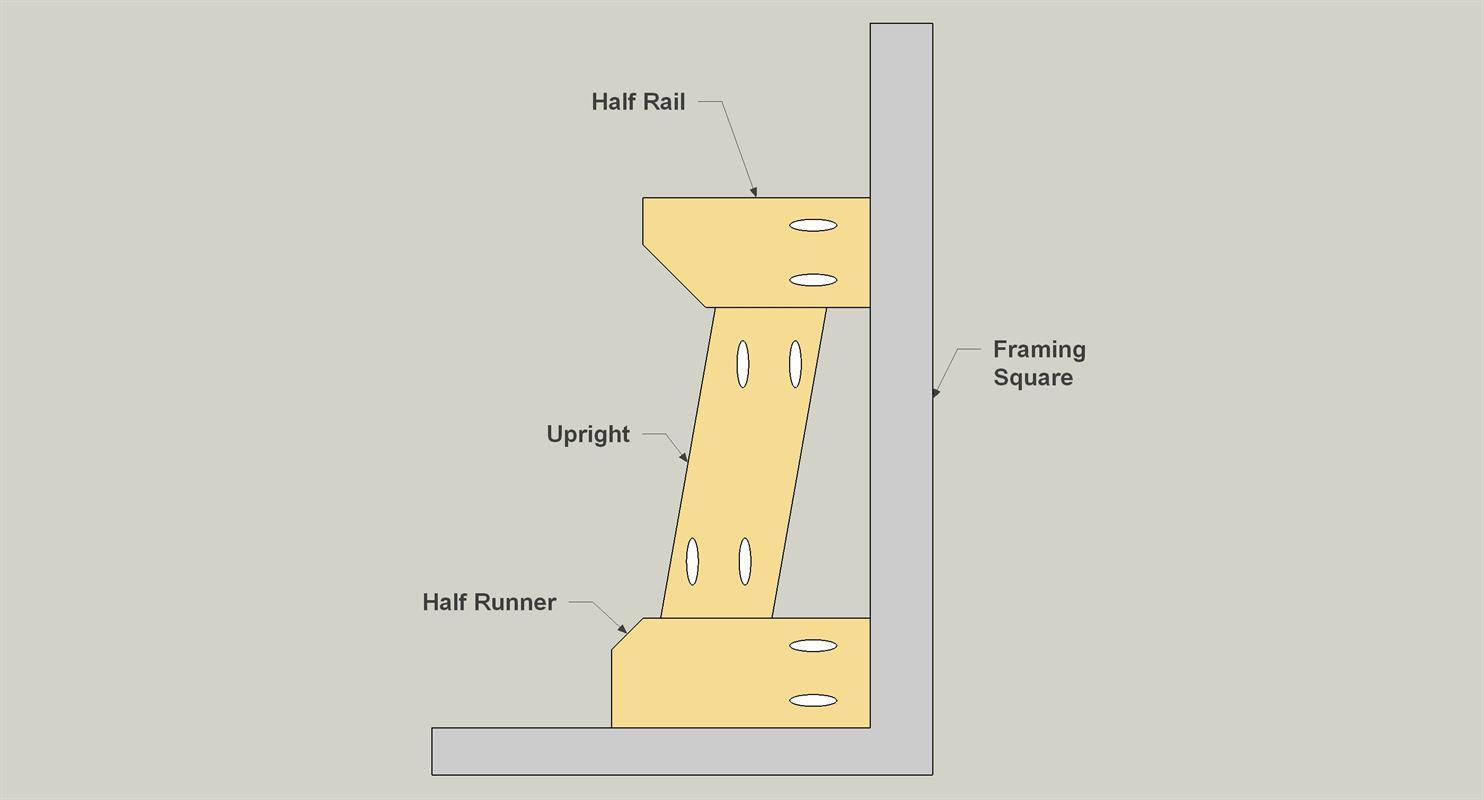
Add the Half Rails
Lay one Half Runner/Upright assembly and one Half Rail on a flat surface. Use a framing square to align the ends of the Half Runner and Half Rail as shown. Attach the Upright to the Half Rail using 2 1/2" exterior pocket-hole screws. Repeat with the remaining Half Runner/Upright assemblies and Half Rails.
-
Assemble the Stool Base
Center one Half Frame on one Full Frame, making sure that the Runners and Rails are flush. Then drive 2 1/2" exterior pocket-hole screws to secure the assembly. Do the same to add a second Half Frame. Repeat with the remaining Full Frame and Half Frame Assemblies.
-
Add the Braces
Clamp one stool base assembly upside down on a flat surface. Position Braces between the Rail and Half Rails with equal space between the tips of the miters and the ends of the Rail and Half Rail. Screw the Braces in place. Repeat with the remaining Base Assemblies and Braces.
-
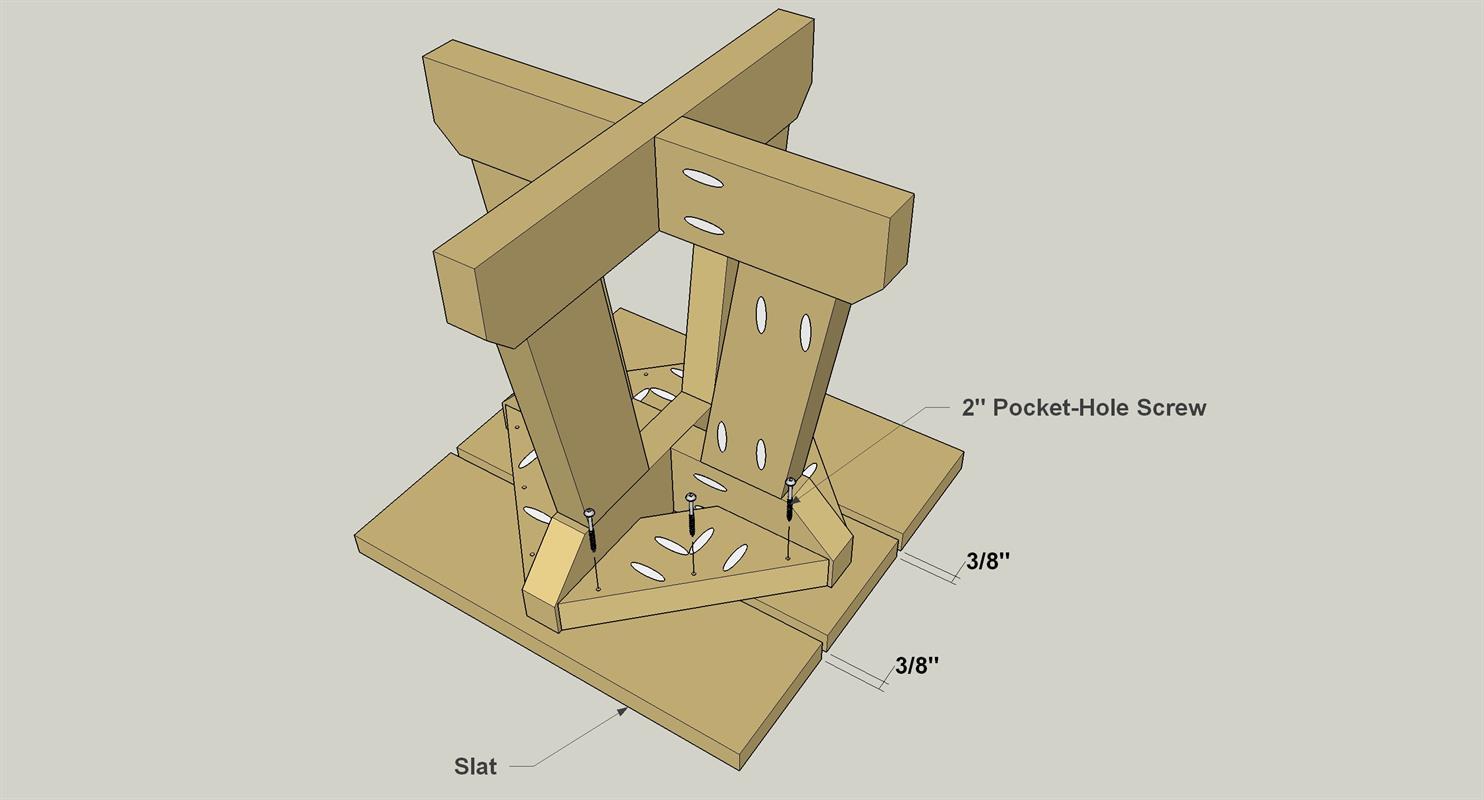
Fasten the Slats
Lay three Slats on a flat surface with the ends flush and 3/8" gaps between. Center a base assembly on the Slats and then drive 2" exterior pocket-hole screws through the pocket holes in the Braces and in to the Slats. Repeat with the remaining Slats and Bases.
-
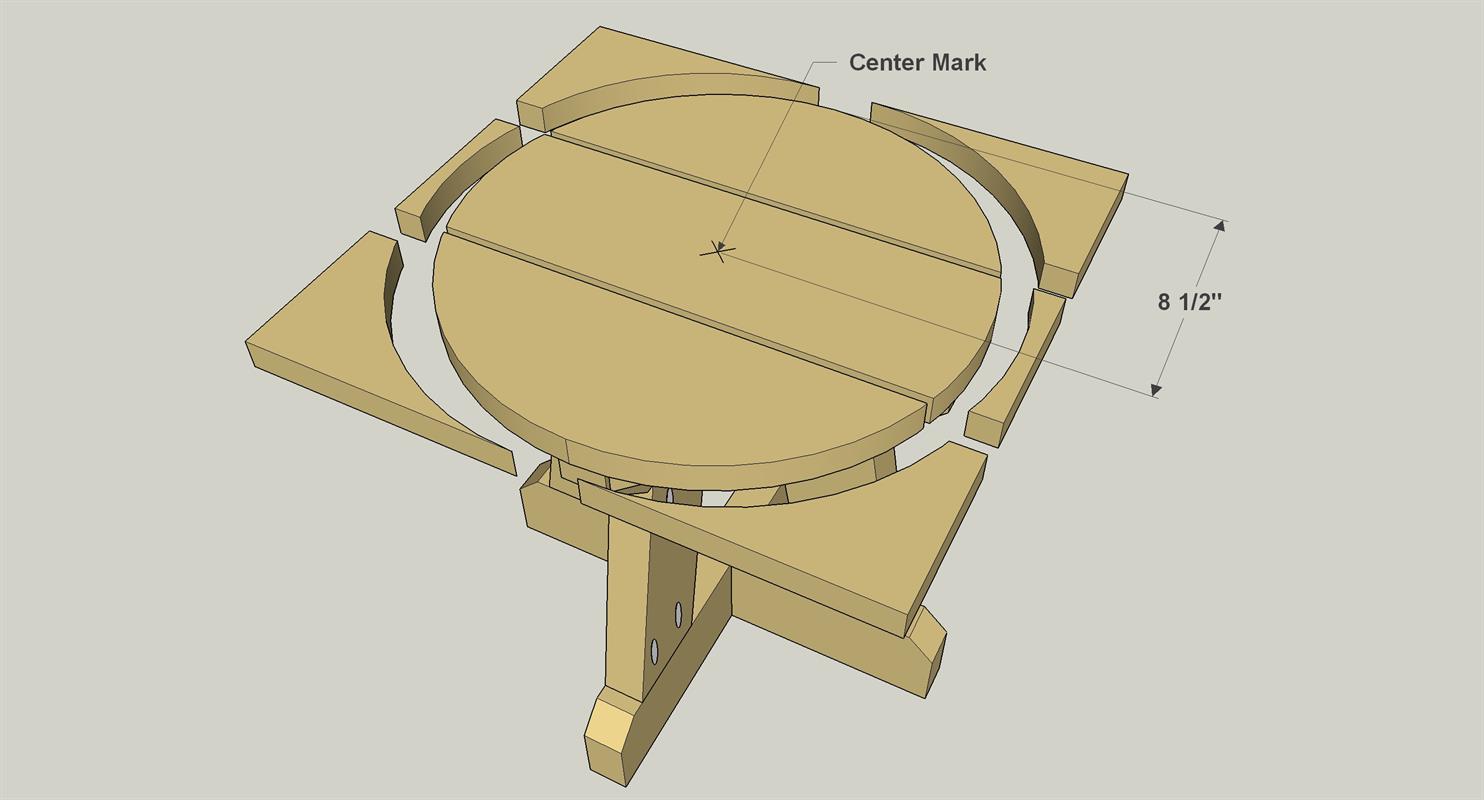
Shape the Seat
Turn the Stools right side up. Mark the center of each center Slat. Using a compass (or a homemade trammel, as discussed in the Tip below), draw a 17"-diameter (8 1/2"-radius) circle on the Slats. Using a jigsaw fitted with a fine-tooth blade, cut the seats to shape.
Tip: Draw Large Circles Easily
Most standard compasses won’t draw a circle larger that 6-9" in diameter. If you don’t have a large compass, you can easily make your own trammel. First, drive a small nail through a 10"-long scrap of wood near one end. Then drill another hole 8 1/2" from the nail, sizing the hole to snugly fit a pencil. Slip a pencil through the hole, place the nail point on the marked center point of the circle, and rotate draw the trammel to draw the circle.
-
Finish Up the Stools
Just as with the table, you can add cedar plugs to the stools if desired. Sand slight bevels or roundovers on the top edges, as well as on all exposed cut ends and edges. Apply an oil-based exterior toner/stain, taking extra care to fully coat exposed end grain. With the finish dry, screw nylon glides onto the bottom edges of the Runners and Half Runners. Then, prepare for great outdoor dining experiences at your new picnic table.