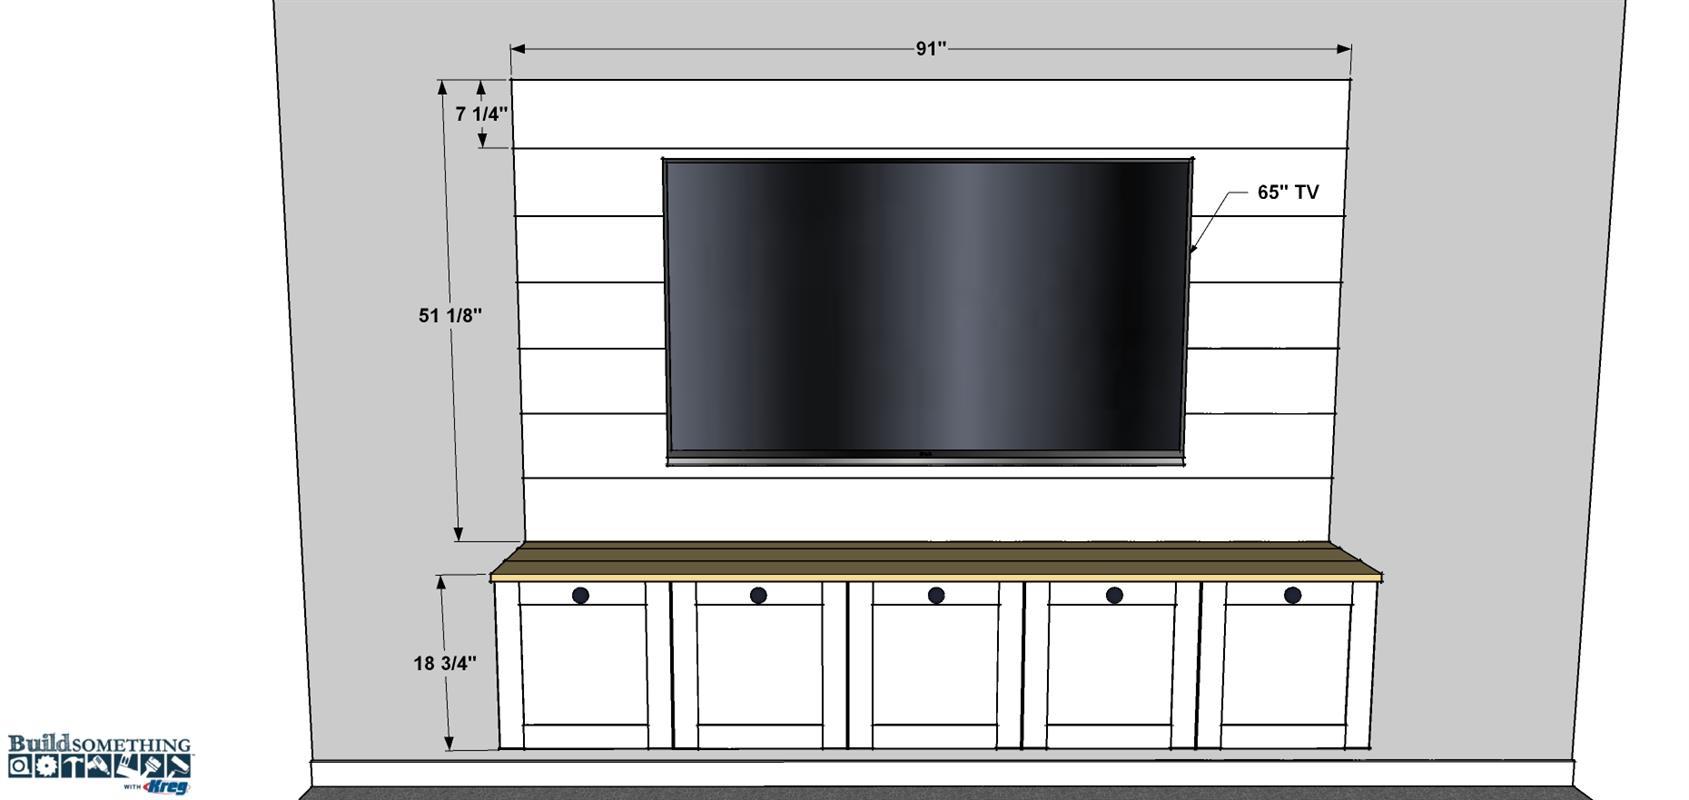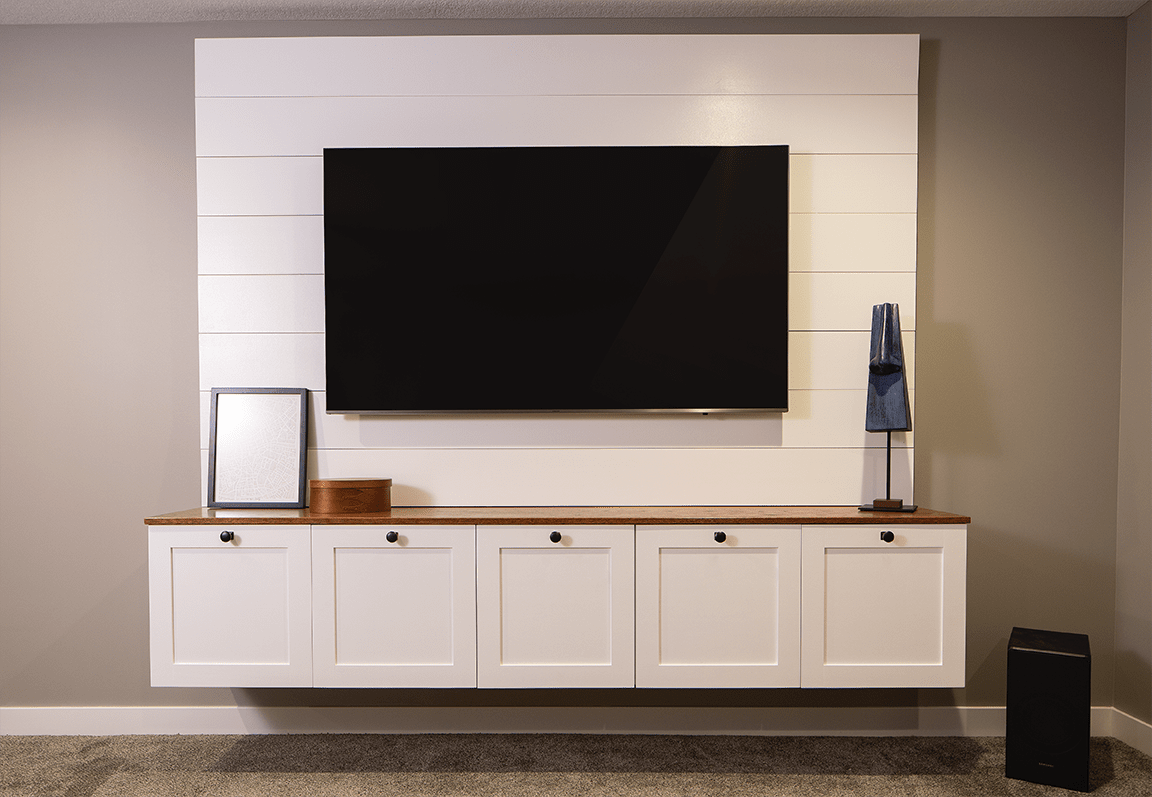
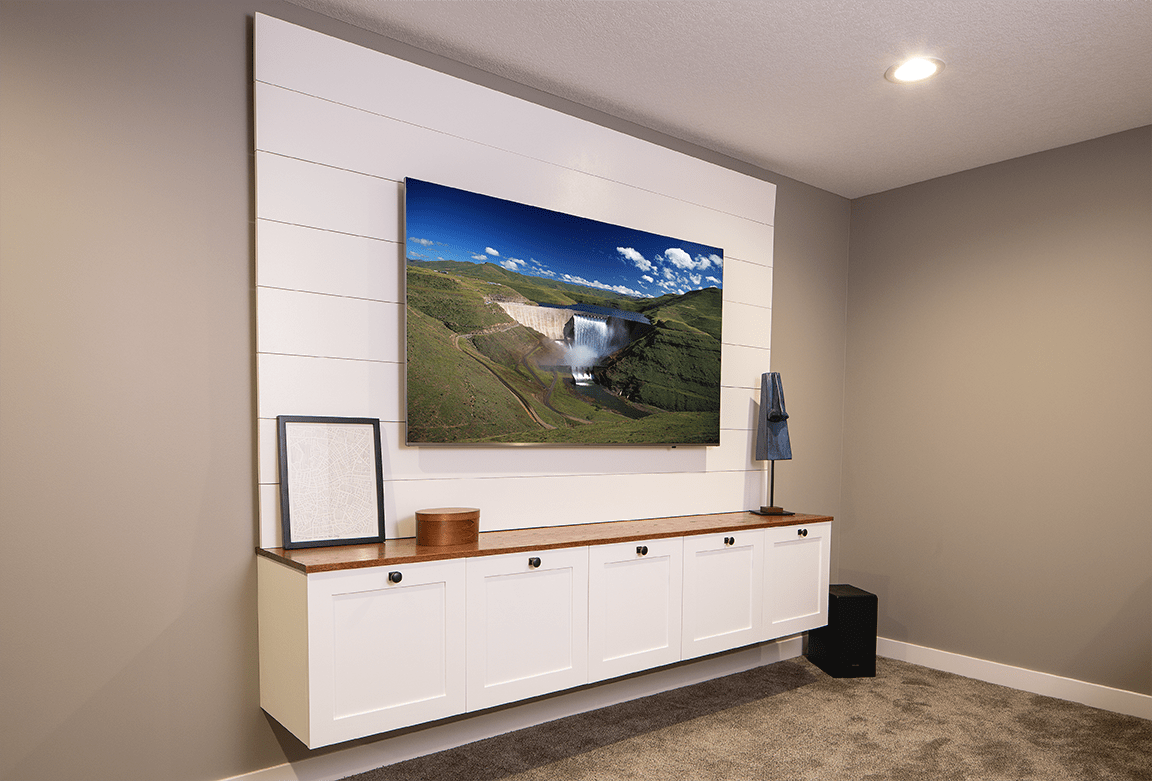
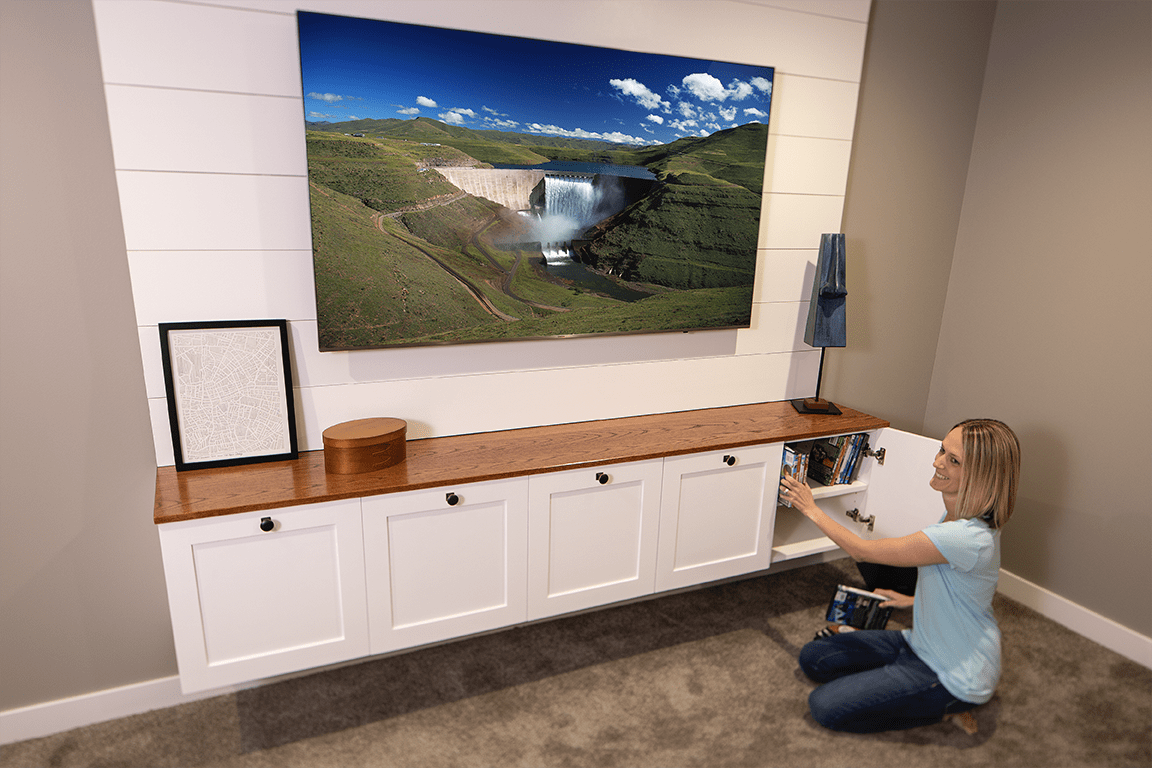
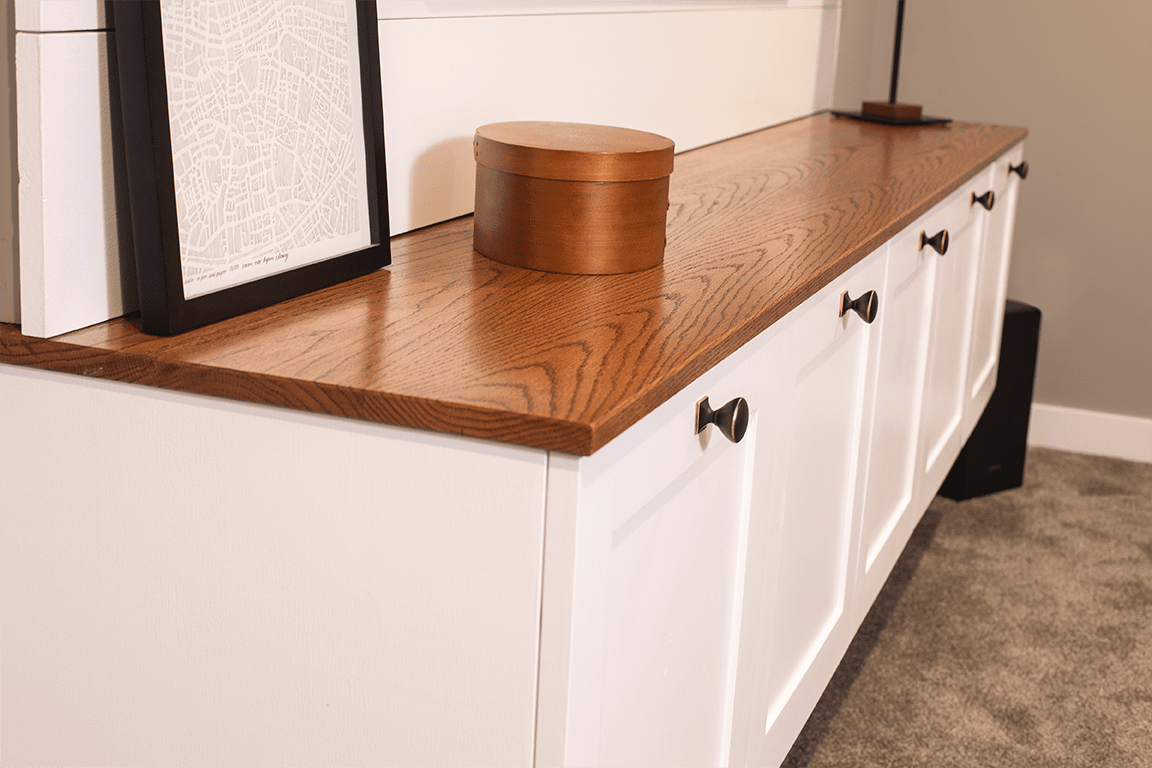


Wall mounting works great for big TVs, but a bare TV on the wall sure doesn’t add any style points to a room. This TV cabinet, on the other hand, sure does. It offers space for media components, and has storage room to spare. Plus, the optional backdrop looks great while hiding cords and cables.
Tools
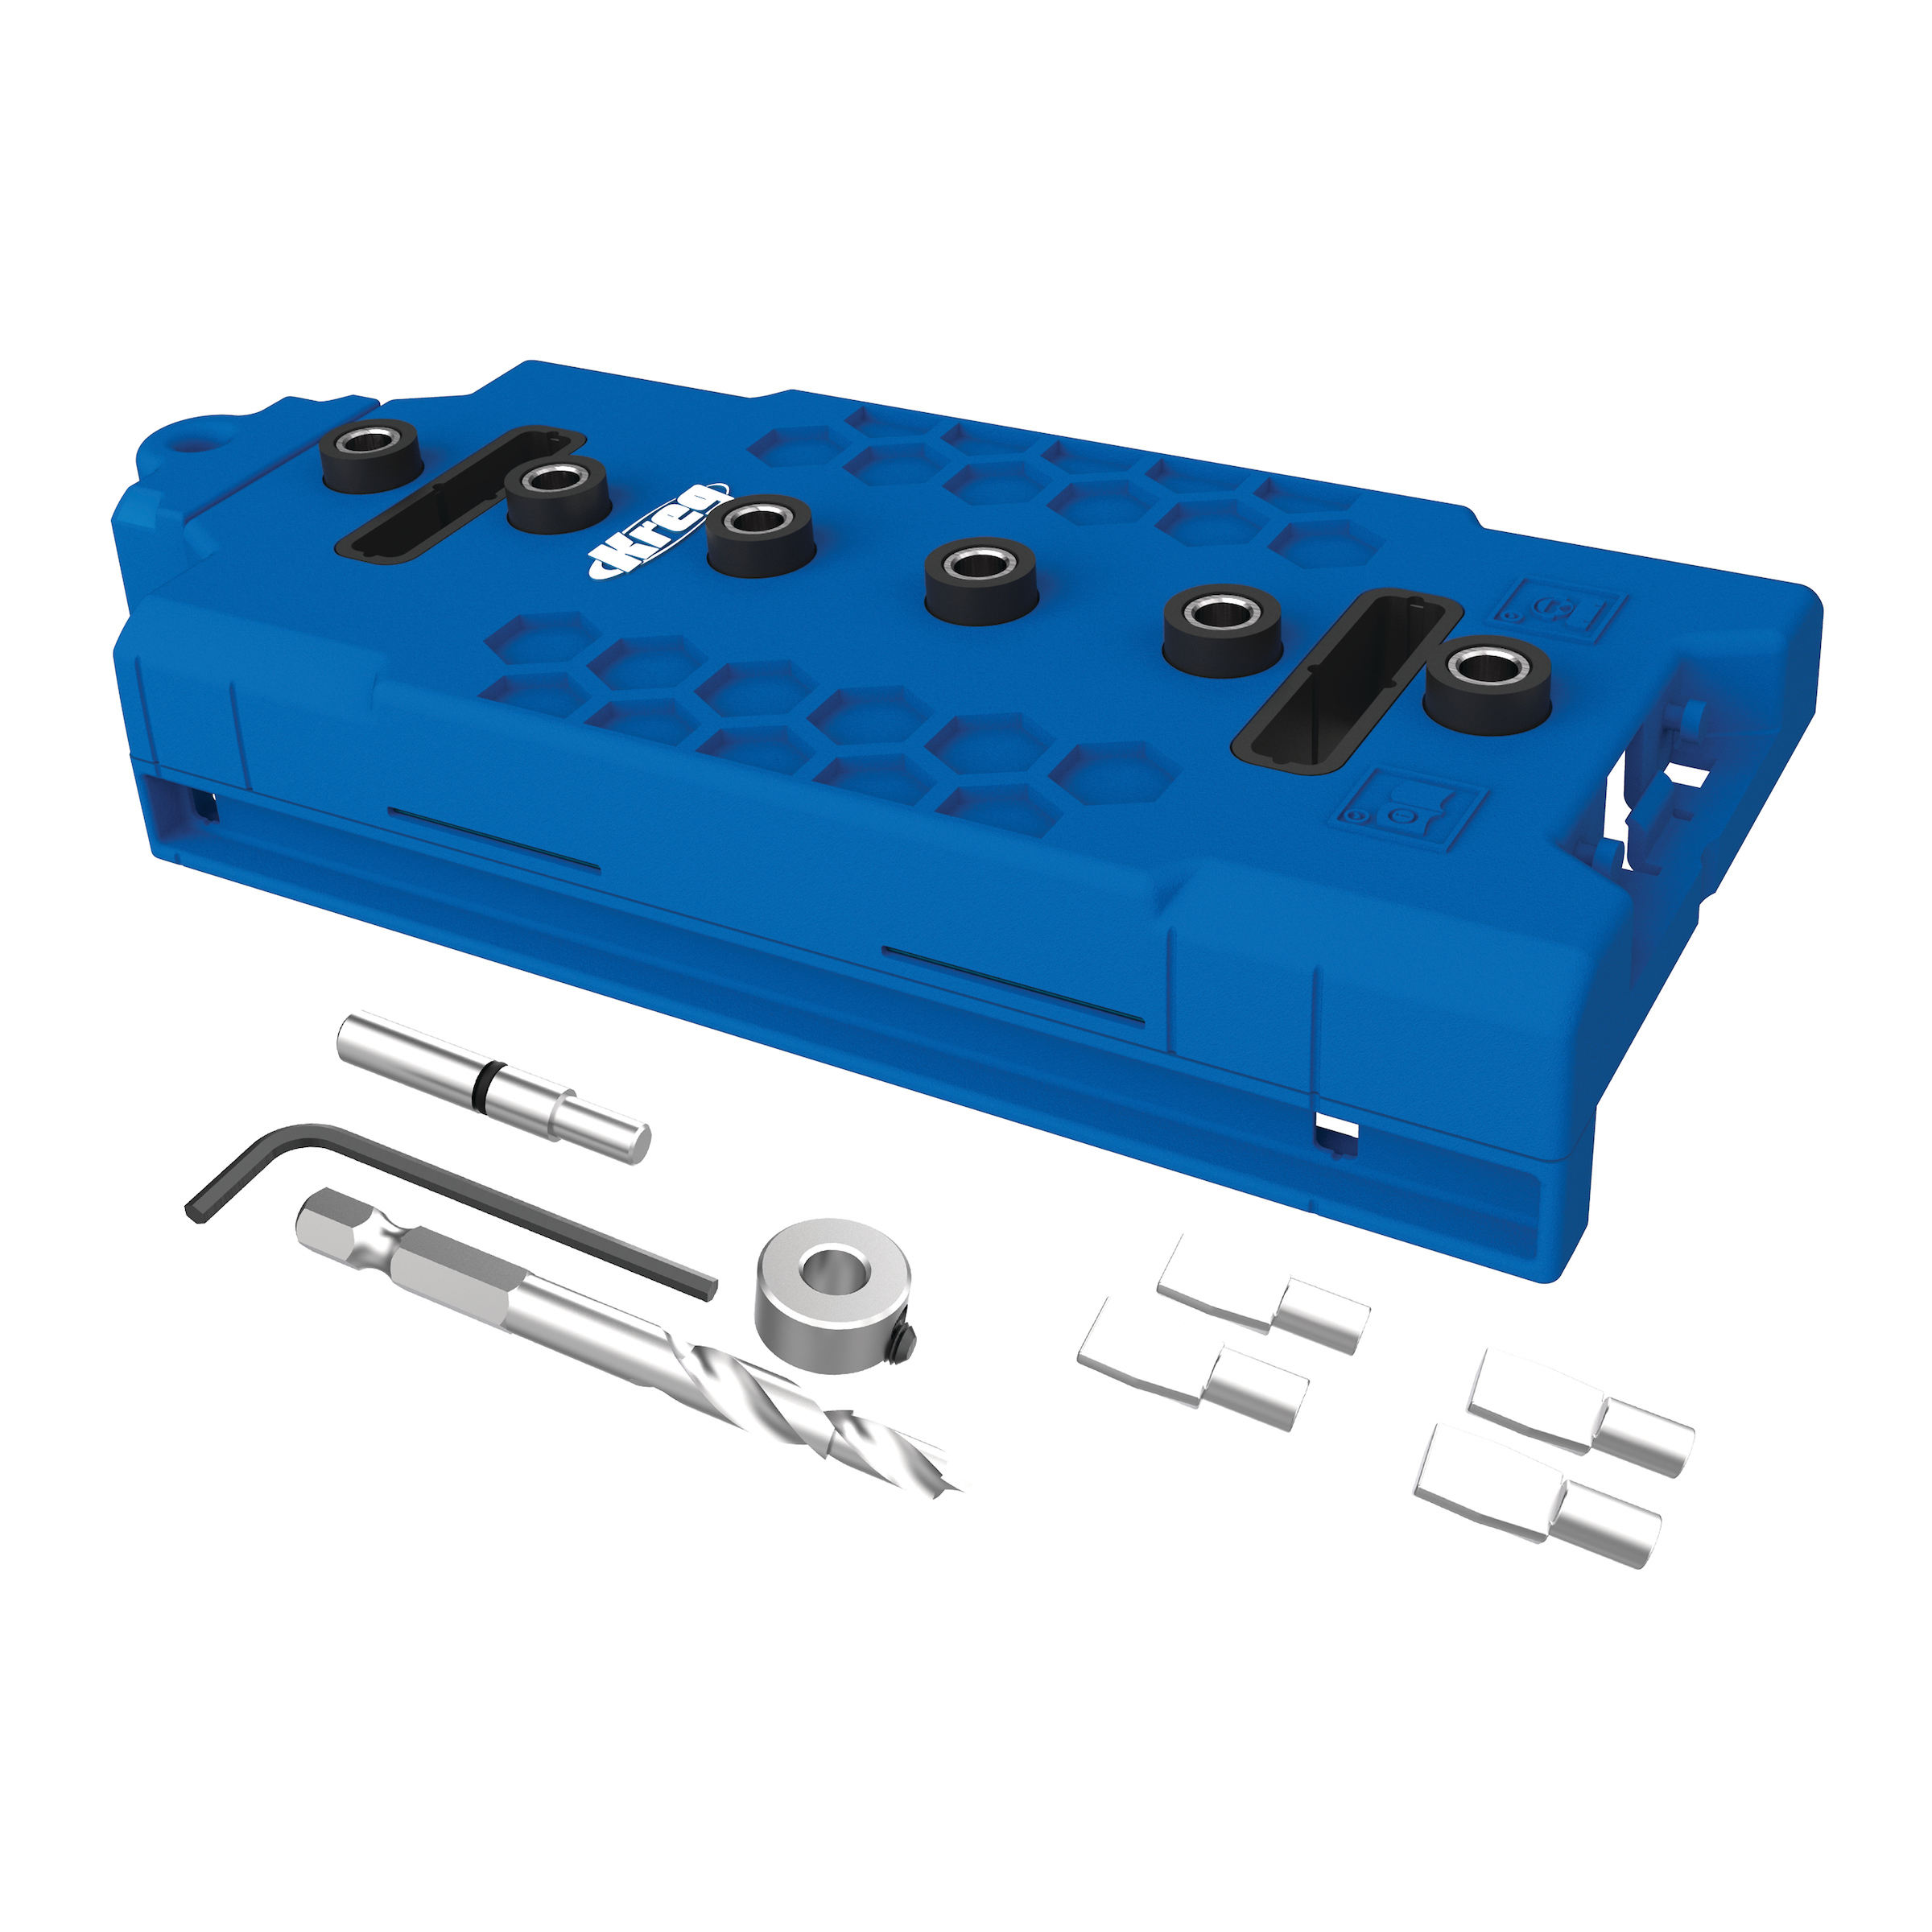
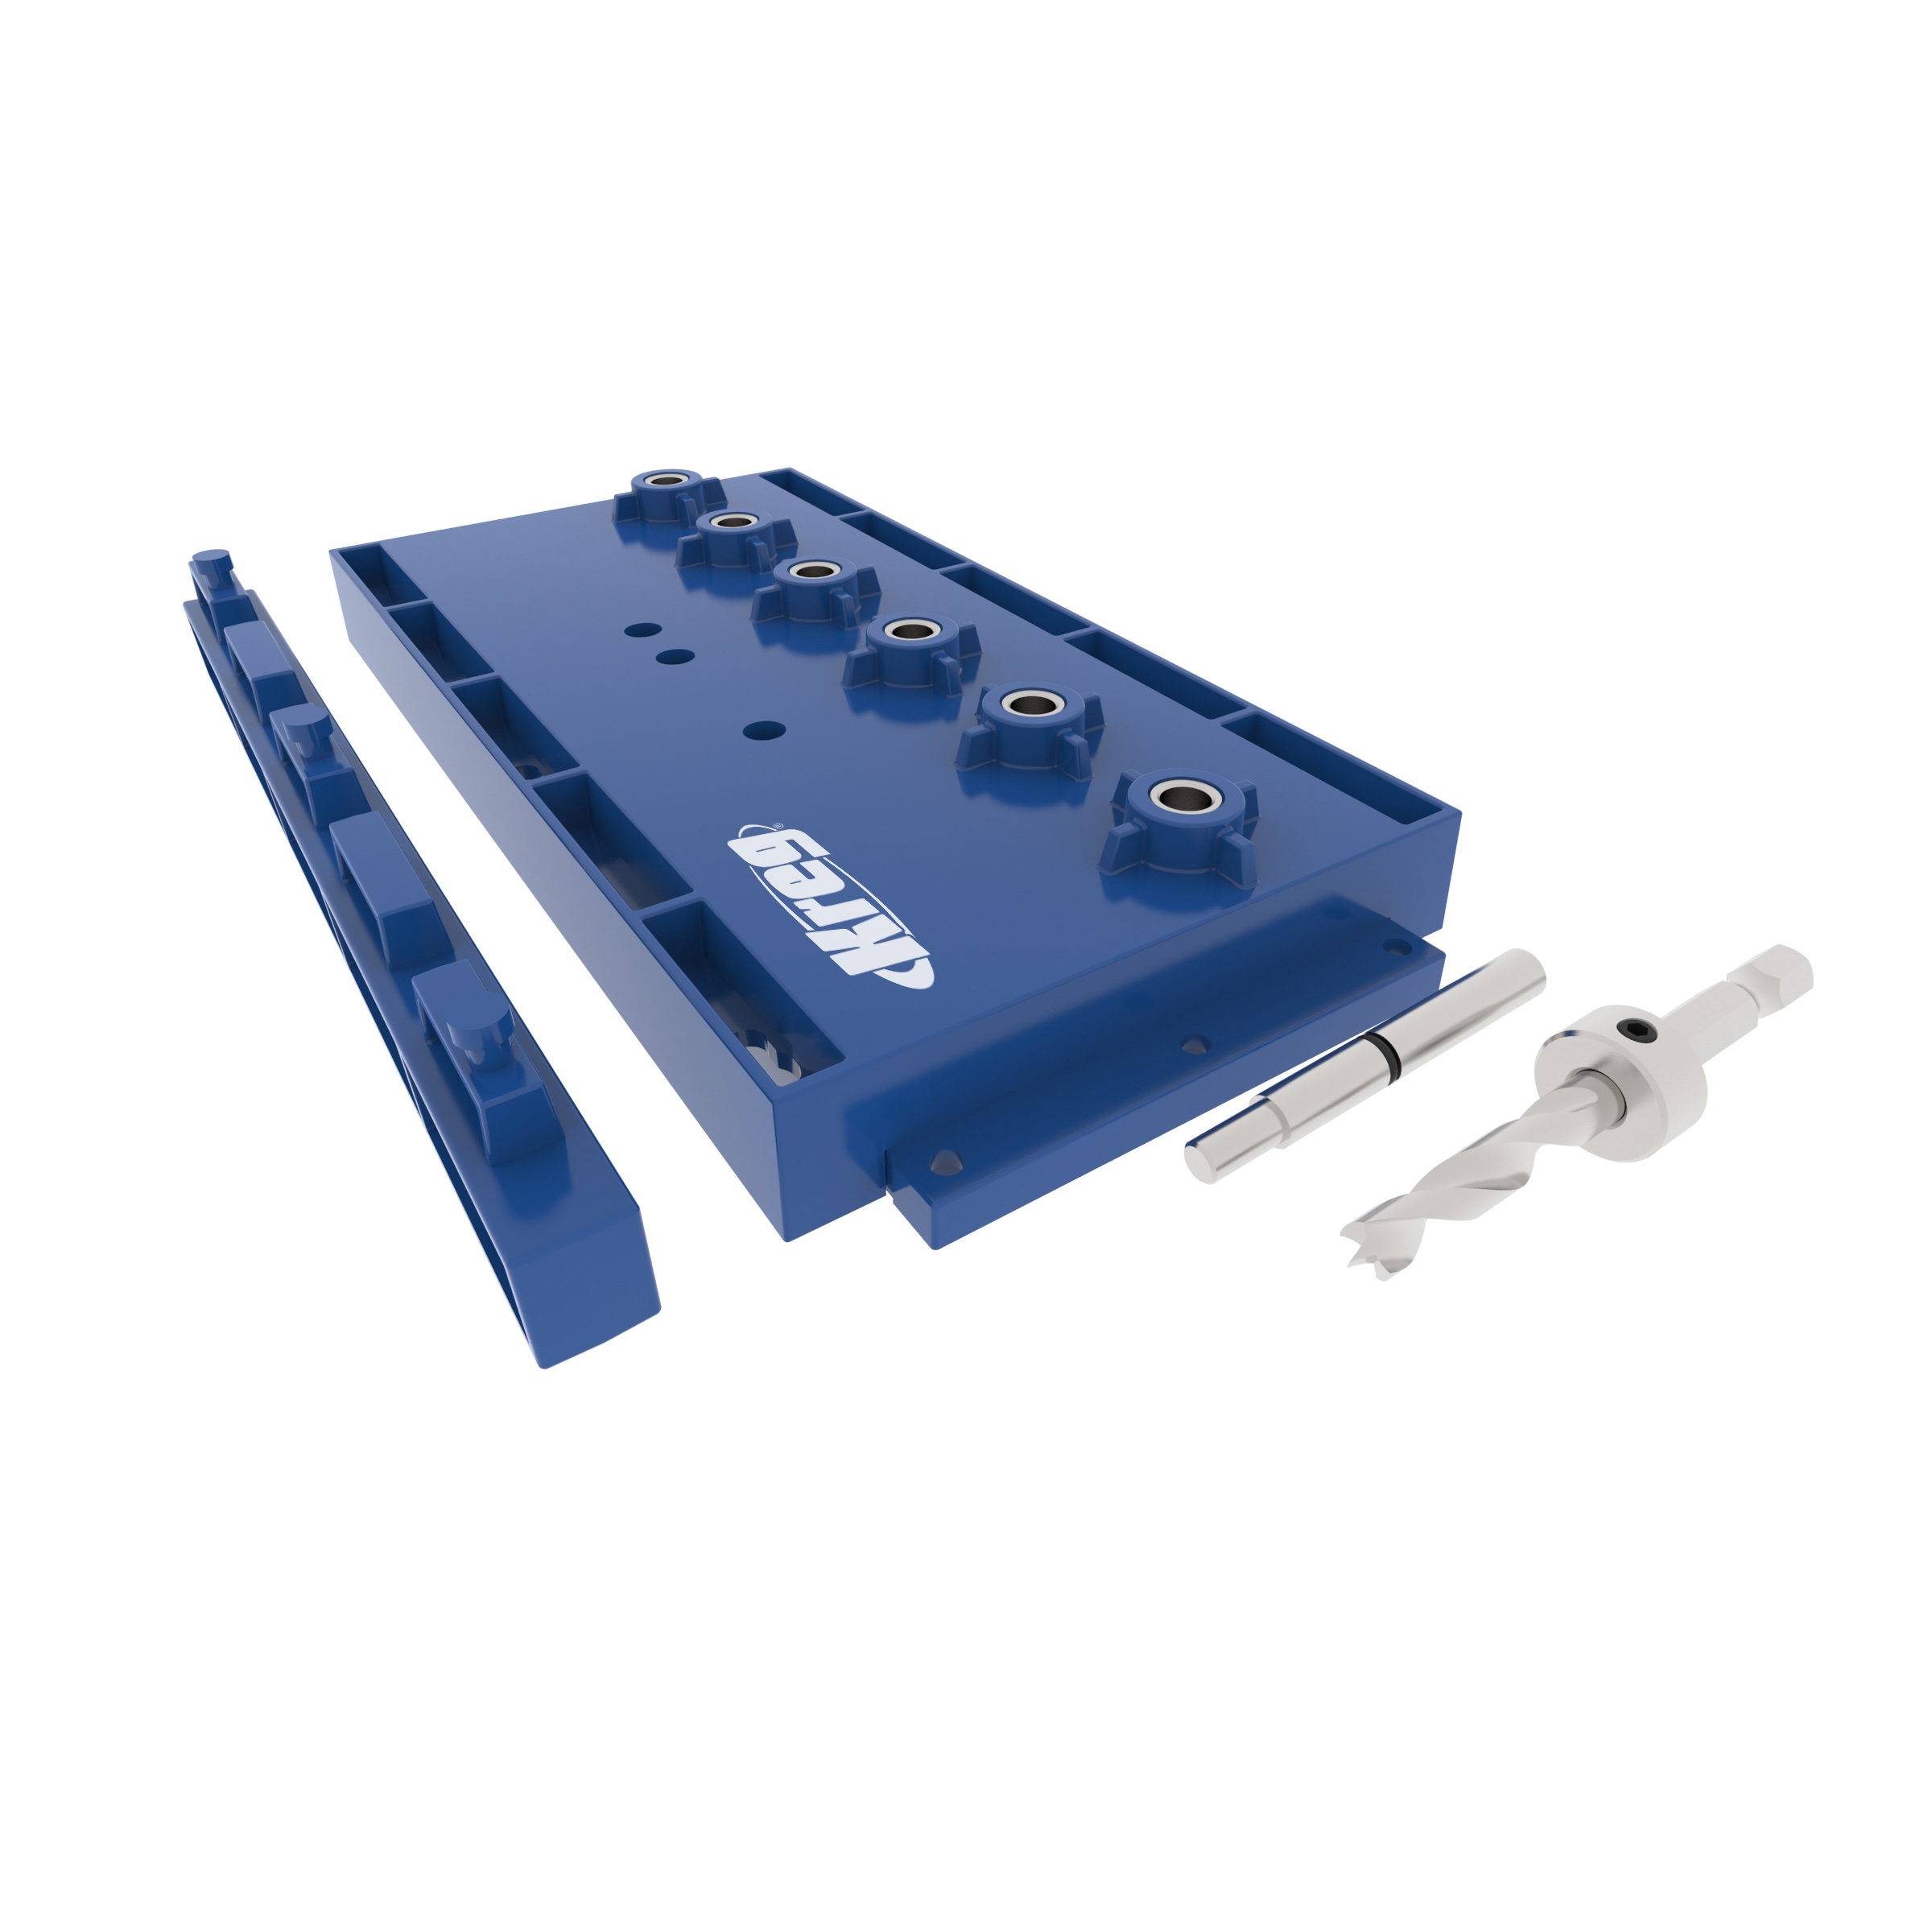
Kreg Tools

Other Tools
-
Square

-
Tape Measure
-
Utility Knife
-
Sander
-
Iron
-
Tape Measure
Materials
Wood Products
- 1 Plywood , 3/4" Thick , Full Sheet
- 1 Plywood , 3/4" Thick , Half Sheet
- 1 Plywood , 1/2" Thick , Full Sheet
- 7 Board , 1/4" Thick , 2 1/2" x 48"
- 1 Board , 1/4" Thick , 2 1/2" x 24"
- 1 Board , 1x4 , 48"
- 3 Board , 1x6 , 96"
Hardware & Supplies
- 1 Edge Banding Trimmer
- 1 1 1/4" coarse-thread Kreg pocket-hole screws
- 1 Kreg 1 1/4" fine-thread pocket-hole screws
- 1 Wood glue
- 1 Pair fill-overlay soft-close hinges
- 2 25' iron-on edge banding
- 5 1 1/4" oil-rubbed bronze knob
- 1 Cabinet door bumpers
- 1 Countersink drill bit
- 1 1 1/2" flat-head wood screw
- 1 2 1/2" pan-head cabinet screws
Cut List & Parts
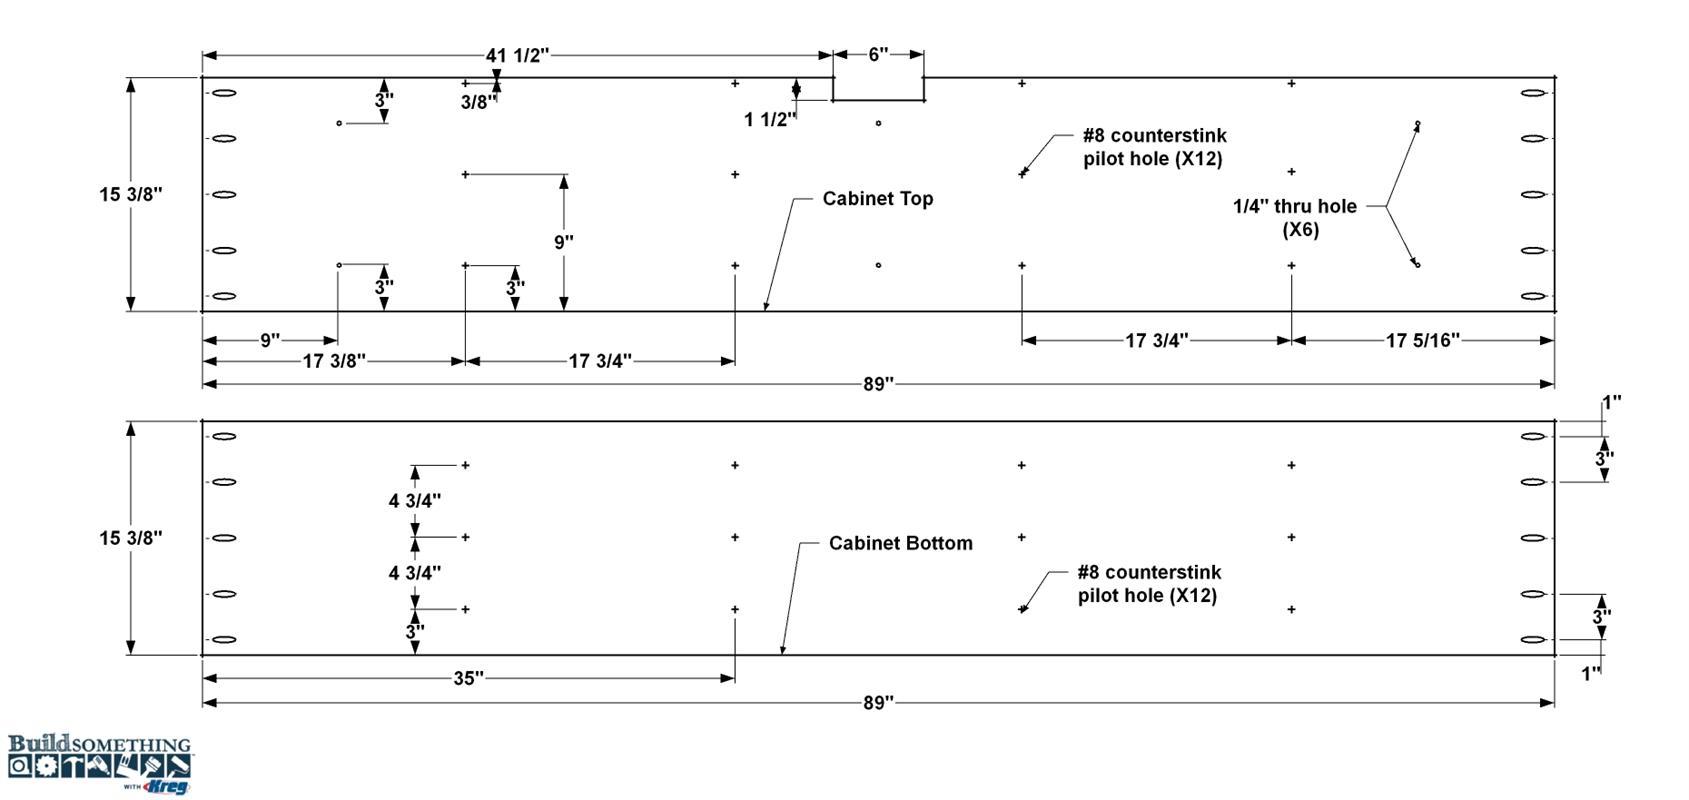
- 1 Cabinet Top , 3/4" x 15 3/8" x 89" plywood
- 1 Cabinet Bottom , 3/4" x 15 3/8" x 89" plywood
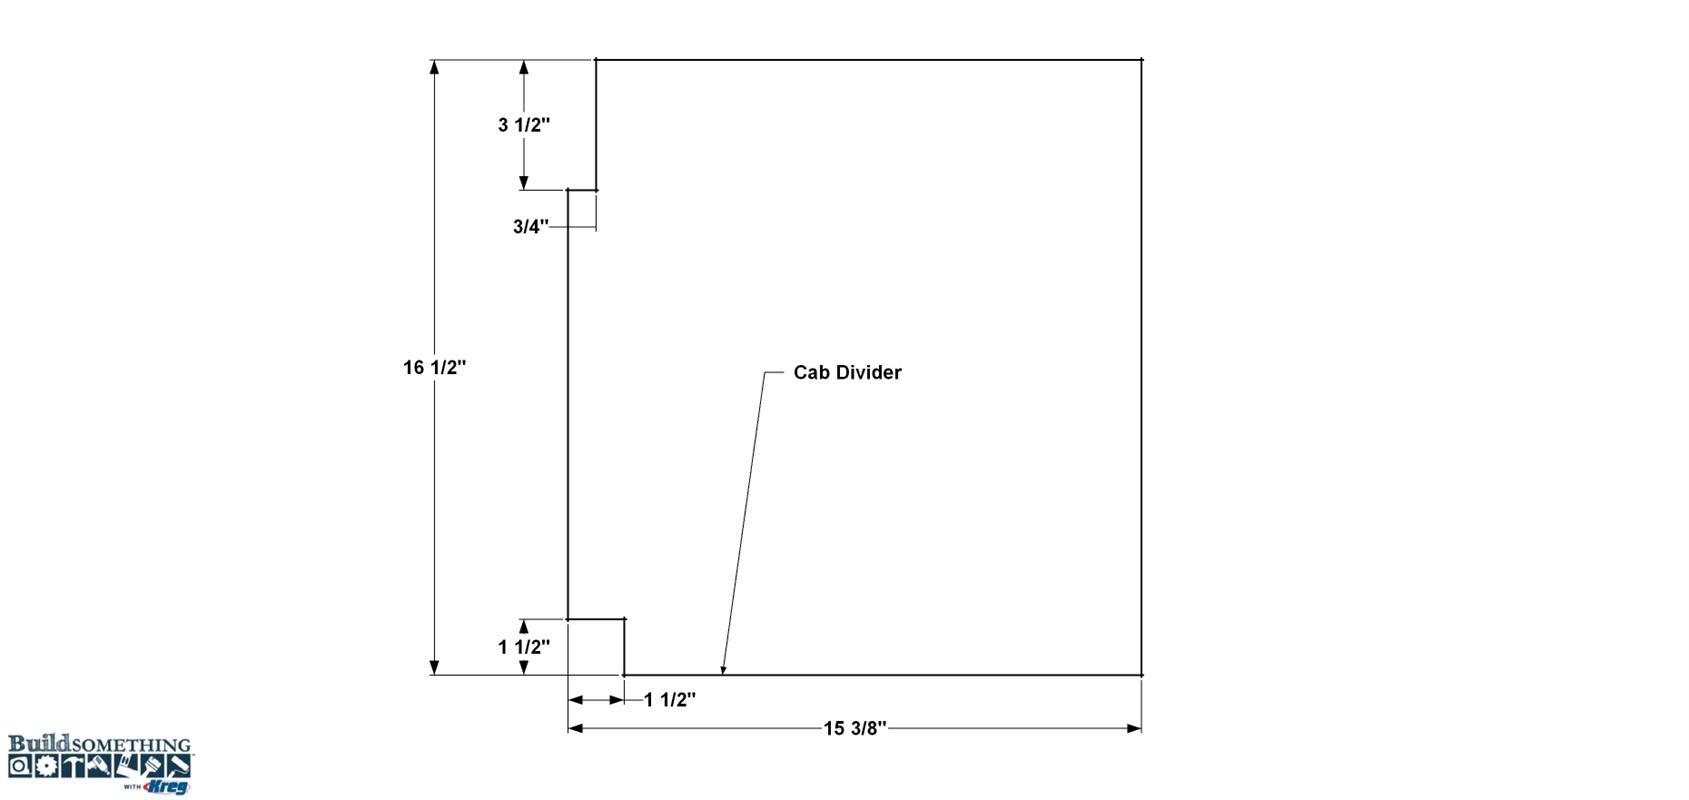
- 4 Cabinet Dividers , 3/4" x 15 3/8" x 16 1/2" plywood
- 2 Cabinet Side , 3/4" x 15 3/8" x 18" plywood
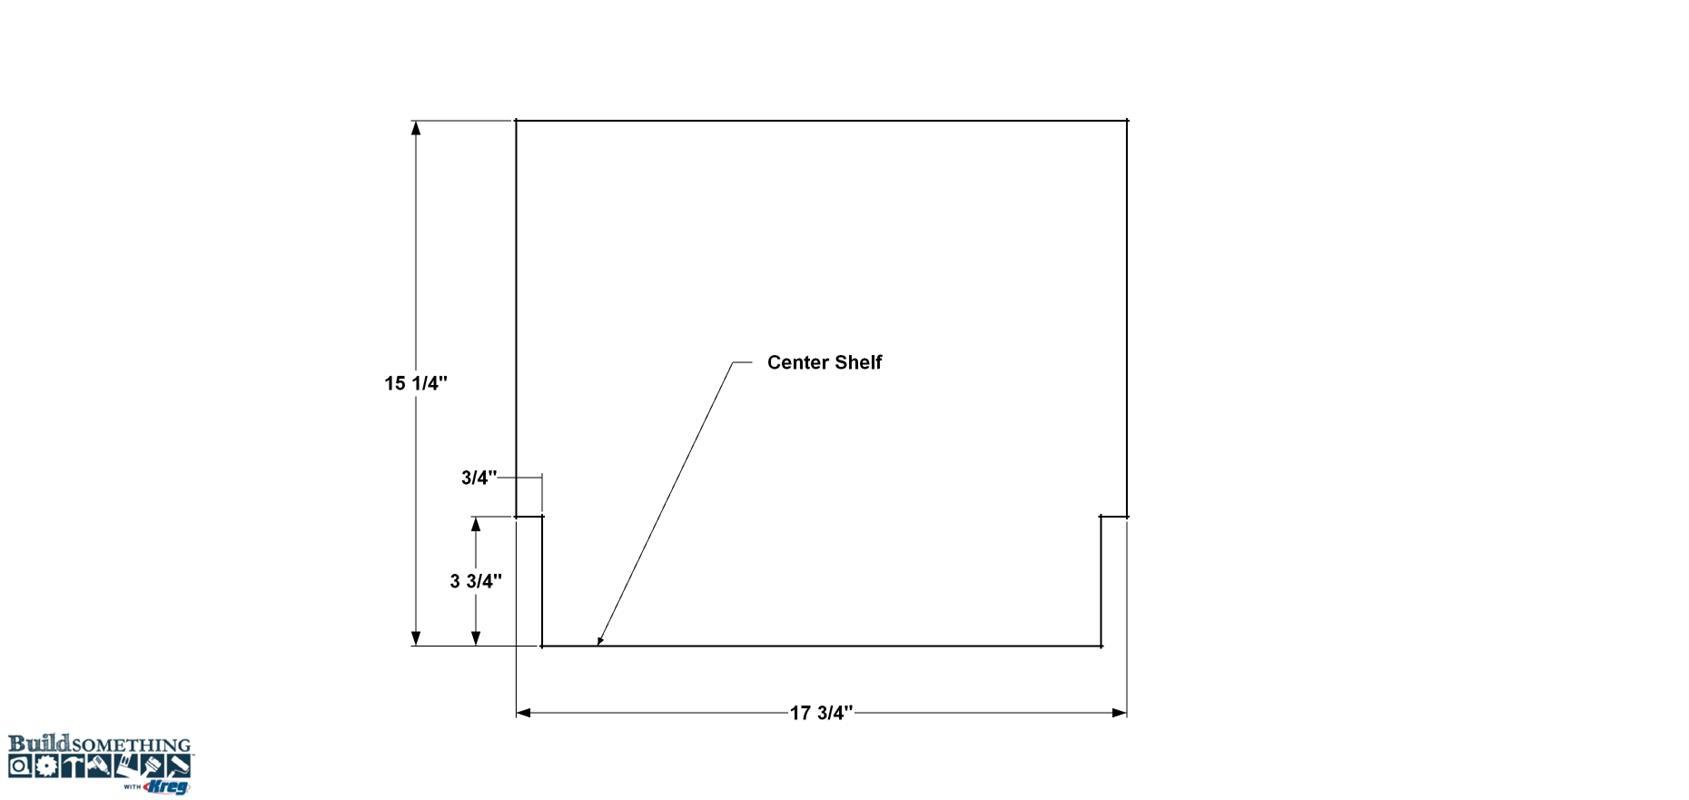
- 4 Shelf , 3/4" x 15 1/4" x 16 3/4" plywood
- 1 Center Shelf , 3/4" x 15 1/4" x 17 3/4" plywood
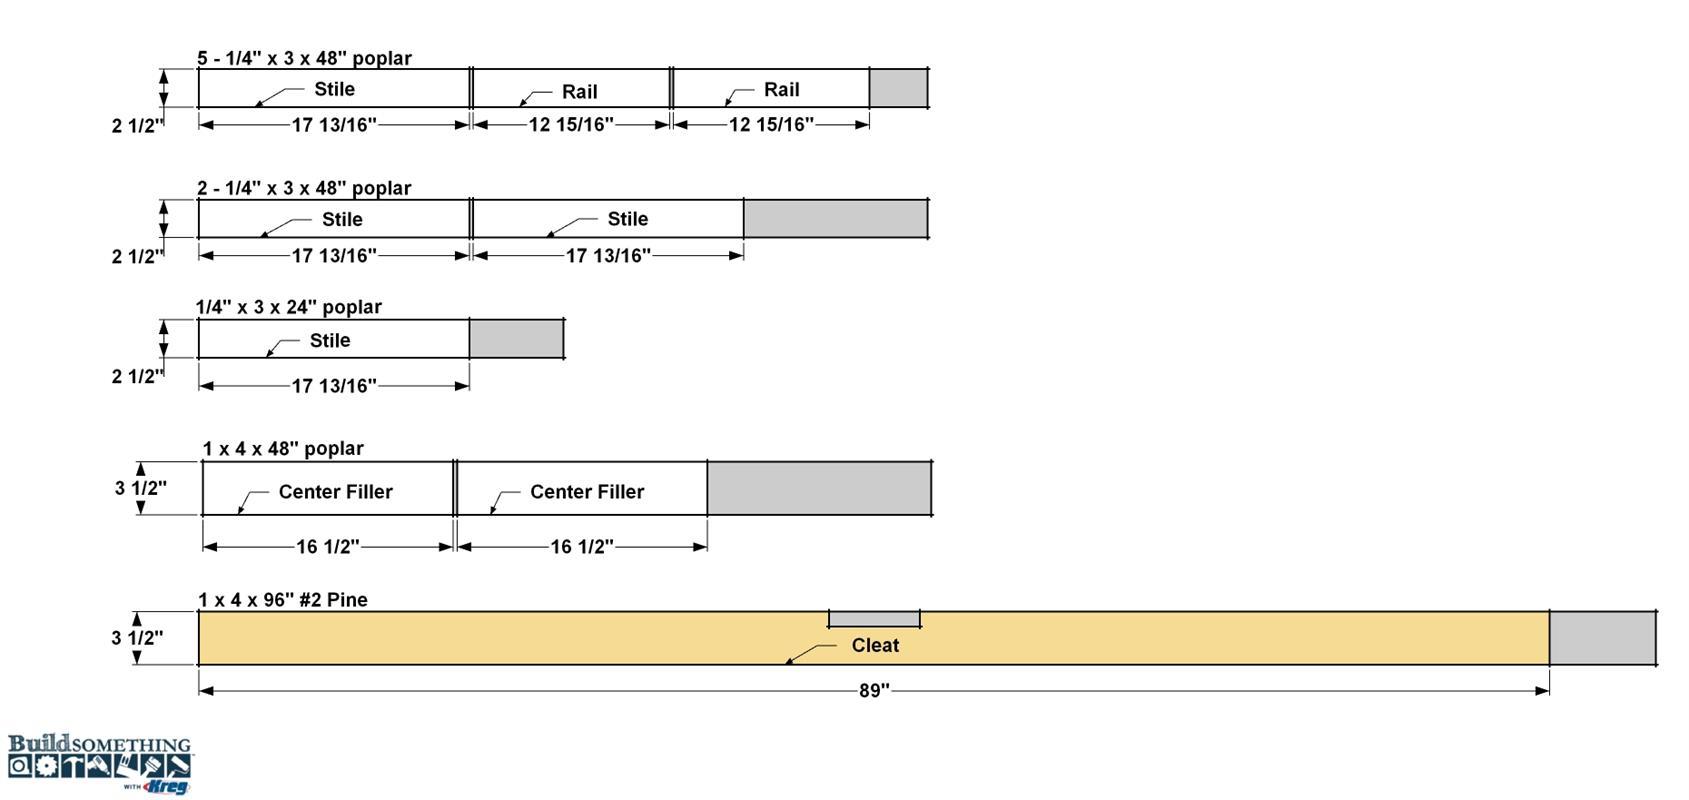
- 2 Center Filler , 3/4" x 3 1/2" x 16 1/2" poplar
- 1 Cleat , 3/4" x 3 1/2" x 89" plywood
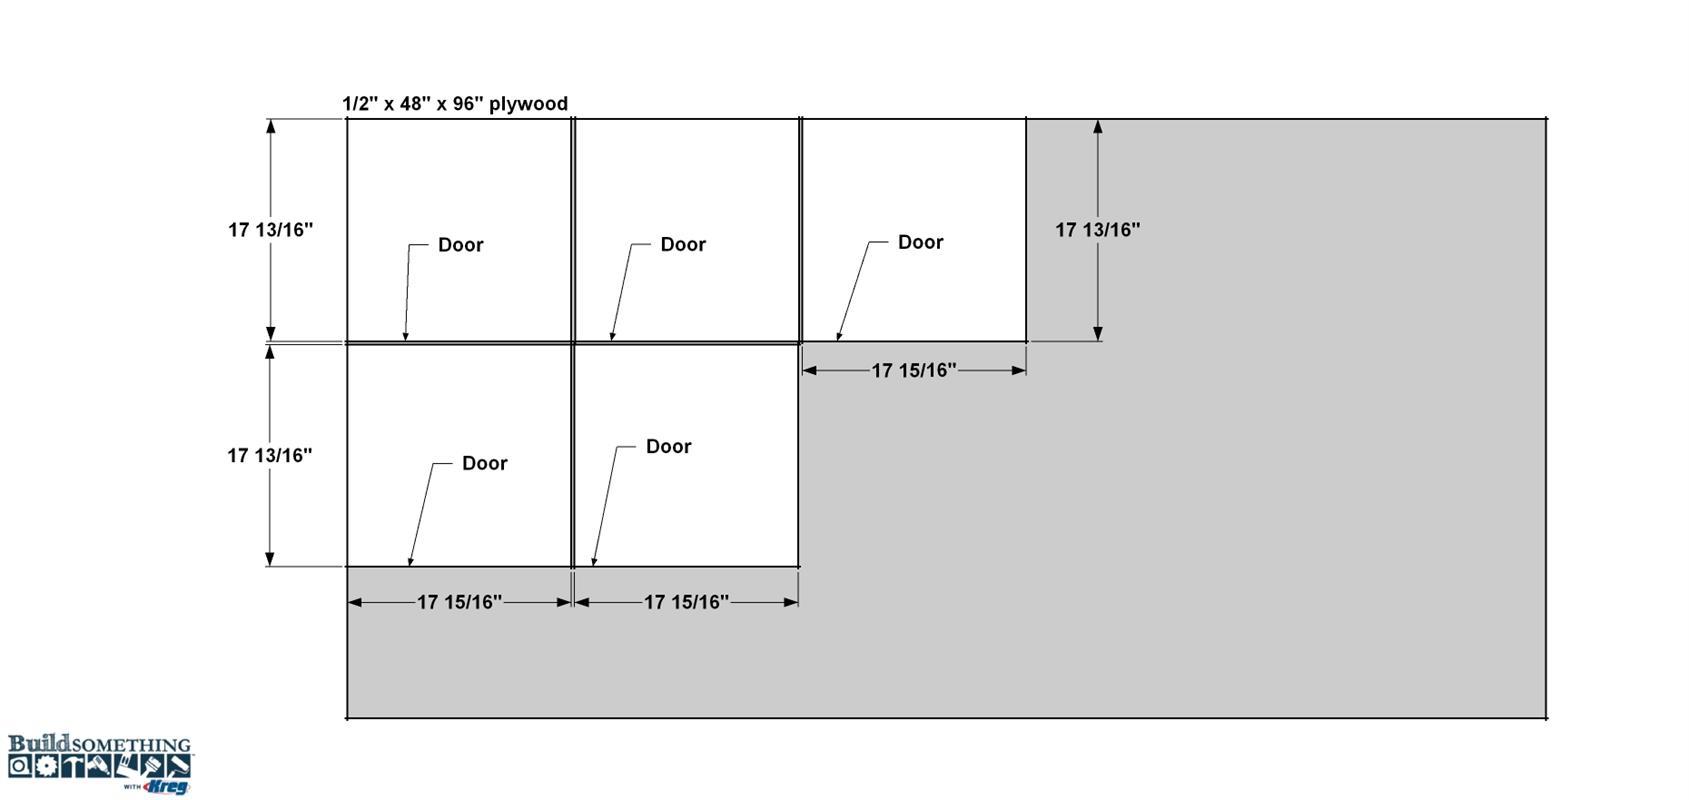
- 5 Door , 1/2" x 17 13/16" x 17 15/16" plywood
- 10 Door Stile , 1/4" x 2 1/2" x 17 15/16" poplar
- 10 Door Rail , 1/4" x 2 1/2" x (cut to fit) poplar
- 3 Top Board , 3/4" x 7 1/4" x 96" oak (cut to finished length after assembly)
Directions
-
Cut the First Cabinet Parts
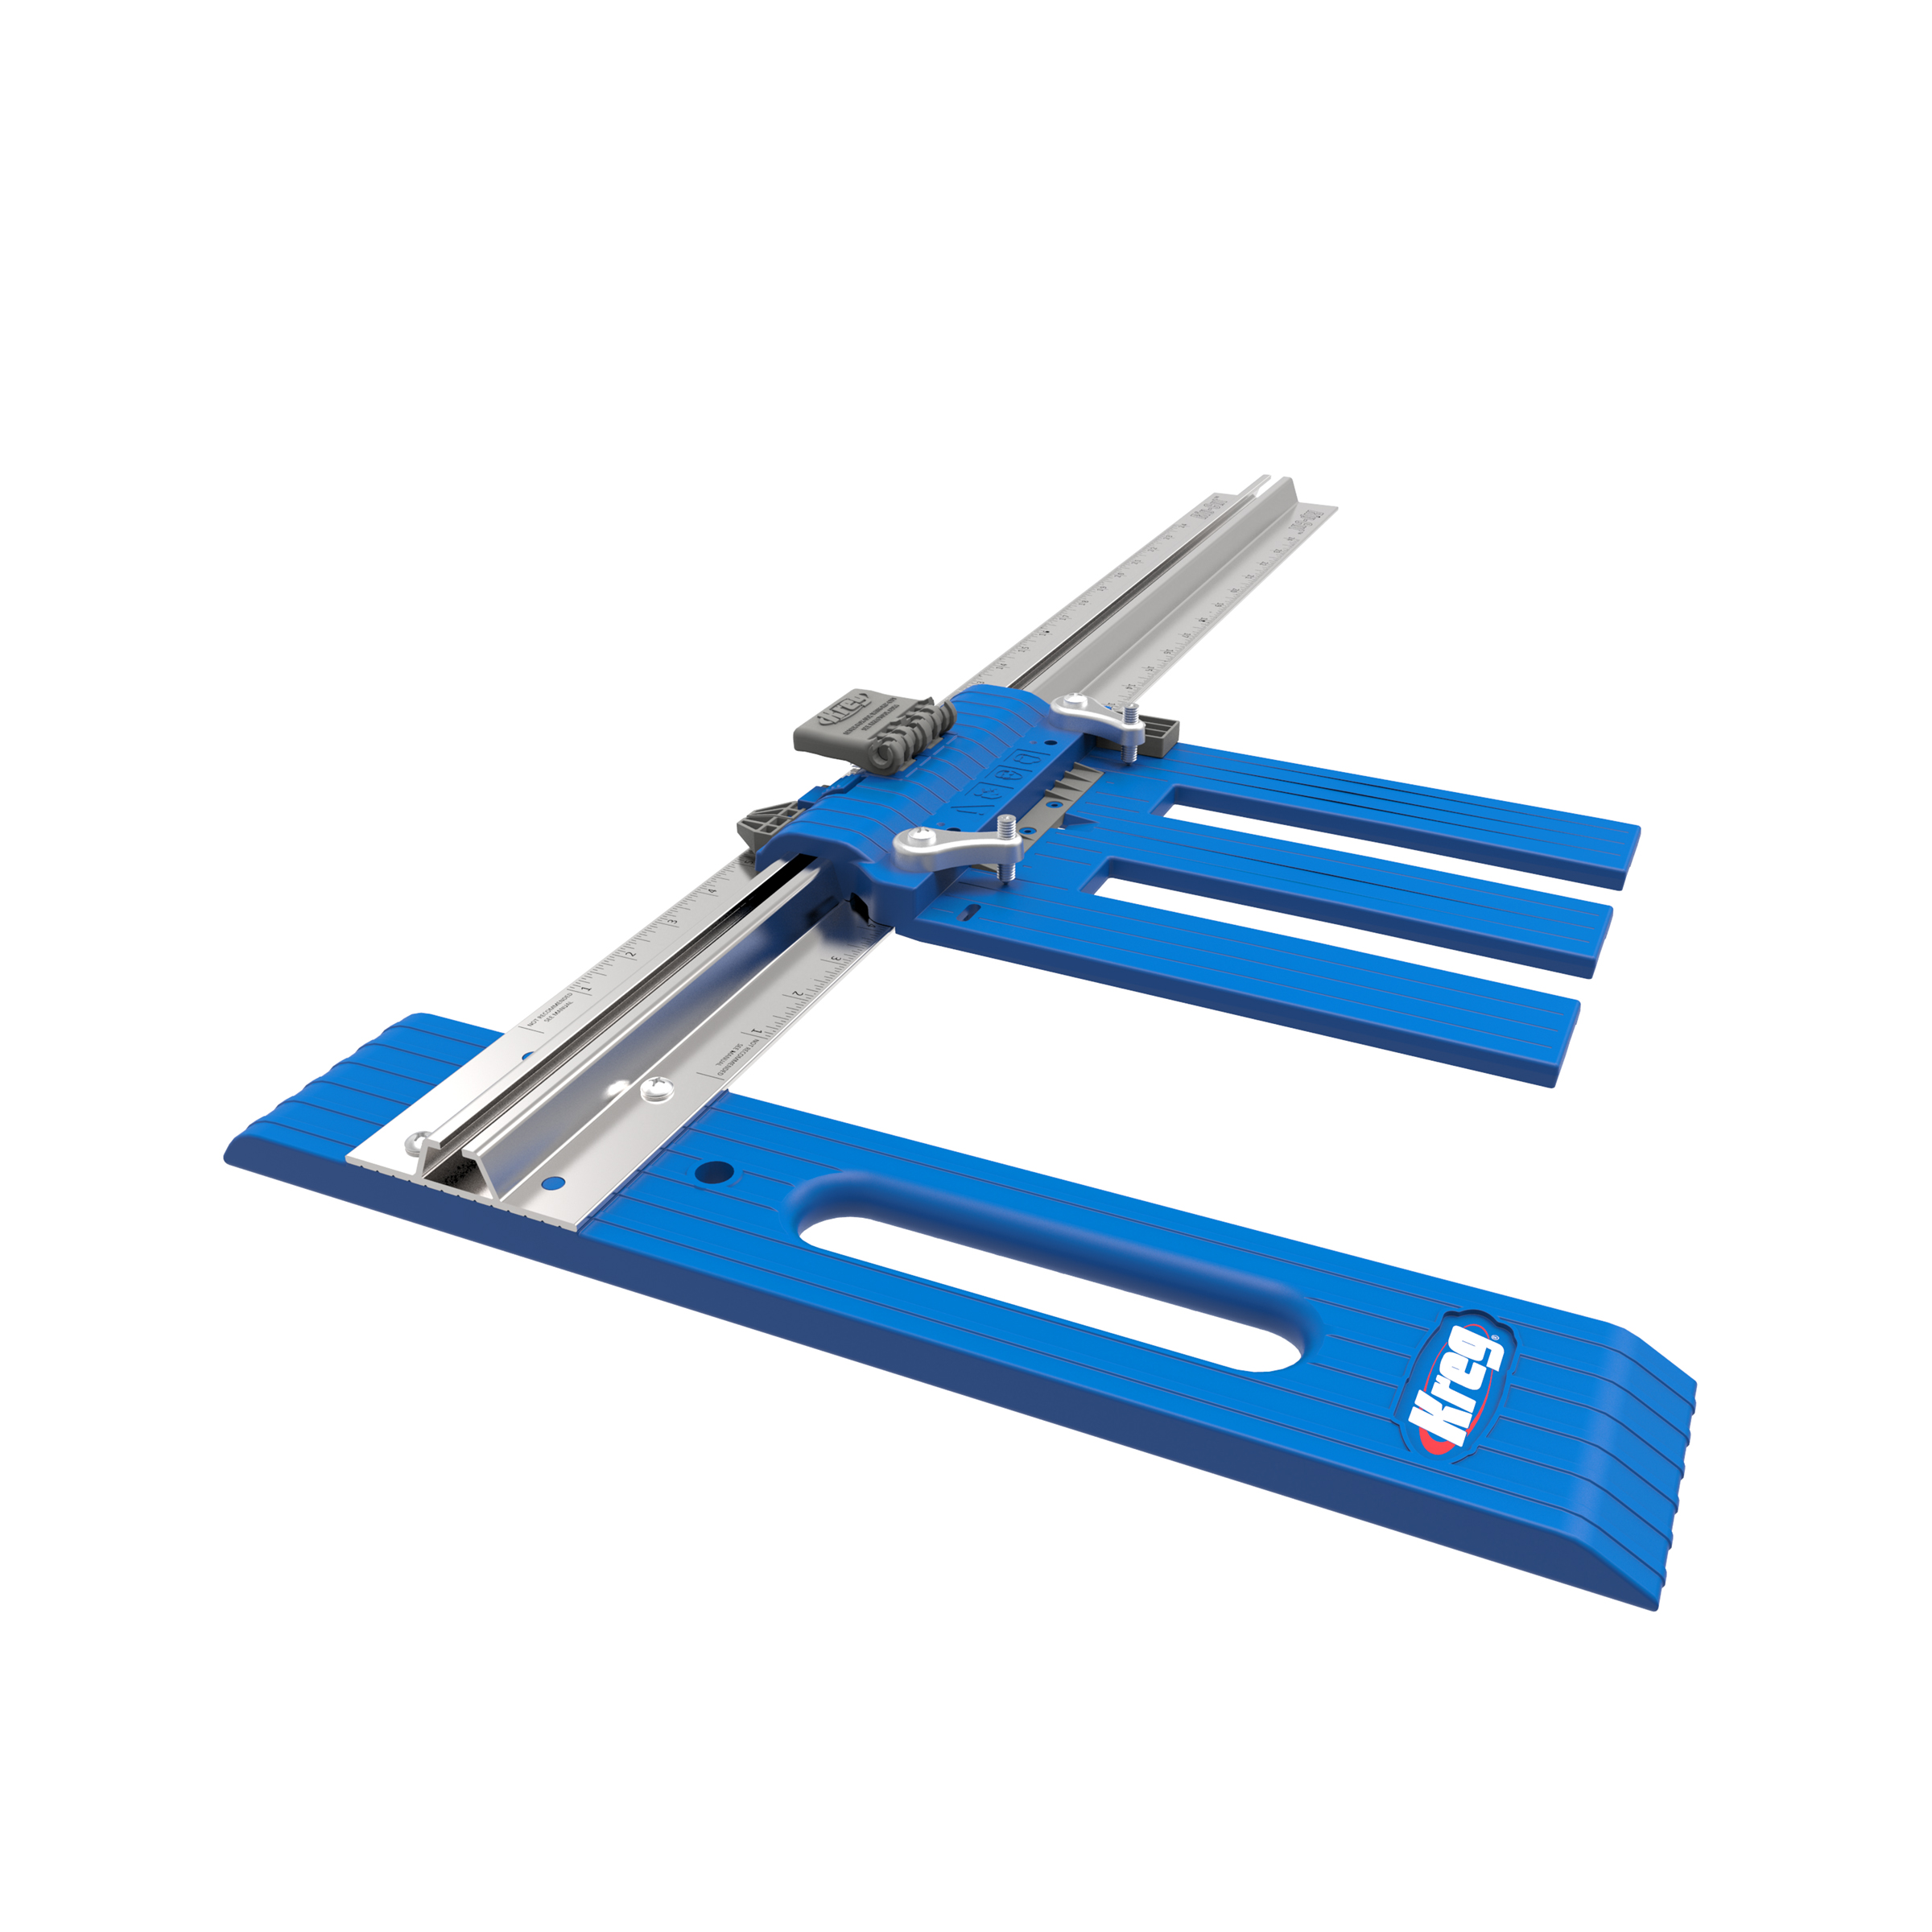
Start by ripping one Cabinet Top, one Cabinet Bottom, and four Cabinet Dividers and one Side from a sheet of 3/4" paint-grade plywood, as shown in the cutting diagram. You can set aside the Cabinet Dividers and Side until a later step. By the way, the how-to video below will show you how to get straight, smooth cuts in plywood by using a saw guide.
-
Make the Top and Bottom
Set your Kreg Pocket-Hole Jig for 3/4"-thick material, and then drill pocket holes in Top and Bottom parts, at the locations shown. Next, using a jigsaw, cut out the notch in the Cabinet Top. This will allow you to run cords and cables from your TV to any equipment you have in the cabinet. Drill the 12 countersink pilot holes each in the Top and Bottom panels. These will be used to secure the Divider panels and the Cleat. Finally, drill the six 1/4" holes in the Top panel only. You’ll use these six holes to secure the solid-wood decorative finished top to the cabinet.
-
Make the Dividers
Cut four Dividers to size, as shown in the cutting diagram. Then you can cut two notches on the back edge of each Divider with a jigsaw. The small notch is for cable access between each divider, while the larger notch is for the Mounting Cleat you’ll make in a later step.
-
Make the Sides and Shelves
Now you can cut two Cabinet Sides to size. As the cutting diagrams show, you should have enough material left over from the full sheet of 3/4" plywood to cut one Cabinet Side. You can cut the other Side from the half-sheet, as shown. Then, from the remainder of the half sheet, cut four Shelves to size, along with one Center Shelf. Note that the Center Shelf is slightly wider, as shown here. Cut and notches with a jigsaw so the Shelf will fit around the Center Dividers.
-
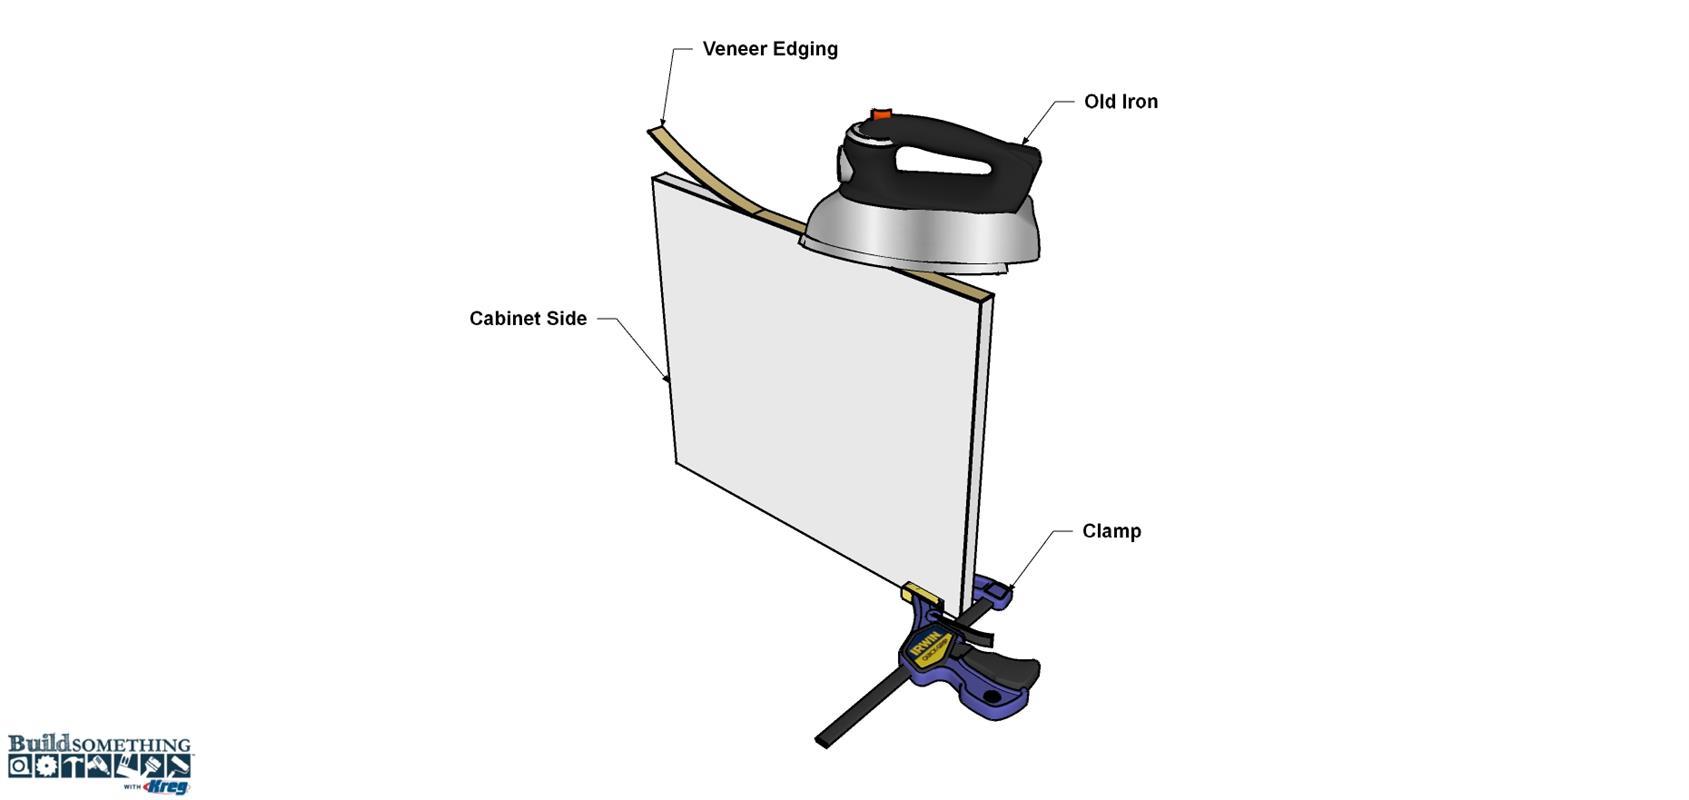
Add Iron-On Edging to the Parts
Before you move to assembly, it’s time to cover the exposed plywood edges to give the cabinet a solid-wood look. The easiest way to do that is with iron-on veneer. The Tip below tells you more about this easy-to-use product. You’ll want to apply banding to just the front edge of the Cabinet Top, Cabinet Bottom, Cabinet Sides, the five Shelves, the four Dividers. Even though we painted the cabinet, we used oak edging because it’s easy to find in home centers. After you glue on the edging, you can trim it to final length with a utility knife, trim it to width using a banding trimmer, and then sand the edges smooth with a fine grit sandpaper, like a 220 grit. Be careful not to sand through the thin veneer on the plywood.
-
Assemble the Cabinet (no glue)
Assemble the cabinet parts as a “dry-fit” (which means you won’t be using any glue). Doing this makes it easier to test fit everything, drill holes for shelf pins, and fit the doors after they’re built. Later, you’ll take the cabinet apart again making it much easier to paint the panels and get a great finish.
Place the Cabinet Bottom on a flat work surface with the back edge facing up. Position the first Divider, as shown, and clamp it in place. Use a square to make sure the Divider is perpendicular to the edge of the Cabinet Bottom. Drive 1 1/2" flat-head wood screws into the Divider. Repeat this for the other Dividers. Add the Top panel in the same way. Finally, Attach the Cabinet Sides using 1 1/4" coarse-thread Kreg screws.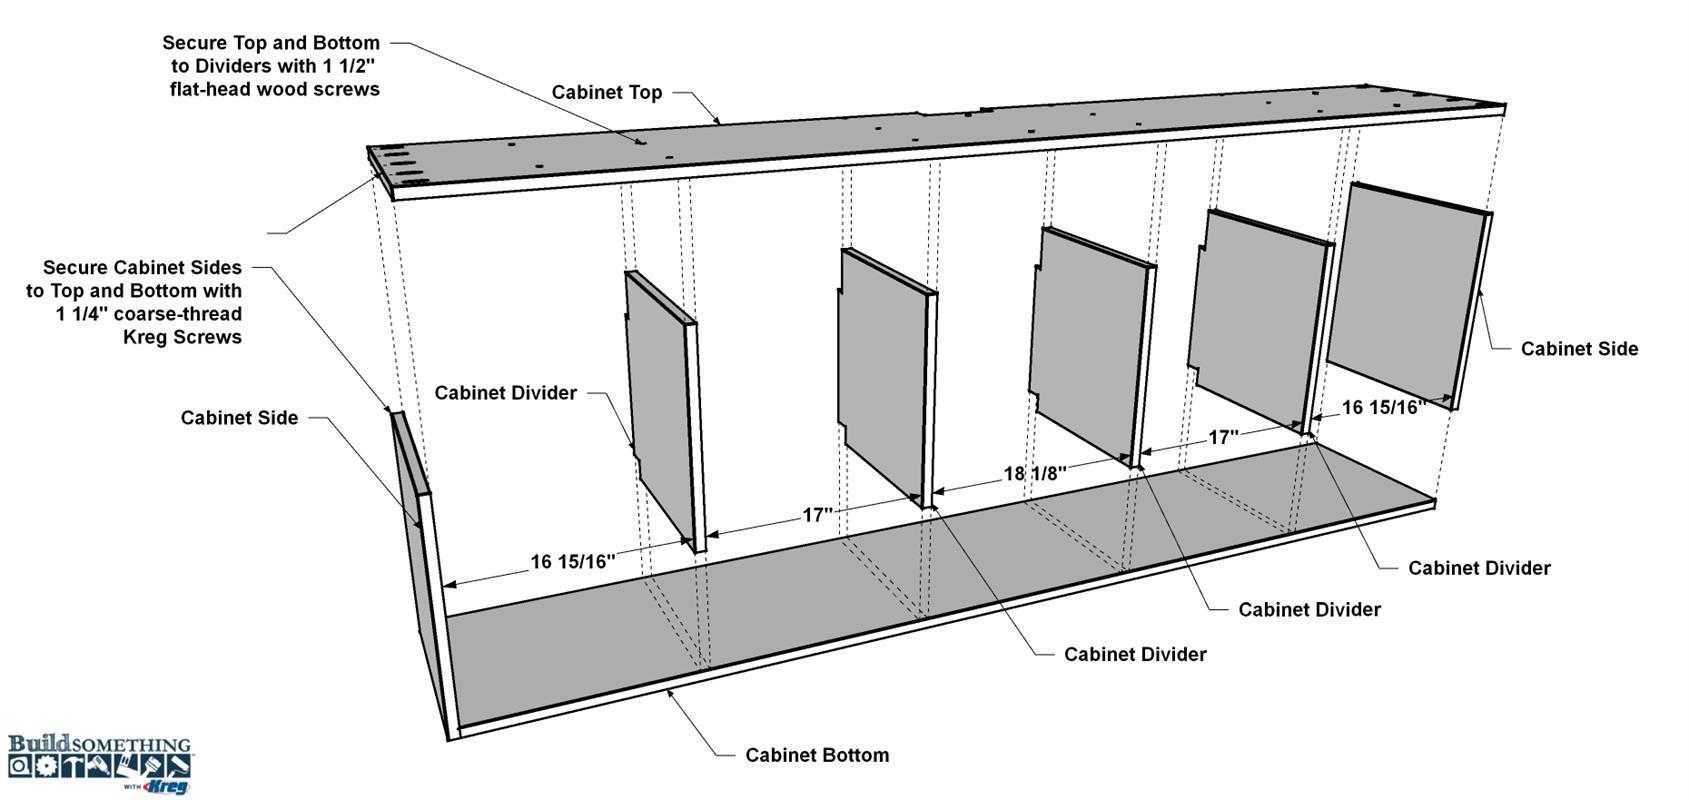
-
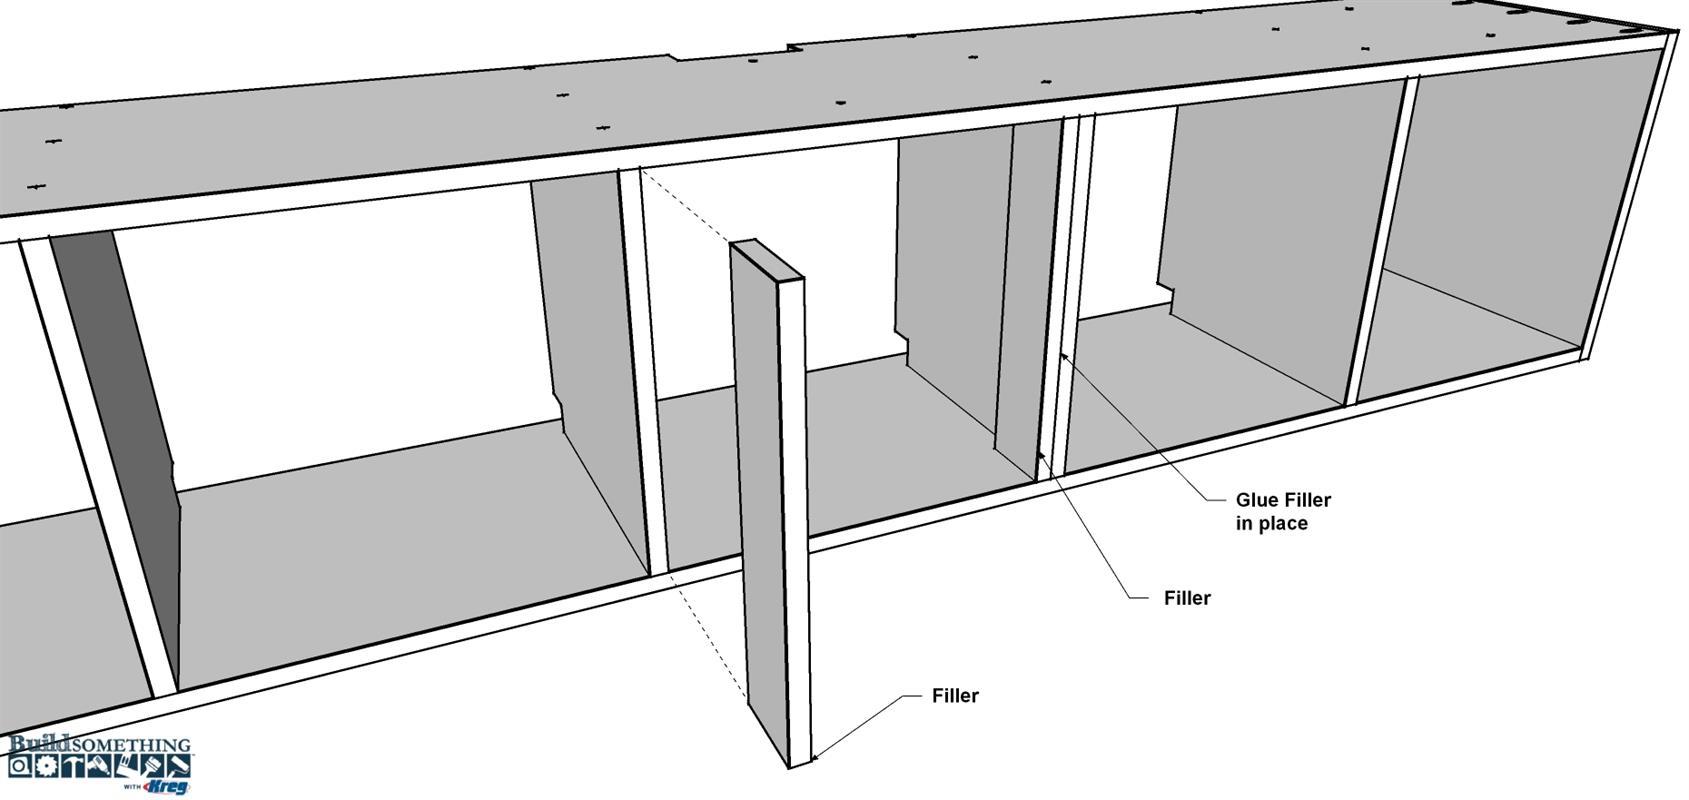
Add the Center Fillers
Cut two Center Fillers from 1x4 board as shown in the cutting diagram. Glue and clamp them to the inner faces of the innermost two Dividers, flush with the front edges, as shown.
-
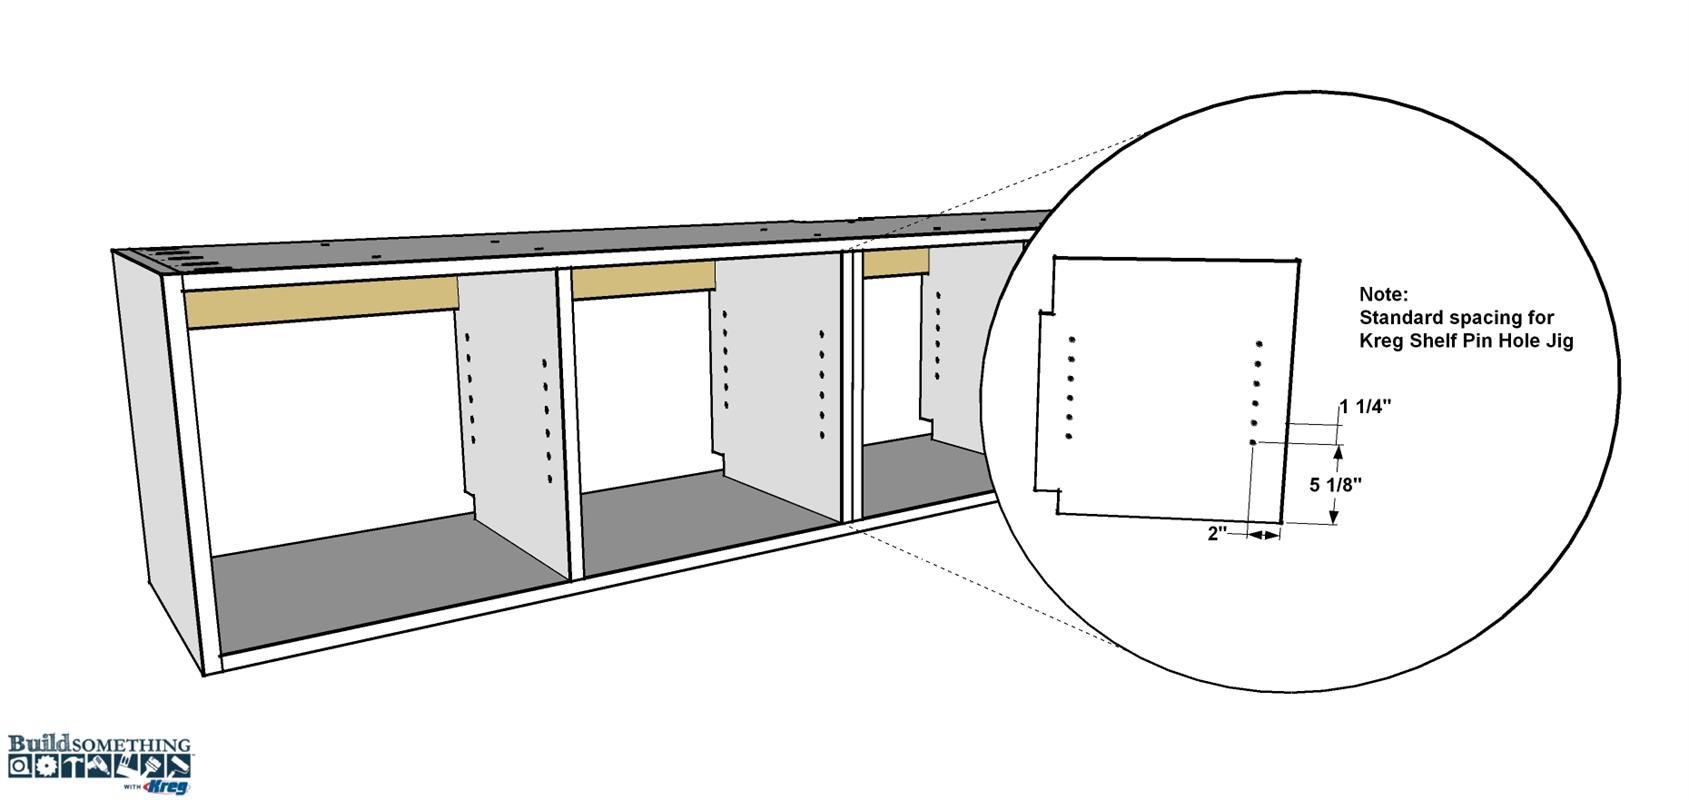
Drill the Shelf Pin Holes
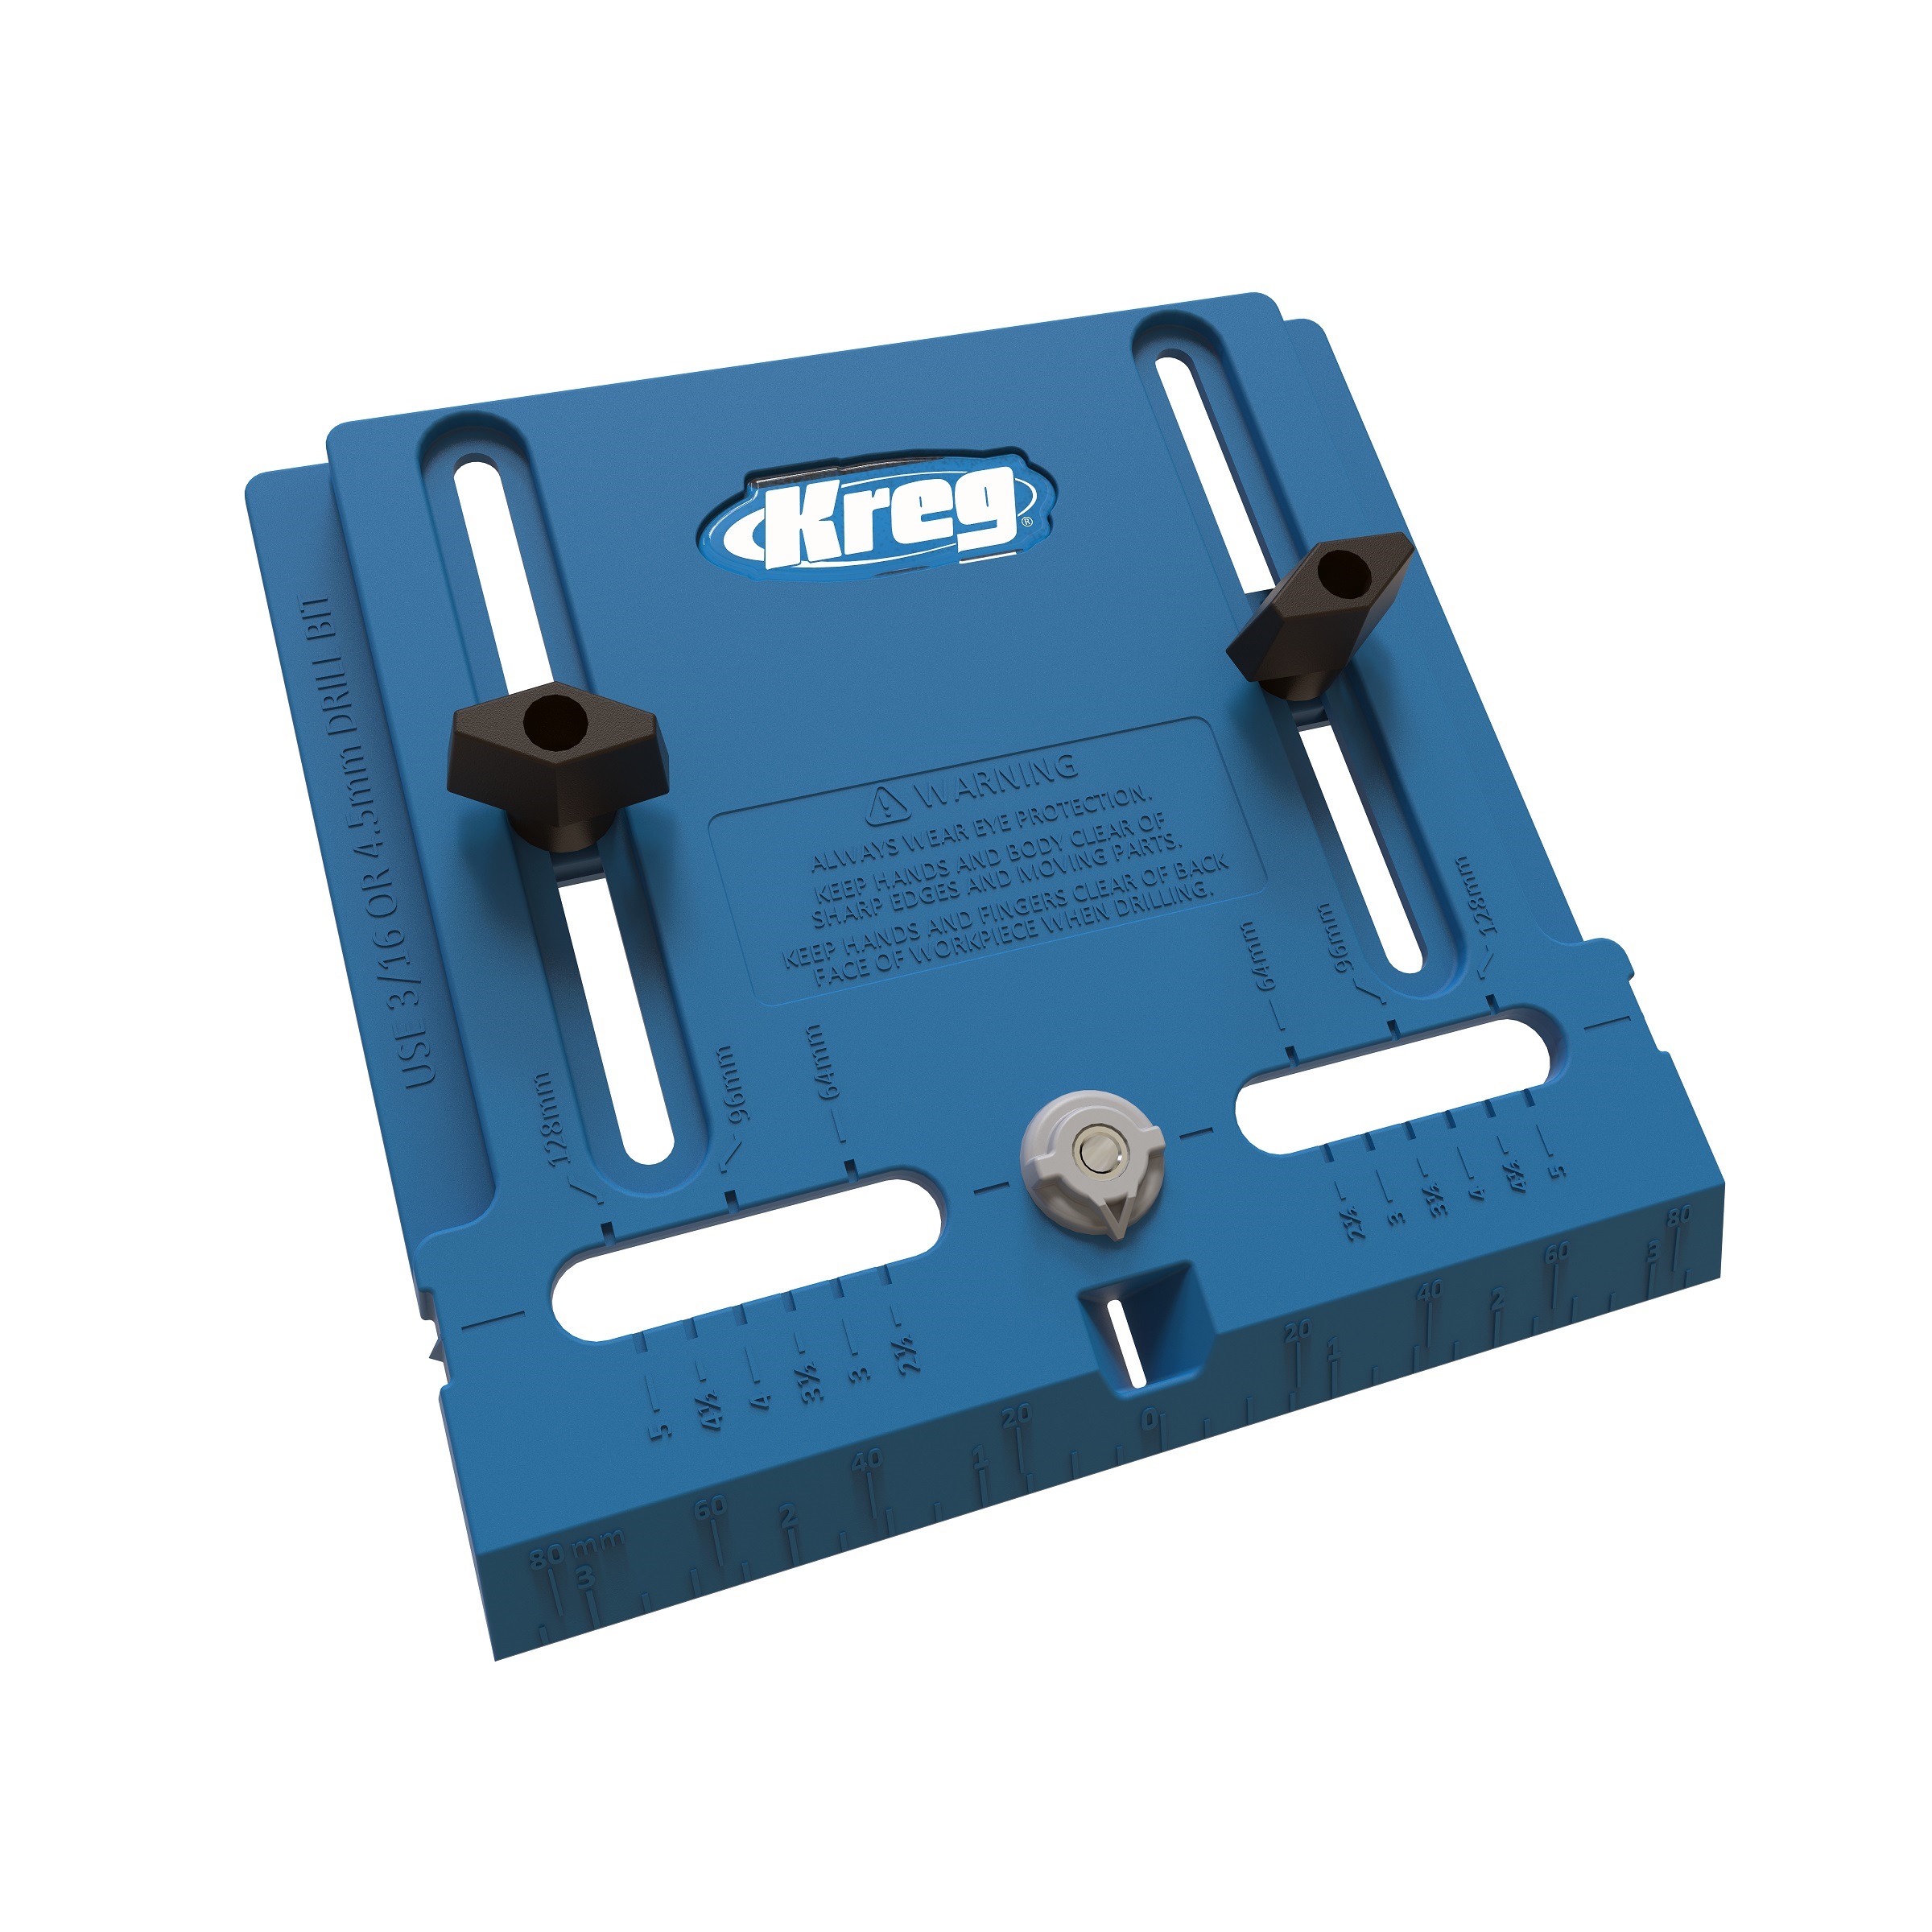
Using a Kreg Shelf Pin Jig, drill shelf pin holes in each bay of the Cabinet, at the locations shown.
NOTE: The setback spacing (distance from the edge to the shelf-pin holes) shown matches the first-generation Kreg Shelf Pin Jig. The second generation model, released in March 2022, has different setback spacing. The vertical distance between the pin holes, though, matches the dimensions shown here—1 1/4". You can create the shelf-pin holes accurately using either the first- or second-generation jig.
-
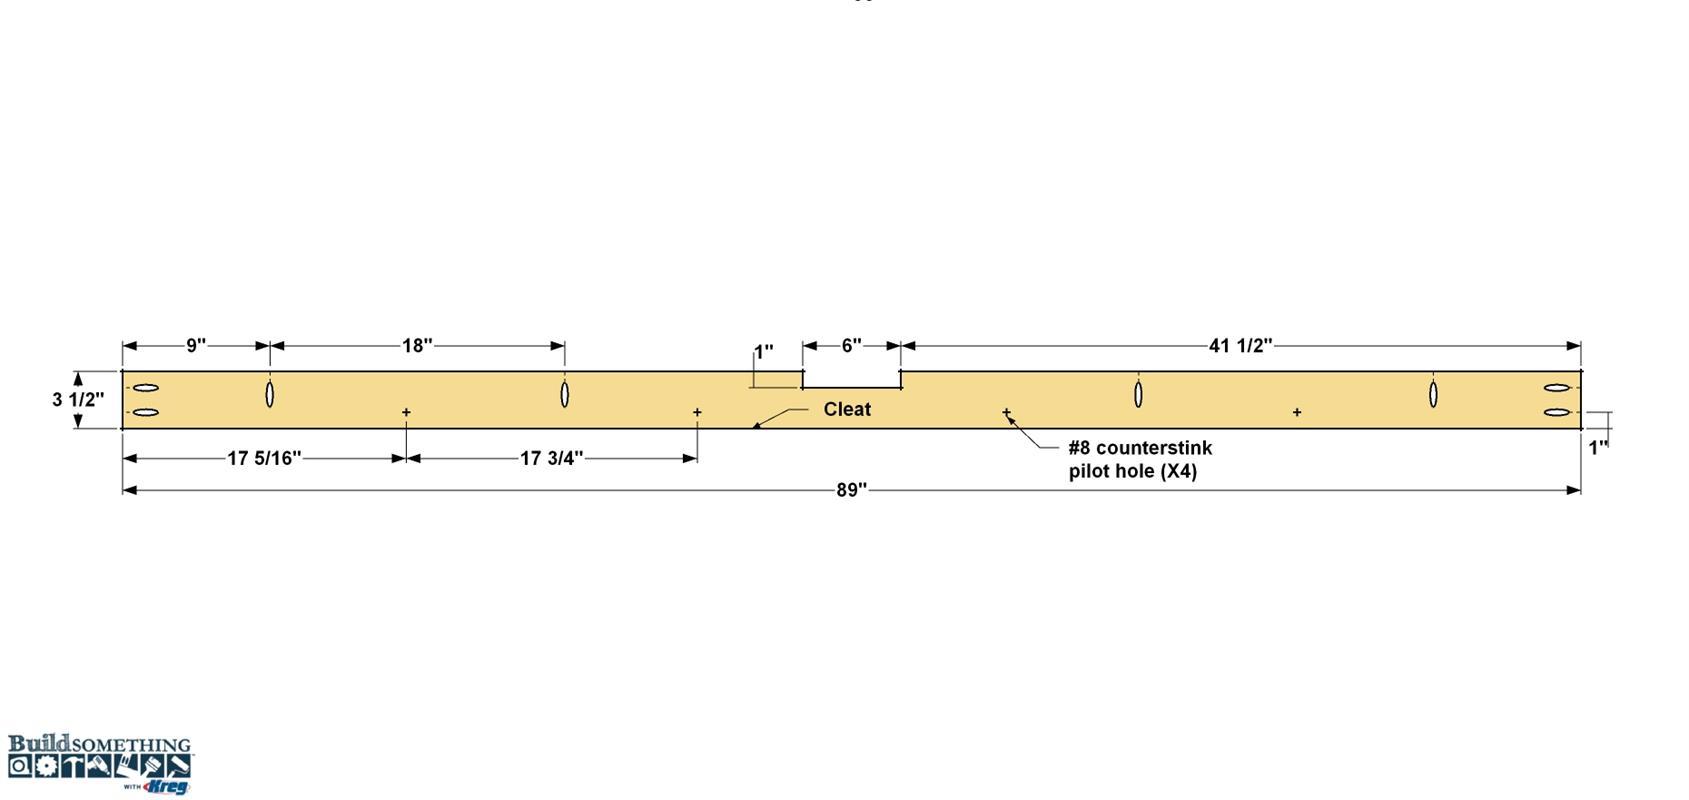
Make the Hanging Cleat
From a 1x4 board, cut the Mounting Cleat to length, as shown in the cutting diagram. Drill Pocket holes at the locations shown, and then cut the cord-access notch with a jigsaw.
-
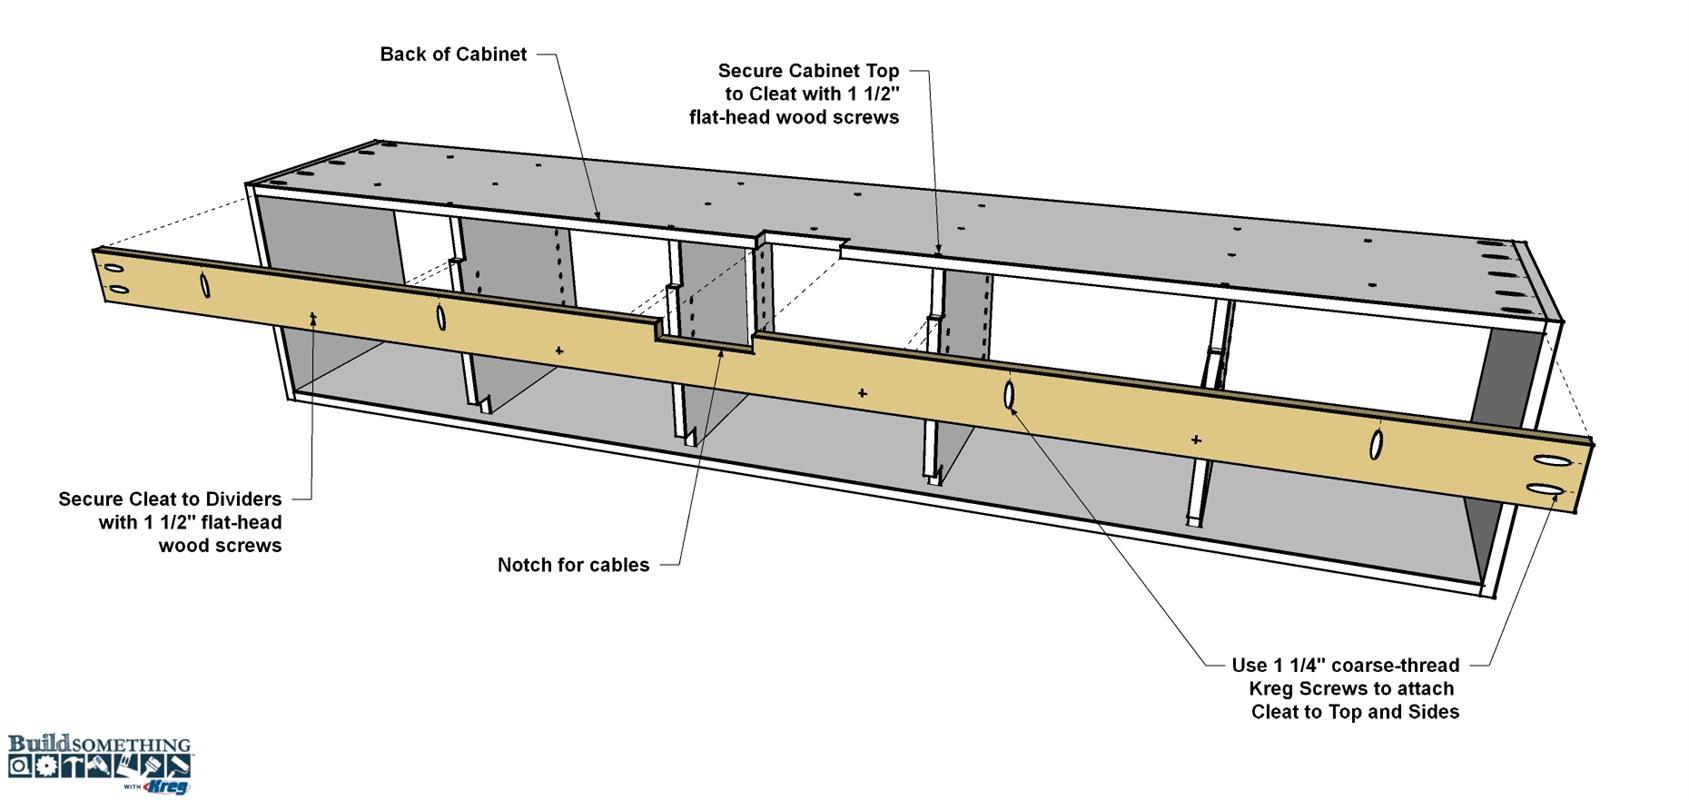
Install the Cleat
Attach the Mounting Cleat to the Sides using 1 1/4" coarse-thread Kreg Screws. Secure the Cleat to the Dividers and Top panel with 1 1/2" flat-head wood screws.
-
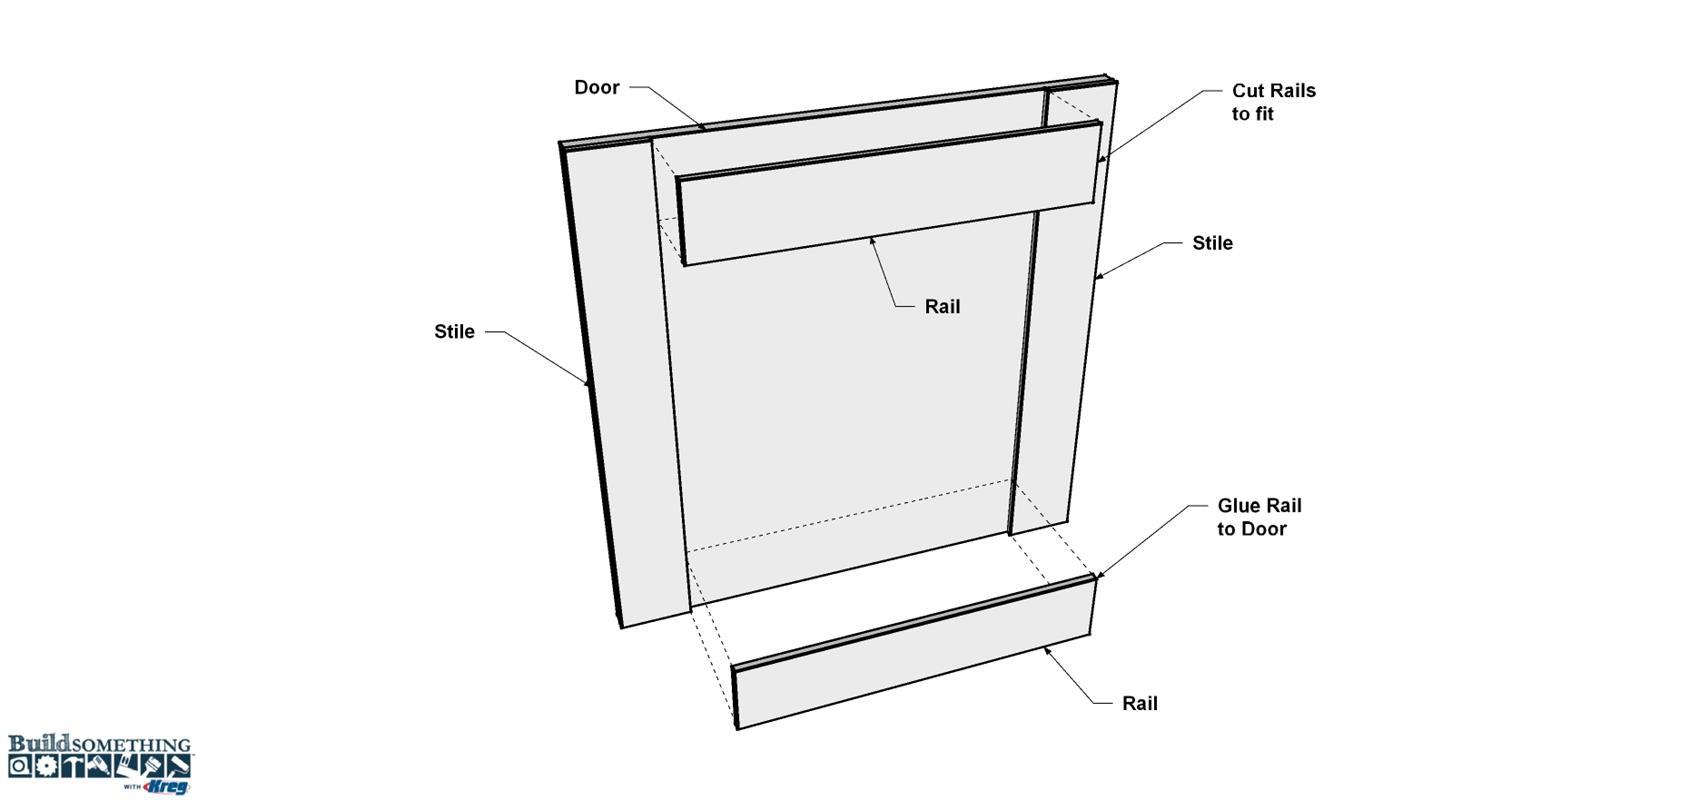
Make the Doors
Typical cabinet doors are made as a frame that consists of two rails (the horizontal parts) and two stiles (the vertical parts) plus a thinner panel that fits into groove cut in the rail and stile. We’ve simplified the process here in a way that gives the same great look—by making the doors from 1/2"-tick plywood, then applying thin “rails” and “Stiles” that are made of solid wood. So, start by cutting five door panels to size from a full sheet of 1/2" plywood, as shown in the cutting diagram. Sand the faces of the Door panels smooth.
-
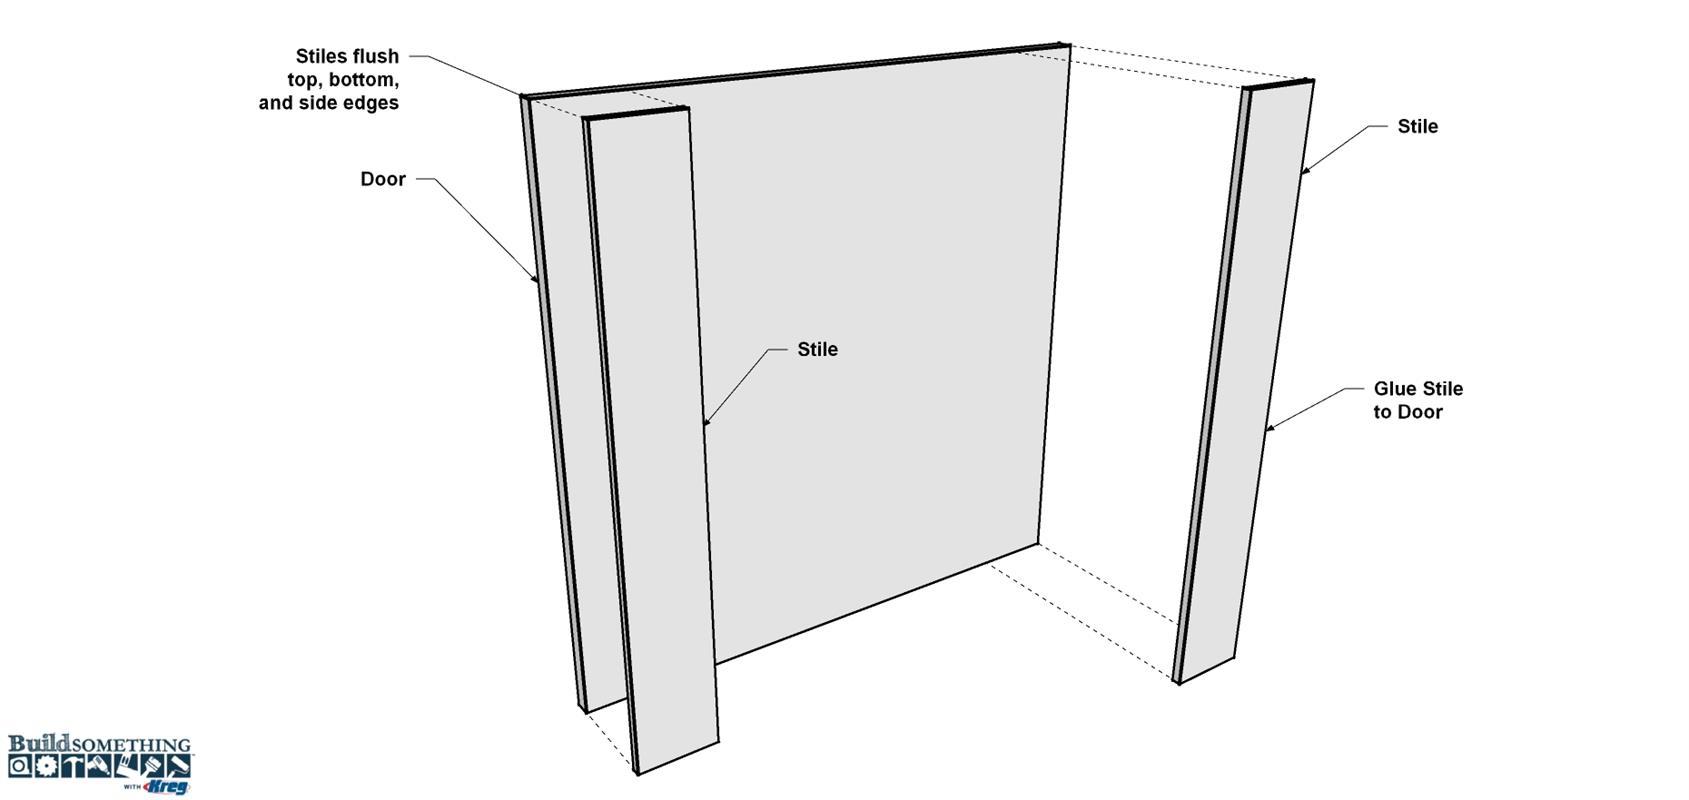
Cut and Apply the Stiles
From 1/4" thick x 3 boards (2 1/2" actual width), cut 10 Stiles to length, as shown in the cutting diagram. Apply glue to the rear face of the first Stile and apply it to one side of the first Door panel as shown. Align it so the side, top and bottom edges are flush. Clamp the Stile in place while the glue dries. Repeat this process for the second Stile. Once the glue dries and you can remove the clamps, and then repeat the process for the other four doors.
-
Cut the Rails to Fit
With all the Stiles applied to the Doors, it’s time to work on the Rails. Instead of cutting all 10 Rails to length at the same time, it’s better to cut one at a time to fit. Start by cutting a clean edge close to the factory end. Next, take the piece to the Door and lay it in place on the Stile. Mark the length with a sharp pencil and then transfer that mark to the face of the Rail. Cut the Rail to that length leaving the pencil line intact on the board. Test fit the Rail and trim as needed to get a tight fit. Once you have a good fit, glue the Rail and clamp it in position. Repeat this process for the other nine Rails.
-
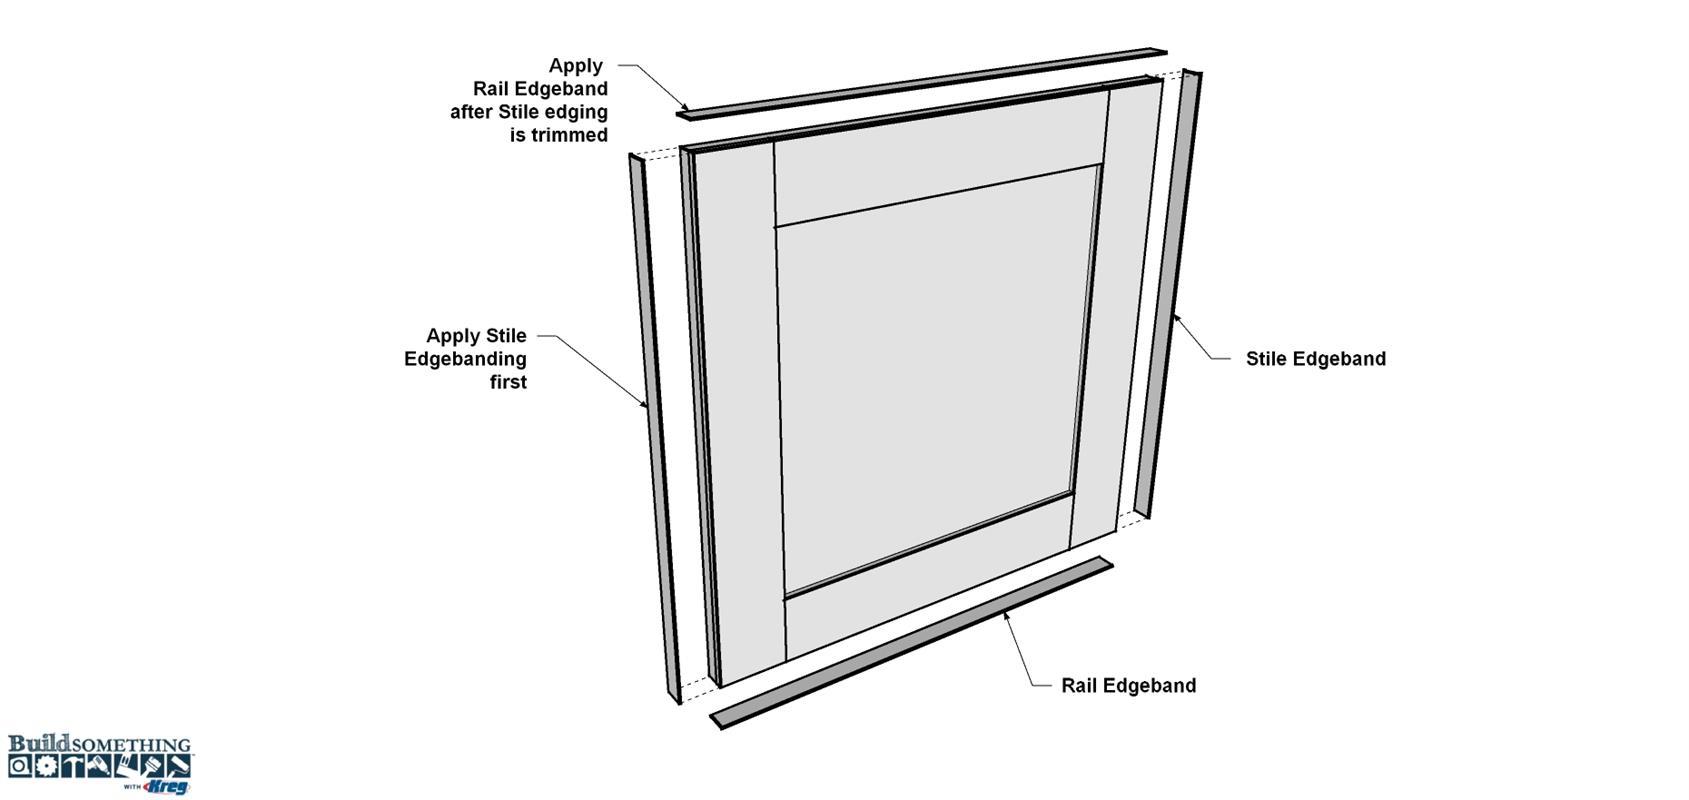
Apply Edging to the Doors
When the glue is dry on the Rails and Stiles, scrape away any squeezed-out glue, and then sand the Stile and Rail faces, as well as the door edges, smooth with 120grit sand paper. Now you can apply veneer edge banding to the doors, just as you did on the cabinet edges. Start by applying edging to the vertical (door side) edges. Trim that banding flush, and then repeat the process on the horizontal (upper and lower) edges.
-
Mount the Hinges
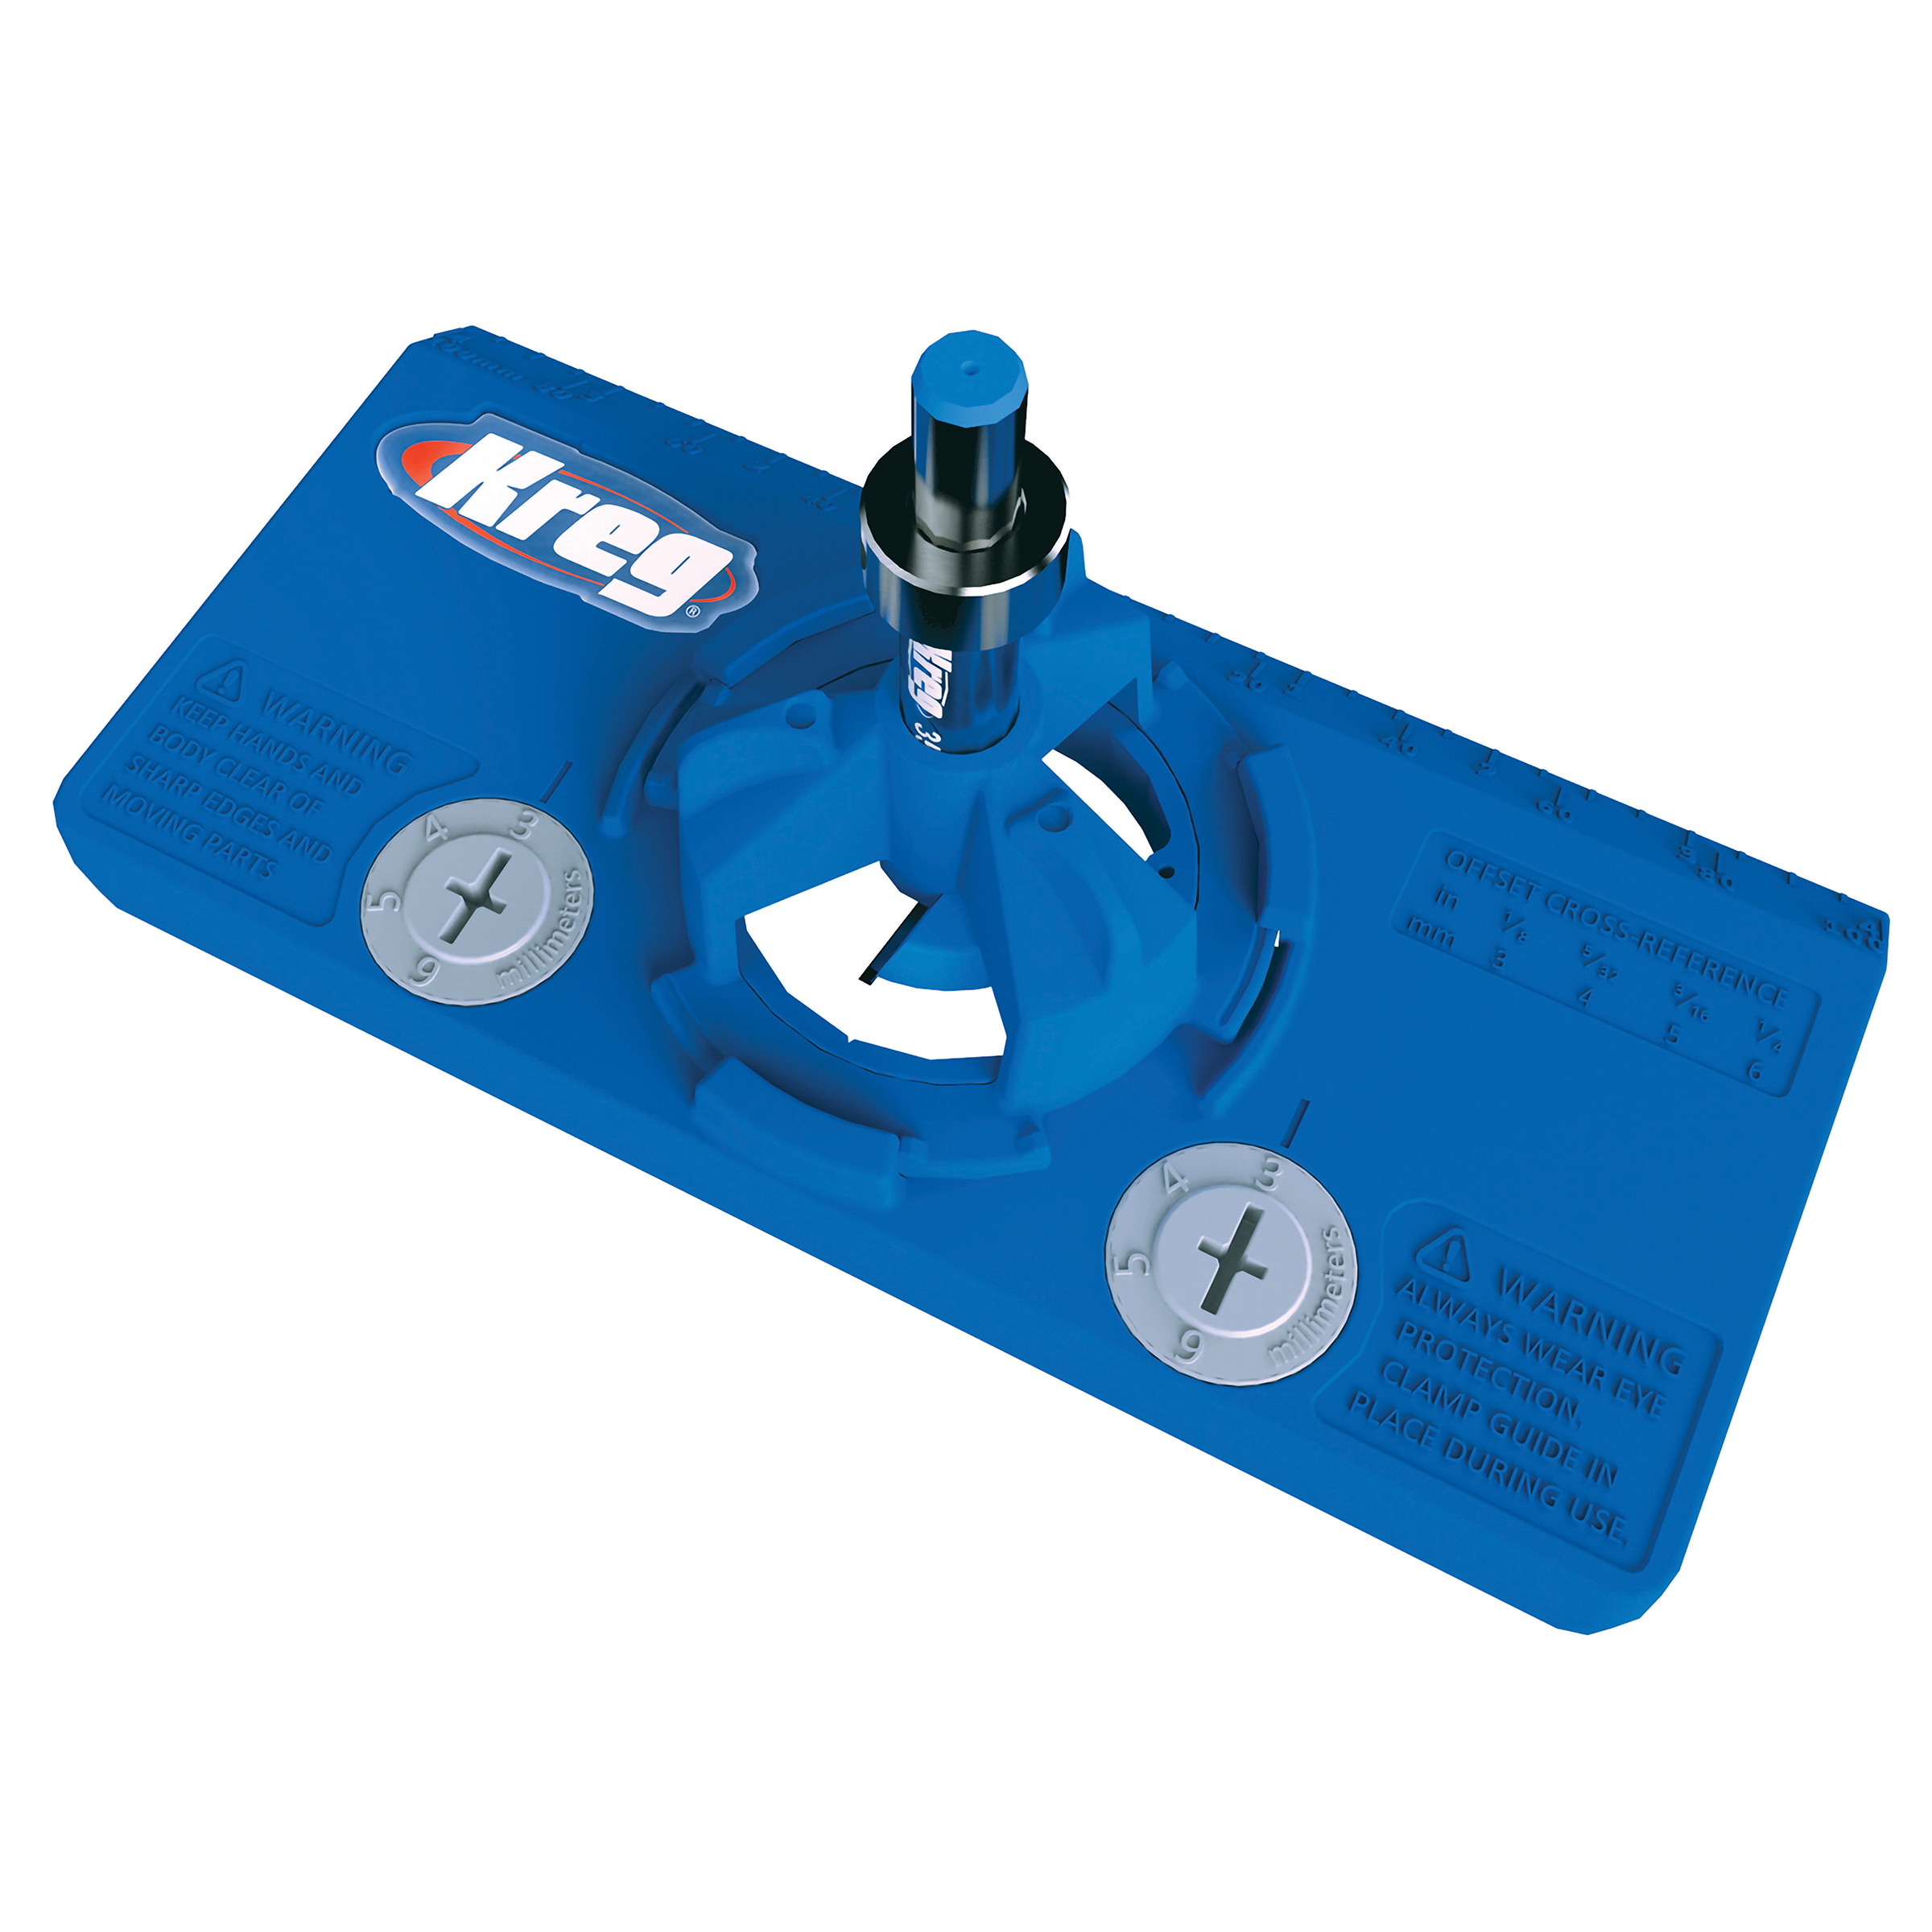
Use the Kreg Concealed Hinge Jig, as well as the instructions that come with your hinges, to mount two hinges on each door.
-
Mount the Doors
Mount the Doors to the Cabinet per the manufacturer’s instructions. Using a phillips screwdriver, adjust the hinges so the doors are spaced and aligned with one another. Remove the first door from the cabinet, remove the top hinge from the door, and mark the hinge location the with a marker in the hinge hole. Write the same hinge location on a piece of painters’ tape and apply it to the hinge. Do this to all the hinges and doors to ensure everything will go back to its original position after painting. This will eliminate the need to readjust the doors and hinges again after the finish is applied.
-
Finishing the Doors
Do any final sanding that’s needed on the doors, and then clean away the dust. Start by painting the inside faces and the edges of each door. When that paint dries, flip the doors over and paint the outside faces. We painted the doors with two coats of a crisp white semi-gloss paint for added protection.
-
Disassemble the Cabinet
Before you disassemble the cabinet to paint it, label each panel’s location and orientation on the back edge of each part using a marker. This makes it much easier to reassemble the cabinet when its finished. Then disassemble the cabinet.
-
Clean and Finish Cabinet Parts
Sand the faces and edges of all he cabinet parts smooth, and then wipe away all dust to prepare the parts for painting. Again, start by painting the inside faces and edges of the of each part. When this paint is dry, flip the panels over and paint the outside faces.
-
Reassemble the Cabinet
When the cabinet parts are thoroughly dried, reassemble the parts as they were before, but this time use glue along all mating edges to add extra strength.
-
Mount the Cabinet
Locate where you want to install the cabinet and mark a level line. Our cabinet is mounted about 11" off the floor so the electrical outlets would be inside the cabinet. Locate the wall studs in this area using a stud finder. With help from someone, position the cabinet on the wall aligned with the line. Double check that the cabinet is level before you secure it to the wall. To do that, drive 2 1/2" pan-head cabinet screws through the cleat and into the wall studs. A couple screws into each stud is a good idea. If, for some reason, you can’t hit at least three studs, you can supplement the screws in studs by also using heavy-duty wall anchors.
-
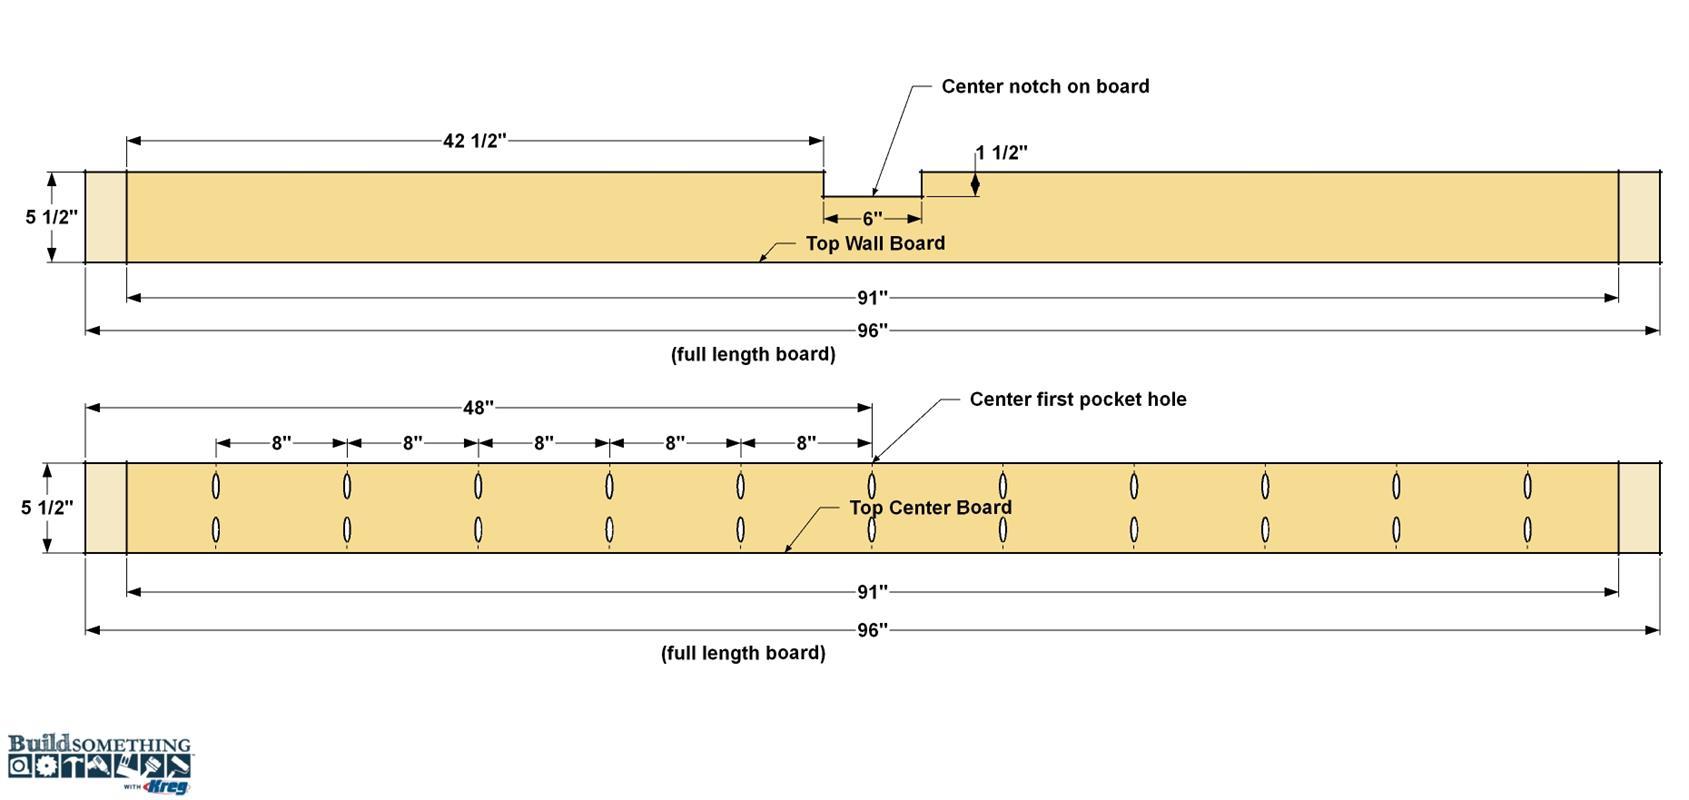
Make the Decorative Top
With the cabinet installed, you can add the decorative top. We used three 1x6 oak boards that we stained a darker color that adds a nice contrast to the white paint. Start with the boards full length (8' long). Mark the first pocket hole at the center of the board and measure out towards the ends to locate the others. Drill pocket holes along both edges, as shown. In one of the other two boards, lay out and cut a notch, centered on the length of the board, for the cable chase, as shown.
-
Glue, Cut and Sand the Top
Glue and clamp the three boards together, and secure them using 1 1/4" fine-thread Kreg screws. First, measure from the center of the Top, out to the ends, to establish the finished length of the top. We made ours 91" so that it will overhang the cabinet by 1/4" at each side. Cut the Top to length with a circular saw. Finally, sand the top flat with 220-grit sand paper, and ease any sharp edges.

-
Finish the Top
Wipe away all dust on the top, and then apply a finish. We used an English Chestnut stain from Minwax. After the stain was dry we added three coats of wipe-on polyurethane.
-
Attach the Top
Because the top is made of solid wood, it will naturally expand and contract with the changes in temperature and humidity. To allow for this movement, Drill six 1/4" pilot holes through the top of the cabinet. Position the Top on the cabinet and adjust it so the overhang is equal. Drive 1 1/4" Kreg screws from inside the cabinet up into the underside of the top of the cabinet into the top. Drive the screws until they are snug, but not super tight. Because the pilot holes are larger than the shaft of the screws, the top will be able to expand and contract freely.
-
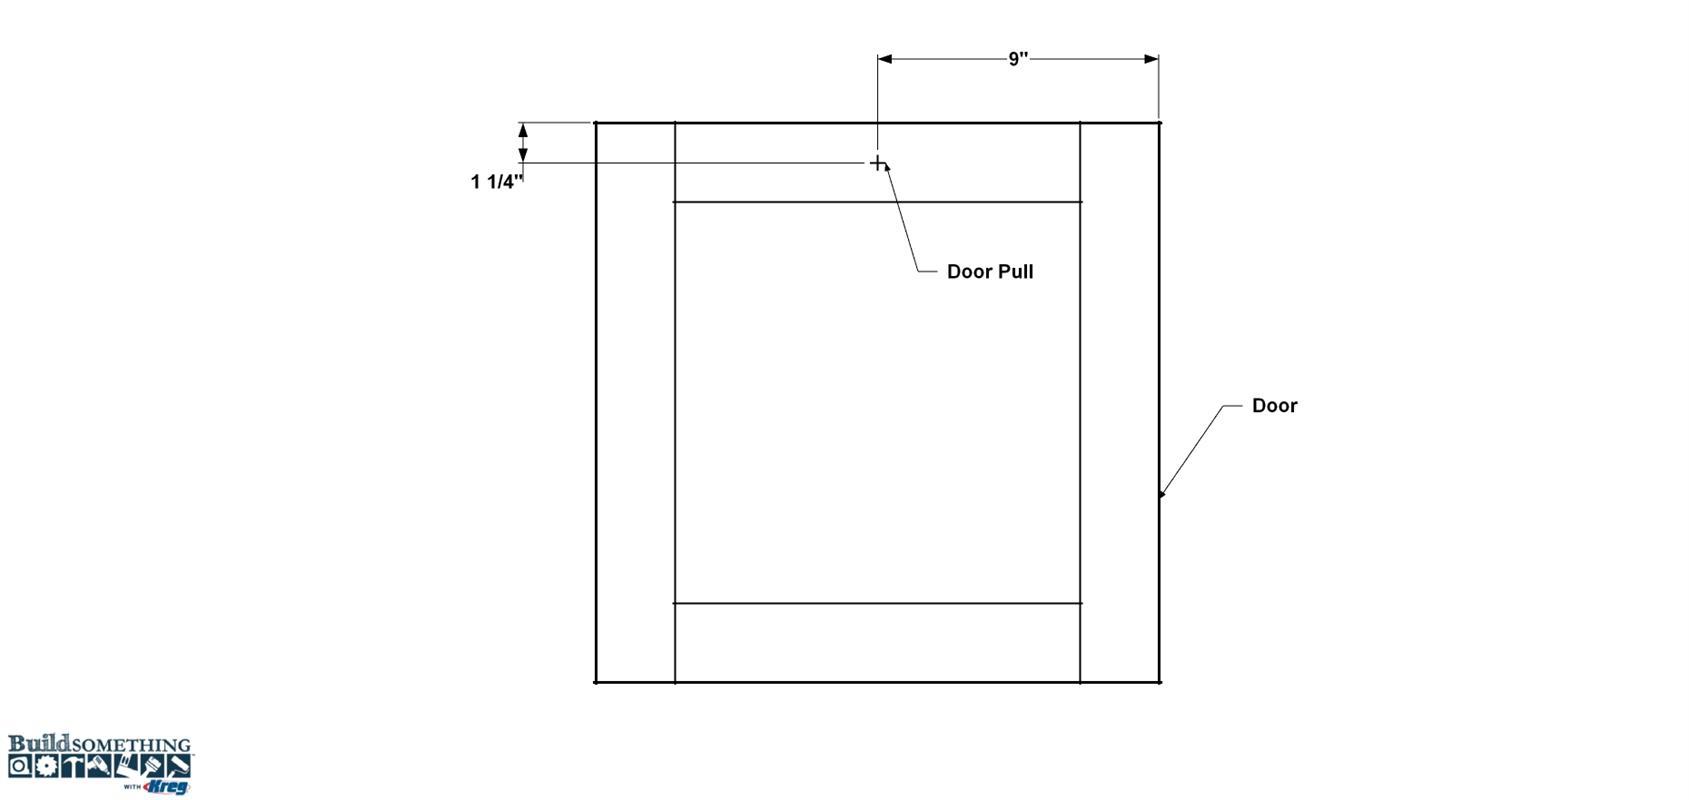
Reinstall the Hinges and Doors
Reinstall each hinge to its original location and mount the doors to the cabinet. Then use the Kreg Cabinet Hardware Jig to install the knobs on each door. We decided to center our on the upper rail of each door.
-
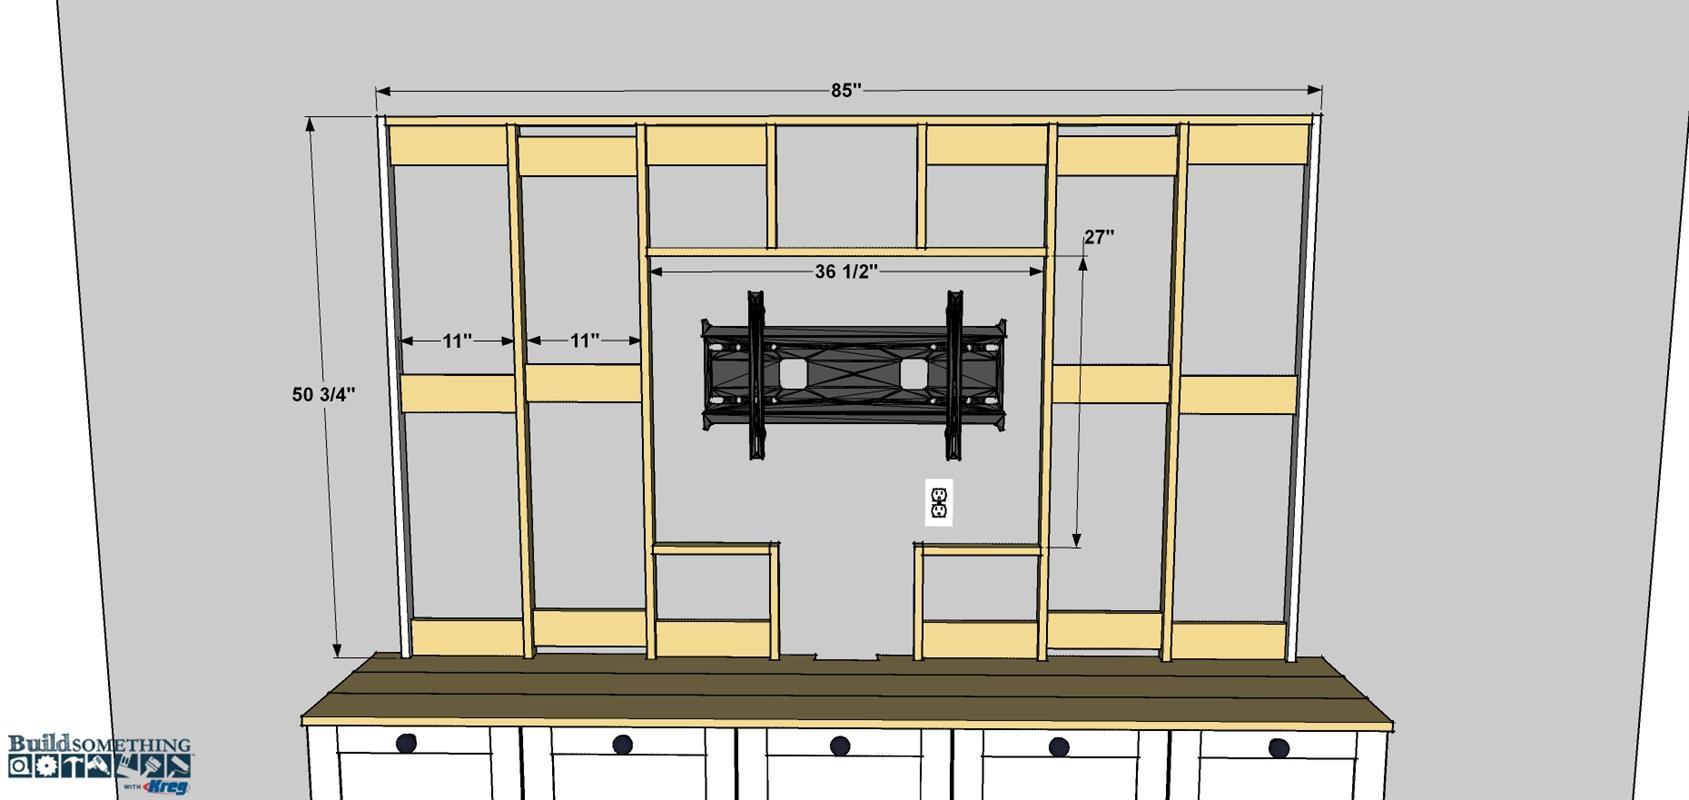
Wall Boards
We built the decorative wall boards behind the TV, not only add to the design of the cabinet, but to also act as a cable chase for any wires connecting the TV to auxiliary devices like speakers or cable boxes. Here is a general guideline as to how we built and mounted the wall boards.
-
Build the Back Frame
Build a simple frame to support the decorative boards. You can use 1x2s set perpendicular to the wall, with 1x4’s as braces between, as shown, that get attached using pocket-hole joints. Construct a frame that fits your TV and wall mounting bracket. Mount the back frame assembly to the wall by driving 2 1/2" pan-head cabinet screws through the 1x4 braces and into the wall studs. The corresponding illustration shows the general structure and size of Back Frame we built for our project.
-
Install the Boards
The decorative part of the wall is made from 1x8 boards. We sanded and painted all the boards before cutting and installing them. Start with the lowest board. Cut it to length, and then position it above the cabinet top with a slight gap—a couple of nickels make perfect spacers for this. Make sure the board is level, and then attach it to the uprights using brad nails—a nail gun works great here. Then, work your way up, cutting the boards to fit, as needed, using nickels as spacers, and checking that each board remains level. Once in all the boards are on, fill the nail holes, then touch up those areas and the cut ends. After that, you can install your TV mount on the wall, hang the TV, and load up the cabinet.