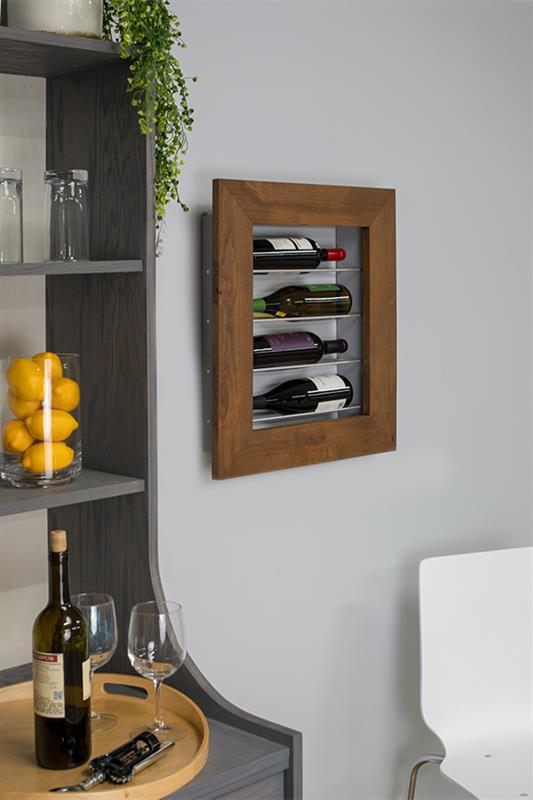
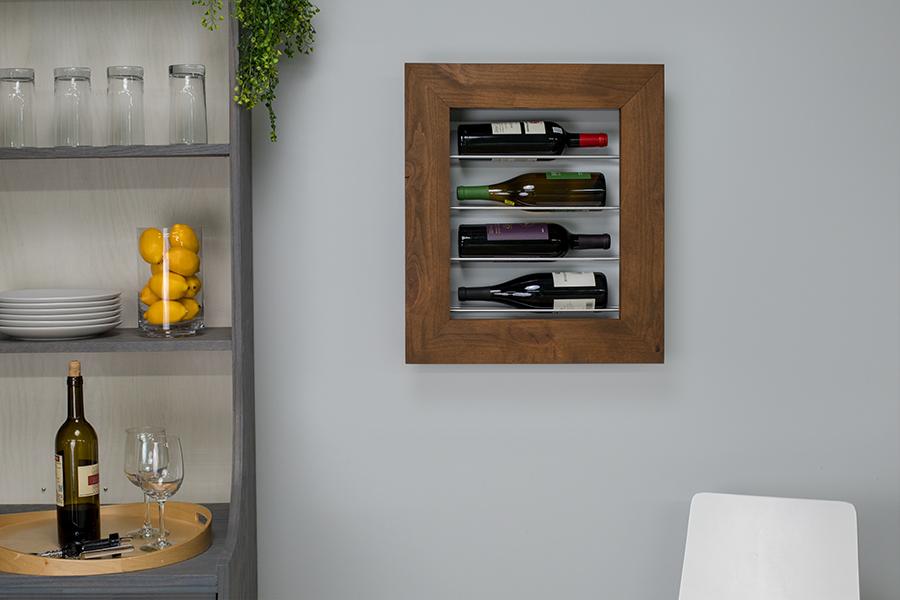
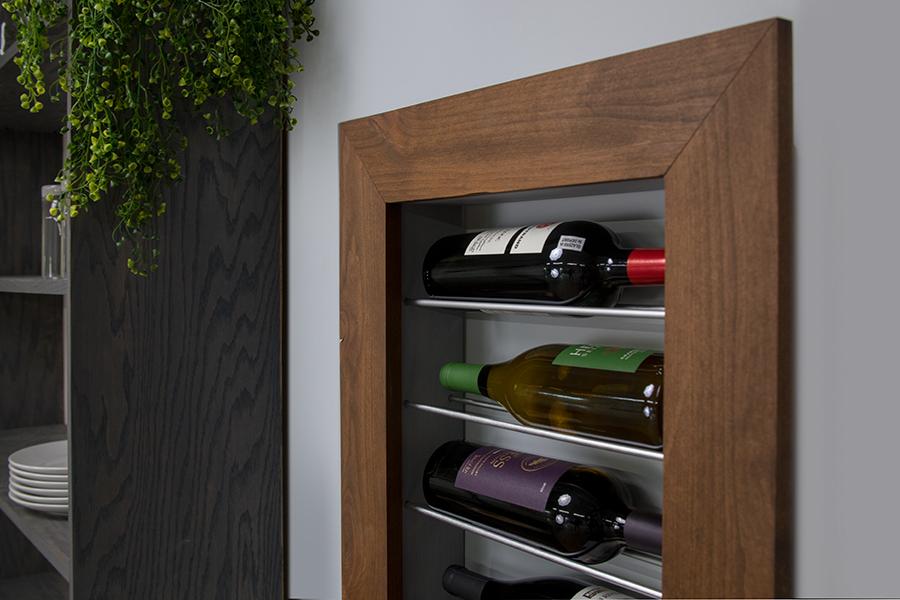
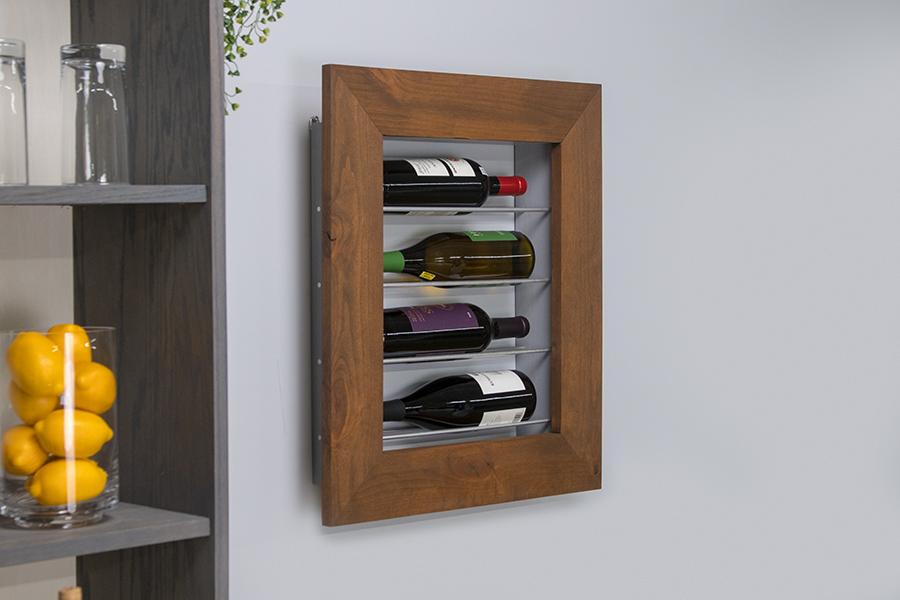


Make your favorite wines look fine with this clever wine rack. With a “box” that’s painted to match the wall, and a “floating” frame, it creates a shadow-box look that really shows off the bottles stored inside. The whole thing is built from two boards and thin aluminum rod from the home center.
Tools
Kreg Tools


Other Tools
-
Miter Saw

-
Square
-
Tape Measure
-
Drill (cordless)
-
Sander
Materials
Wood Products
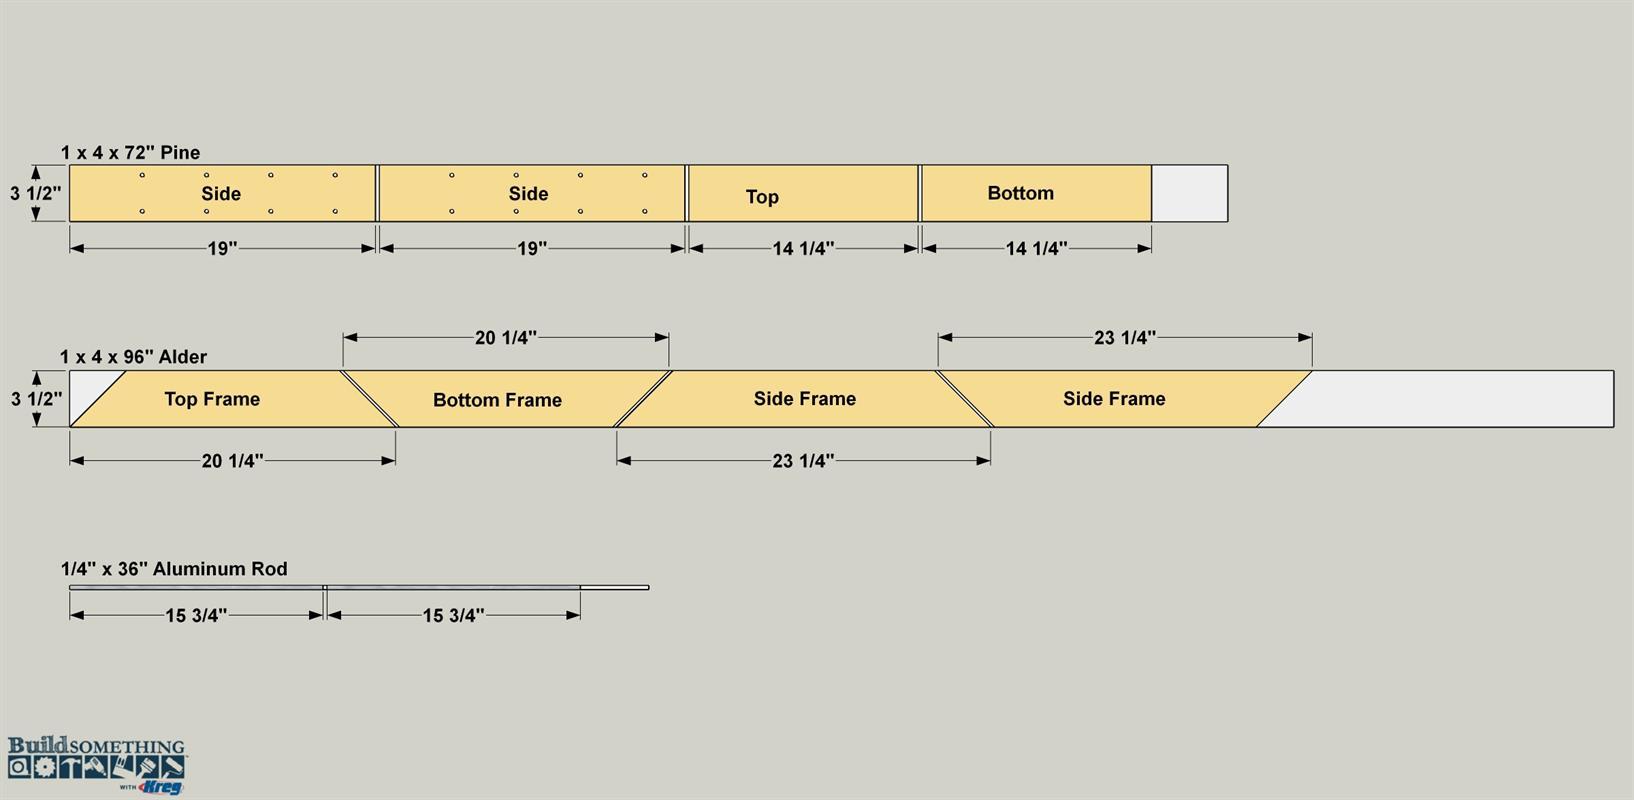
- 1 Board , 1x4 , 72"
- 1 Board , 1x4 , 96"
Hardware & Supplies
- 4 1/4" x 36" aluminum rod
- 12 1 1/4" fine-thread Kreg pocket-hole screws
- 8 1 1/4" coarse-thread Kreg pocket-hole screws
- 1 Wood glue
- 2 D-ring hangers
- 2 Medium-duty wall anchors
Cut List & Parts
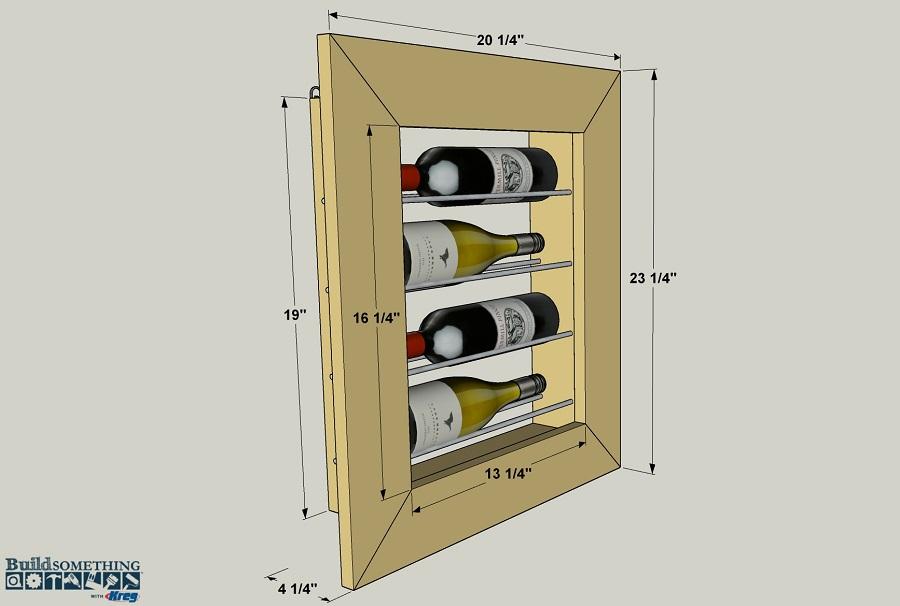
- 2 Box Top/Bottom , 3/4" x 3 1/2" x 14 1/4" pine
- 2 Box Side , 3/4" x 3 1/2" x 19" pine
- 2 Frame Top/Bottom , 3/4" x 3 1/2" x 20 1/4" alder
- 2 Frame Side , 3/4" x 3 1/2" x 23 1/4" alder
- 8 Rod , 1/4"-dia. x 15 3/4" aluminum rod
Directions
-
Make the Box Top and Bottom
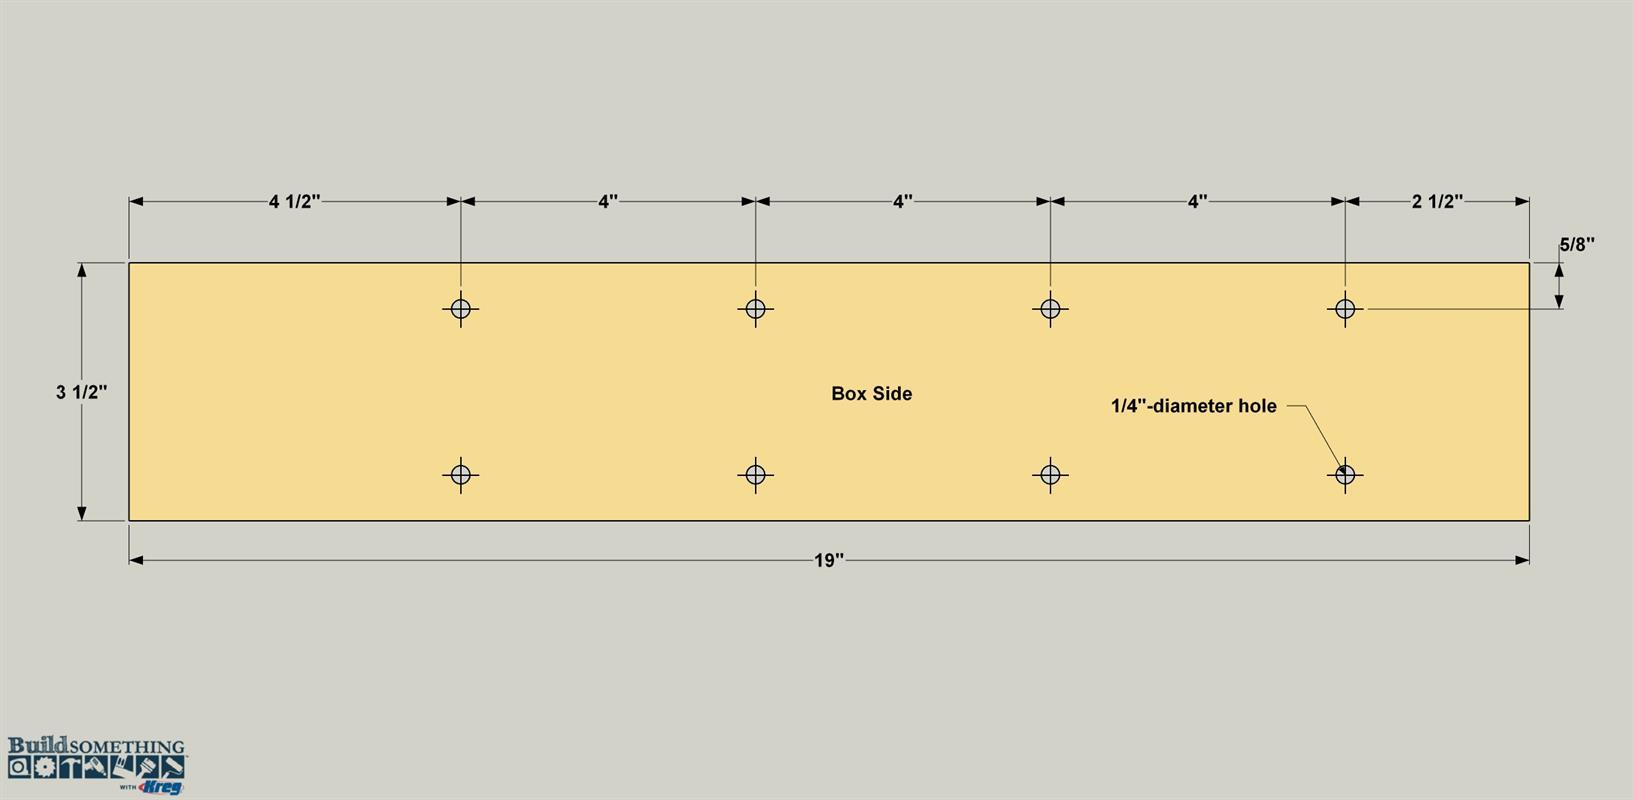
From a 1x4 pine board, cut the Box Top and Box Bottom to length, as shown in the cutting diagram. Set your Kreg Jig for 3/4"-thick material, and then drill pocket holes in both boards at the locations shown. There are two pocket holes at each end, plus two along one edge. These will be used to attach the frame later.
-
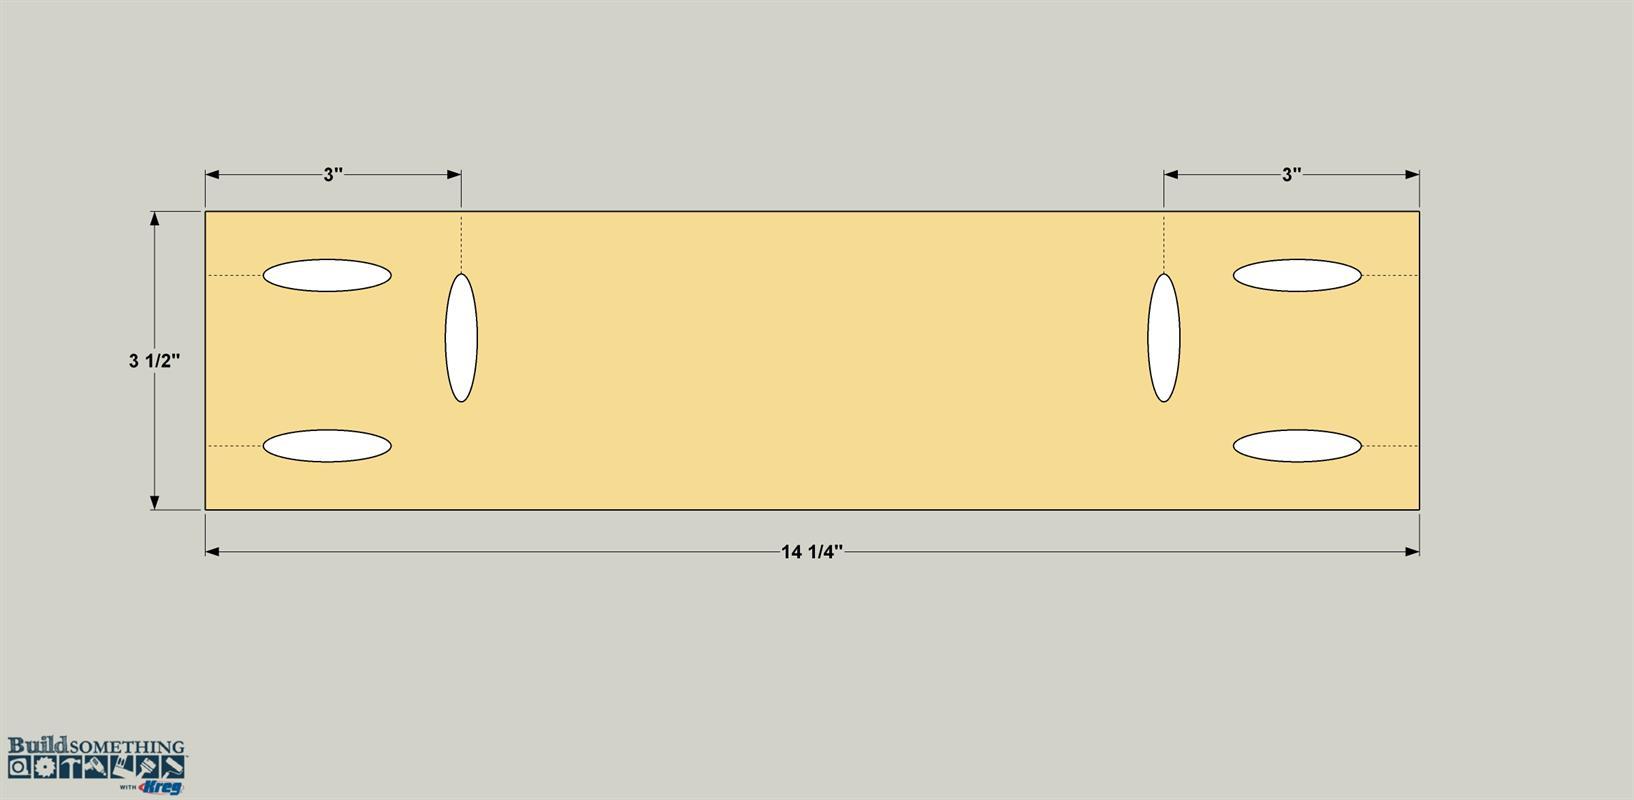
Make the Box Sides
From the remainder of the 1x4 pine board, cut two Box Sides to length. On one of the Sides, lay out the locations of the holes shown. These will receive the aluminum rods that the wine bottles rest on. Now stack the Sides, with the marked piece on top, so that the ends and edges are flush. Place them on a scrap board or piece of plywood, and clamp them to a work surface. Drill the holes through both boards at the same time so that they will be aligned. The holes need to be straight—meaning perpendicular to the board faces—so that the rods will pass through easily later. A drill guide, as shown in the video below, makes this easier.
-
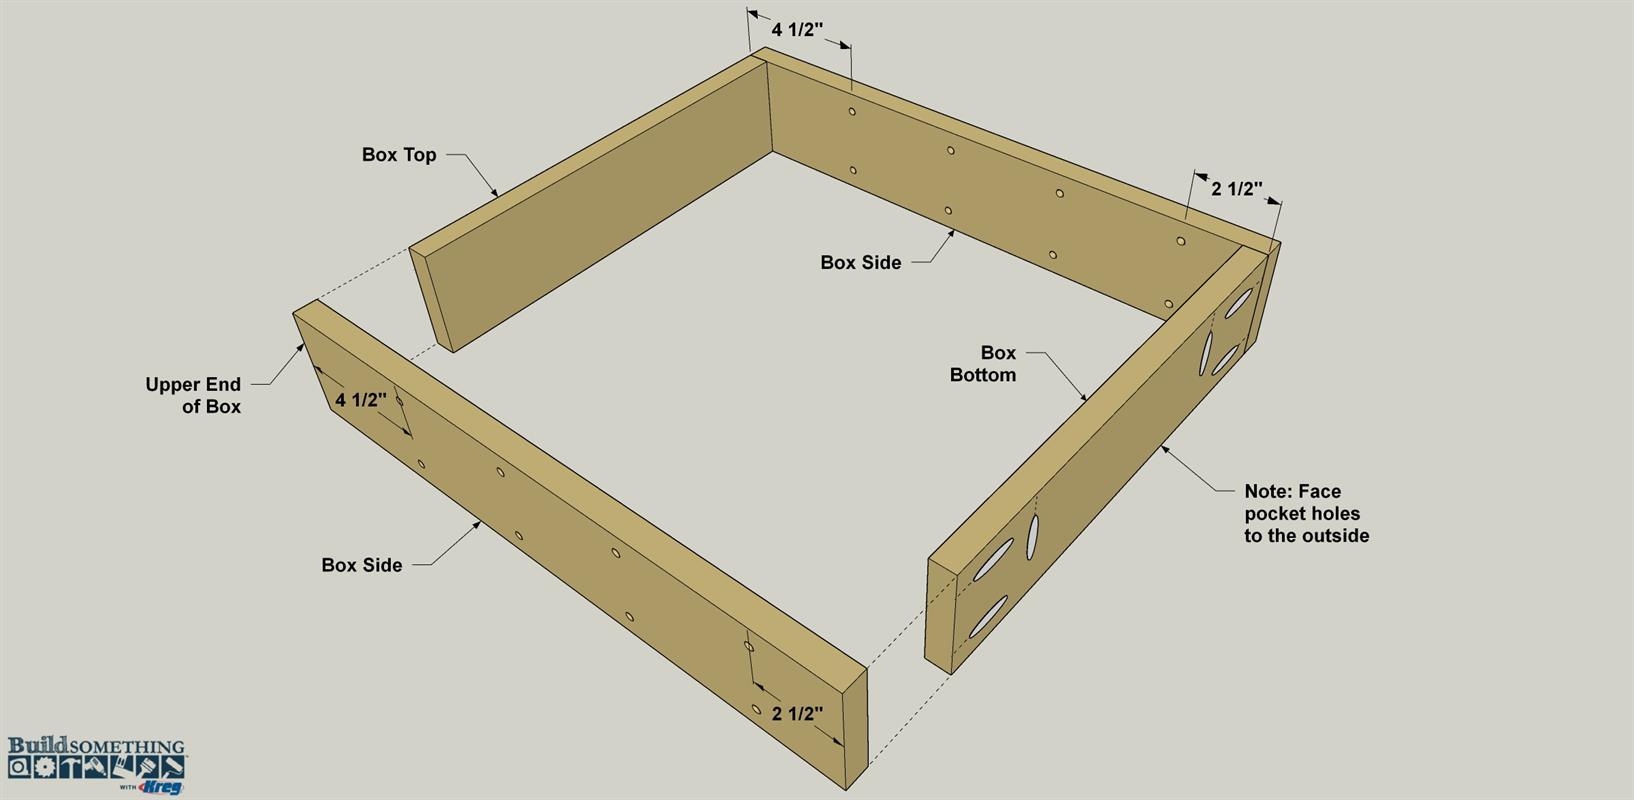
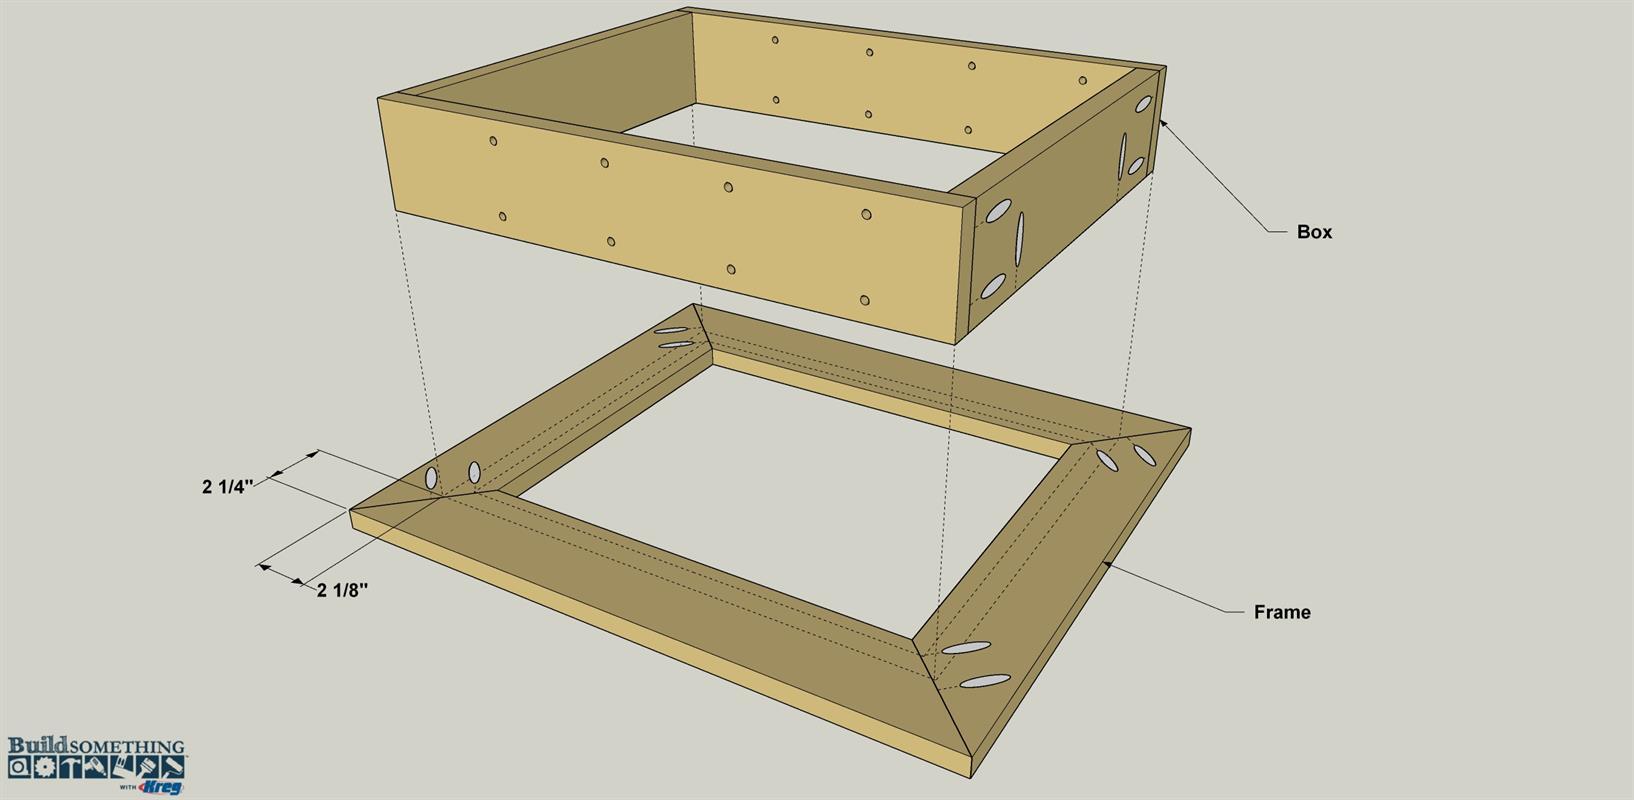
Assemble the Box
Before assembly, sand the inside faces of each part. Spread glue on the ends of the Top and Bottom, and then align the Sides as shown. Make sure that the holes in the sides are aligned, with the larger space at what will be the top of the wine rack. Clamp the parts together, and then secure the Top and Bottom to the Sides using 1 1/4" coarse-thread Kreg screws. Then sand the outside faces of the box assembly. Because we chose to paint the box and stain the frame, we went ahead and painted the box now. We used the same color as the wall where the wine rack will be mounted.
-
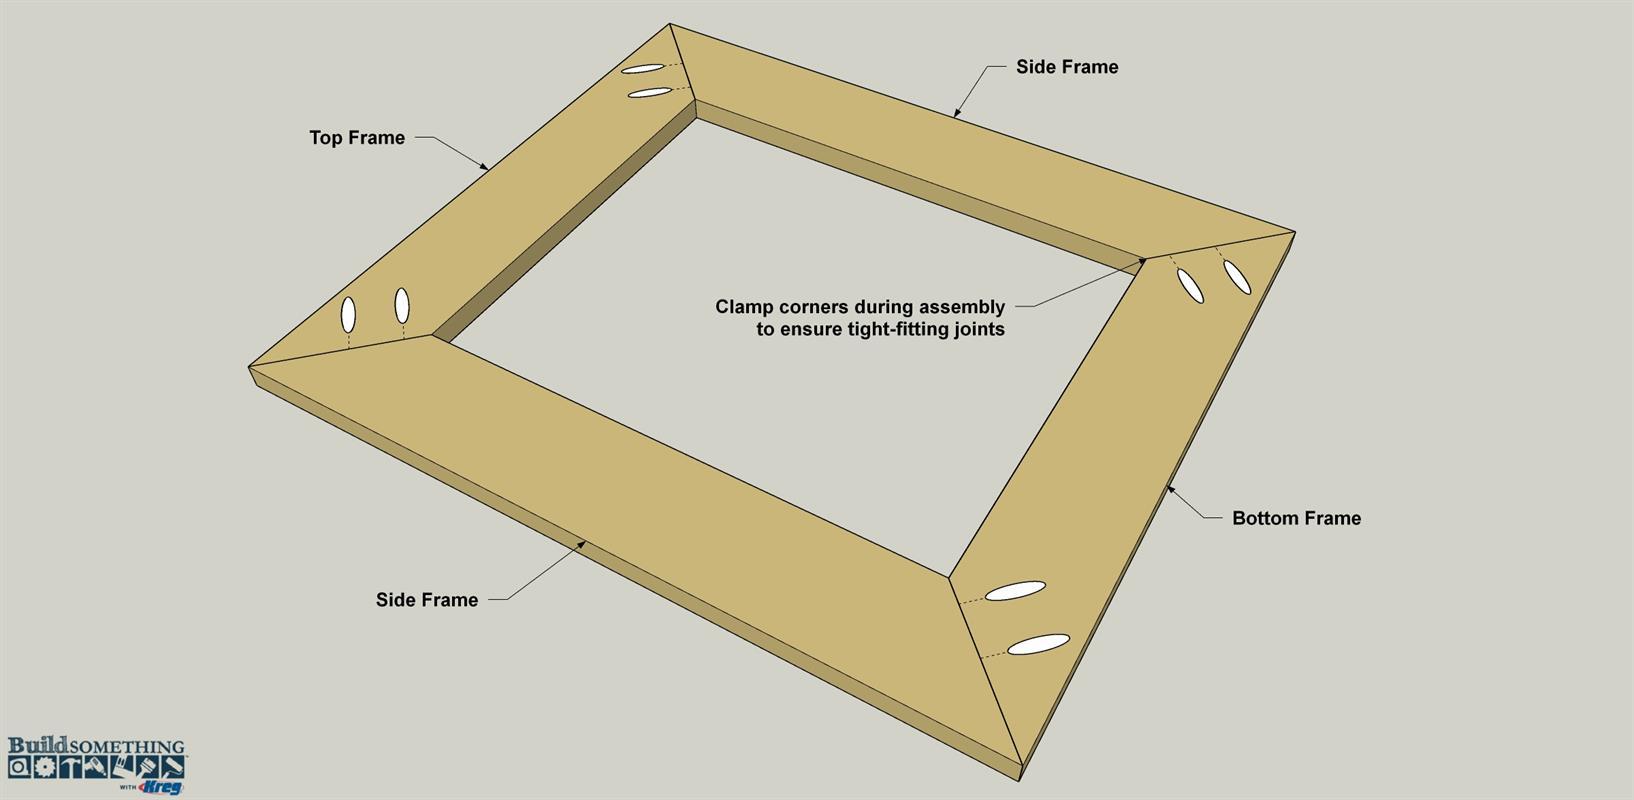
Make the Frame Parts
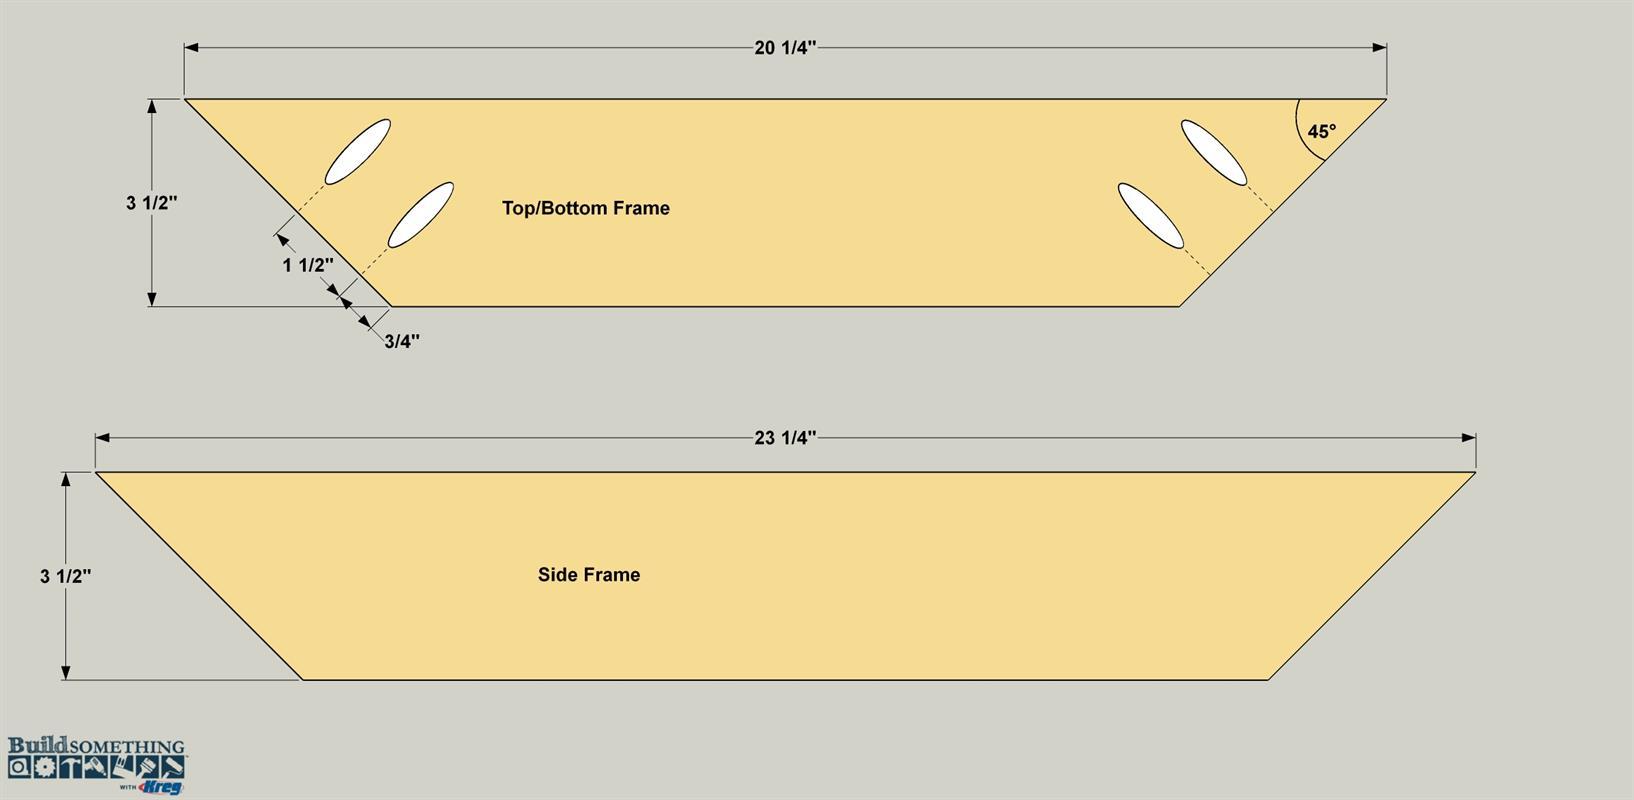
Cut two Side Frames, one Top Frame, and one Bottom Frame from a 1x4 board, as shown in the cutting diagram. Both ends are mitered at 45°. We used alder for the frame, which we picked up at a local home center. You could use another wood, such as pine, oak, poplar, or maple, if you prefer. After you cut the pieces, test fit them to make sure the mitered corners align properly without gaps. Then you can drill pocket holes in just the Short Frames at the locations shown.
-
Assemble the Frame
Apply glue to the mitered ends of the Side Frames, and then attach them to the Top and Bottom Frame using 1 1/4" Kreg screws. The alder we used is a hardwood, so we used fine-thread screws here, instead of the coase-thread screws used to assemble the pine (softwood) box. Be sure to clamp the joints to keep the faces flush and the corners aligned as you drive in the screws. After the glue dries, you can sand the frame and apply the stain or finish of your choice. We used a dark walnut gel stain.
-
Join the Box and Frame
After the finish dries, lay the frame face down on a protected work surface. Lay the Box in place on the back of the frame and position it so the overhangs are correct, as shown. Secure the Box to the Frame with 1 1/4" Kreg screws—again, using fine-thread screws if your frame is made from hardwood.
-
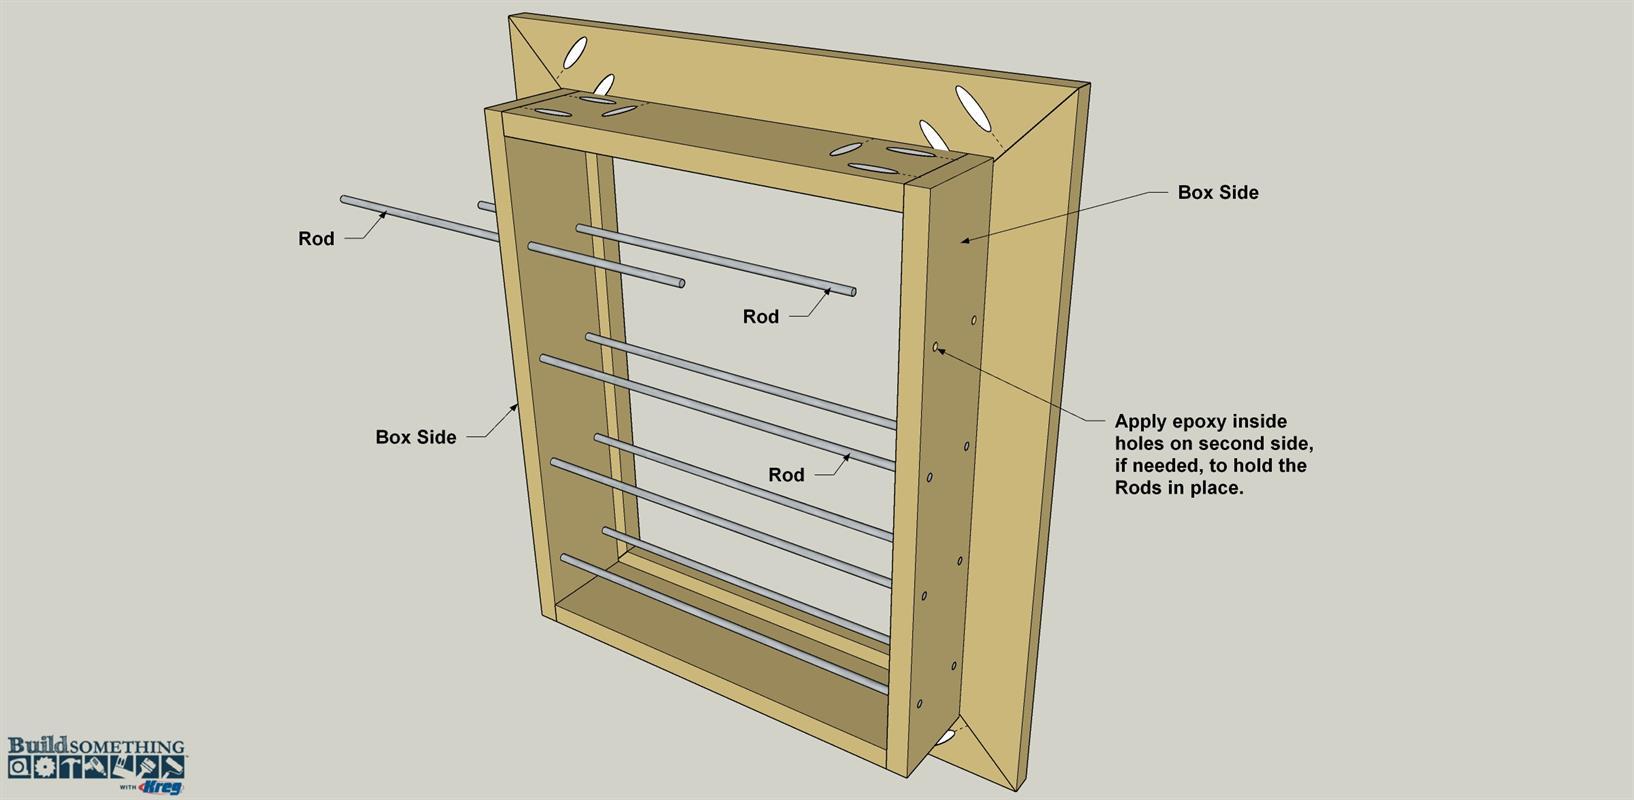
Cut and Install the Rods
Cut eight 1/4" aluminum Rods to length as shown in the cutting diagram. Clean the rods glass cleaner, or denatured alcohol if needed to remove adhesive. Then buff the rods to remove scratches and to create a consistent sheen. You can do this easily using steel wool or 220-grit sandpaper. Wipe off any residue. To install the Rods, slide them through the Sides, as shown. If the Rods don’t fit tight in the holes, you can place a small dba of epoxy in the hole on the second side, and then press the Rod in.
-
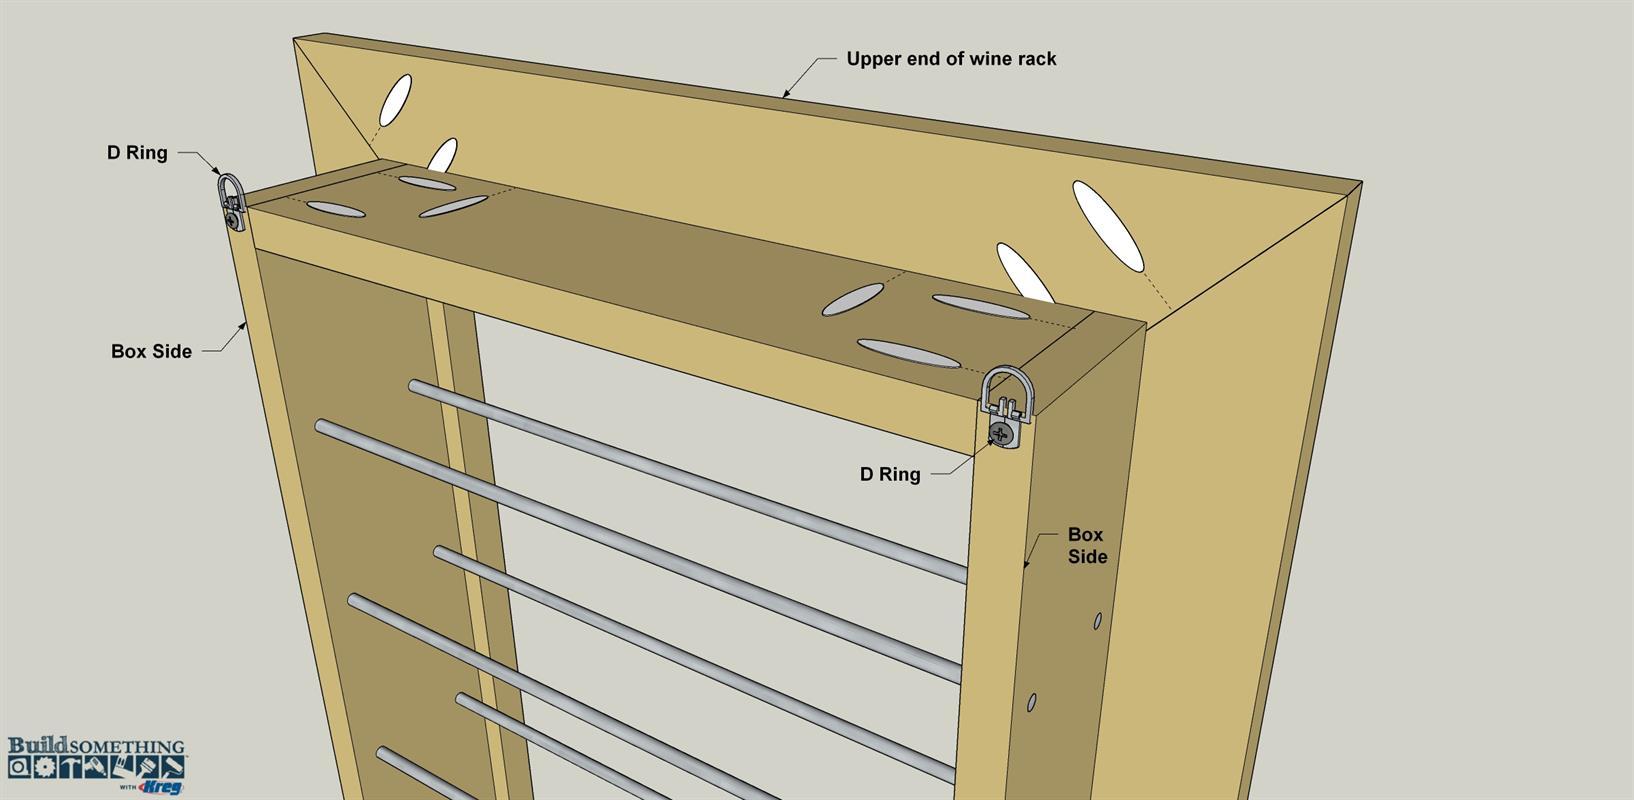
Attach the D-Rings
The wine rack isn’t heavy, but with the weight of four bottles stored on it, you’ll want to make sure it’s mounted securely on the wall. Start by installing two D-Ring hangers, as shown (making sure you locate them at the top of the rack). Position the rack where you’ll want it on the wall, make sure it is sitting level, and then mark the hanger locations. Drill holes and install medium-duty wall anchors, as directed by the manufacturer. Drive screws into the anchors, and you can hang the rack.