

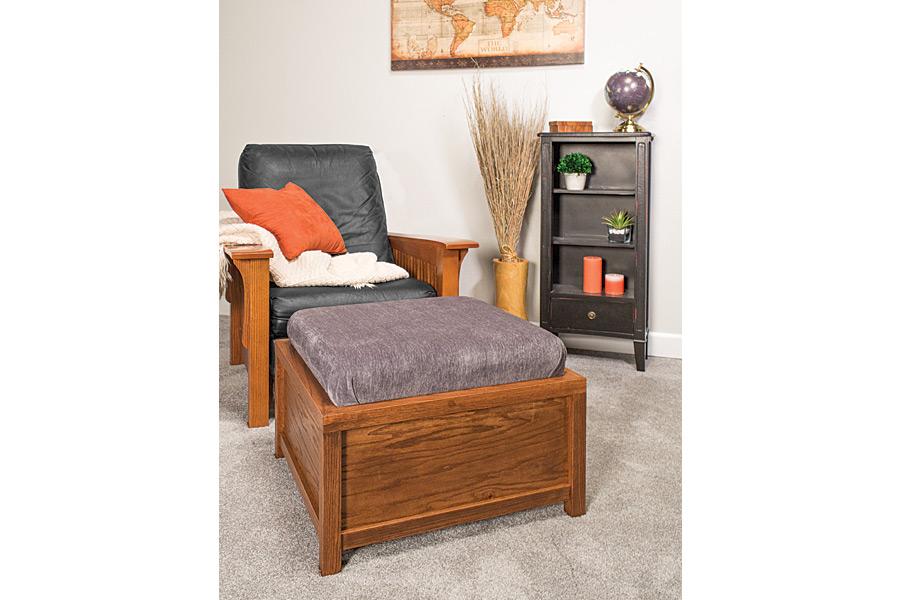
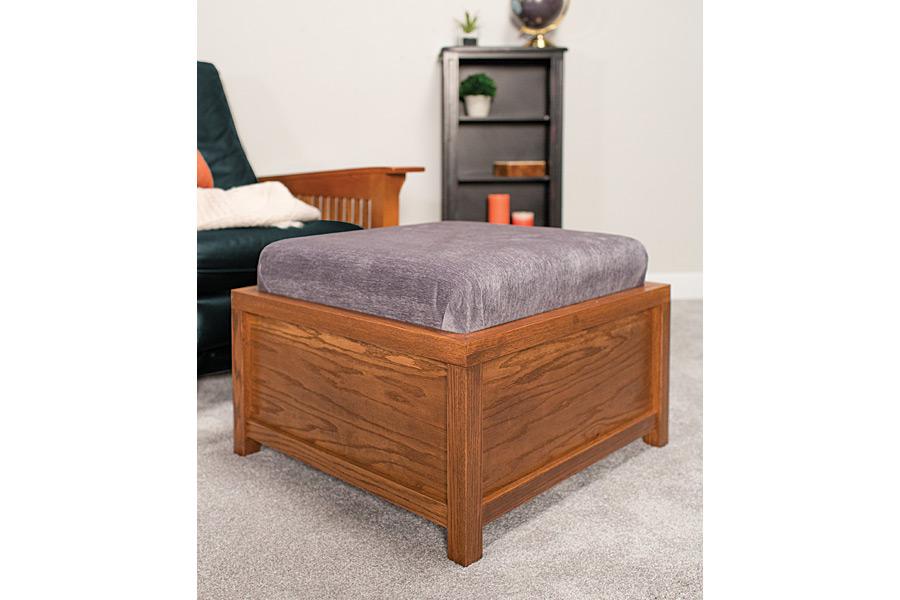
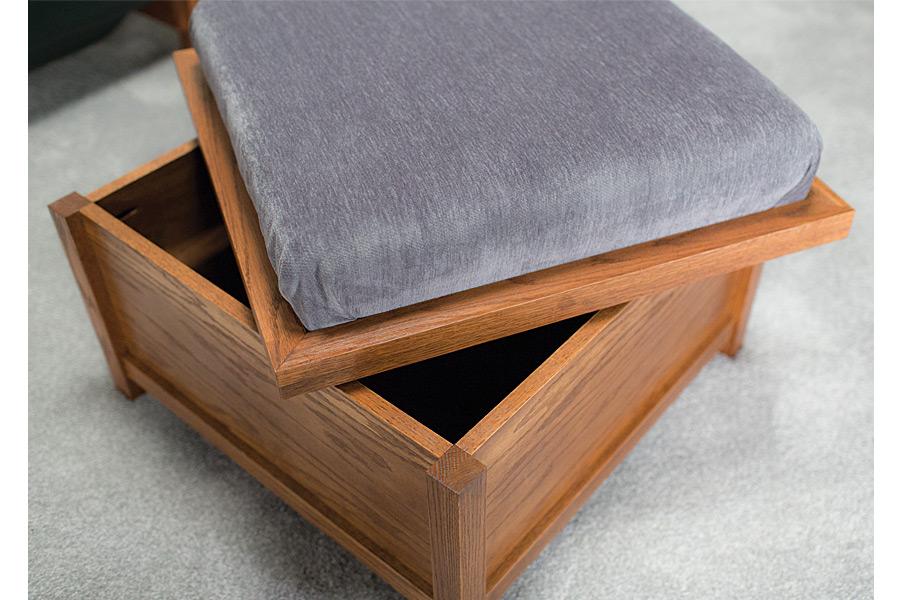
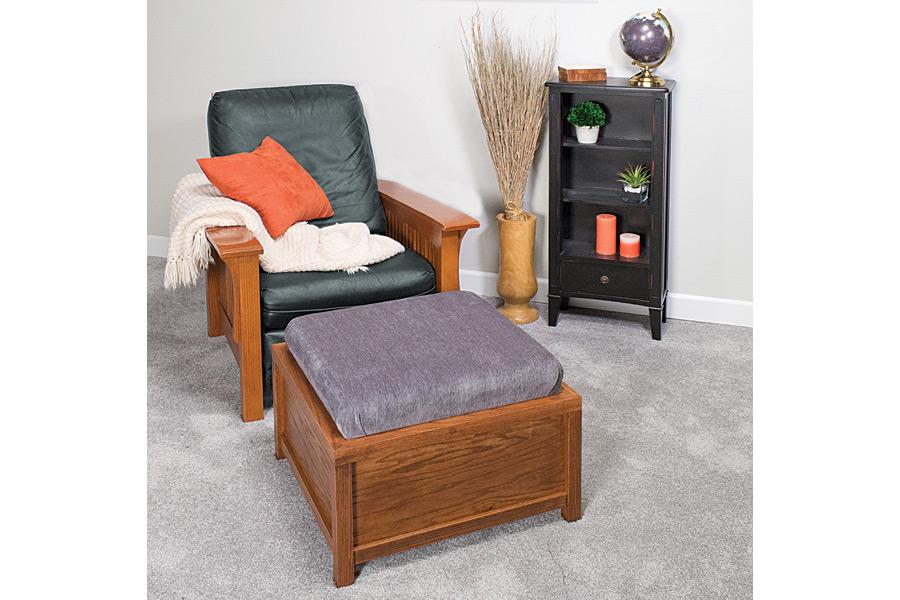
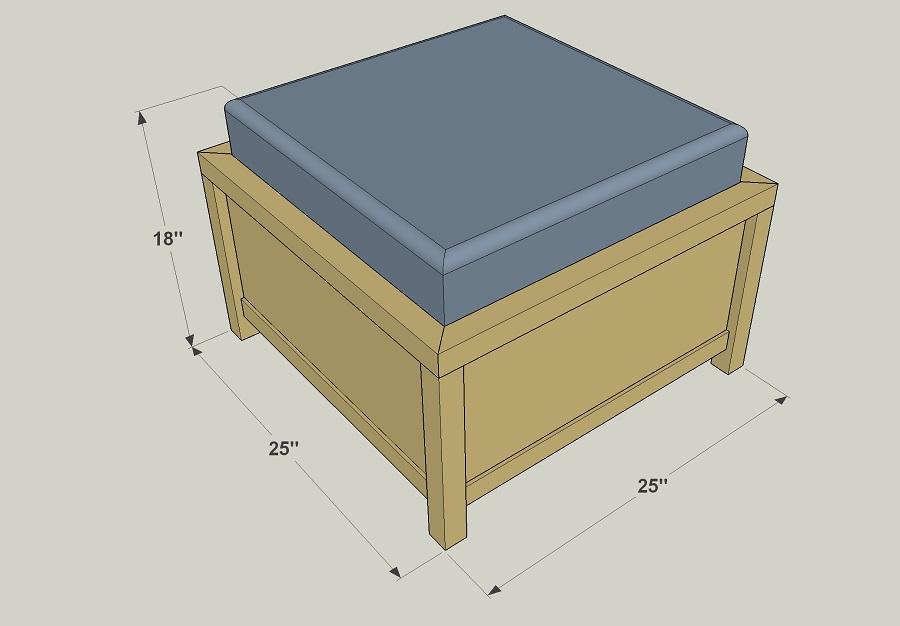


This handsome ottoman provides a great place to rest your feet, and it offers more. Lift off the cushioned top, and you’ll find storage inside. You can even flip the top over to create a small coffee table. It’s easy to vary the looks by choosing a stain or paint and fabric that suit your style.
Tools
Kreg Tools


Other Tools
-
Circular Saw (corded)

-
Miter Saw
-
Square
-
Tape Measure
-
Drill (cordless)
-
Stapler
-
Iron
-
Sander
Materials
Wood Products
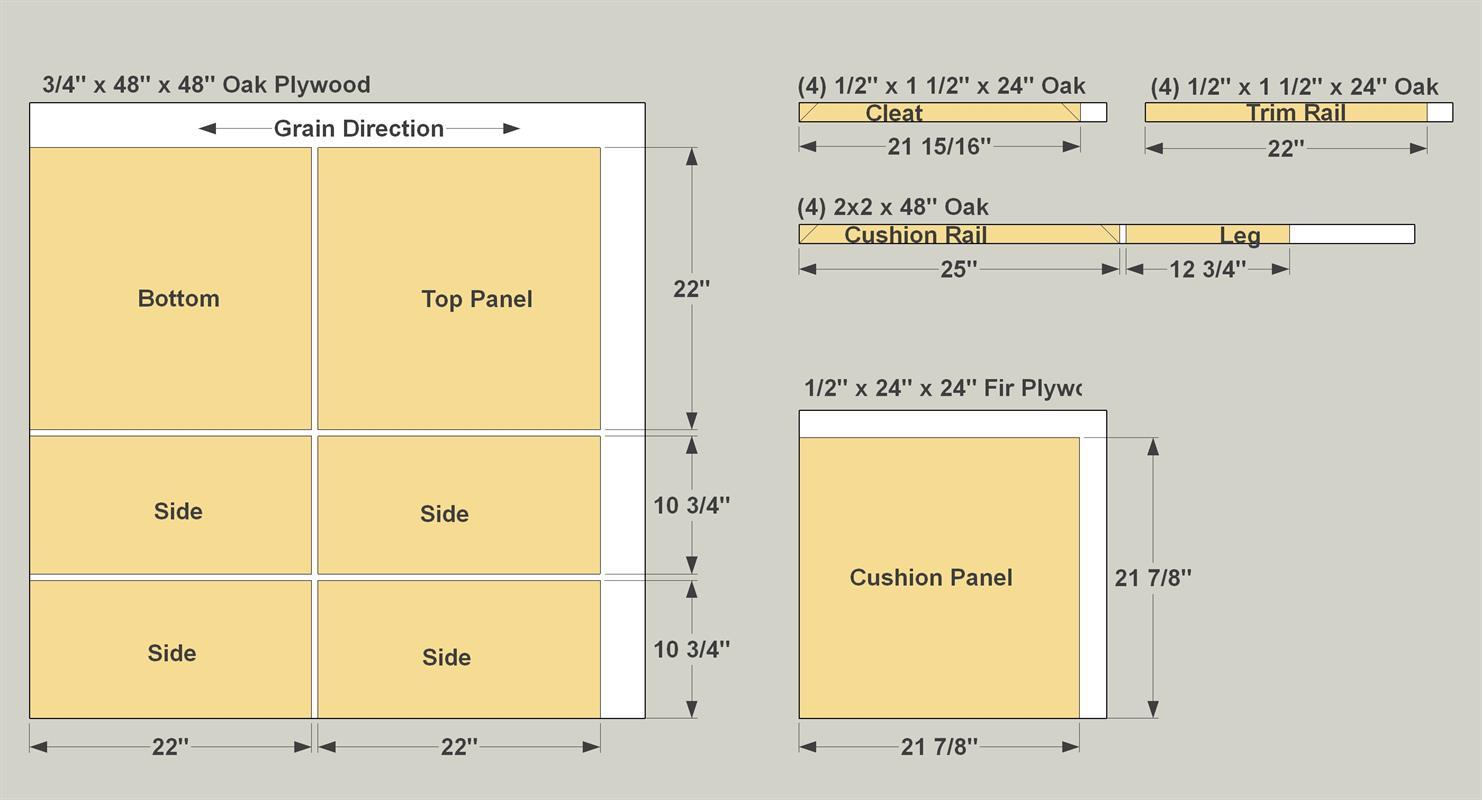
- 1 Plywood , 3/4" Thick , Half Sheet
- 1 Plywood , 1/2" Thick , Quarter Sheet
- 8 Board , 1/2" x 11/2" , 24"
- 4 Board , 2x2 , 48"
Hardware & Supplies
- 16 1 1/4" coarse-thread pocket-hole screws
- 40 1 1/4" fine-thread pocket-hole screws
- 4 #8 x 1 1/4" brass flathead wood screws
- 1 8' roll iron-on oak veneer edging
- 1 Wood glue
- 1 1/2"-thick upholstery batting
- 1 4" x 22" x 22" upholstery foam
- 1 Quart wood stain
- 1 Quart clear finish
- 1 Box 5/16" staples
- 1 36" x 36" upholstery fabric
Cut List & Parts
- 4 Side , 3/4" ply x 10 3/4" x 22" oak
- 4 Trim Rail , 1/2" x 1 1/2” x 22" oak
- 1 Bottom , 3/4" ply x 22" x 22" oak
- 4 Leg , 1 1/2" x 1 1/2" x 12 3/4" oak
- 1 Top , 3/4" ply x 22" x 22" oak
- 4 Cushion Rail , 1 1/2" x 1 1/2" x 25" oak
- 4 Cleat , 1/2" x 1 1/2" x 21 15/16" oak
- 1 Cushion Panel , 1/2" ply x 21 7/8" x 21 7/8"
Directions
-
Make the Ottoman Sides
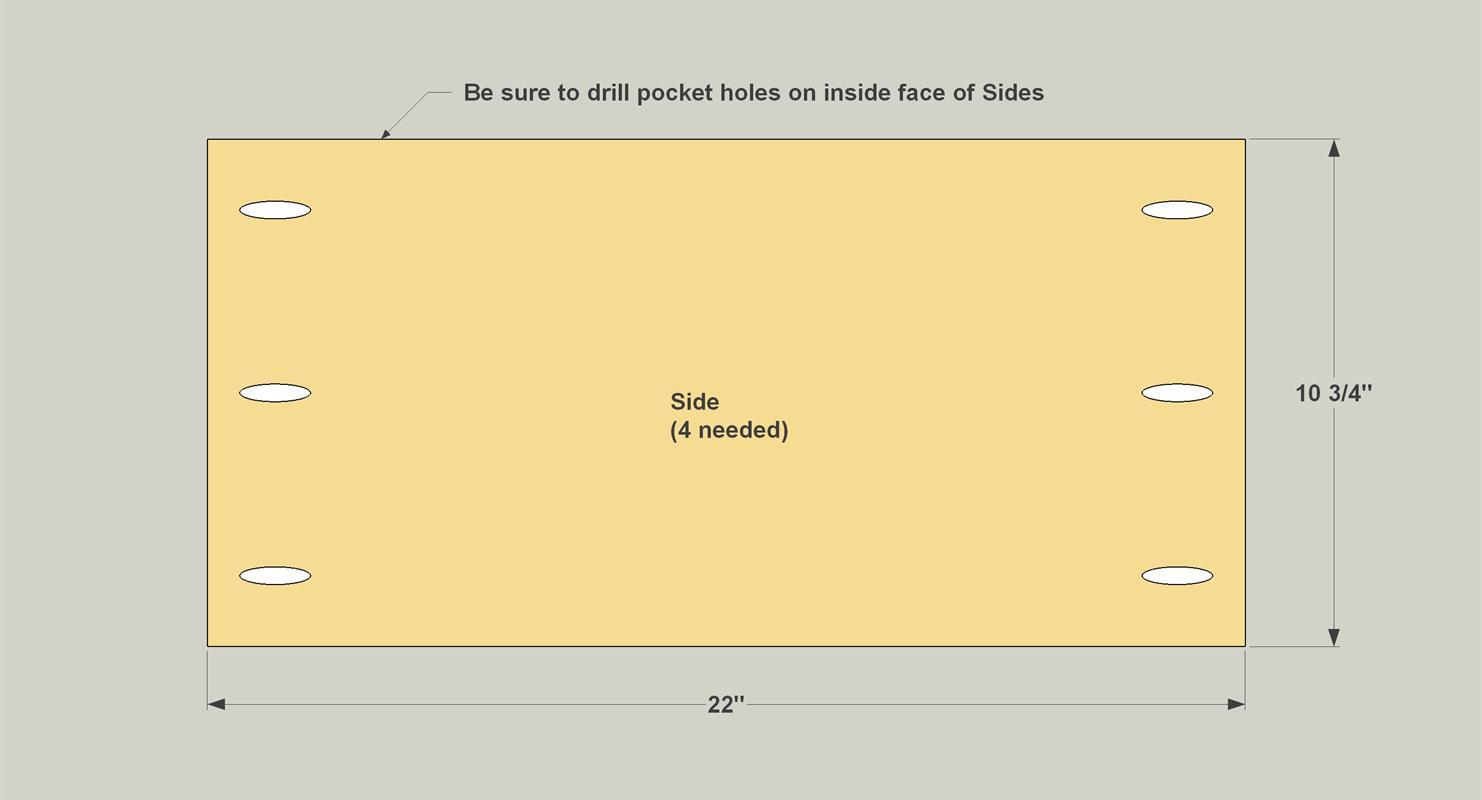
Cut four Sides to size from 3/4" plywood, as shown in the cutting diagram. Make sure that the grain direction runs along the long dimension of the Sides, and take care to make sure that the Sides are all the same size. With your pocket-hole jig set for 3/4" material, drill pocket holes in the inside face of each Side, as shown.
-
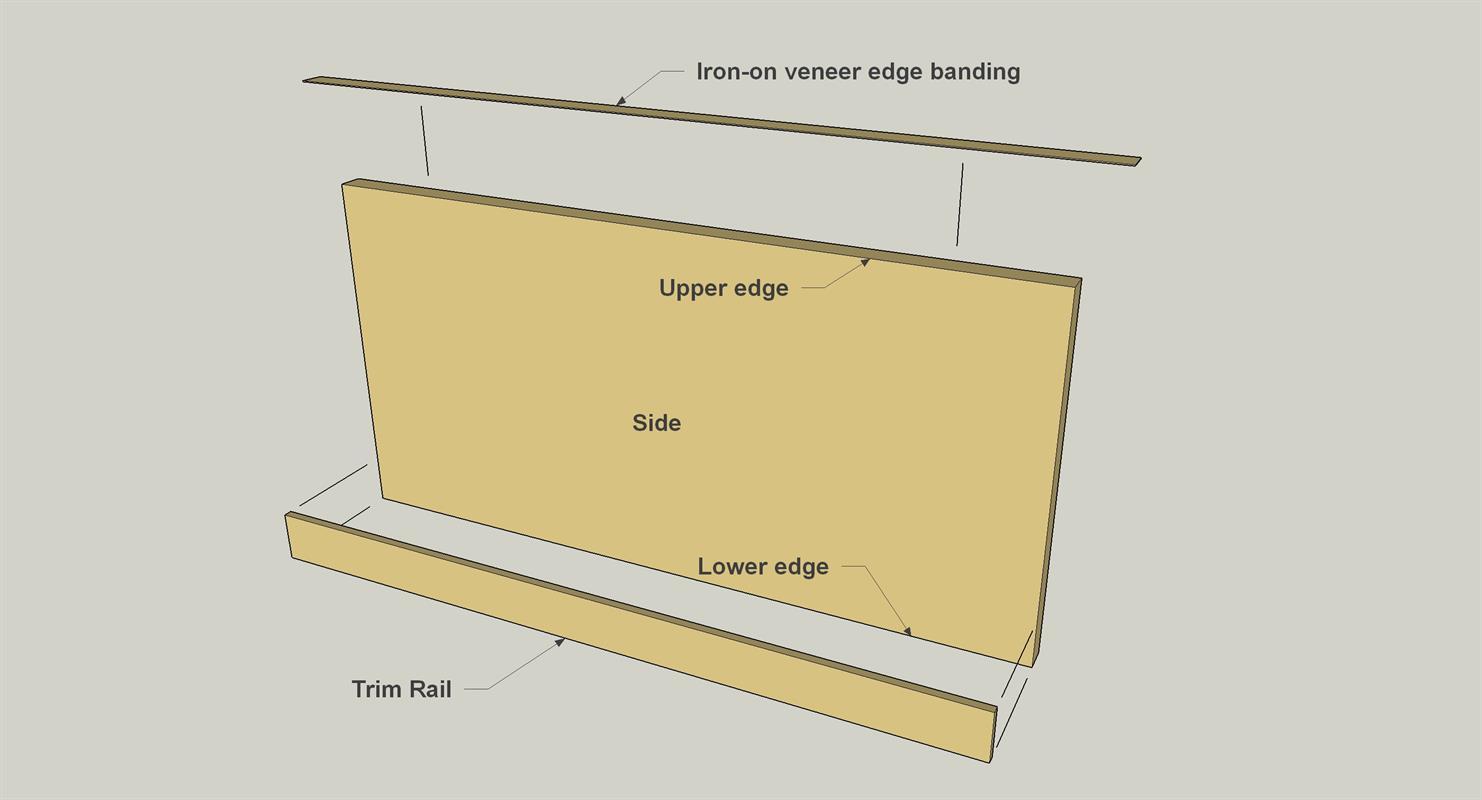
Dress Out the Sides
Cut four 23"-long pieces of iron-on oak-veneer edging and apply one piece to the top edge of each Side. Trim ends and edges of the edging flush using either a veneer trimmer or a sharp utility knife. Then sand the cut edges and ends smooth. Sand the faces of the Sides, as well. If you’re planning to stain, use 180-grit sandpaper. If you plan to paint your ottoman, 150-grit sandpaper will suffice. Cut four Trim Rails to length, and then sand them smooth. Then glue one Trim Rail to the outer face of each Side, as shown, so that it’s flush with the lower edge of the Side, and that the ends align with the ends of the Side.
-
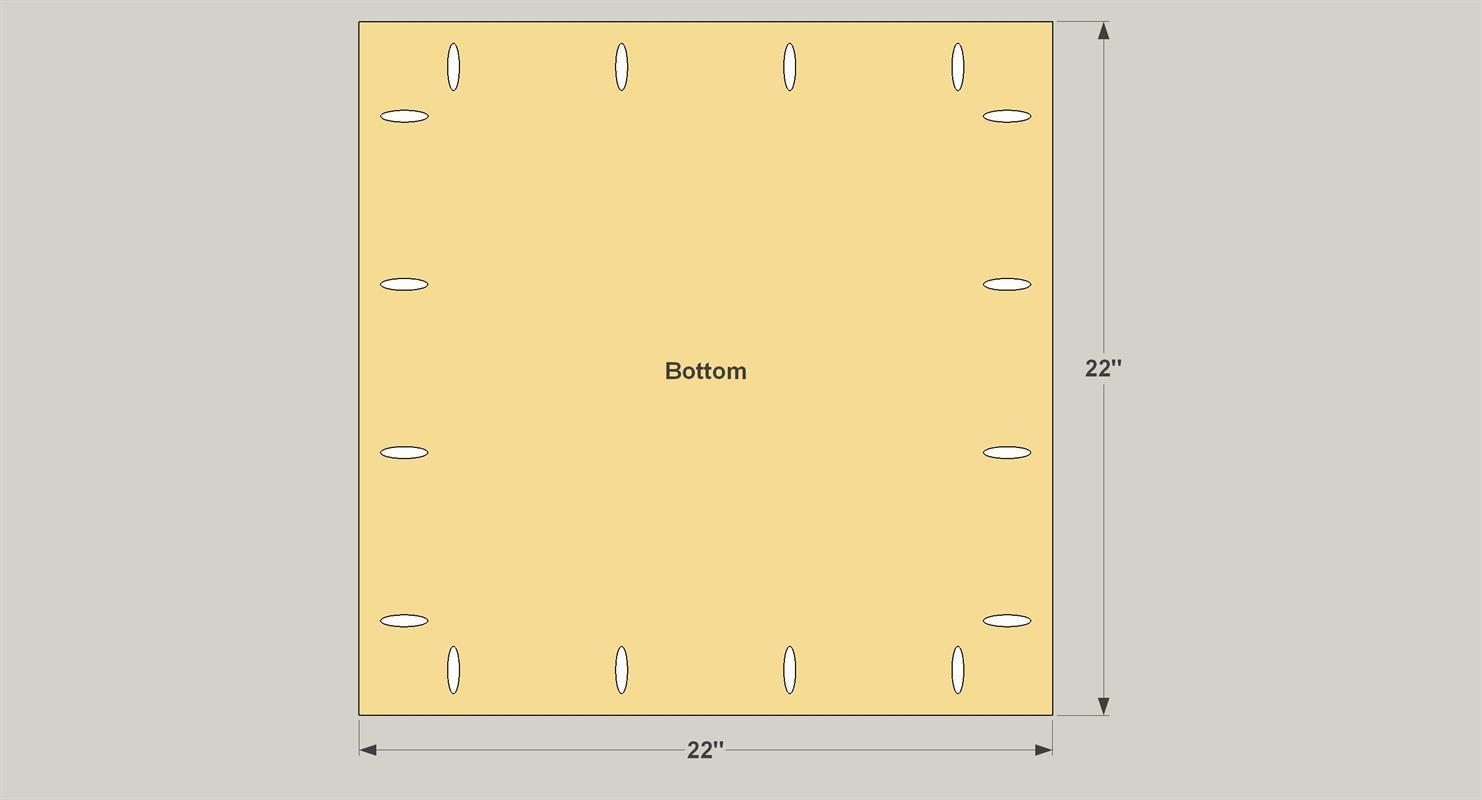
Make the Bottom
Cut one Bottom to size from 3/4" plywood, as shown in the cutting diagram. Drill pocket holes in the outside face. In this case, have the better-looking face of the plywood be the inner face, so it will look good when you remove the lid from the ottoman. Sand the faces of the Bottom smooth.
-
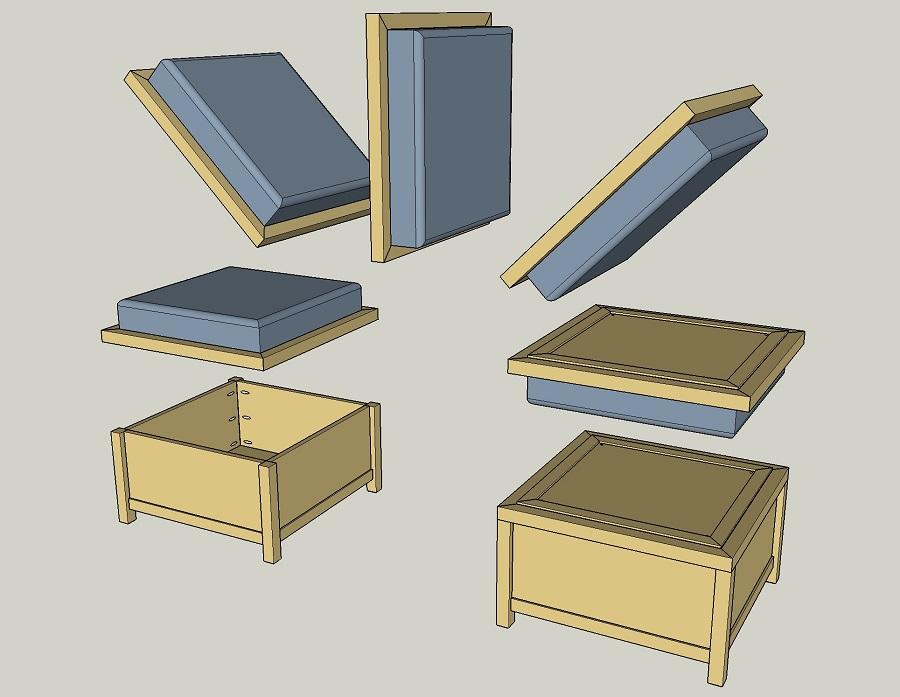
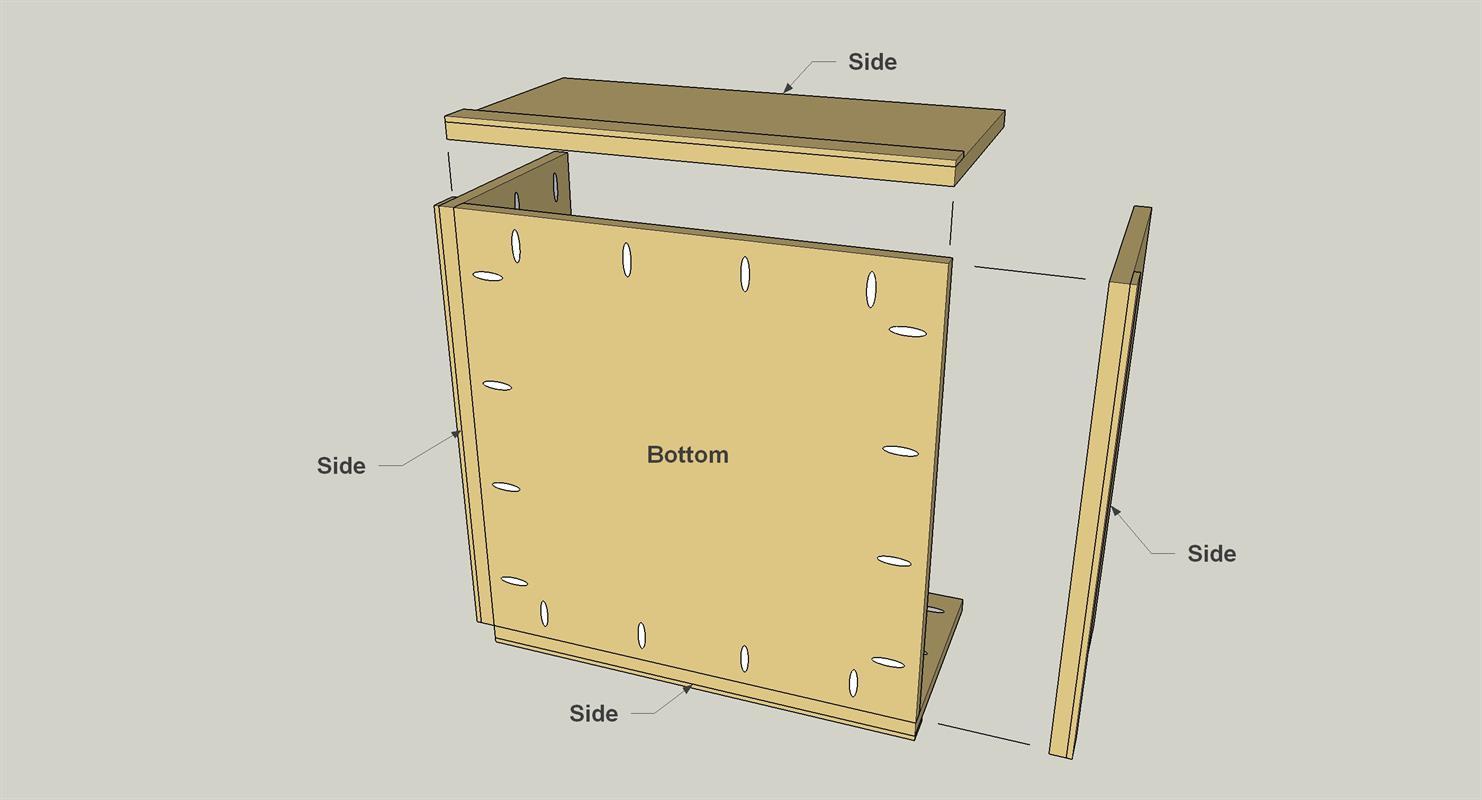
Attach the Sides to the Bottom
Now you can attach the side assemblies to the Bottom, as shown. Make sure to carefully align each side assembly as you position it, and then attach it using 1 1/4" coarse-thread pocket-hole screws.
-
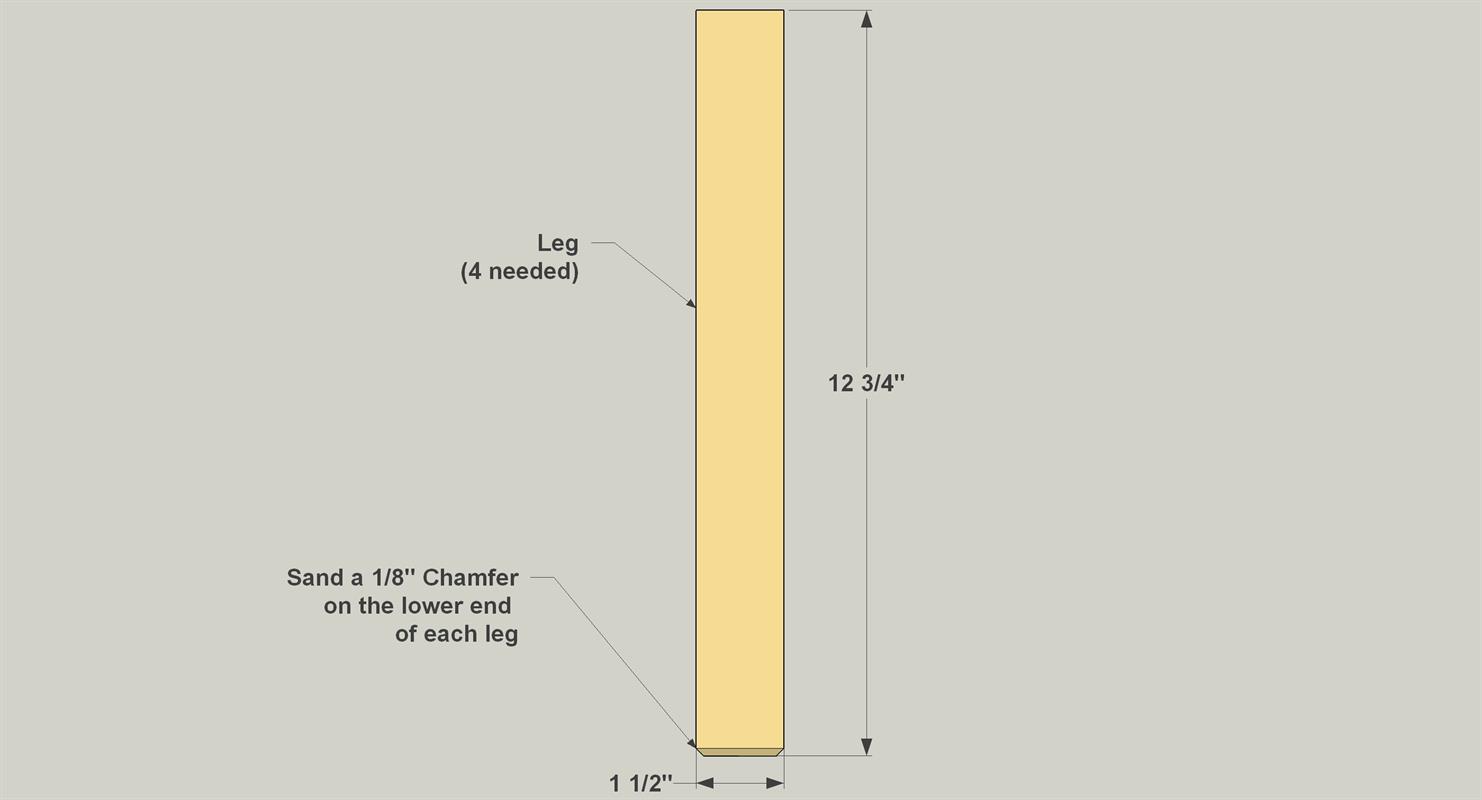
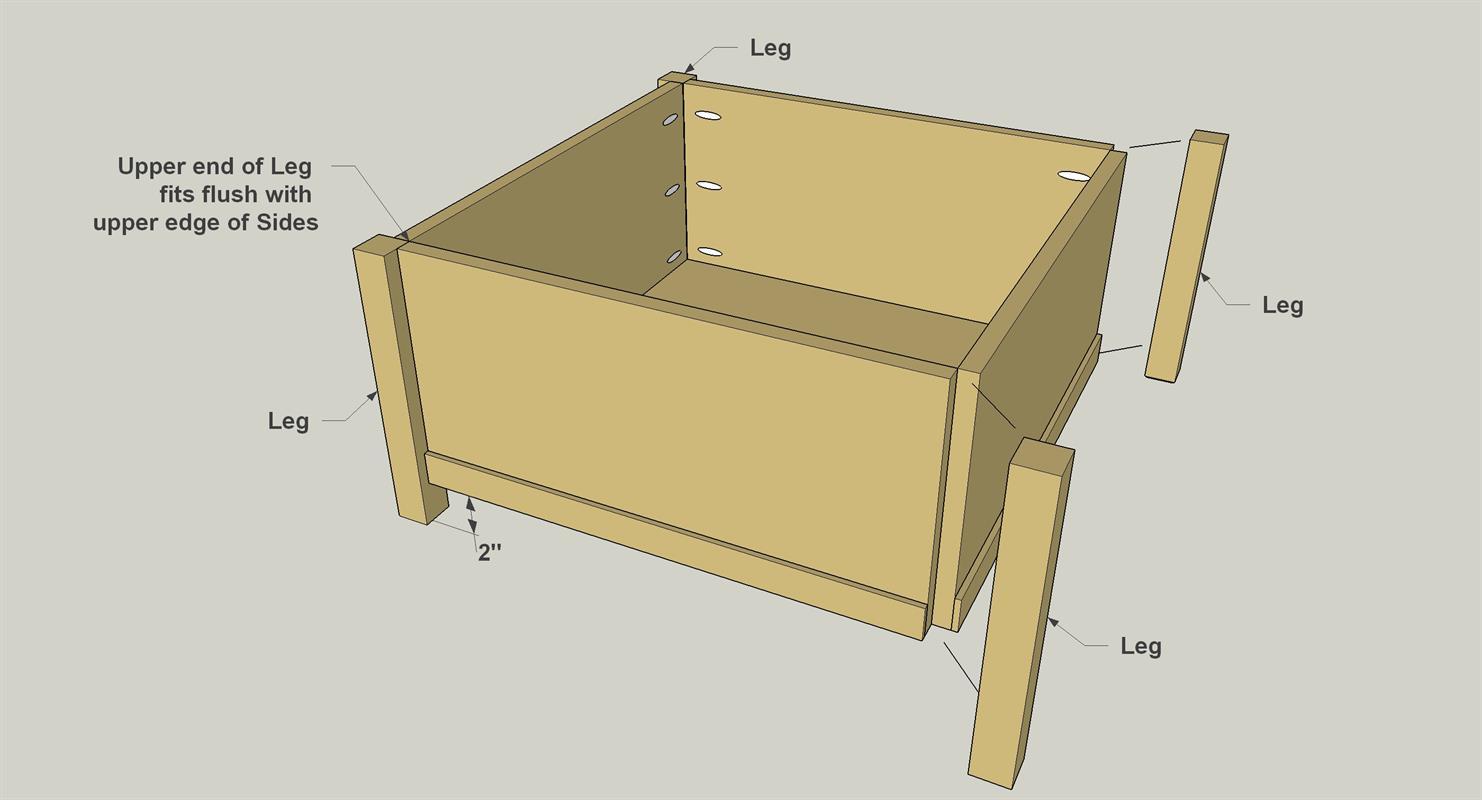
Make the Legs
Cut four Legs to length from 2x2 boards, as shown in the cutting diagram. Sand the lower end of each leg to create a “chamfer” (slight bevel on the corners) as shown. Also sand the long corners lightly—just enough to ease the sharp edges—and then sand the faces of each Leg smooth.
-
Attach the Legs
Position the Legs, as shown, on the ottoman assembly. Make sure the upper end of each Leg is positioned flush with the upper edges of the sides. Now you can attach the Legs using 1 1/4" pocket-hole screws. If you’re building from oak, as we did, or using another hardwood like maple, attach the Legs using fine-thread pocket-hole screws. If you’re building from a softwood, such as pine or fir, use coarse-thread pocket-hole screws.
-
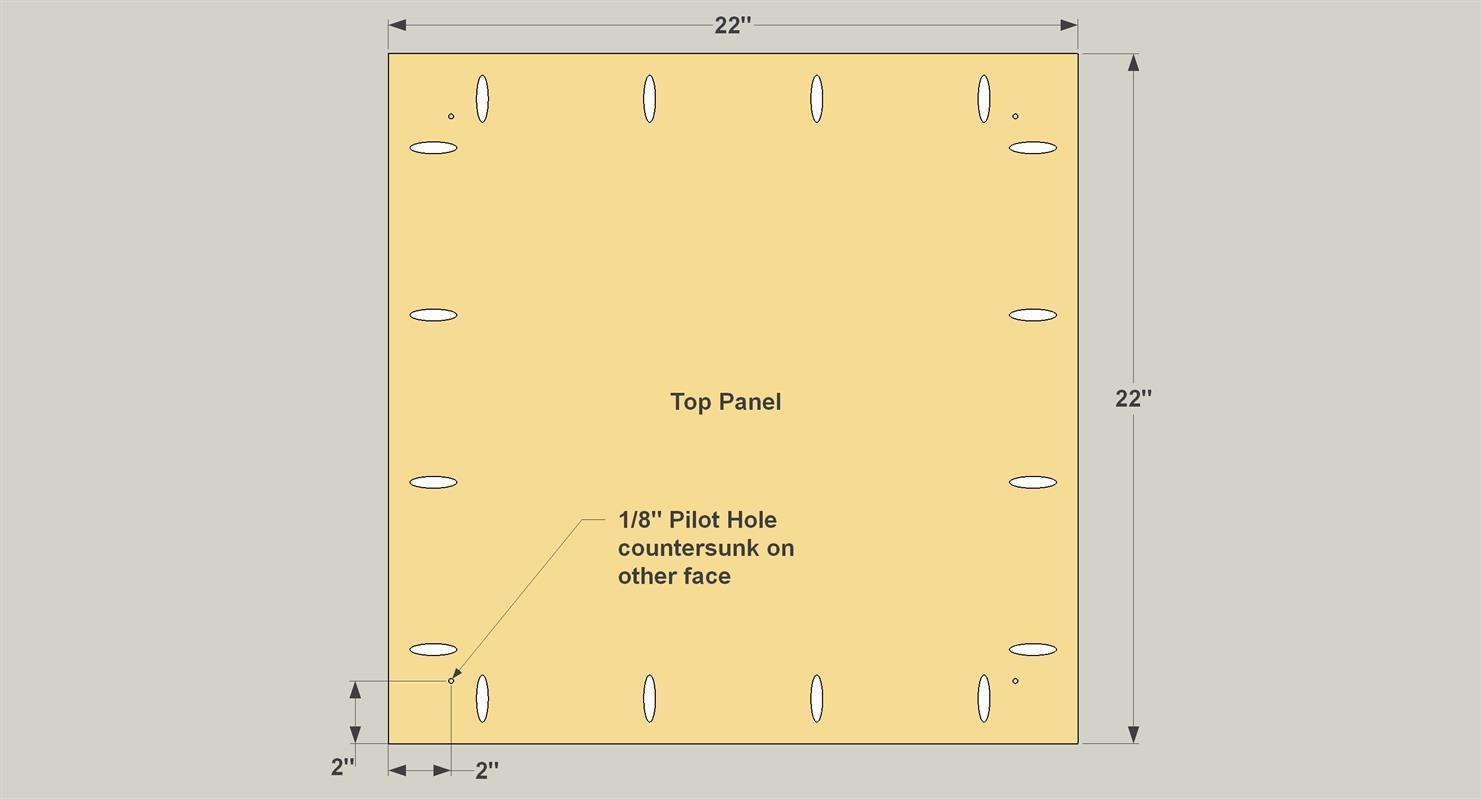
Make the Top
Cut one Top to size from 3/4" plywood, as shown in the cutting diagram. Before you drill pocket holes, look at the plywood and make sure you’re NOT putting the pocket holes in the better-looking face. Even though the better-looking face will be toward the inside of the ottoman, most of the time, you’ll want the face to look good if you ever flip the top over to use it like a coffee table. Once you have the Top oriented correctly, drill pocket holes, as shown. These will be used to attach the cushion rails. Also drill a pilot hole near each corner, as shown. These will be used to attach the cushion assembly. Countersink the pilot holes on the face opposite the pocket holes, so that the screws that attach the cushion assembly will sink flush
-
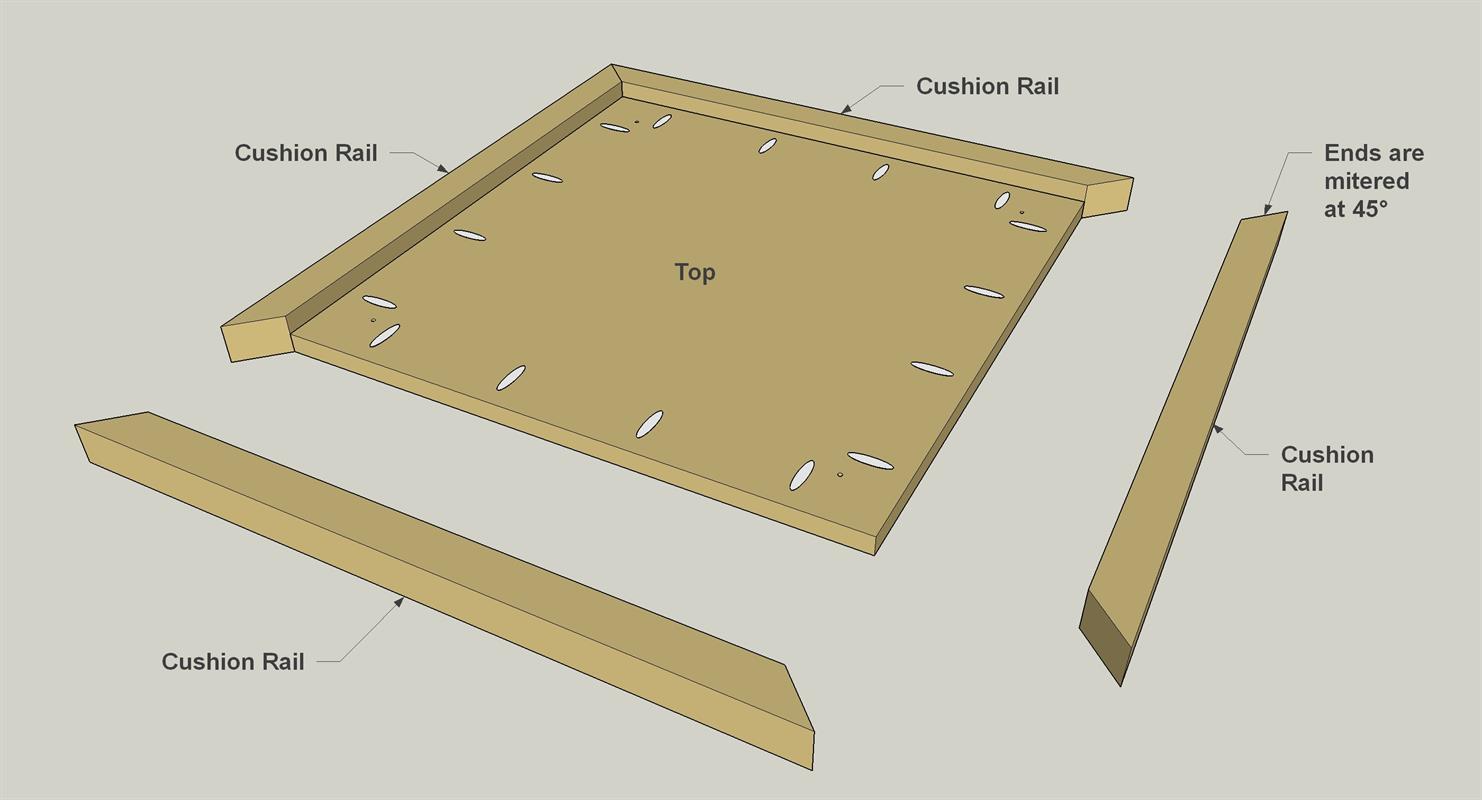
Cut and Attach the Cushion Rails
Cut four Cushion Rails to length from 2x2 boards, as shown in the cutting diagram. These are mitered at 45° on each end. Rather than just cutting them to the length shown, it’s best to start each with a slightly over-length piece. Then miter one end. Position it against the Top, mark the other end, and then miter that end to final length. Once you have all of the Cushion Rails cut, sand them smooth. Then attach them to the Top using 1 1/4" pocket-hole screws. Also glue the mitered ends.
-
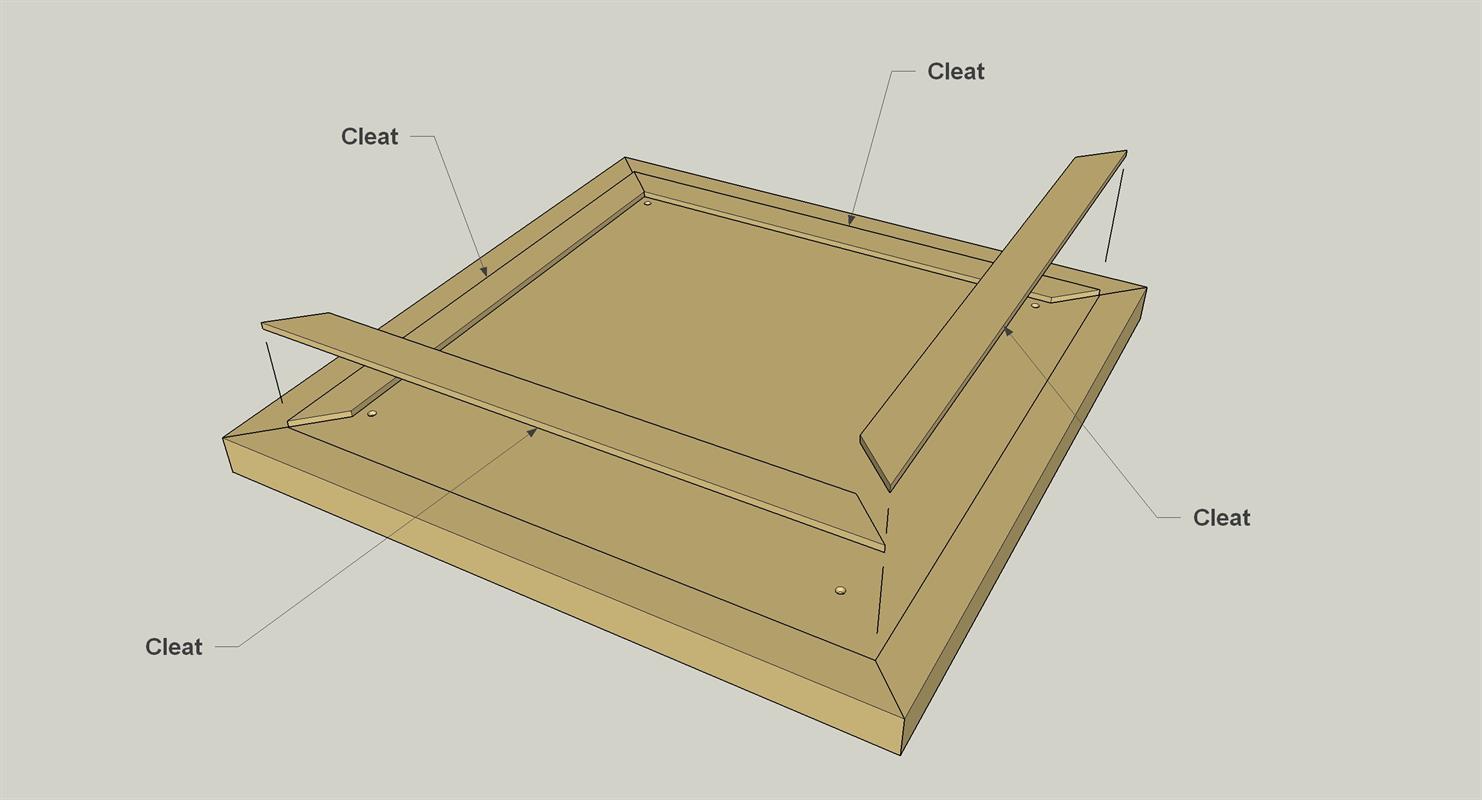
Make and Attach the Cleats
Now you can make cleats that hold the Top in place on the base. The cleats need to be slightly shorter than the inside dimensions of the opening. So, to make the Cleats, first measure the inside dimensions of the ottoman base along each Side. If everything went together straight and according to the plan, it will be 22" on each side, but your assembly may vary slightly. If the distances aren’t the same, use shortest distance to determine the Cleat length. Then cut four Cleats, mitering each end at 45°, and making the cleats 1/16" shorter than the inside distance you measured. Sand the Cleats smooth, and then glue them in place on the top assembly, as shown. Clamp the cleats in place, or weight them down, until the glue dries.
-
Apply a Finish
Check all the assemblies, do any tough-up sanding that’s needed, and then clean up all sanding dust. Then you can apply the stain and finish—or paint—of your choice. (We used Varathane “Gunstock” oil-based stain followed by two coats of satin polyurethane.)
-
Prep the Cushion Parts
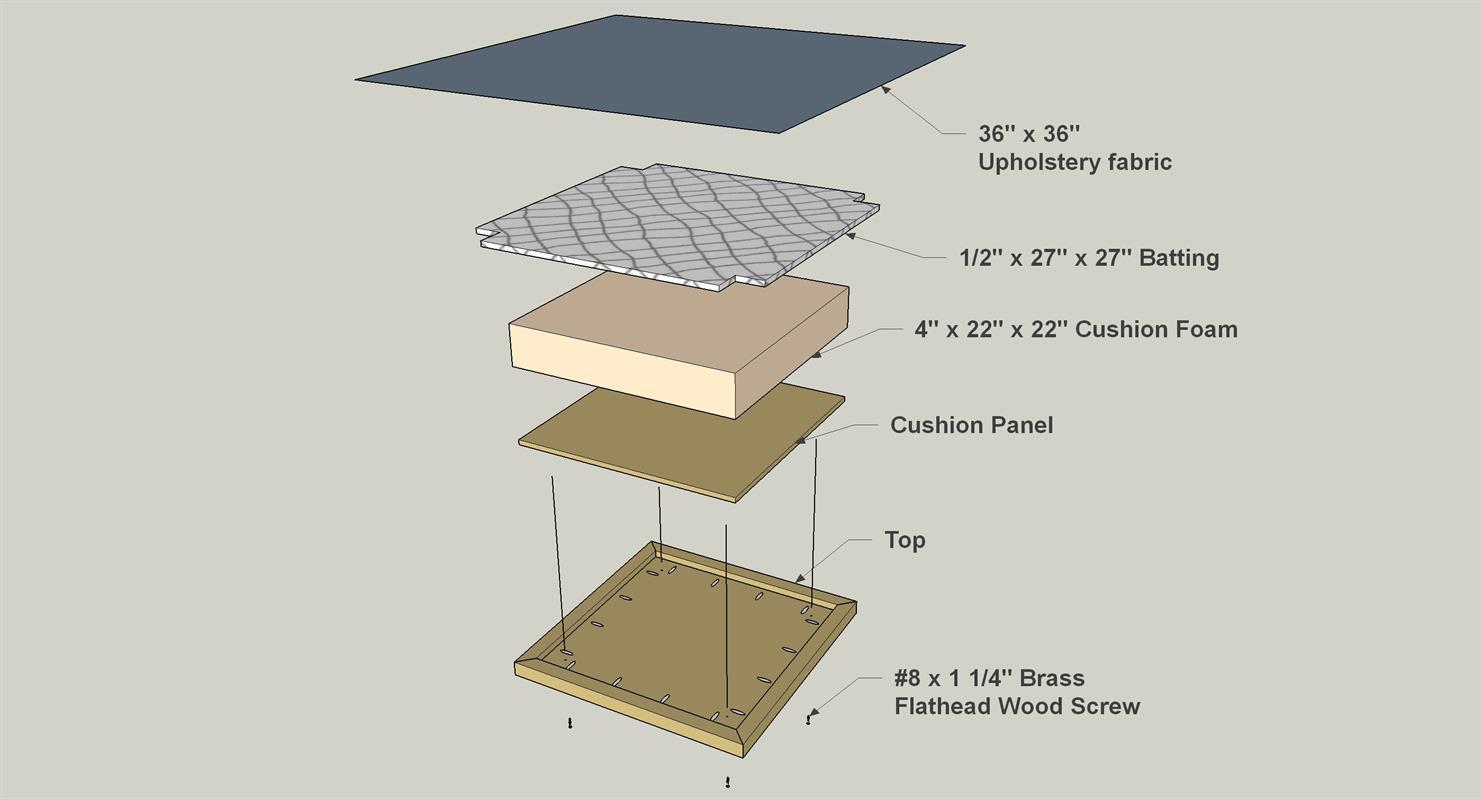
Cut the Cushion Panel to size from 1/2" plywood, as shown in the cutting diagram. On one surface, draw lines around the perimeter 3" in from the edges. These will be Cut (or have a fabric store cut) a piece of 4"-thick cushion foam to 22" x 22". Then cut a 27" x 27" piece of 1/2"-thick batting, and create 2 1/2" x 2 1/2" notches in the corners. Select a piece of upholstery fabric you like, and cut it to 36" x 36". Then lay the cushion parts out to prepare for assembly. Lay the upholstery fabric on your clean work surface with the outside face down. Center the batting on the fabric, and center the cushion foam on the batting. Finally, center the Cushion Panel, with the drawn lines facing up, on the cushion foam.
-
Assemble the Cushion
Starting along one edge, pull the fabric around the Cushion Panel. Slightly compress the foam (use clamps or a helper) so you can pull the fabric edge even with the drawn line. Then staple the fabric in place using a staple gun and 5/16" staples. Drive the staples very close together do the fabric won’t “pull” and pucker. Repeat this process on the opposite edge. Next, carefully fold the fabric at the corners to create uniform pleats, and then attach the other two fabric edges using the same procedures.
-
Attach the Cushion
With the cushion laying fabric-face down, lay the Ottoman top assembly on the cushion, so that the Cushion Rails overlap the edges of the cushion assembly. Using the holes in the Top Panel as guides, drill pilot holes into the Cushion Panel. Drive #8 x 1 1/4" brass flathead woodscrews to attach the cushion. Now you can place the completed top on your ottoman, and then put your feet up and enjoy the results of your efforts. To convert the Ottoman into a coffee table, simply flip the top over and slide the cushion into the base.