

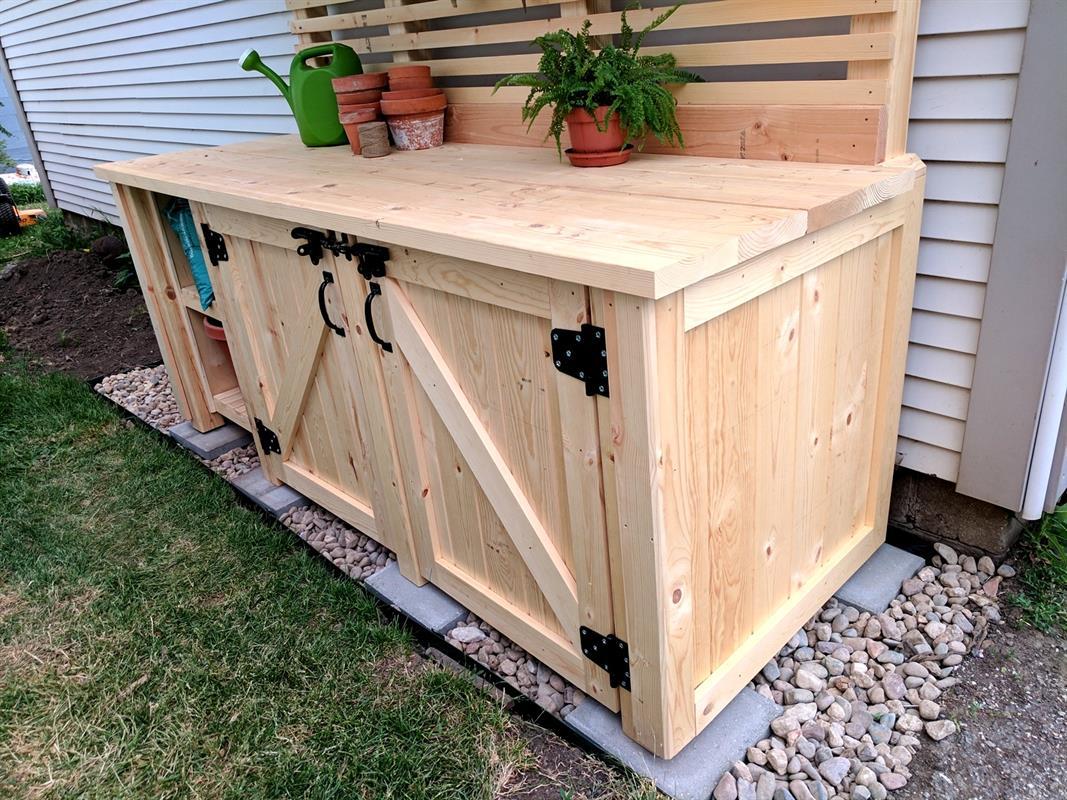
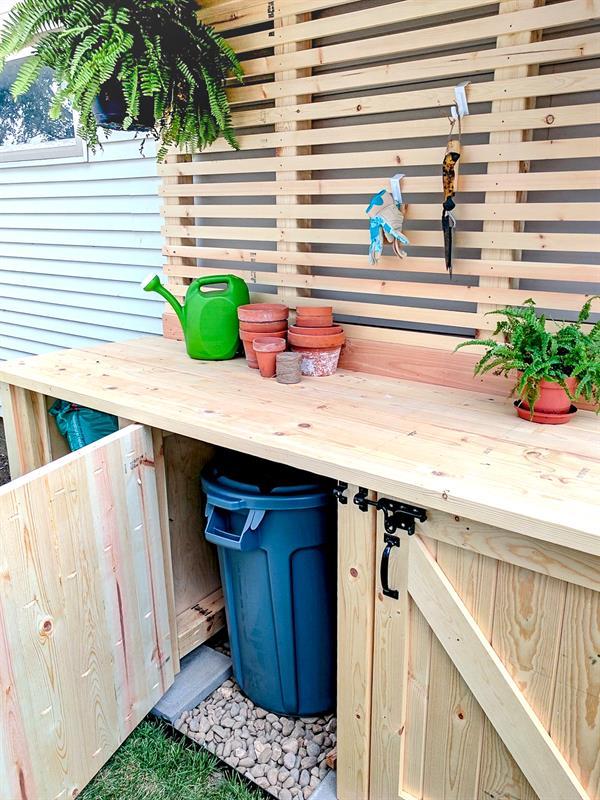
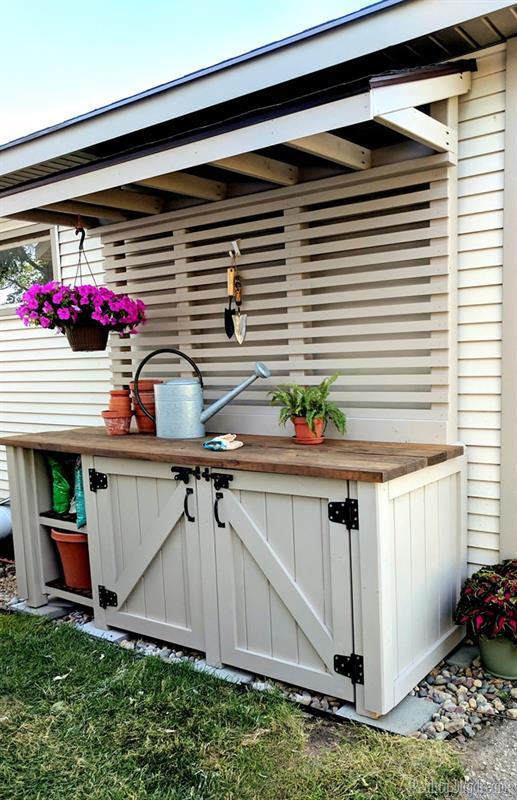


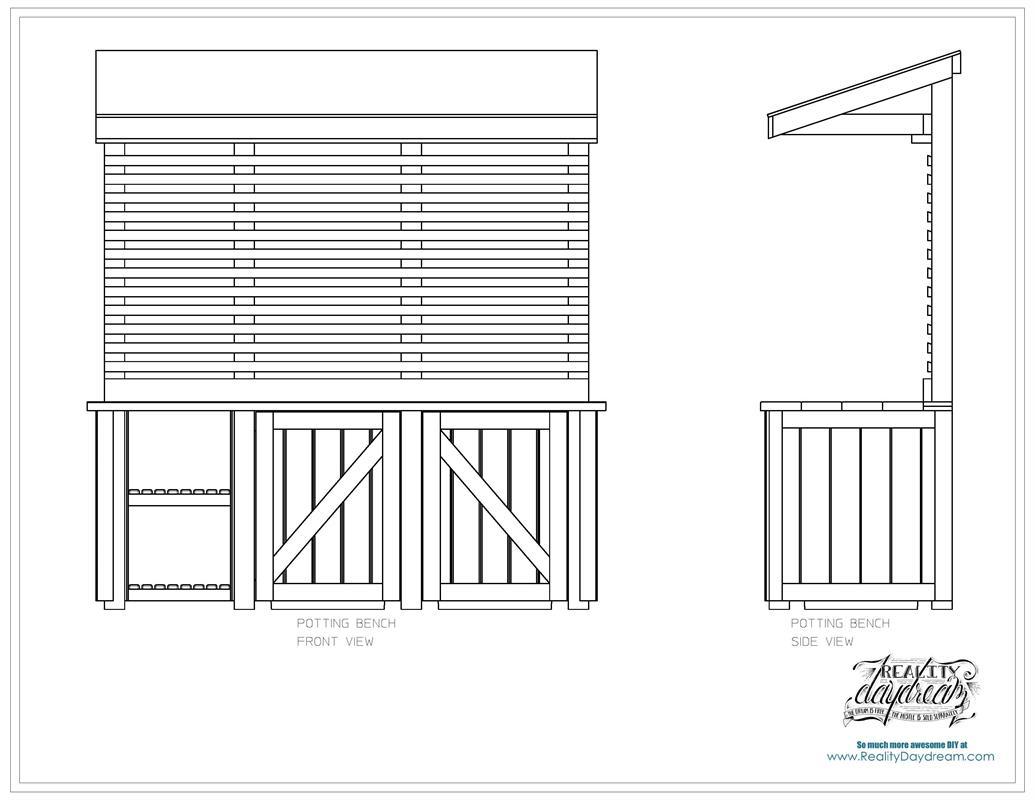
Learn how to build the mother of all potting benches! This hefty potting bench has shelving for storage, two garbage/trash can enclosures hidden behind doors, tons of work surface, slats for hanging tools, and a roof!
See more pics and details on our blog!
http://realitydaydream.com/potting-bench-with-hi
Tools
Kreg Tools


Other Tools
-
Miter Saw

-
Square
-
Table Saw
-
Tape Measure
-
Drill (cordless)
-
Impact Driver
-
Nail Gun
-
Router Table
-
Workbench
Materials
Wood Products
- 11 Board , 2x4 , 96"
- 1 Board , 2x6 , 96"
- 4 Board , 2x8 , 96"
- 8 Board , 4x4 , 96"
- 1 Plywood , 5/8 thick , Full Sheet
- 12 Board , 1x6 , 72"
- 8 Board , 1x8 , 72"
- 10 Board , 1x4 , 72"
- 5 Board , 1x6 , 96"
- 1 Plywood , 1/2" Thick , Full Sheet
Hardware & Supplies
- 250 2 1/2 inch outdoor Kreg screws
- 250 1 1/4 inch Kreg screws
- 4 Hinge
- 2 Handle
- 2 Latch
- 1 Outdoor Wood Glue
- 100 T10 2" FINISHING SCREWS
Cut List & Parts
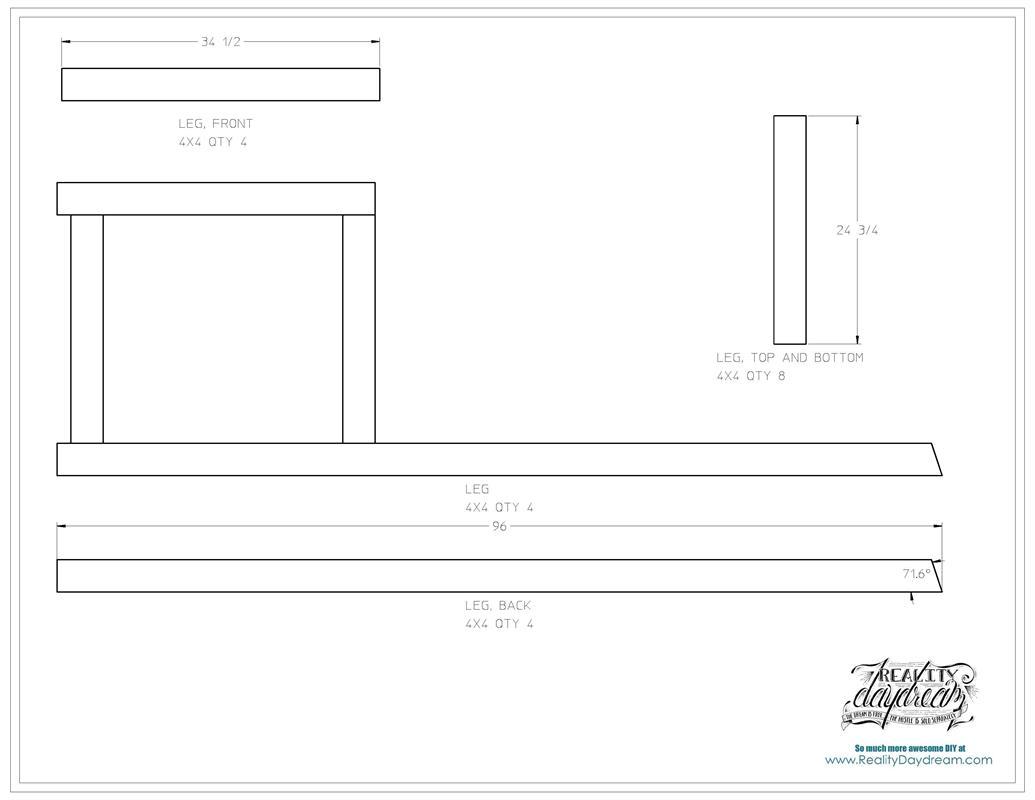
- 4 LEG, FRONTS , 4 X 4 X 34 1/2
- 8 LEG, TOP AND BOTTOM , 4 X 4 24 3/4
- 4 LEG, BACK , 4 X 4 X 96
- 4 LEG ASSEMBLY , N/A
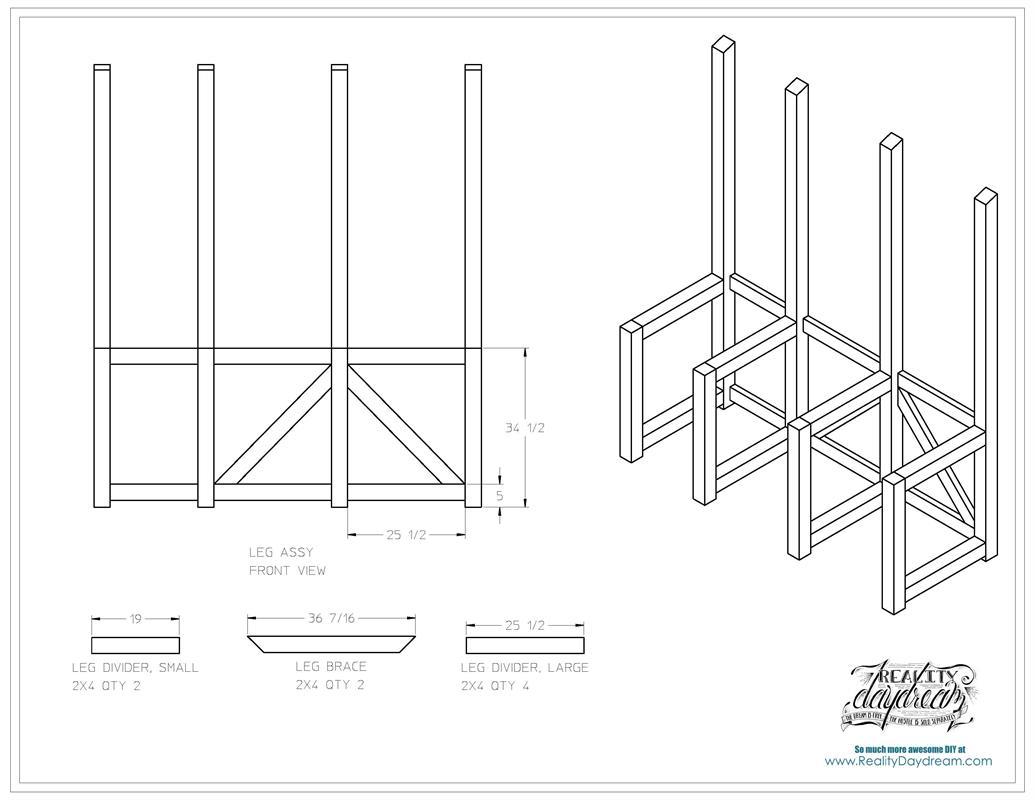
- 2 LEG DIVIDER, SMALL , 2 X 4 X 19
- 2 LEG BRACE , 2 X 4 X 36 7/16
- 4 LEG DIVIDER, LARGE , 2 X 4 X 25 1/2
- 1 POTTING BENCH, LEG ASSY , N/A
- 1 BACK SPLASH , 2 X 6 X 84
- 4 BENCH TOP BOARD , 2 X 8 X 90
- 1 BENCH TOP ASSEMBLY , N/A
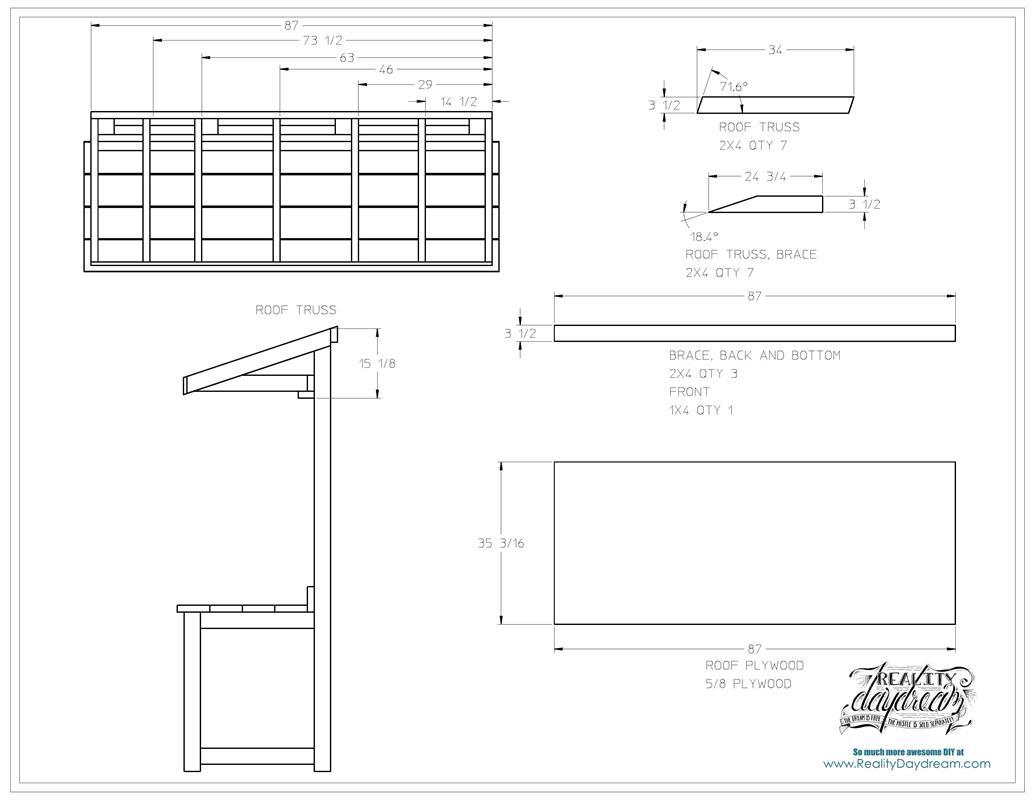
- 7 ROOF TRUSS , 2 X 4 X 34
- 7 ROOF TRUSS, BRACE , 2 X 4 X 24 3/4
- 3 ROOF TRUSS BRACE, BACK AND BOTTOM , 2 X 4 X 87
- 1 ROOF TRUSS, BRACE, FRONT , 1 X 4 X 87
- 1 ROOF PLYWOOD , 5/8 X 35 3/16 X 87
- 1 ROOF ASSEMBLY , N/A
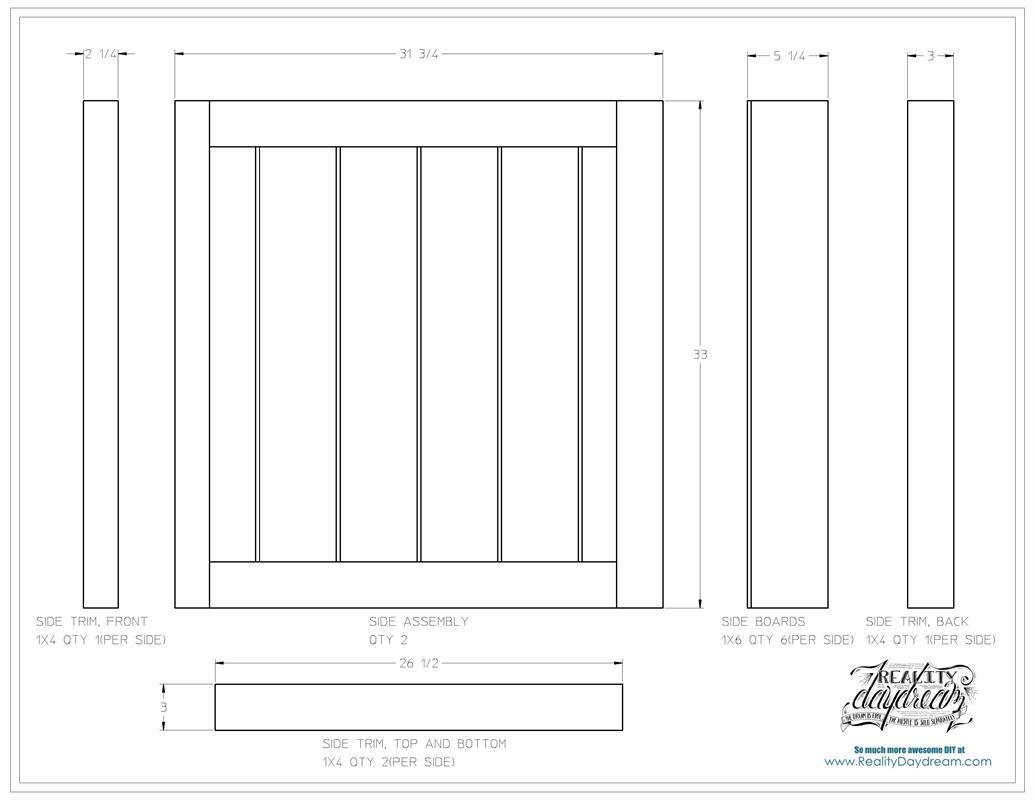
- 12 SIDE BOARDS , 1 X 5 1/4 X 33
- 2 SIDE TRIM, BACK , 1 X 3 X 33
- 4 SIDE TRIM, TOP AND BOTTOM , 1 X 3 X 26 1/2
- 2 SIDE TRIM, FRONT , 1 X 2 1/4 X 33
- 2 SIDE ASSEMBLY , N/A
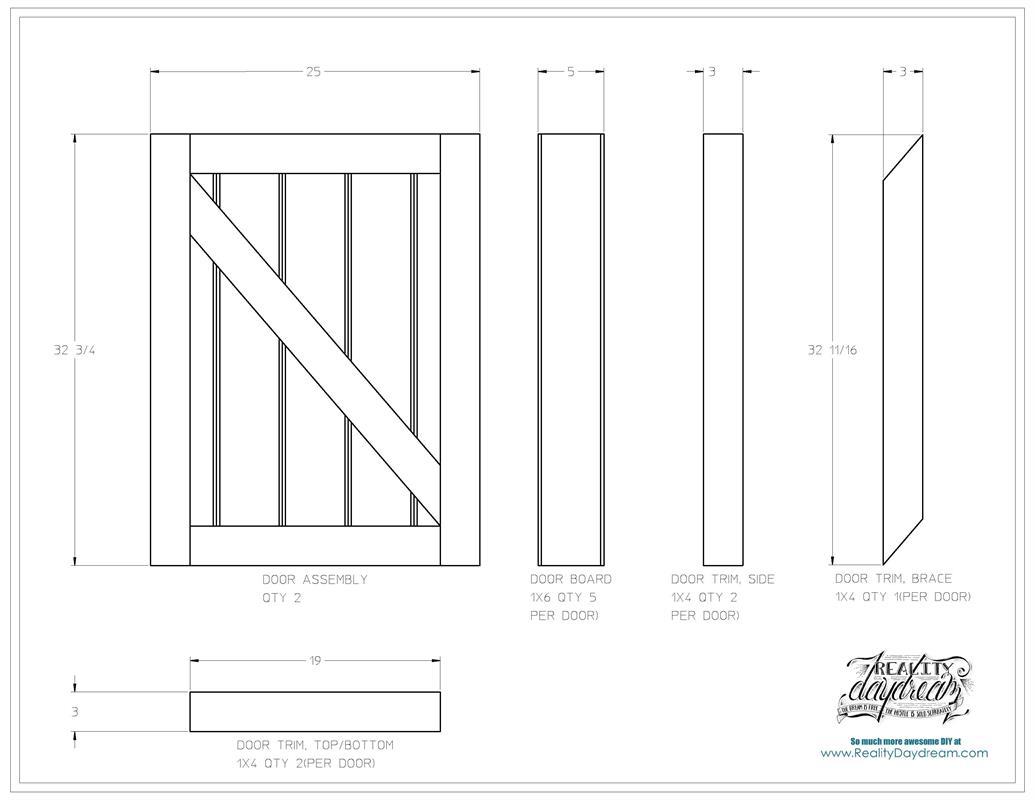
- 10 DOOR BOARD , 1 X 5 X 32 3/4
- 4 DOOR TRIM, SIDE , 1 X 3 X 32 3/4
- 2 DOOR TRIM, BRACE , 1 X 3 X 32 11/16
- 4 DOOR TRIM, TOP AND BOTTOM , 1 X 3 X 19
- 2 DOOR ASSEMBLY , N/A
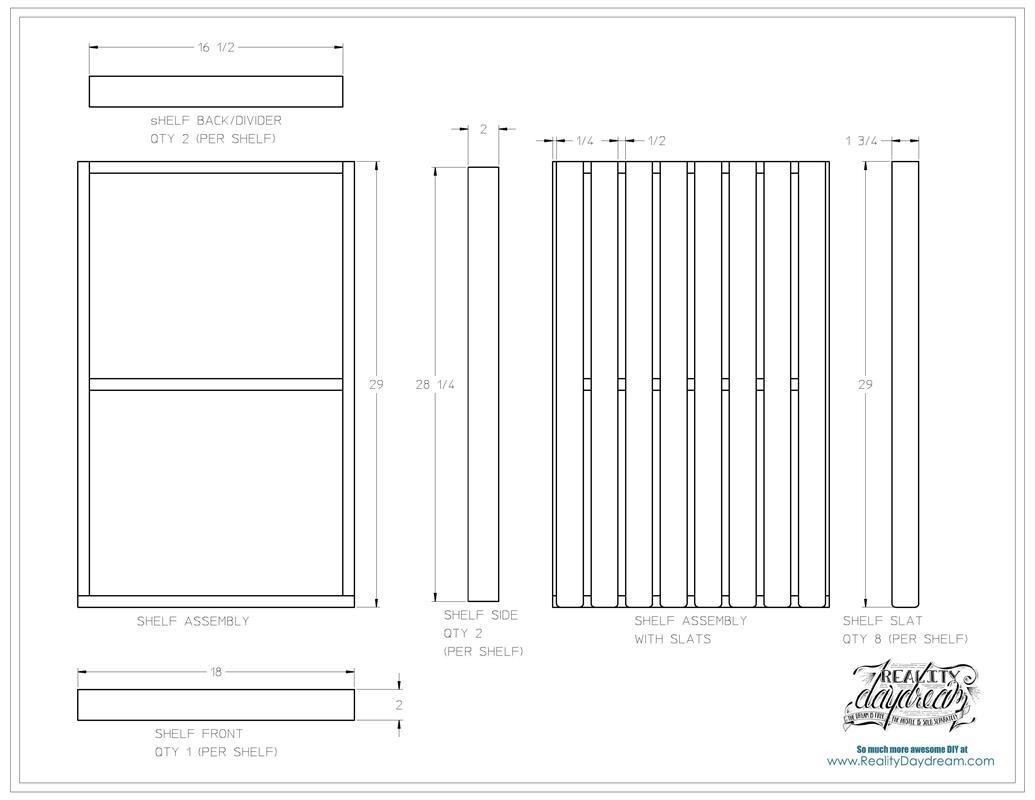
- 4 SHELF SIDE , 1 X 2 X 28 1/4
- 4 SHELF BACK/DIIVIDER , 1 X 2 X 16 1/2
- 2 SHELF, FRONT , 1 X 2 X 18
- 16 SHELF, SLAT , 1 X 1 3/4 X 29
- 2 SHELF ASSEMBLY , N/A
- 2 PLYWOOD SHEET FOR SHELF SIDE , 1/2 X 29 X 33
- 1 PLYWOOD SHEET FOR SHELF BACK , 1/2 X 19 X 33
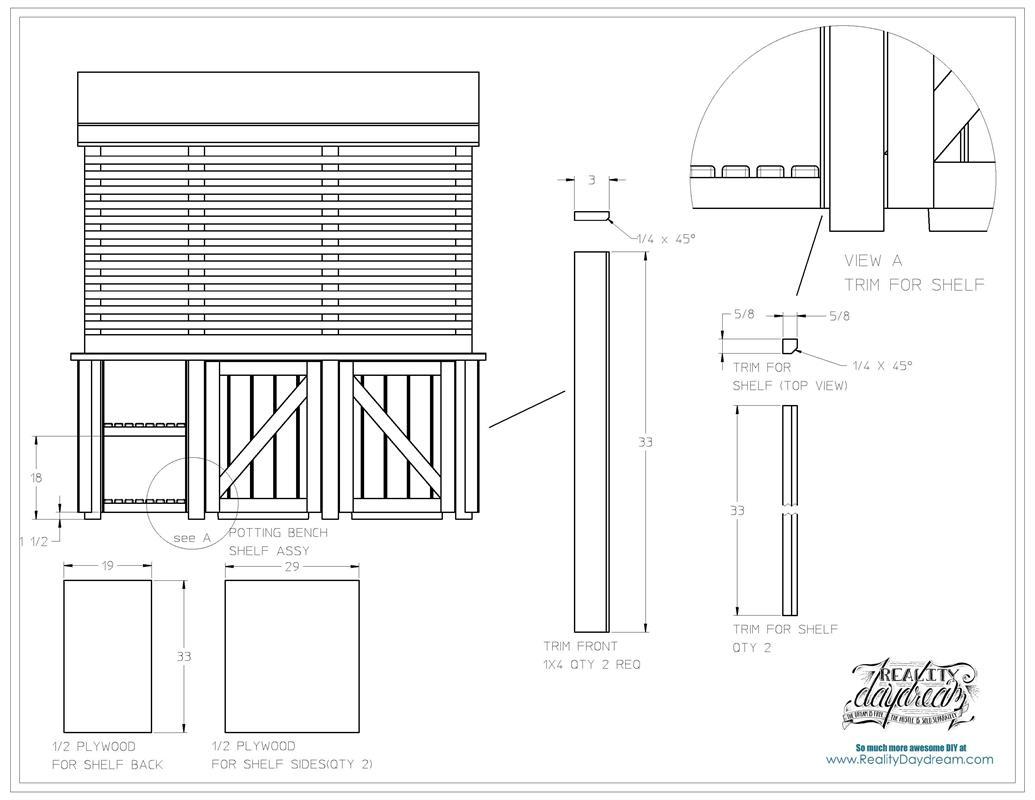
- 2 TRIM FRONT , 1 X 3 X 33
- 2 TRIM FOR SHELF , 5/8 X 5/8 X 33
- 2 TRIM FOR BENCH TOP , 1 1/2 X 1 1/2 X 5
- 14 BACK WALL SLATS , 1 X 1 5/8 X 84

Directions
-
PRINT PLANS
Download plans from the parts/cut list.

-
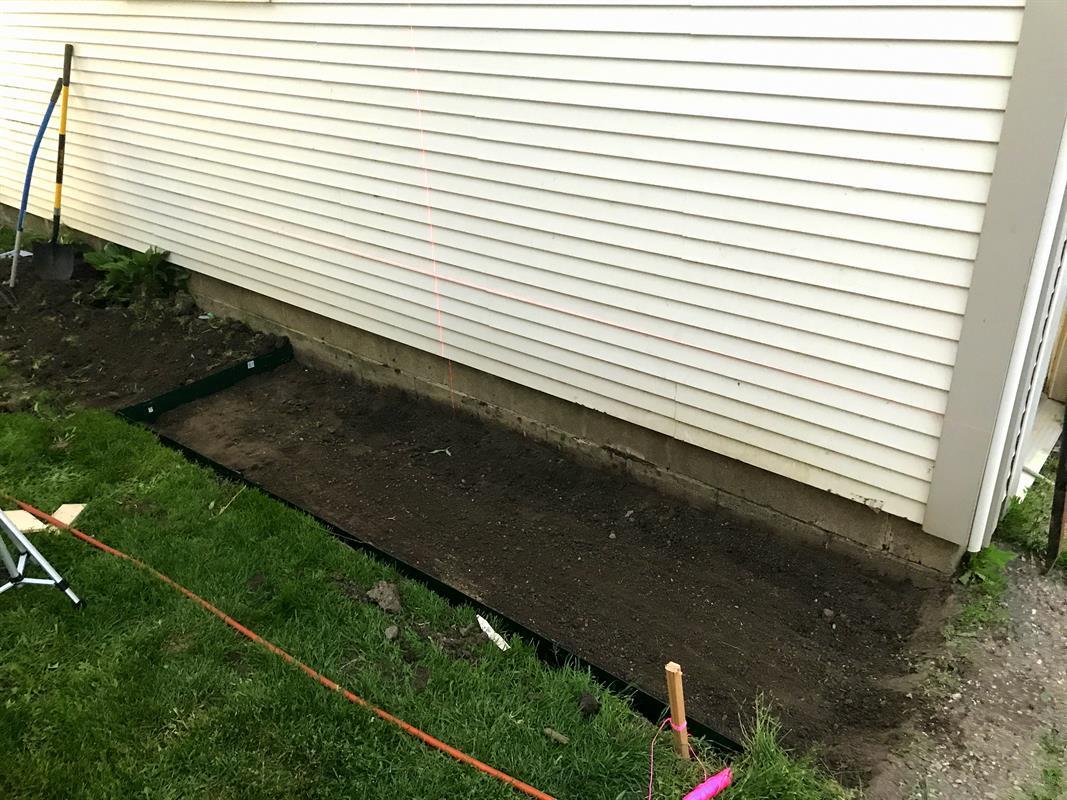
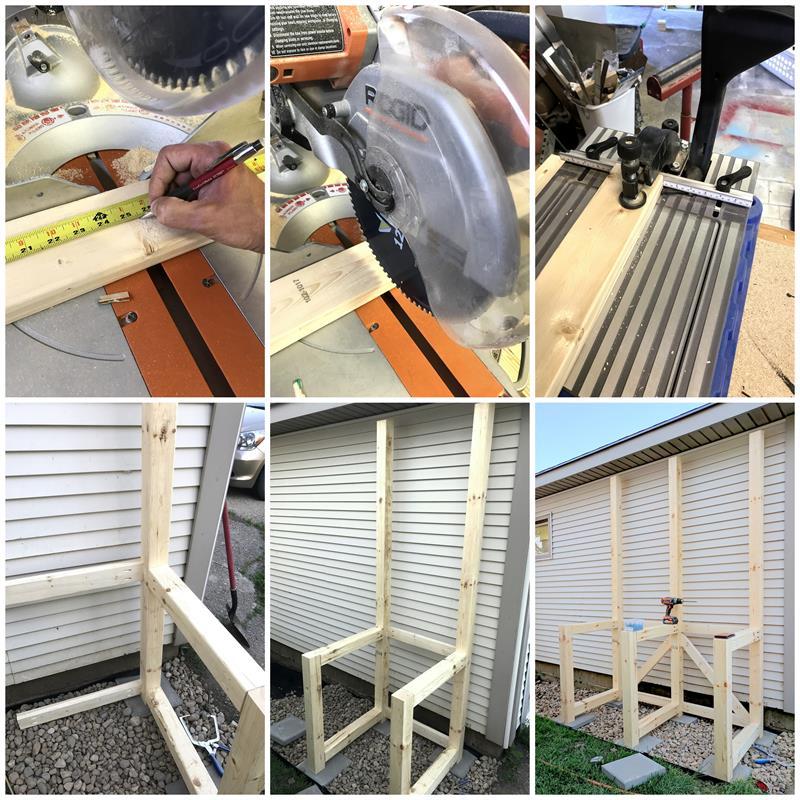
PREPARE THE SITE
You will need to have a level site. we put in some rock and used 12" x 12" paver to set the legs on.
-
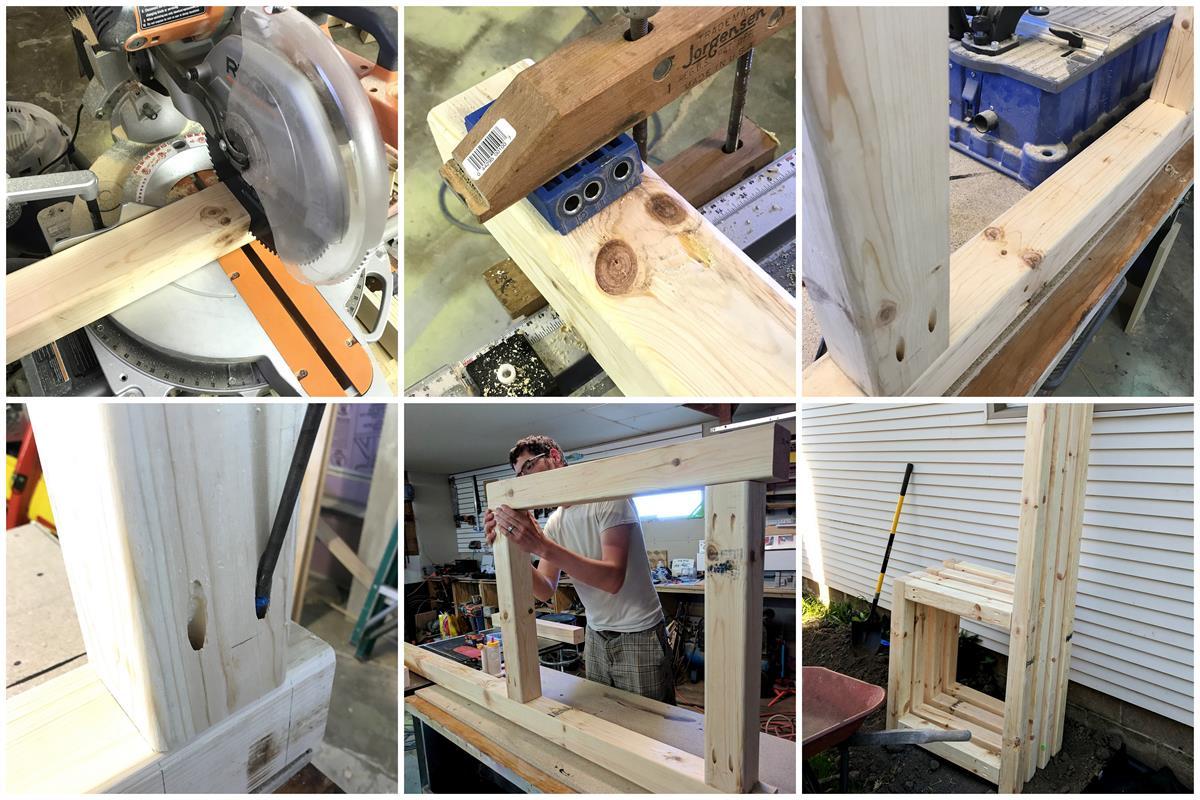
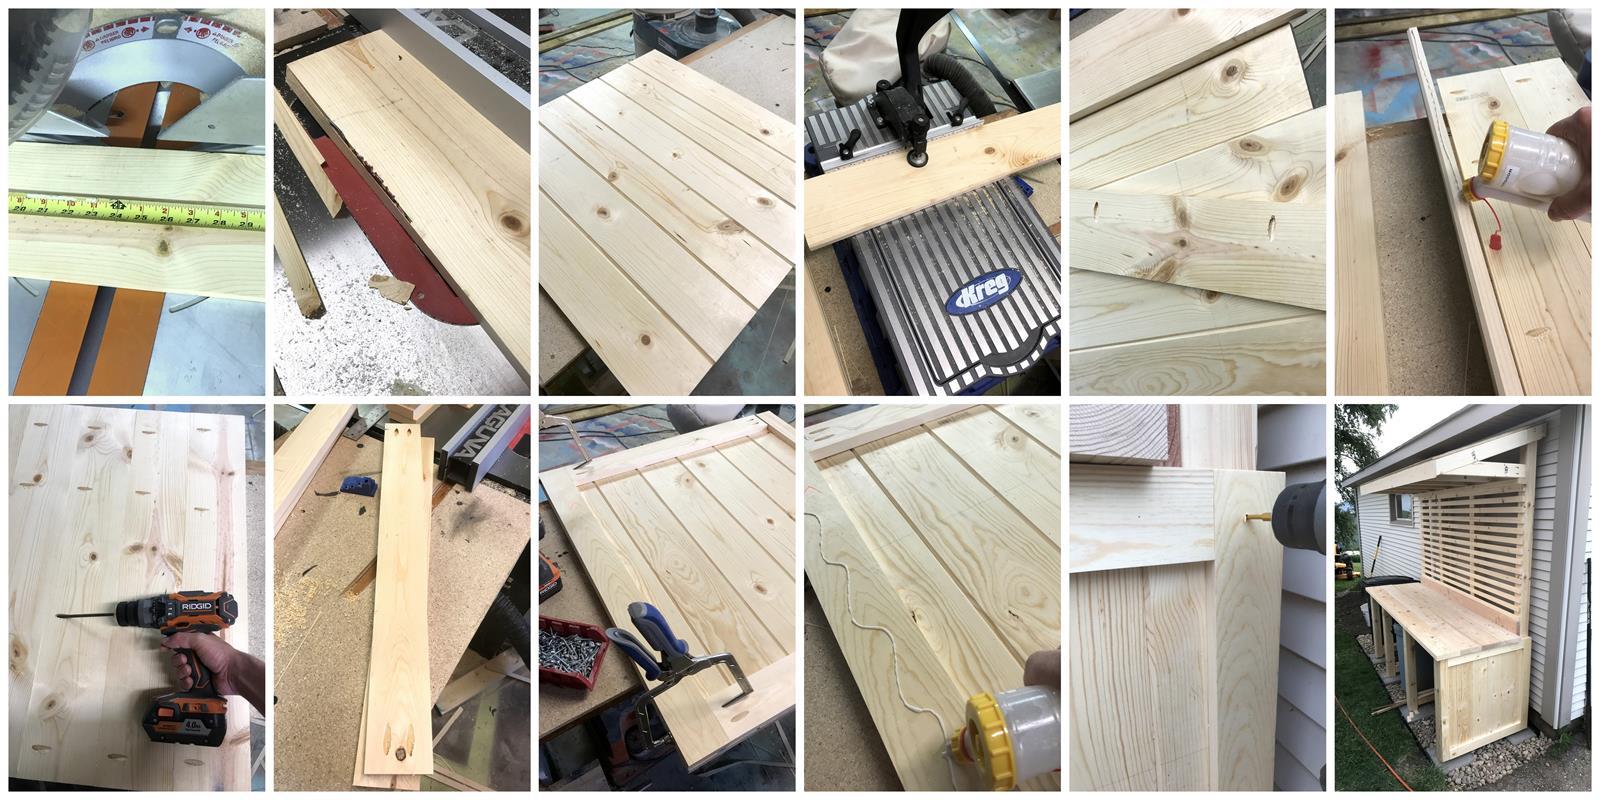
LEGS
Cut out all the components for the legs.
Using a Kreg jig, drill 2 pocket holes on each side of the part Leg top and bottom (should be 8 pocket holes total per part).
Mark the leg top and bottom locations (5" and 34 1/2").
Assemble the leg assembly.
Repeat for all four legs.
-
LEG ASSEMBLY
Cut out the large and small leg dividers from 2X4's. Pocket hole 2 holes on both sides of the dividers. Screw to the leg assemblies at 5" and 34 1/2" high. Then mark the leg braces, drill pocket holes and screw them into place.
-
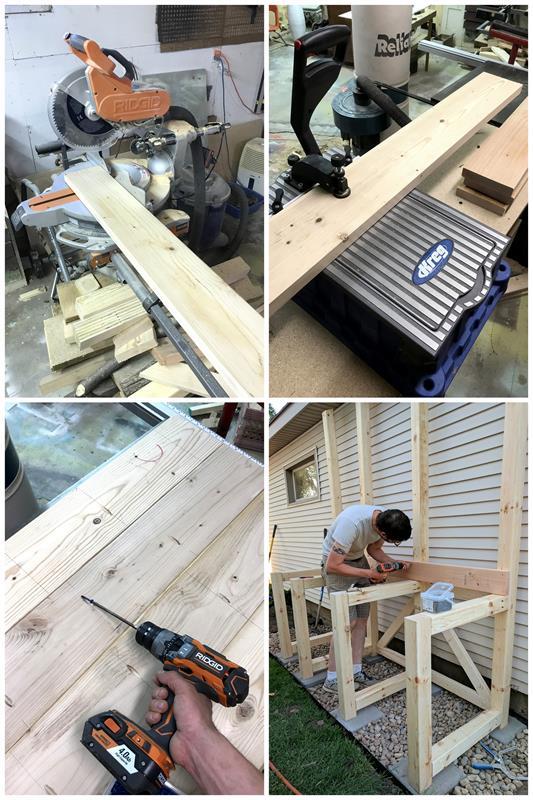
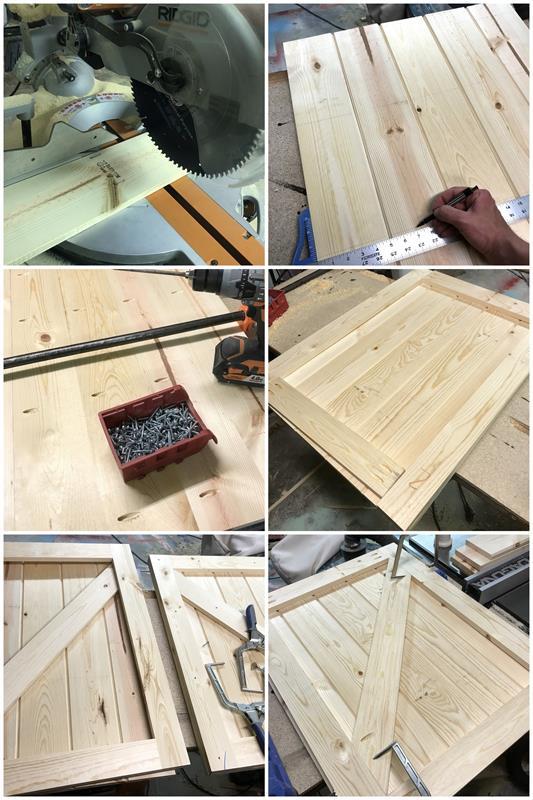
BENCH TOP
Cut all the 2X8's and the 2X6 to size with the miter saw. For a smooth top surface (removing the rounded edges of the 2x8) you can rip the boards down on a table saw. Using a kreg jig we drilled pocket holes every ten inches down the length of the 2X8. Glue and screw the bench top together. Screw the 2X6 to the legs first, as the backsplash, then screw the benchtop to the legs (maintain the correct spacing of the legs at the front of the benchtop).
-
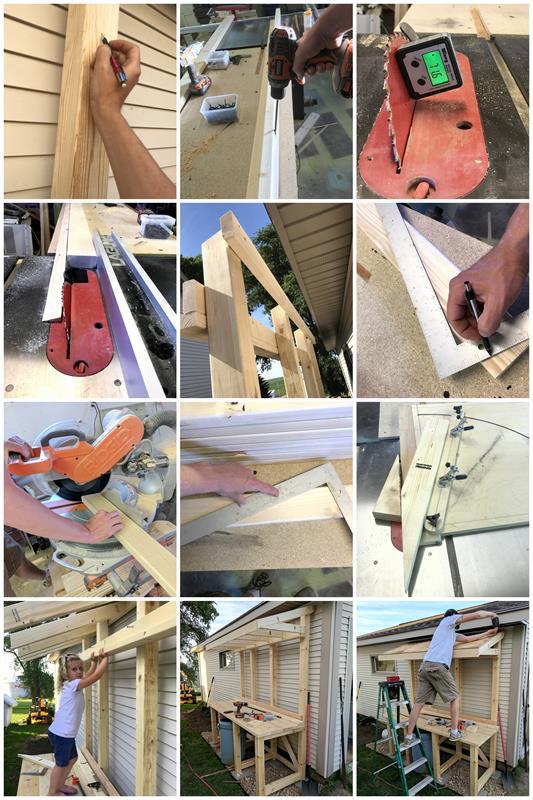
ROOF
Cut out all the pieces for the Roof assembly. I have fancy table saw sled to cut the long angle of the roof truss brace, but you could just as easily use a circular saw. It is a 4/12 roof so to draw the angles, use a square and line up the 4" mark on one side of the square and the twelve inch mark on the other. Drill pocket holes in the end of the roof truss brace, the roof truss, and on edge of one of the bottom braces. Mark the truss spacing on each of the back, bottom, and front braces. Then screw the braces to the potting bench assembly (maintaining the appropriate leg spacing) and screw the trusses to the bracing. Lastly screw the front brace to the trusses and attach the plywood.
-
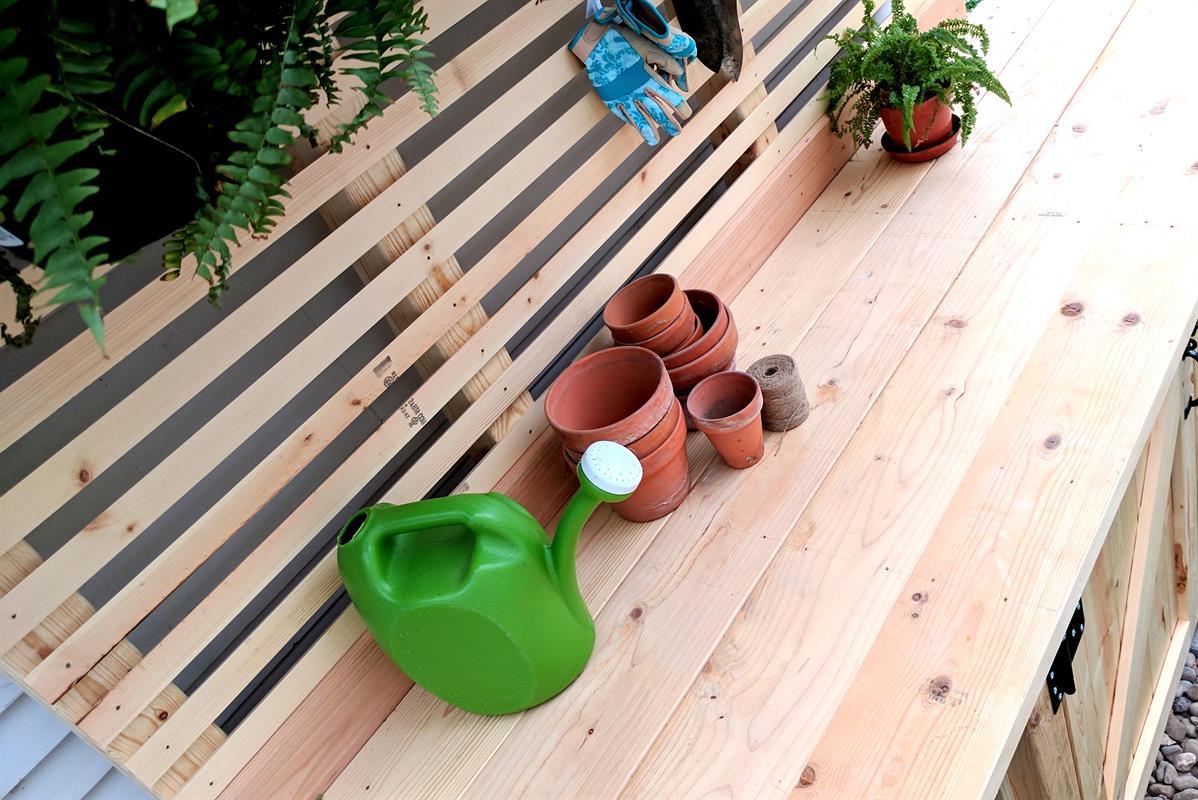
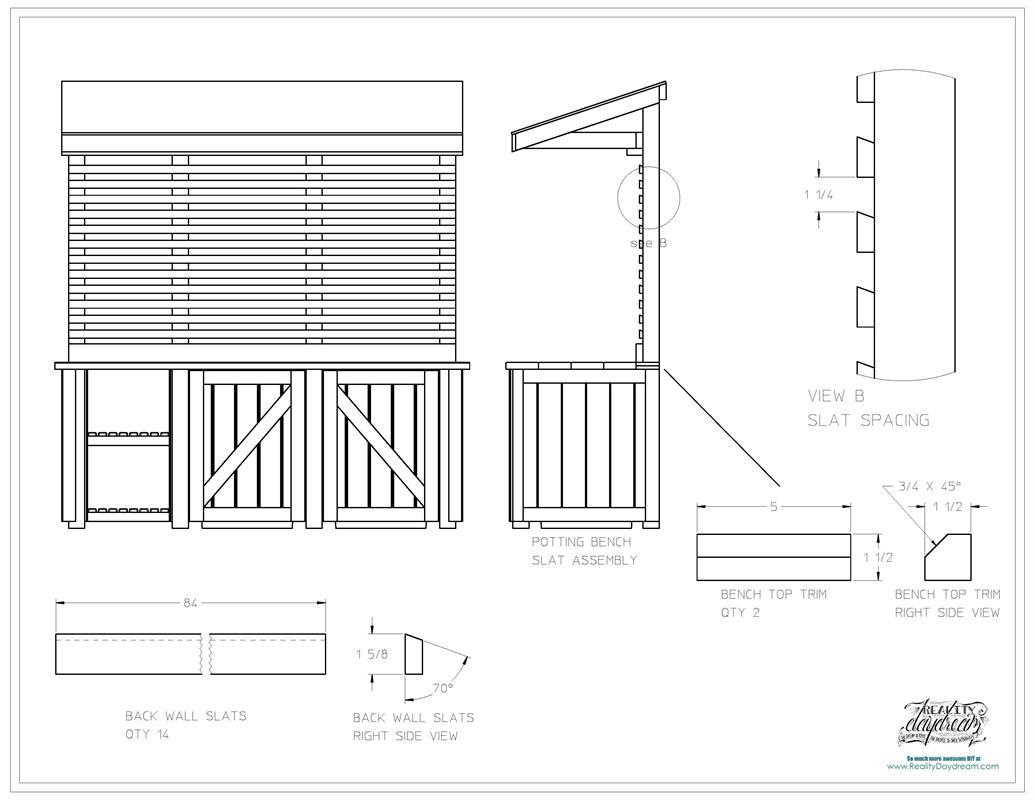
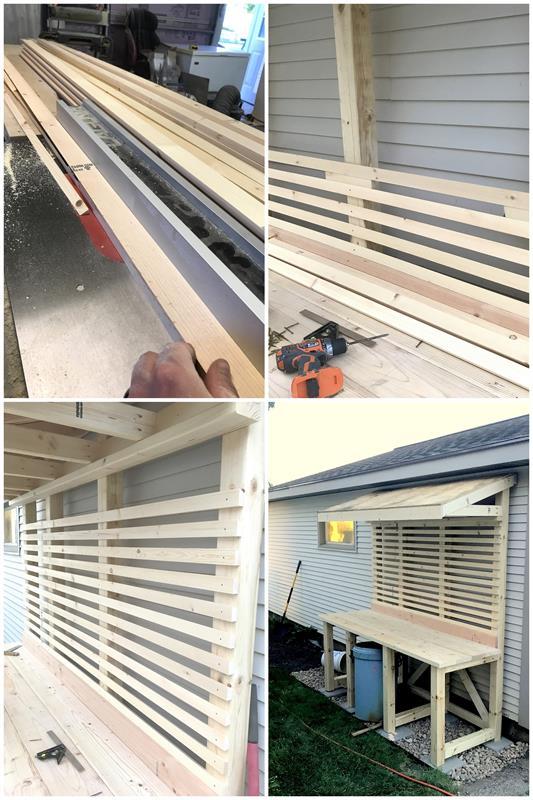
BACK BOARD
Cut all the slats to size from the 1X6X96, using a miter saw and a tablesaw. We put an angle on the top side as a french cleat, in case we want to build shelves. Also cut out three blocks 1 1/4" wide to use as spacers. Grab your pile of slats, starting just above the backsplash screw them to the leg assembly using the T10 finishing screws.
-
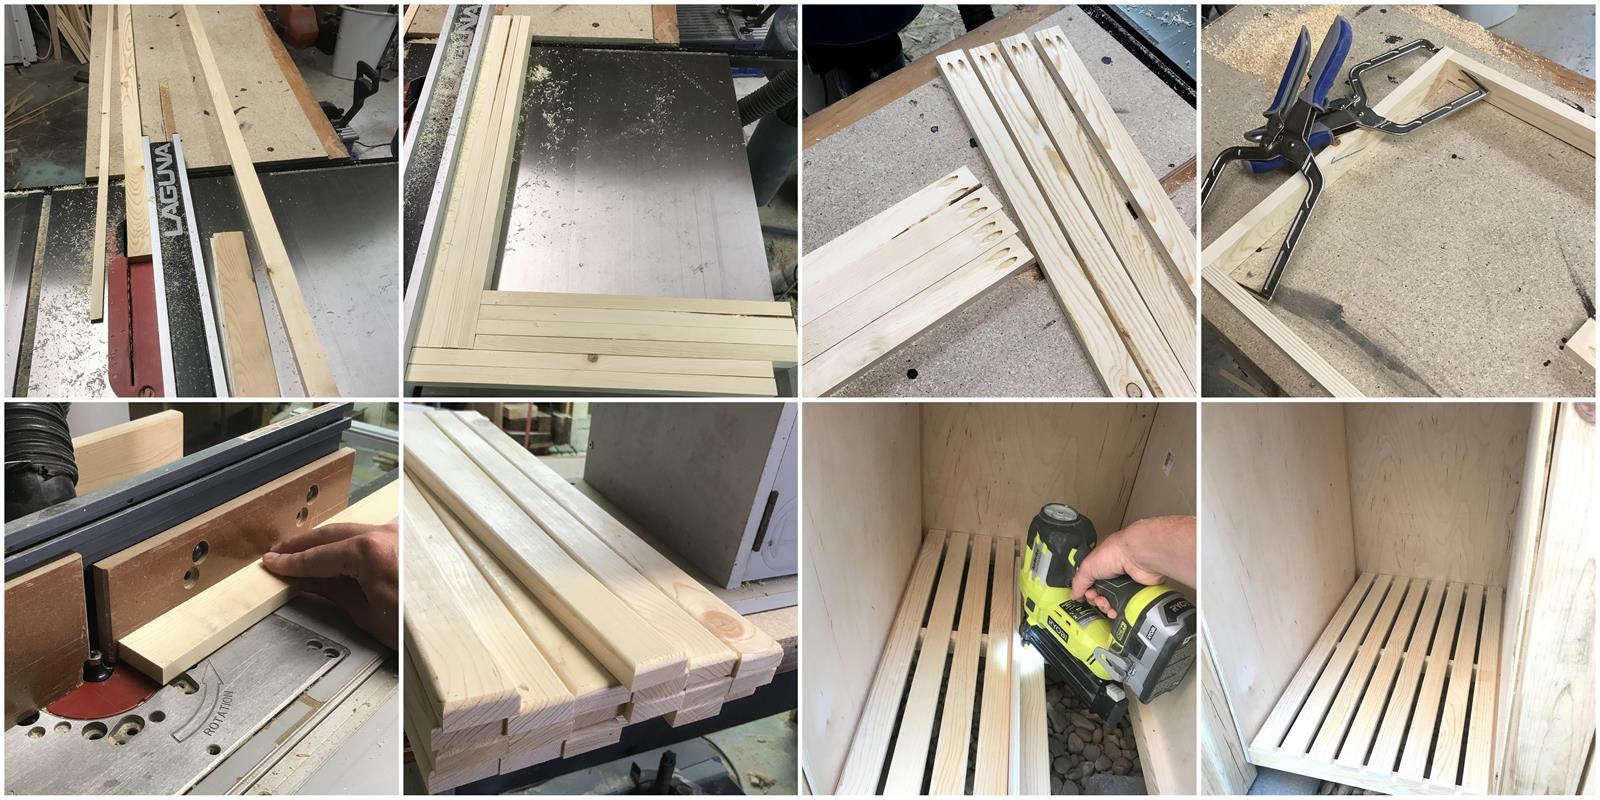
SIDES
Cut all the side boards to length and width. Then set the cut a 45* x 3/16 angle on the edges of the side boards. 4 of the boards i only cut the angle on one side, to be used as the ends. Then I laid out 6 boards for each side, marked where I wanted the pocket holes (4 on each side board). Glue and screw the side boards together. Then cut the side, top and bottom trim pieces to size. Drill 2 pocket holes on each end of the top and bottom trim piece. Screw it all together to make a frame. then glue and nail it to the side boards. Lastly, screw the side assemblies to the sides of the potting bench.
-
DOORS
The doors are built a lot like the sides, so cut all your pieces to size, cut the 3/16" angle on the door boards and screw together. Then cut, drill and screw the door trim pieces together, to build the frame. Before attaching it to the door boards, mark the door trim brace. Cut it to size and screw it to the door trim. THen screw the trim to the door boards. Using T10 finishing screws. Attach the hardware to the doors and the potting bench.
-
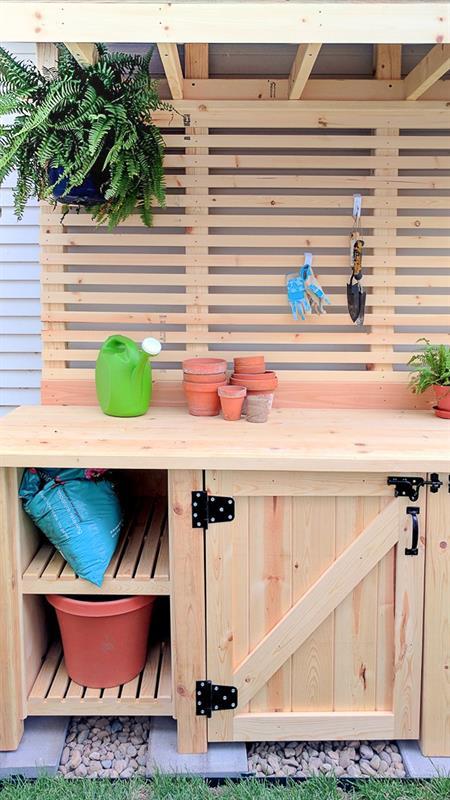
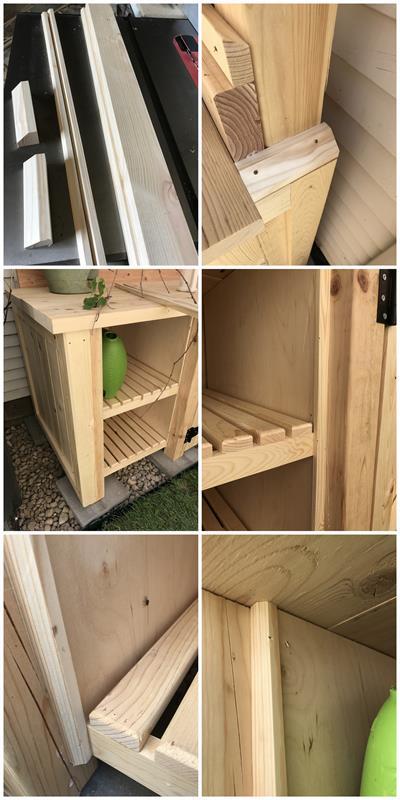
SHELVES
Start by cutting out the plywood for the shelf backs and sides. Screw the plywood back to the legs first and then the sides. We wanted to isolate the shelves from the other two compartments (keeping things from falling off the shelf). Cut out remaining shelf components. Drill pocket holes on both ends of the Shelf back/divider and on end of the shelf sides, then assemble. To make things easy we mounted the bottom shelf first, Cut the slats and screwed the to the shelf before doing the middle shelf. The slats are cut to size and rounded with a round over router bit. Then nail (18 ga) to the shelf. We used a scrap piece of 1/4" and 1/2" ply to keep our spacings.
-
TRIM
lastly, cut all the trim pieces out and screw them to their respective location on the potting bench.
-
Paint and Shingles!
Come on over to our blog to see how we finished this baby of with a coat of primer/paint and shingles on the roof. It turned out SO GOOD!
http://realitydaydream.com/the-painting-of-the-potting-bench/