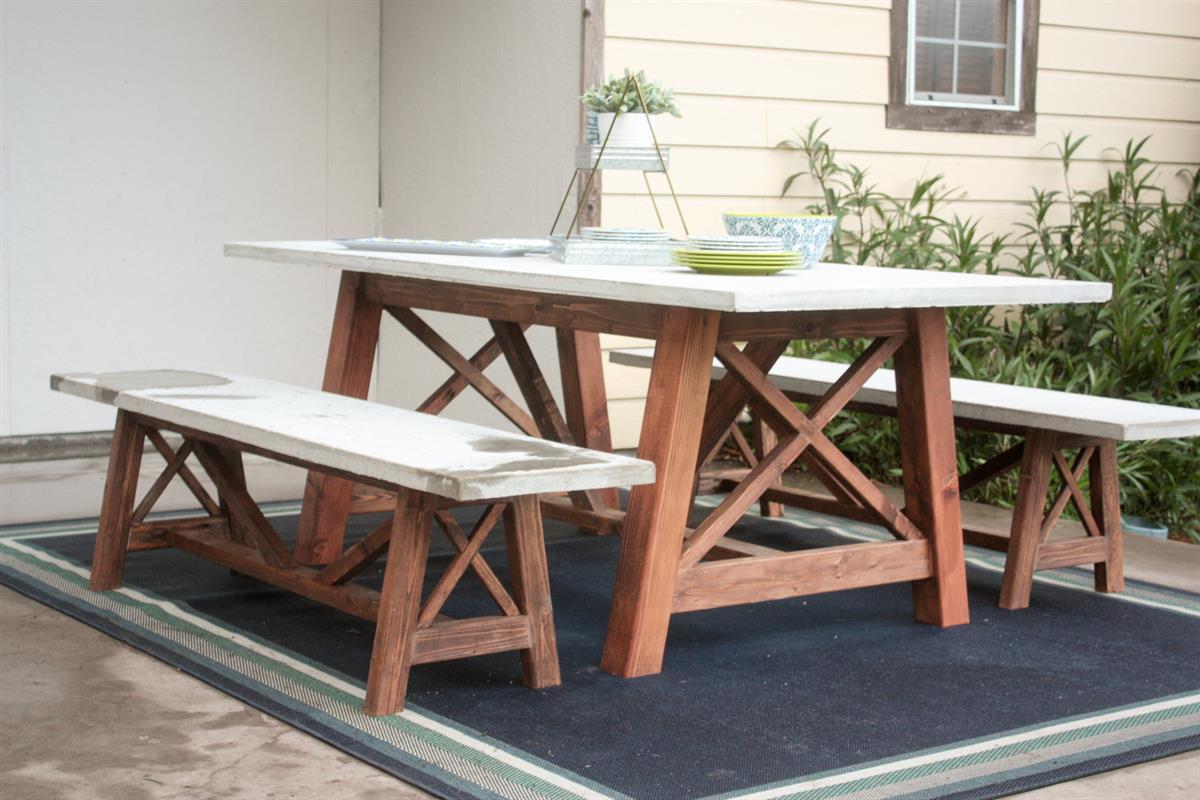


It’s summertime…which means grillin’ time…which means you need a gorgeous outdoor dining table to enjoy all the delicious grilled meals at!! This plan has you covered, for less than 100 bucks, you can build this concrete topped beauty and start enjoying your summer meals outside!!
Tools
Kreg Tools

Other Tools
-
Miter Saw

-
Table Saw
-
Tape Measure
-
Drill (cordless)
-
Sander
Materials
Wood Products
- 2 Board , 4x4 , 96"
- 3 Board , 2x4 , 96"
- 1 Board , 2x6 , 96"
- 2 Board , 2x2 , 96"
- 1 Melamine , 3/4" Thick , Full Sheet
- 1 Board , 2x3 , 96"
Hardware & Supplies
- 1 2 1/2" pocket hole screws
- 1 1 1/4" drywall screws
- 1 Tube silicone caulk
- 5 Bags of Quickrete 5000 concrete
- 1 Roll of 36" hardware cloth
Directions
-
Step 1
I started this project a little backwards from normal, when making a table I usually start with the base and then work my way to the top...but since this table has a concrete top, I opted to pour my concrete first and build the table while the concrete was setting! You do not have to build yours in this order, just skip on through to start building the base if you would rather!!
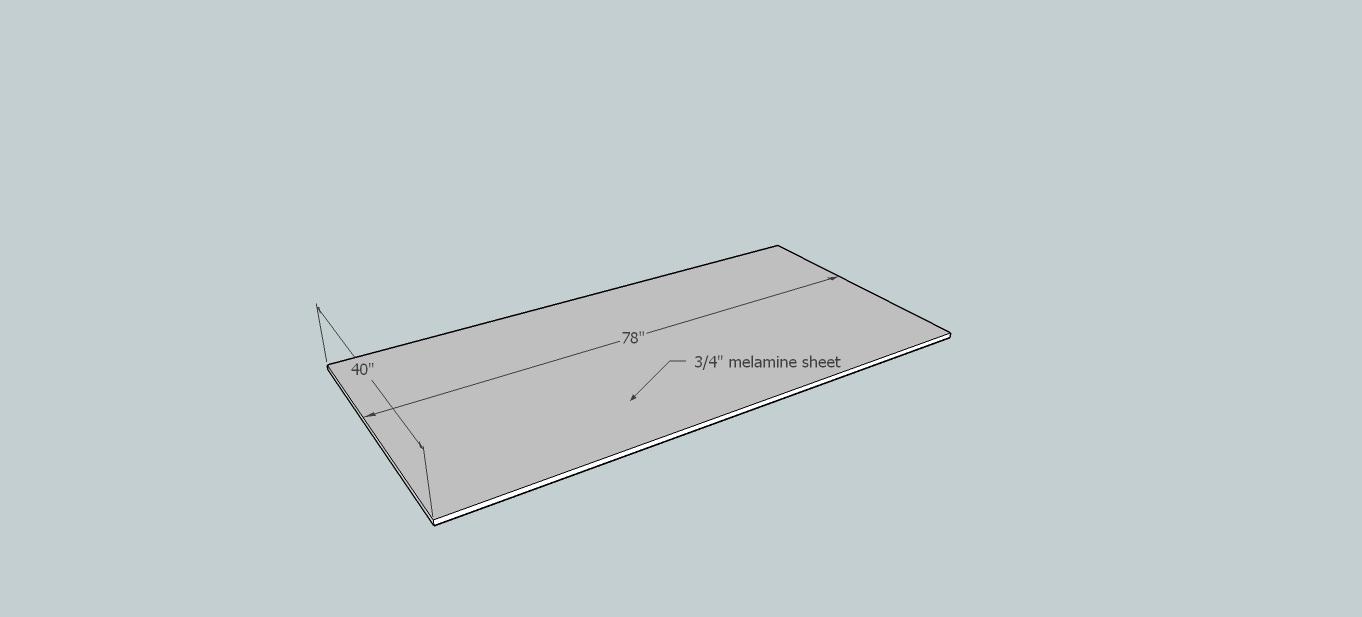
I started by cutting down the melamine sheet to the size of table top I wanted which was 40" x 78"!
-
Step 2
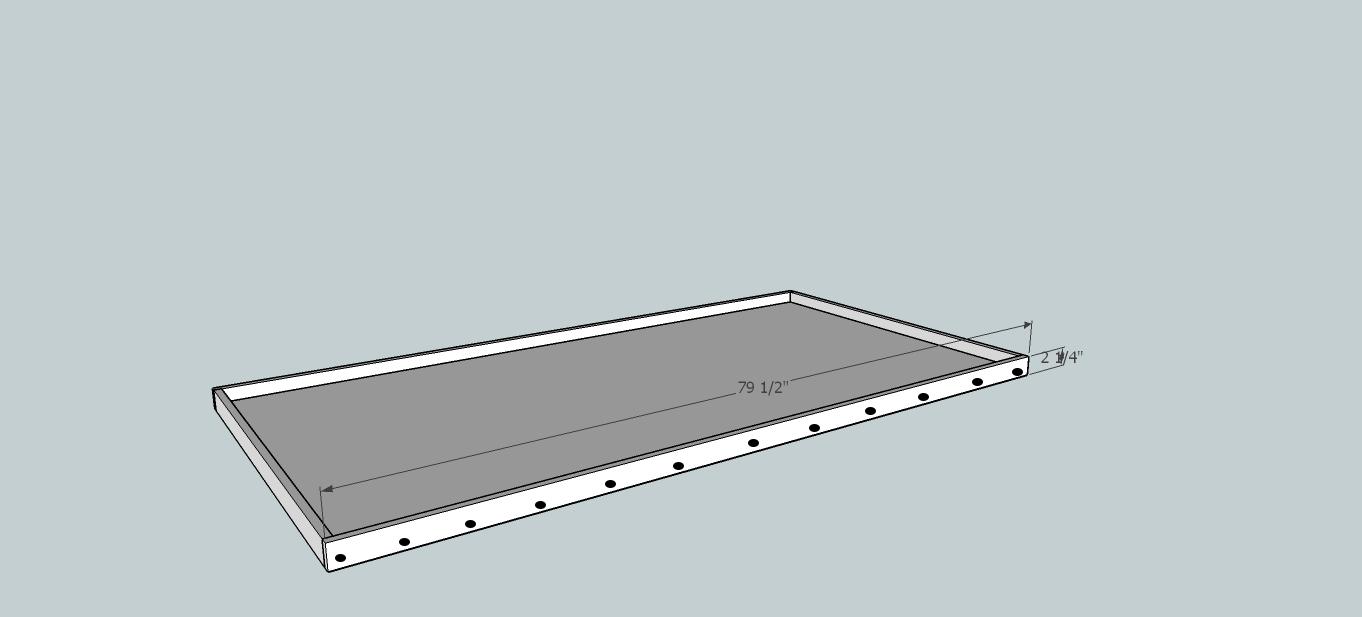
I ripped strips of melamine down to 2 1/4" so that my actual top would be 1 1/2" thick! I cut the short sides to 40" and screwed them to the concrete top form piece! I used 1 1/4" drywall screws for this placed one about every 6 inches!

-
Step 3
Attach the concrete form long strips to the long sides of the form the same way, using 1 1/4" drywall screws and placing them every six inches or so! Make sure and pre-drill the holes so the melamine doesn't split! The ends should overlap the short sides!
-
Step 4
Caulk the concrete form on all the seams and let dry fully before you pour your concrete! Mix the concrete according to the directions on the bag! I used Quickrete 5000 concrete, and the table top took me 4 1/2 bags to complete! When the mold is about half full, I added in the hardware cloth, then just continue filling the mold until full!
I then vibrated my concrete for about an hour with an orbital sander! Cover and let the concrete sit for several days while you move on and build the base! -
Step 5
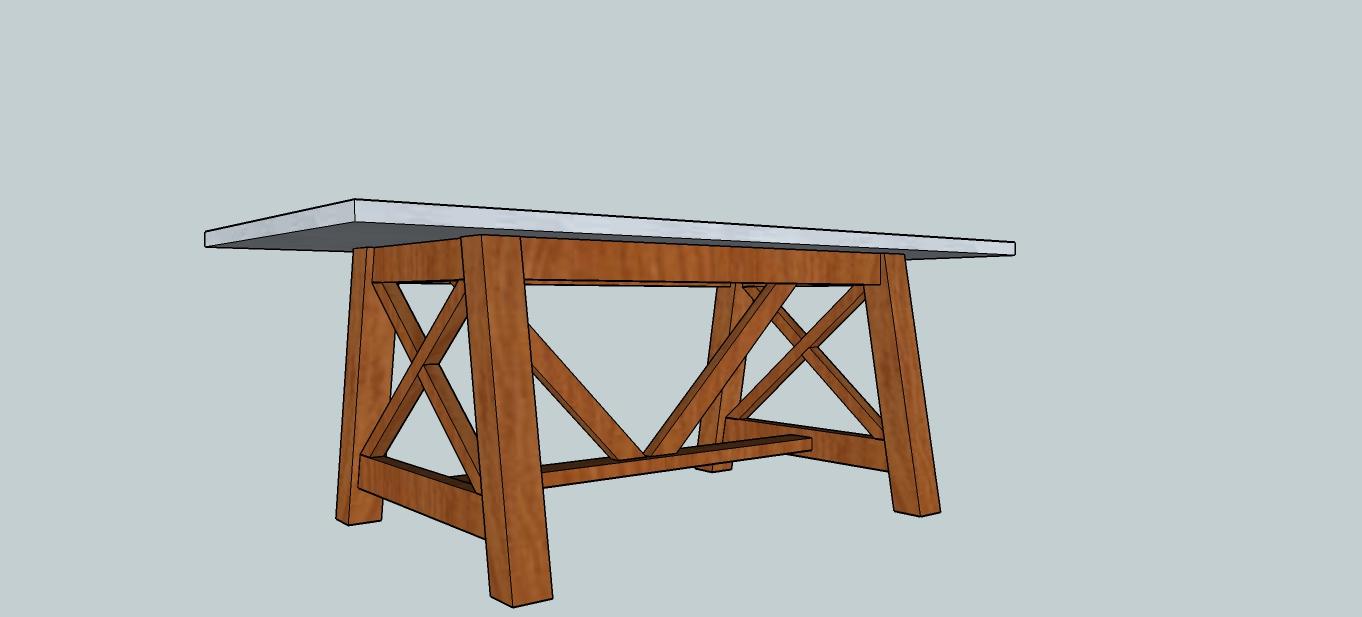
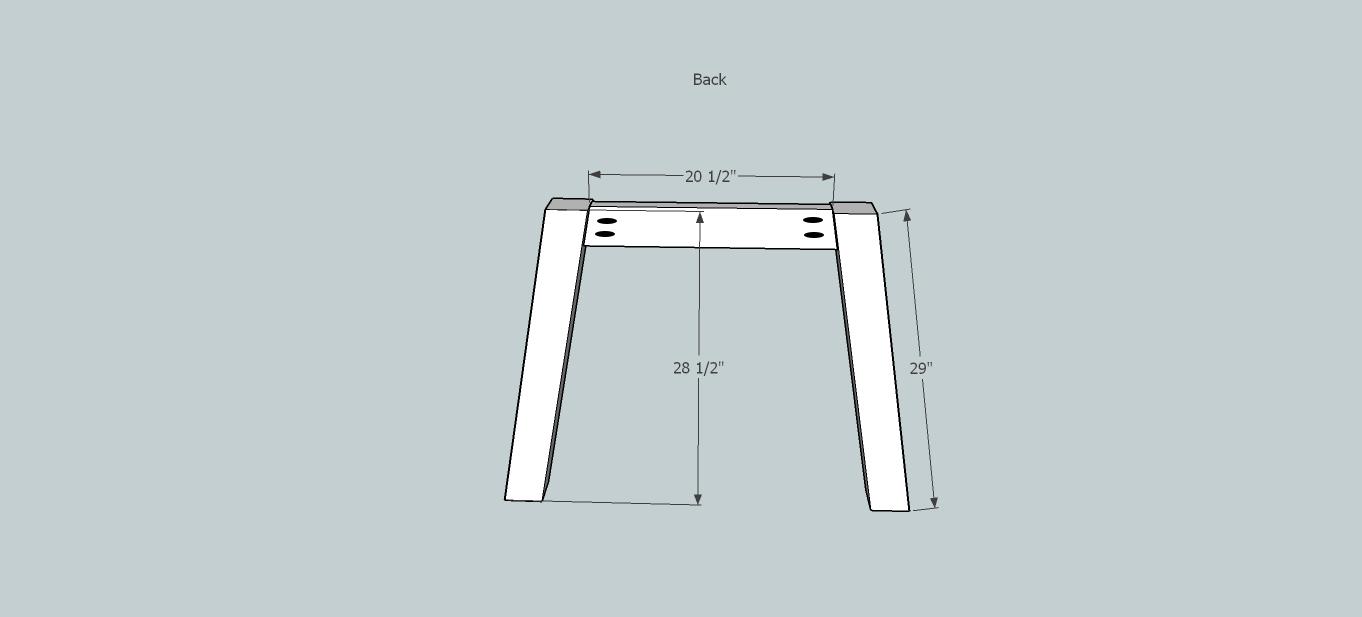
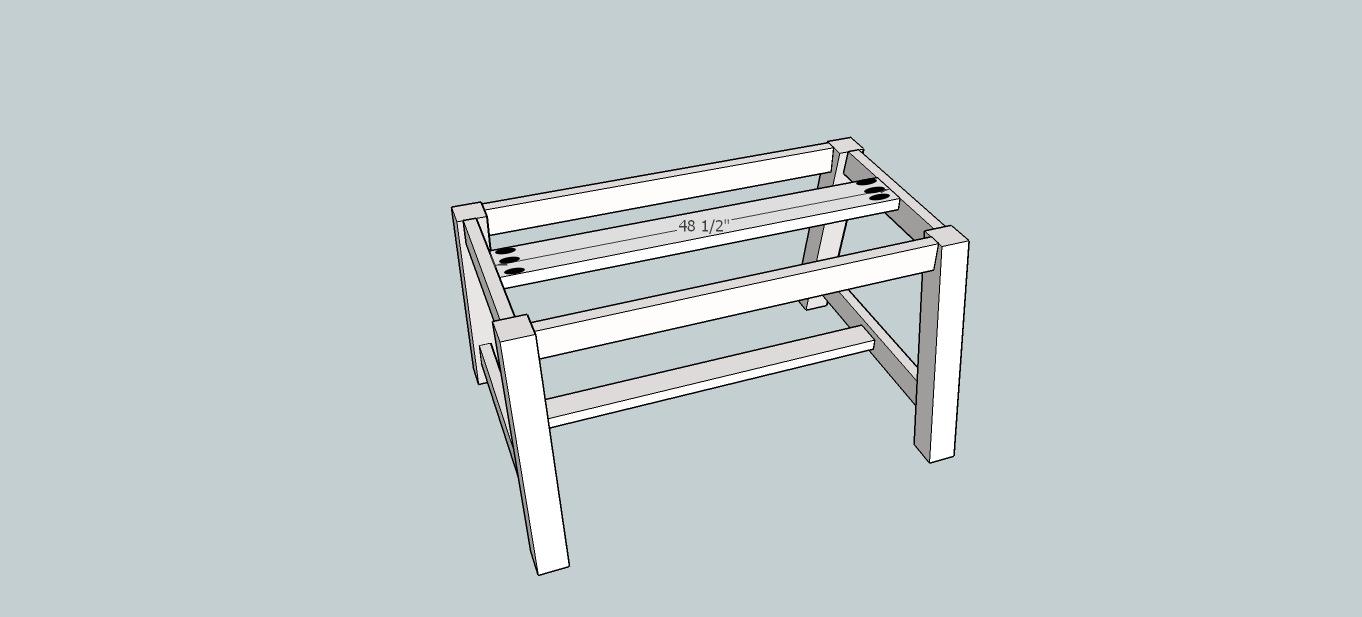
Alright! To start the building of the table: take two legs and a top side apron...both cut at 10 degrees off square... drill 1 1/2" pocket holes and attach using 2 1/2" pocket hole screws! Repeat this step to make your other side as well! The top apron is set back 3/4" from the front!
I suggest using the Kreg Jig HD on this project, the screws are a little heavier duty and with a concrete top, you need heavy duty!! Lol!! Make sure and glue all joints in this build!
-
Step 6
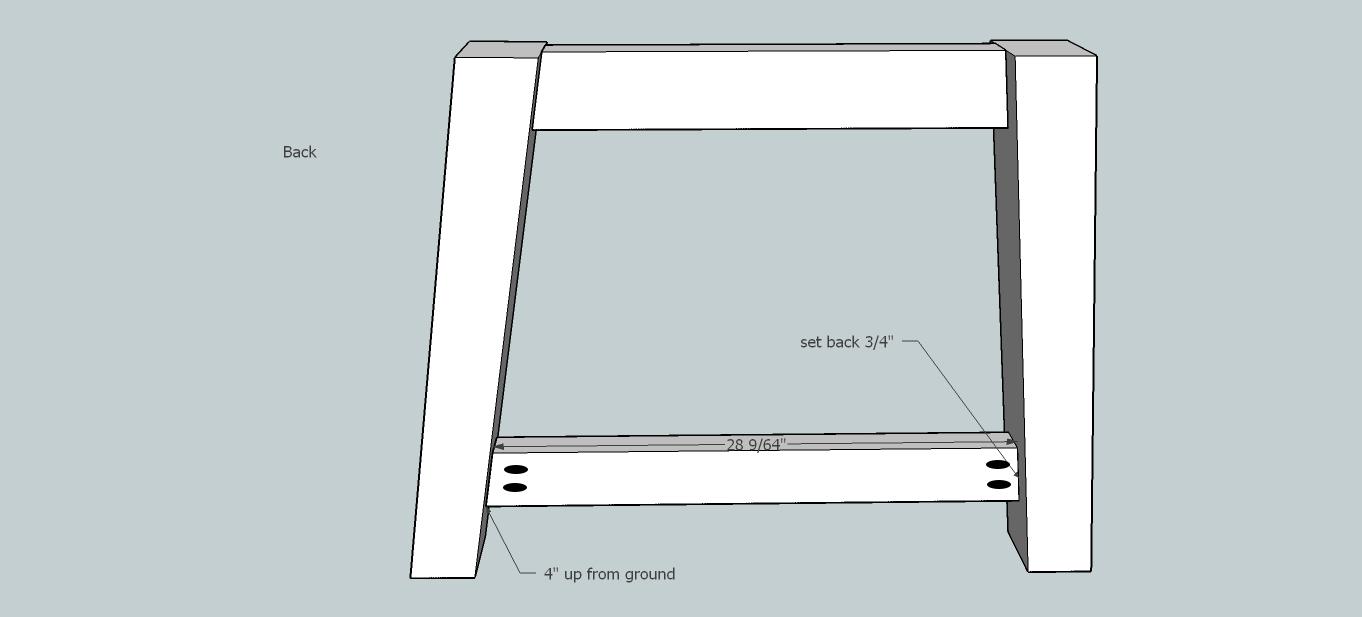
Attach the bottom side rails the same as the top, I placed mine 4" up from the bottom! Using 1 1/2" pocket holes and 2 1/2" screws attach the board! Make sure and use glue! This board is set back 3/4" from the front! Repeat on second leg!
-
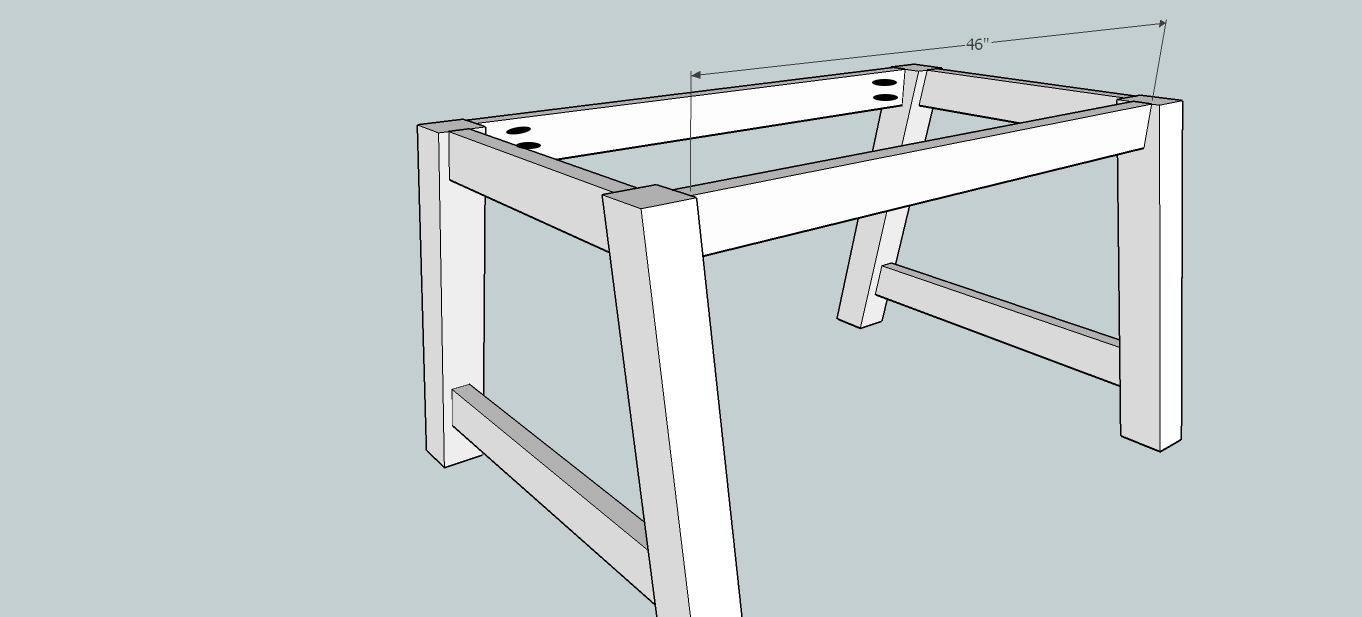
Step 7
Attach both of your sides to the table aprons! Again, using 1 1/2" pocket holes and 2 1/2" pocket hole screws along with a good amount of glue!
-
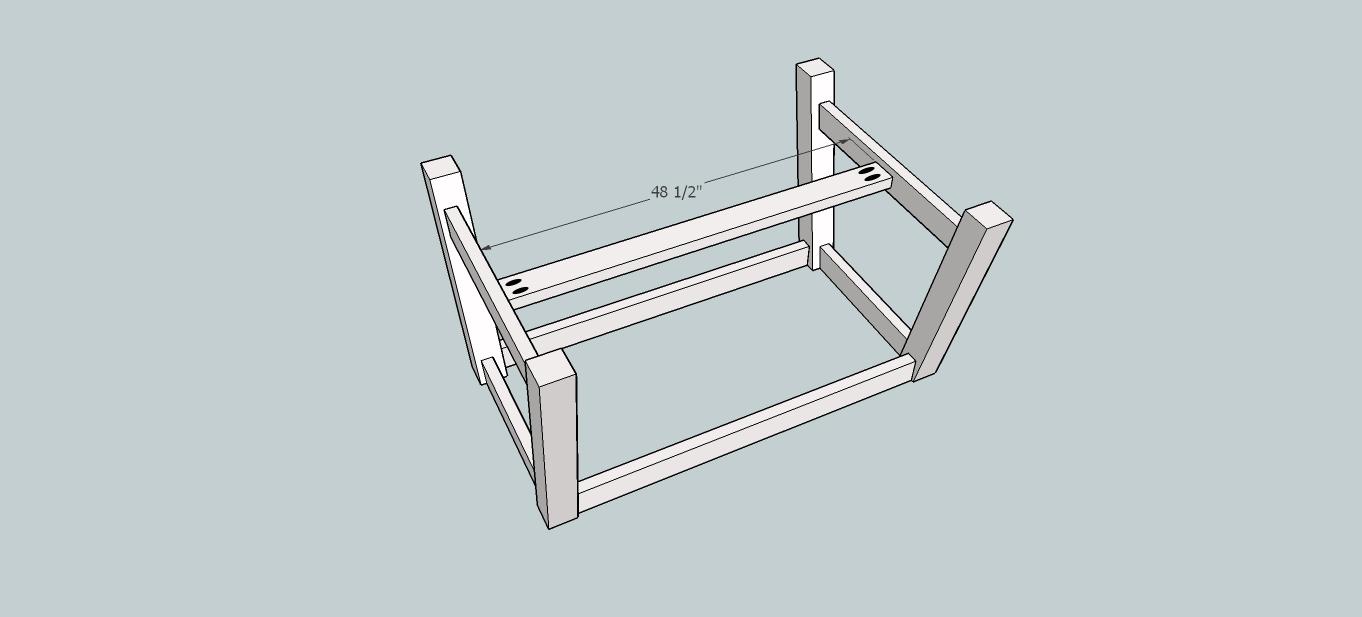
Step 8
Attach bottom stretcher, the board is centered on the bottom side rails, which makes it set down 1" from the top of the bottom side rail! Use 1 1/2" pocket holes and 2 1/2" screws to attach! Don't forget the glue! (Picture is with the table flipped over)
-
Step 9
Next is the top stretcher for added support! If you are building this table and plan on having a wood top, you do not really need this board, but with a concrete top, we need all the extra support we can get! Again, using 1 1/2" pocket holes, 2 1/2" screws and glue to attach!!
-
Step 10
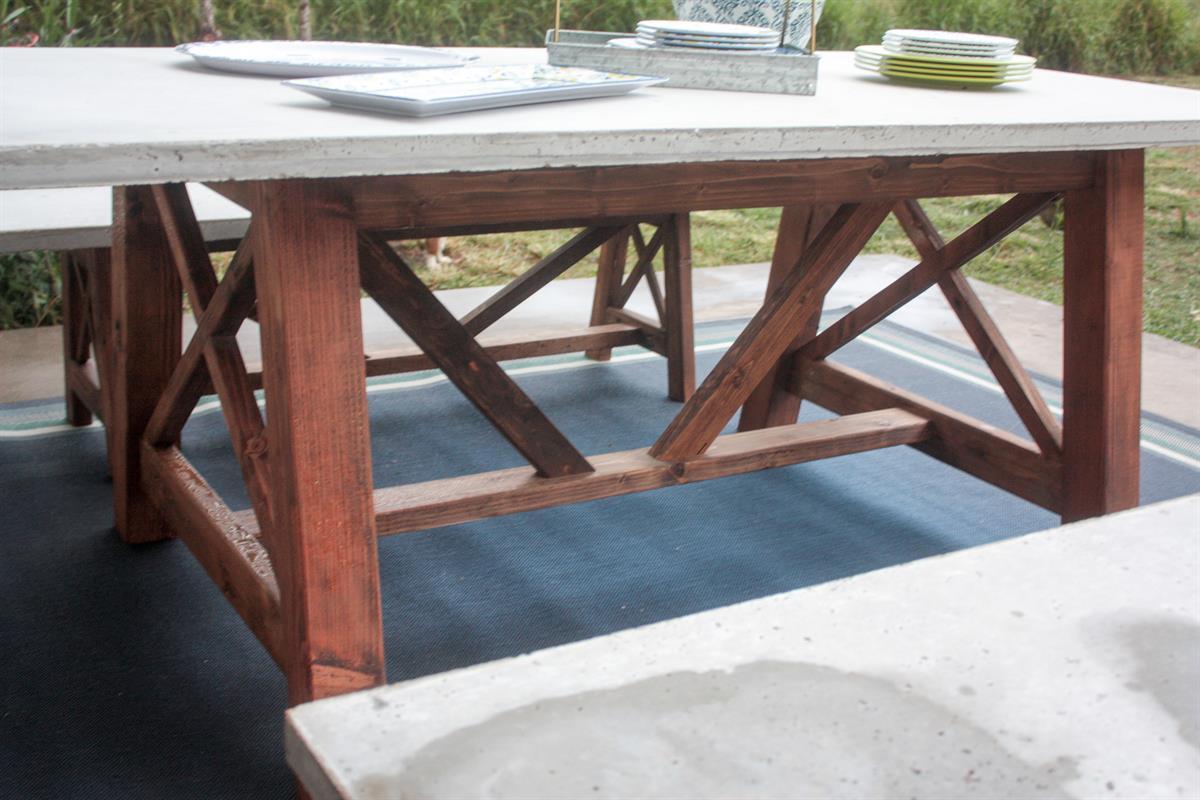
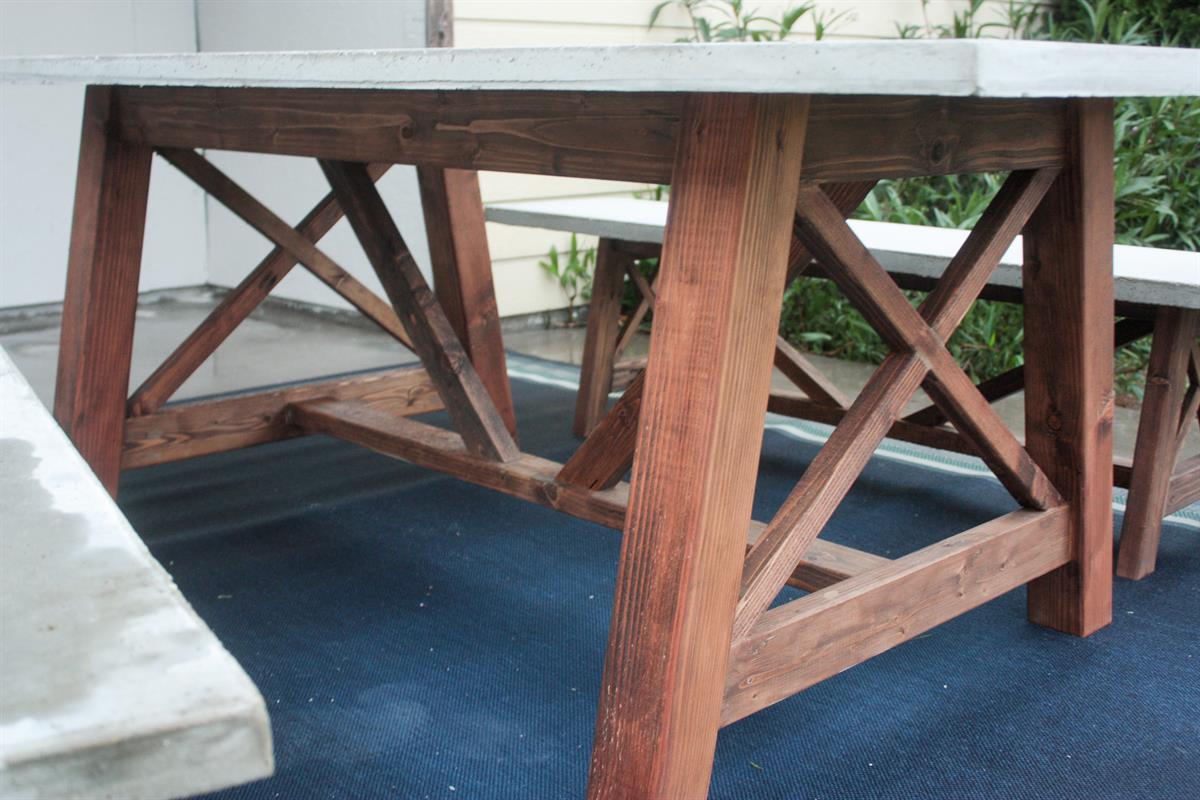
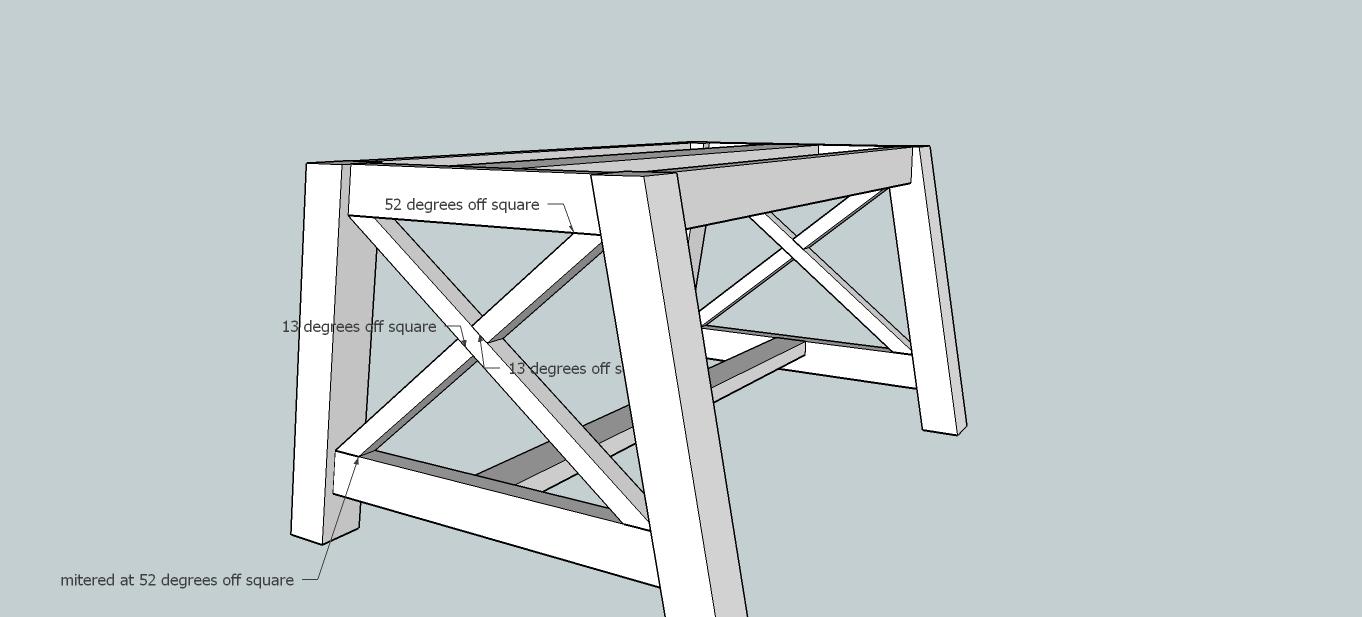
Next is creating the X's on the sides, I was not able to pocket hole the ends so instead I used a 1/2" countersink drill bit and drilled holes for the screws near the edges and used 2" screws to attach, along with glue of course! The small black circles show where I drilled the counter sunk holes! I did all the long X pieces first.
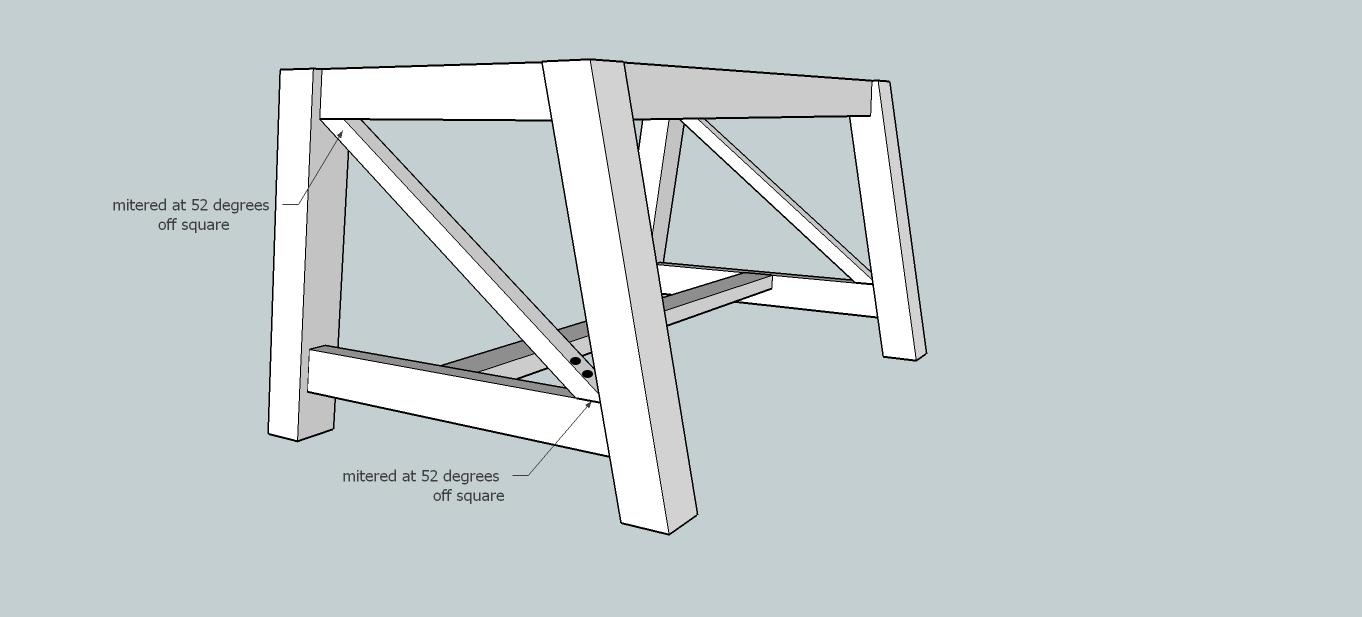
-
Step 11
Next up are the short X pieces! You have a top and bottom piece to fit here! The two ends on each piece are mitered at different angles! I was able to use 1 pocket hole on each piece to attach it to the other long X piece, but where they attached to top and bottom rails, I still used the countersunk holes! I didn't give measurements on the X's because measuring your space is the best idea here...even the slightest off can make a huge difference! So make sure and measure!
-
Step 12
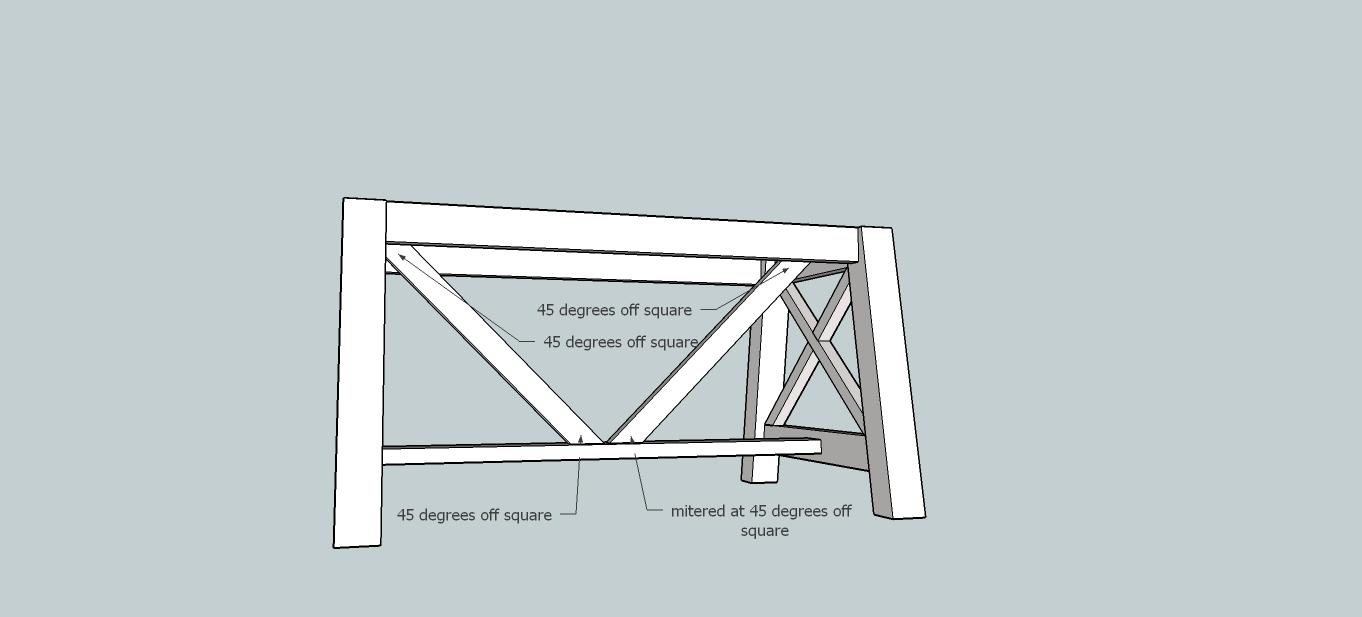
Originally the design of the table stopped there...but after feeling how heavy the top was as we turned it over, I decided to put extra supports even though I loved the simplicity! I mitered two boards at 45 degrees off square on both ends and I was able to pocket hole the top of the boards, but chose to drill up through the bottom stretcher with 2" screws to keep from seeing pocket holes along the bottom of the braces!
-
Step 13
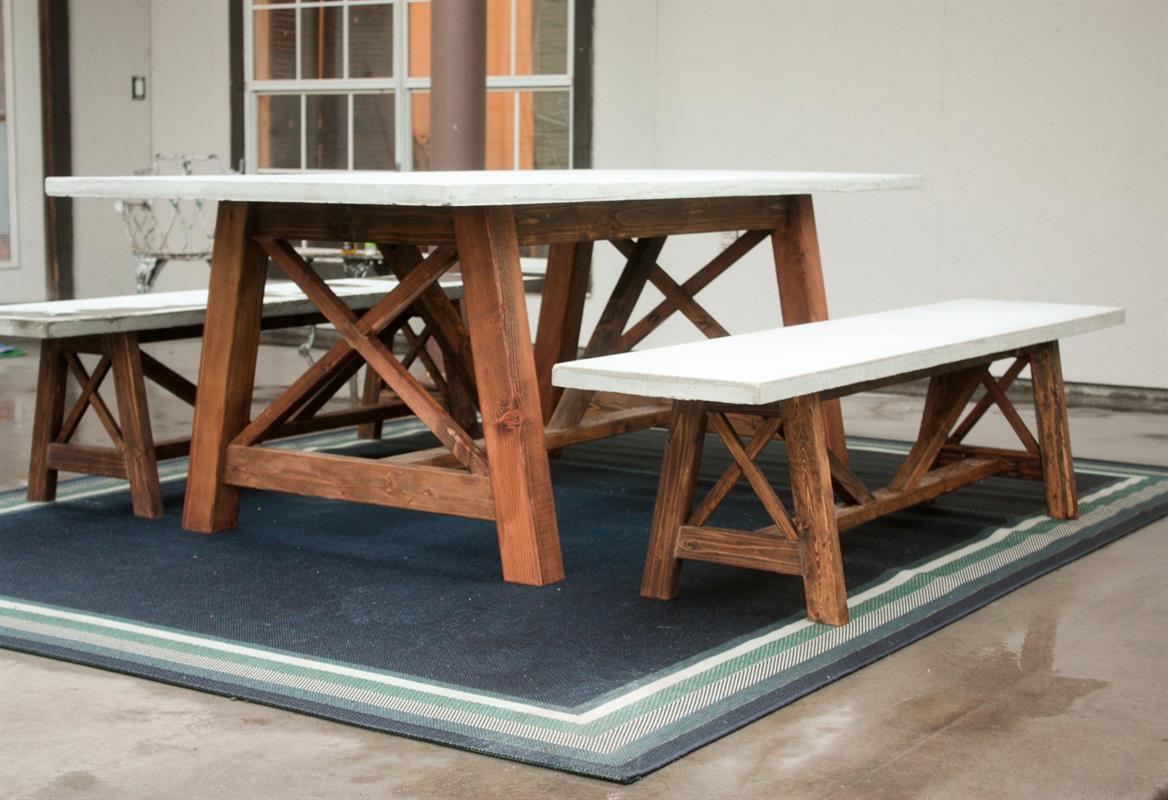
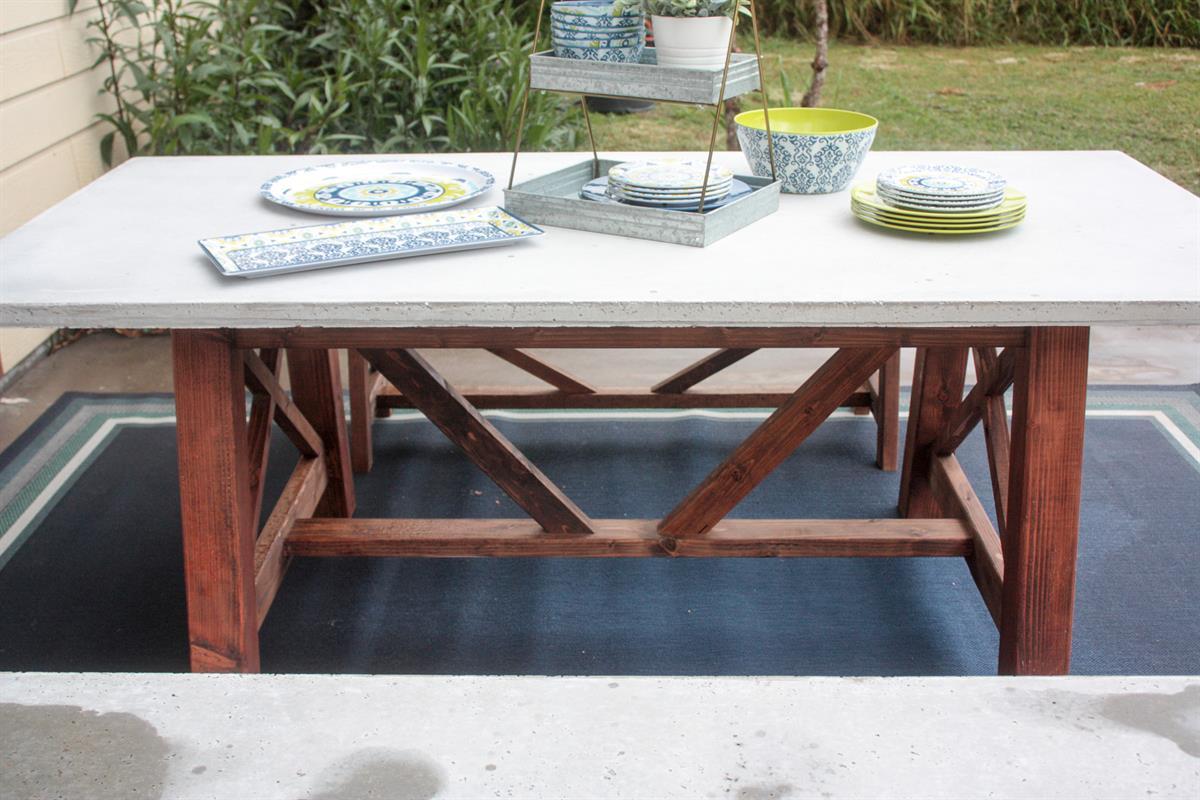
Take your concrete out of it's mold and place it on top of this awesome table and you are almost done!! Make sure and epoxy some small squares of wood to the inner four corners of the table so it can't slide around, although with the weight, I don't exactly see it sliding around! LoL!!
I used Minwax Providence as the stain and Hellsman Spar Urethane as the outdoor protectant! I hope you enjoy many meals under the summer sky here at your new outdoor dining table!
Get the FREE mathcing bench plans at http://builditcraftitloveit.com