

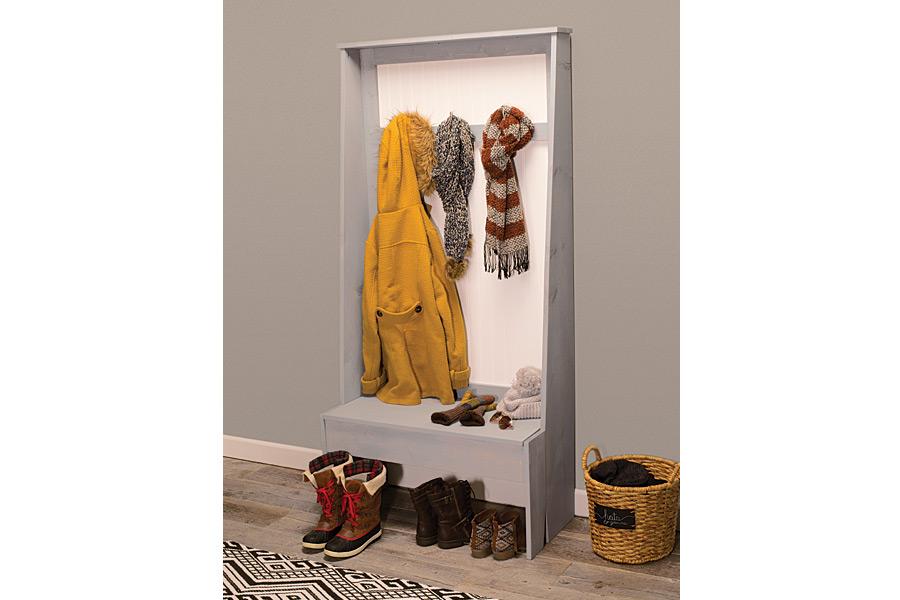
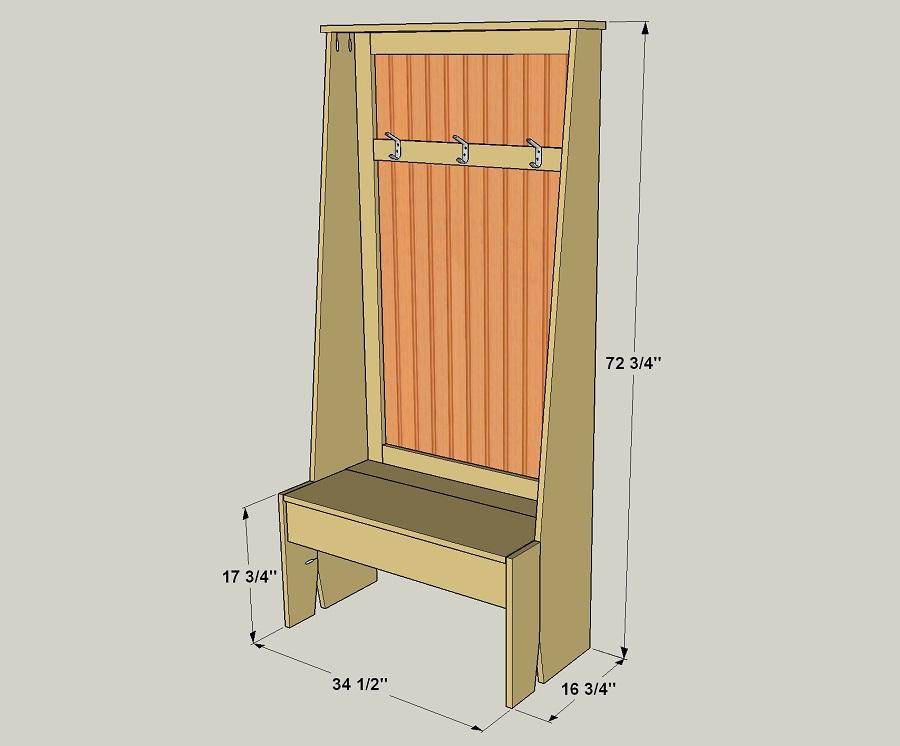


Add some rustic style to any entryway with this easy-to-build organizer. It offers hooks, a seat, and a shallow storage compartment. All you have to do is make some cuts in off-the-shelf pine boards and a sheet of beadboard paneling. Even the subtle tapered cuts are easy using a jigsaw.
Tools
Kreg Tools

Other Tools
-
Circular Saw (corded)

-
Jigsaw
-
Miter Saw
-
Square
-
Tape Measure
-
Drill (cordless)
-
Sander
Materials
Wood Products
- 1 Beadboard Paneling , 1/4" Thick , Full Sheet
- 1 Board , 1x3 , 48"
- 2 Board , 1x3 , 96"
- 1 Board , 1x4 , 72"
- 3 Board , 1x6 , 72"
- 3 Board , 1x12 , 72"
Hardware & Supplies
- 96 1 1/4" coarse-thread pocket-hole screws
- 33 #6 x 3/4" flathead wood screws
- 1 Pair 2 1/2" non-mortise hinges
- 3 Coat hooks
- 1 Wood glue
Cut List & Parts
- 2 Seat Leg , 3/4" x 5 1/2" x 17 3/4" Pine
- 2 Main Leg , 3/4" x 11 1/4" x 72" Pine
- 2 Frame Stile , 3/4" x 2 1/2" x 54 1/4" Pine
- 2 Frame Rail , 3/4" x 2 1/2" x 28" Pine
- 1 Hook Rail , 3/4" x 2 1/2" x 28" Pine
- 1 Small Box Bottom , 3/4" x 3 1/2" x 33" Pine
- 1 Large Box Bottom , 3/4" x 11 1/4" x 33" Pine
- 1 Box Front , 3/4" x 5 1/2" x 33" Pine
- 1 Box Back , 3/4" x 5 1/2" x 33" Pine
- 1 Seat Rail , 3/4" x 5 1/2" x 33" Pine
- 1 Box Brace , 3/4" x 3 1/2" x 14 3/4" Pine
- 1 Top , 3/4" x 5 1/2" x 35 1/2" Pine
- 1 Seat Lid , 3/4" x 11 1/4" x 32 3/4" Pine
- 1 Back Panel , 1/4" x 32 1/2" x 54" Beadboard
Directions
-
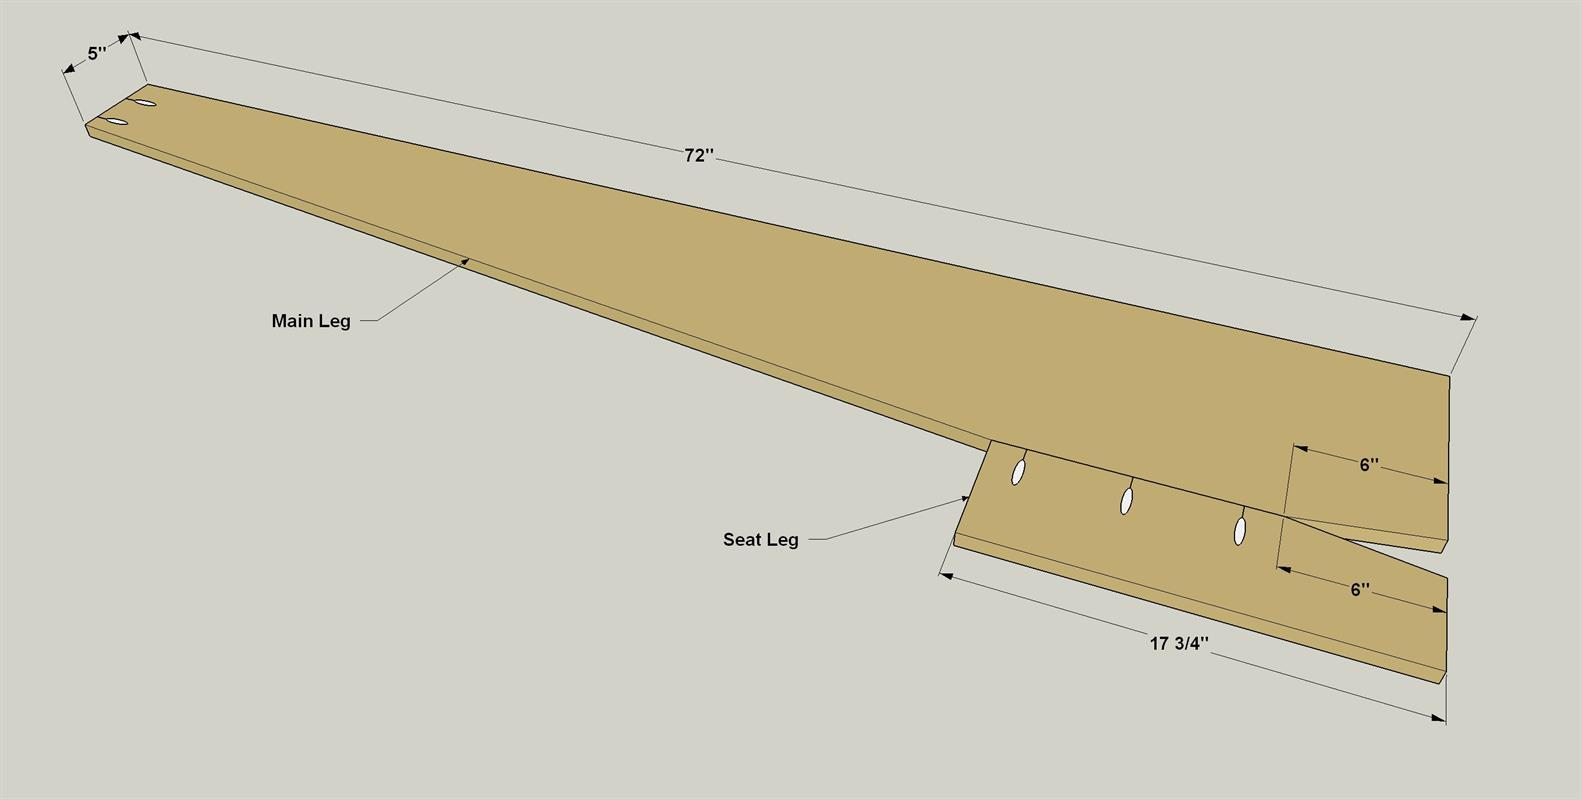
Shape the Legs
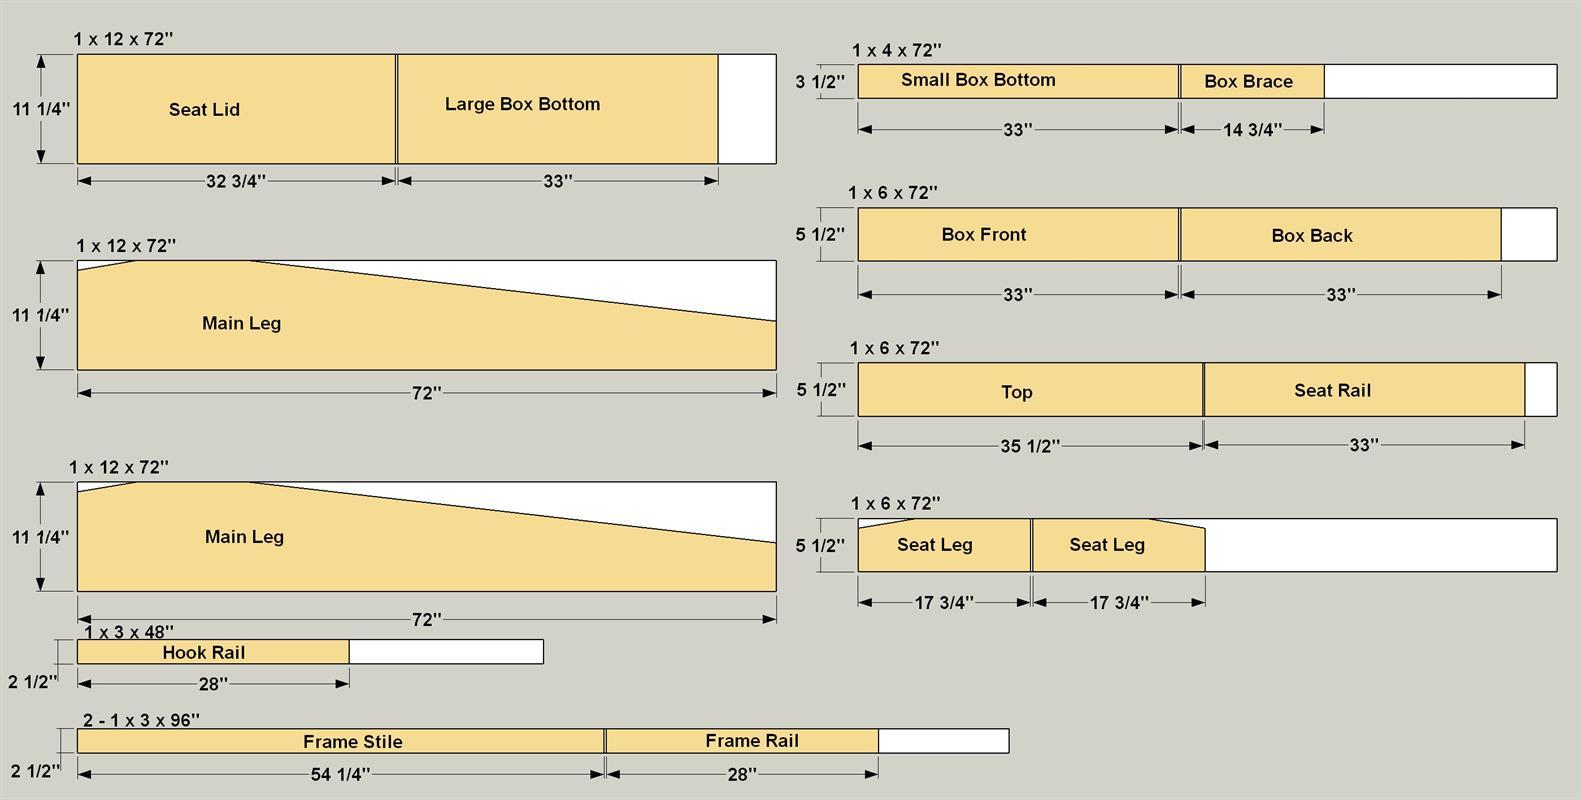
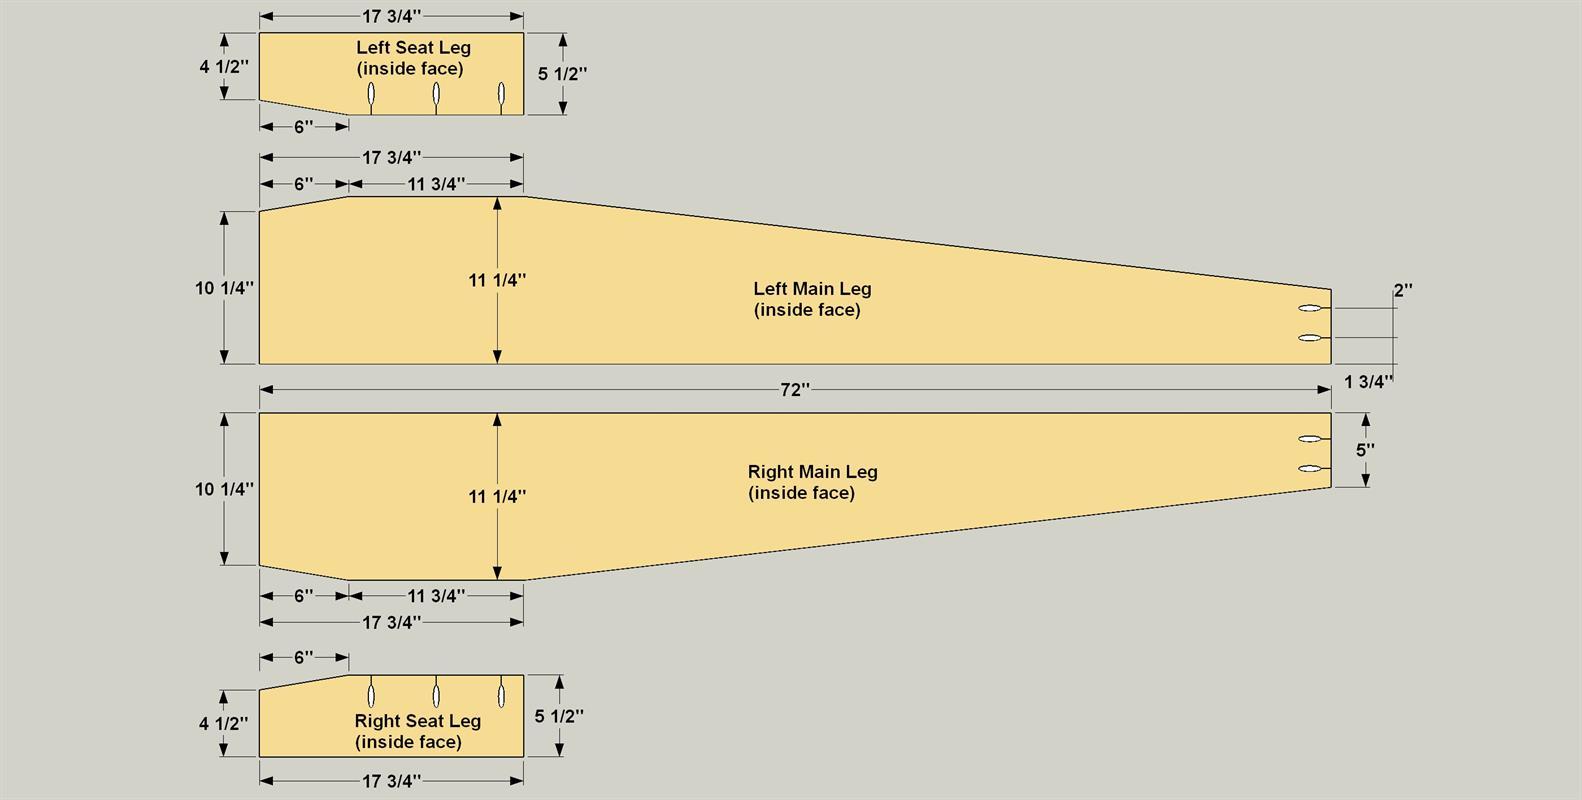
Cut two Main Legs to length from 1x12 pine boards, and cut two Seat Legs to length from a 1x6 pine board, as shown in the cutting diagram. With the pieces cut to length, you can create the tapered edges. First, lay pair a Main Leg and Seat Leg side by side to make a left-hand and right-hand assembly. At the lower end, lay out the 6"x 1" taper on each piece, as shown. Then lay out the long taper on the Main Legs only. When done, cut the tapers with a jigsaw, and then sand the cut edges smooth. Next, with your pocket-hole jig set for 3/4"-thick material, drill pocket holes where shown. Note that you’re creating two “mirrored” assemblies. That way the pocket holes will end up facing toward the inside.
-
Assemble the Legs
Attach each Seat Leg to each Main Leg, as shown, using glue and 1 1/4" coarse-thread pocket-hole screws, as shown. After the glue sets, sand the surfaces and edges as needed. We used #2 pine for this project to give it a more rustic look, and we dry-brushed a colonial blue paint. So, we wanted some imperfections to show. Because of this, we just made sure the cut edges and ends were smooth, and then we scuff-sanded the surfaces with 100-grit paper. If you plan on a more-refined painted look, plan to sand with 100-grit, then move to 150-grit. If you’re planning to stain your project instead, continue on to 180-grit sandpaper.
-
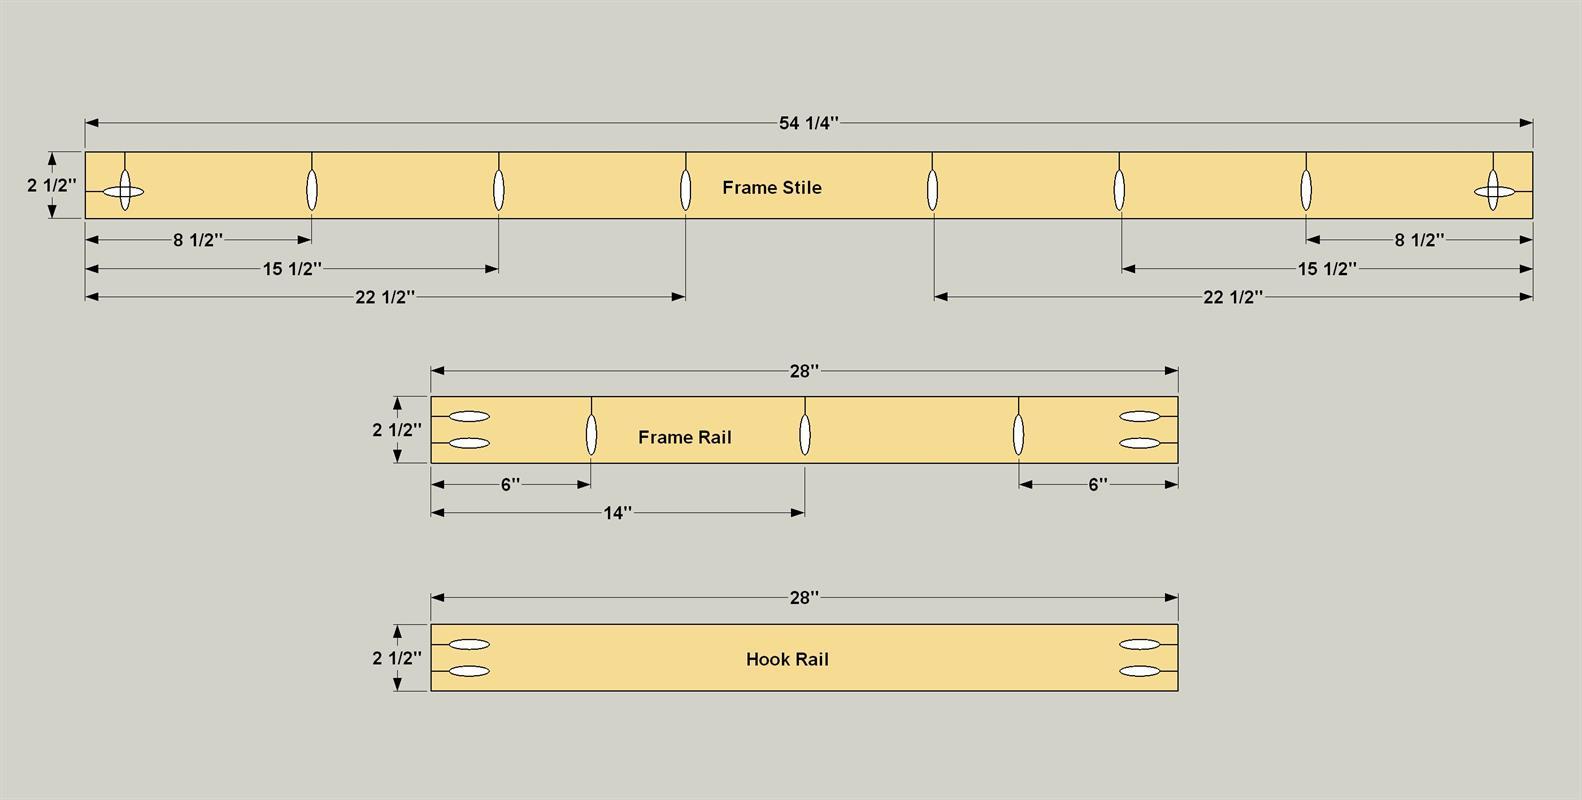
Make the Frame Parts
Cut two Frame Stiles, two Frame Rails and one Hook Rail from 1x3 pine boards, as shown in the cutting diagram. With your pocket-hole jig set for 3/4"-thick material, drill pocket holes in the frame parts where shown.
-
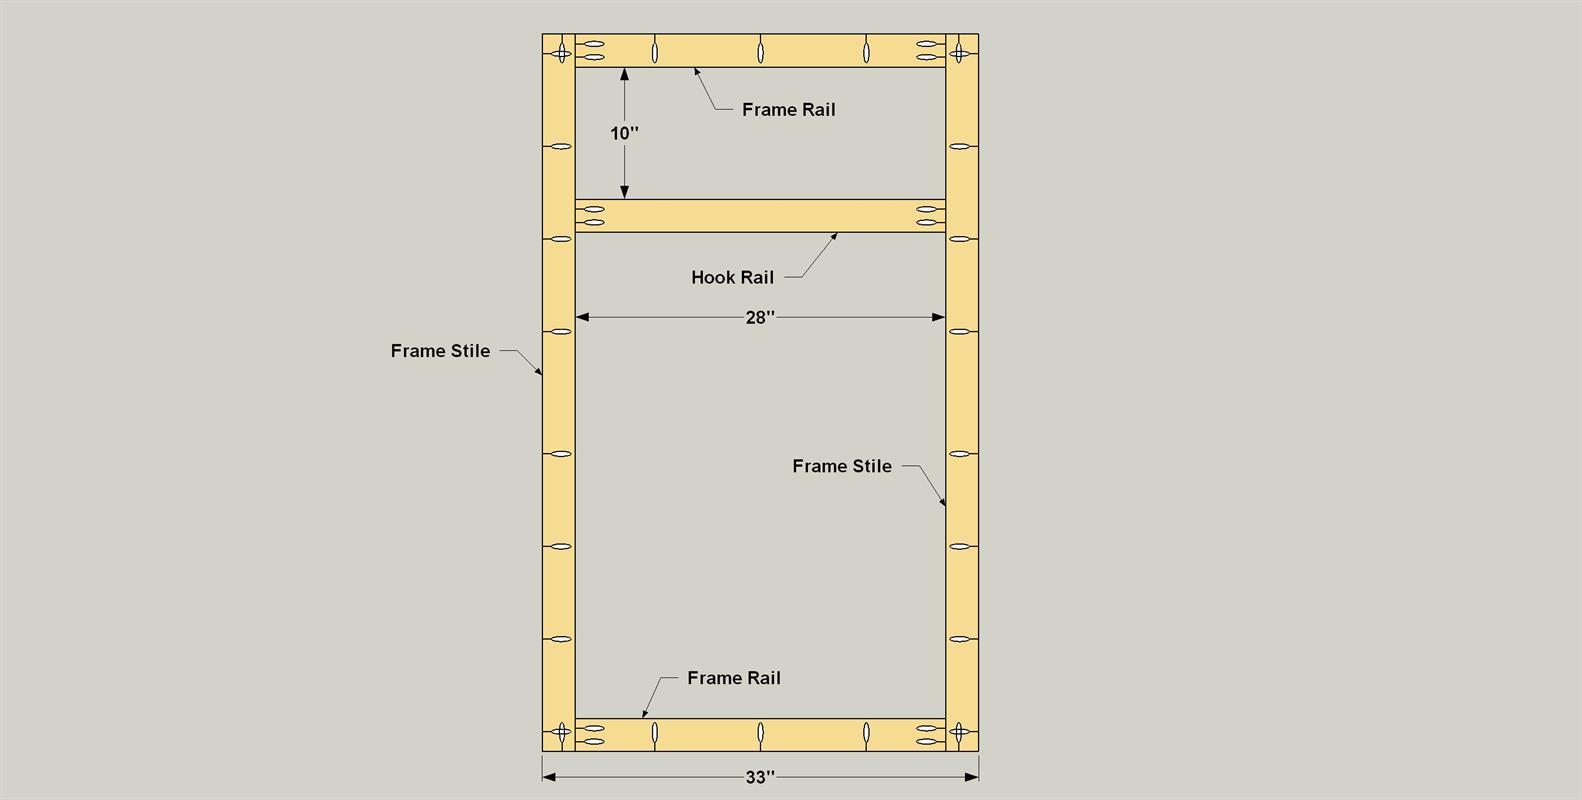
Assemble the Frame
Now you can assemble the frame, as shown, by attaching the Frame Rails and the Hook Rail to the Frame Stiles using 1 1/4" coarse-thread pocket-hole screws. Sand the face of the frame that doesn’t have pocket holes, as well as all of the inner edges. The remaining surfaces will all be hidden.
-
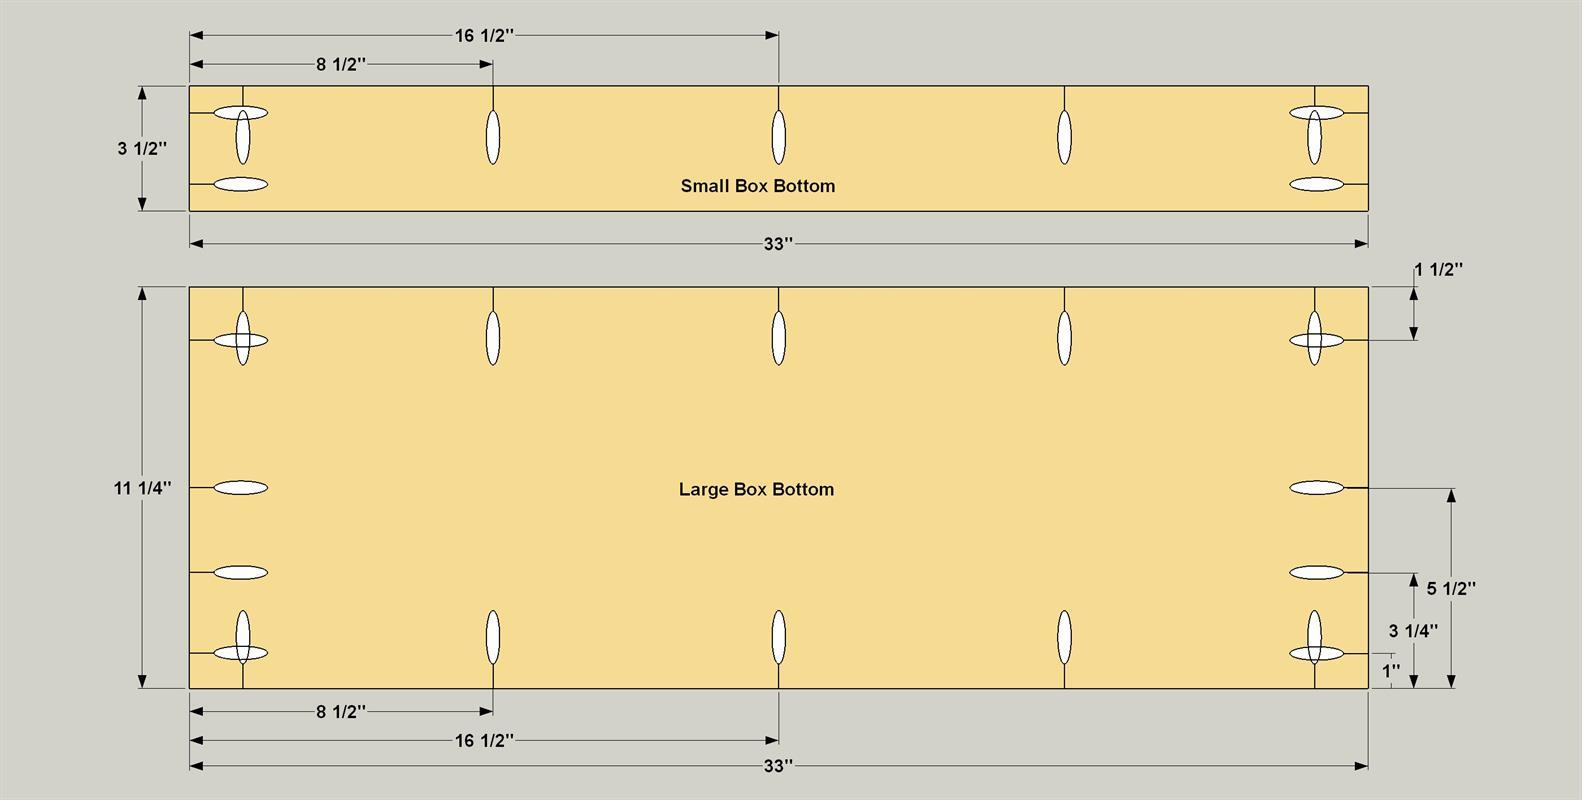
Make the Box Bottom Parts
Now you can begin making the box assembly that forms the seat and storage area. First, cut a Large Box Bottom to length from a 1x12 board, and cut a Small Box Bottom from a 1x4 board, as shown in the cutting diagram.
-
Assemble the Box Bottom
Now you can attach the Small Box Bottom to the Large Box Bottom using glue and 1 1/4" coarse-thread pocket-hole screws. Make sure that the pocket holes in both pieces are oriented correctly. Sand the Box Bottom after assembly.

-
Make the Other Box Parts
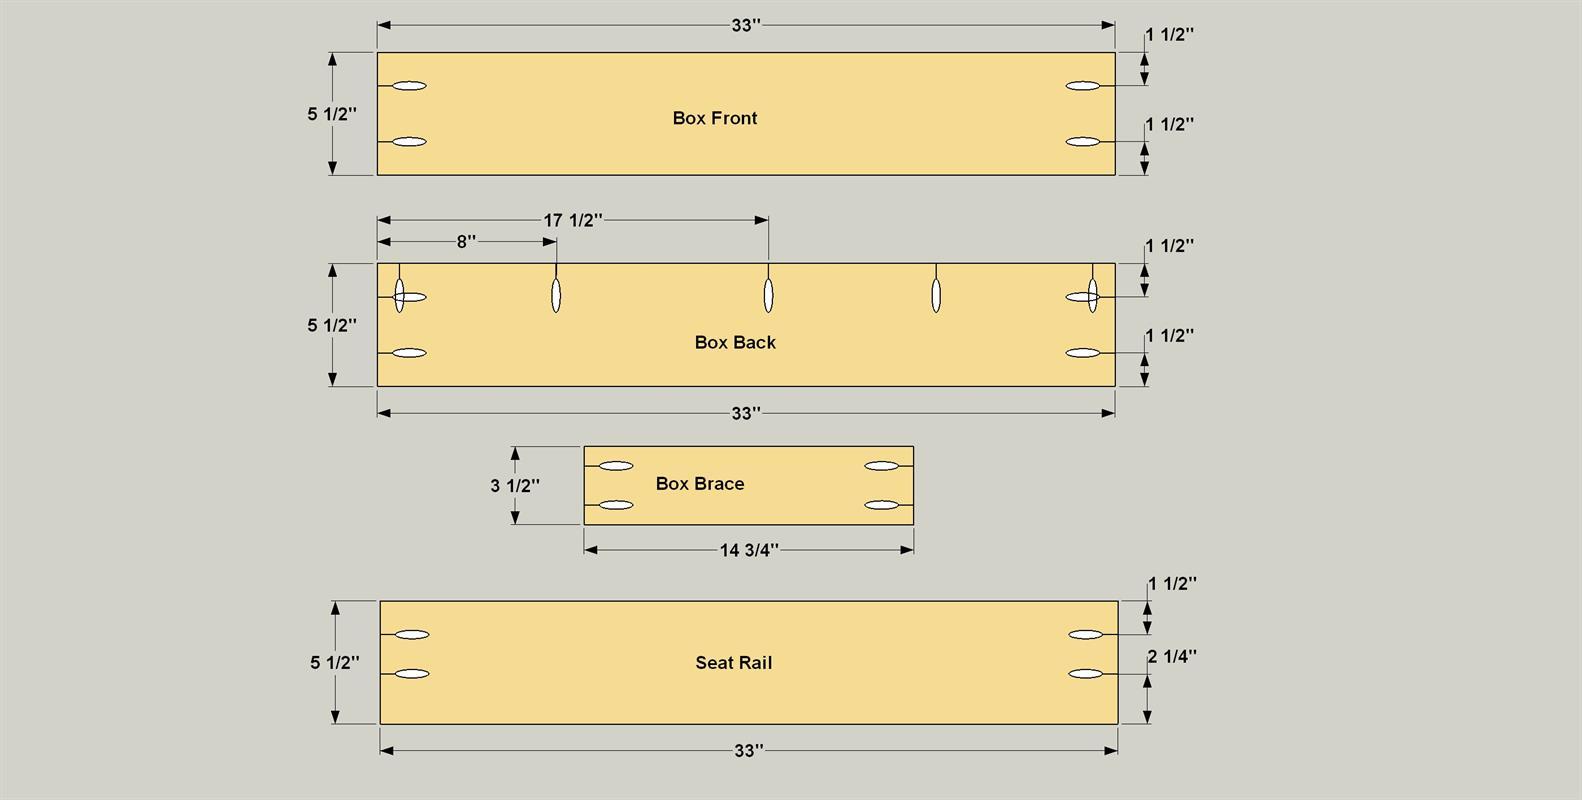
Next, cut a Box Front, a Box Back, and a Seat Rail to length from 1x6 boards, as shown in the cutting diagram. Also cut a Box Brace to length from a 1x4 board. Then, with your pocket-hole jig set for 3/4"-thick material, drill pocket holes in these parts where shown. Sand all of the parts smooth.
-
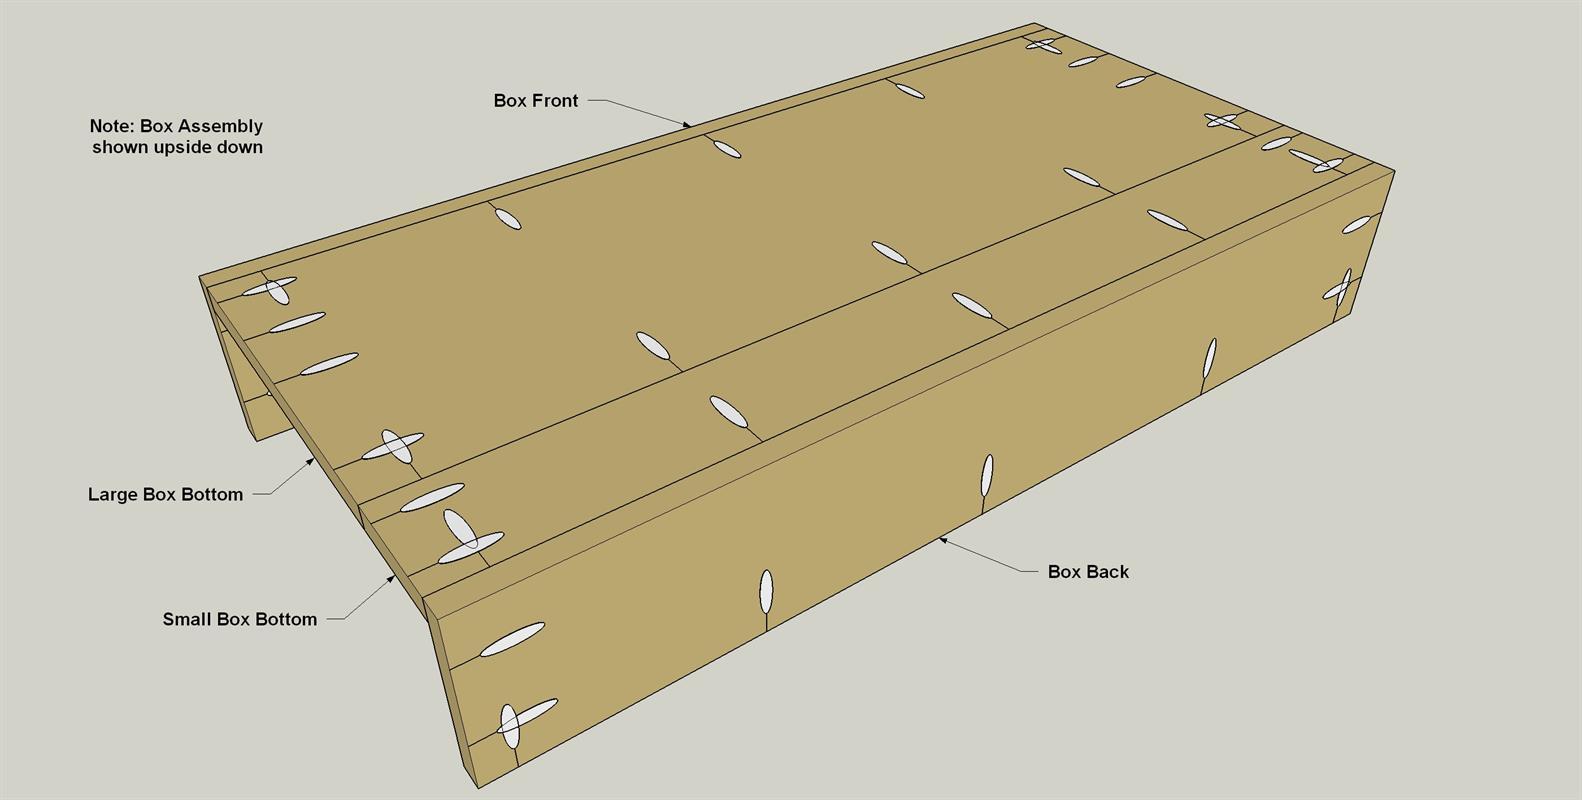
Attach the Box Front and Back
Attach the Box Front and the Box Back to the bottom assembly using glue and 1 1/4" coarse-thread pocket-hole screws. Make sure that the bottom assembly is oriented correctly—so that the Small Box Bottom sits against the Box Back.
-
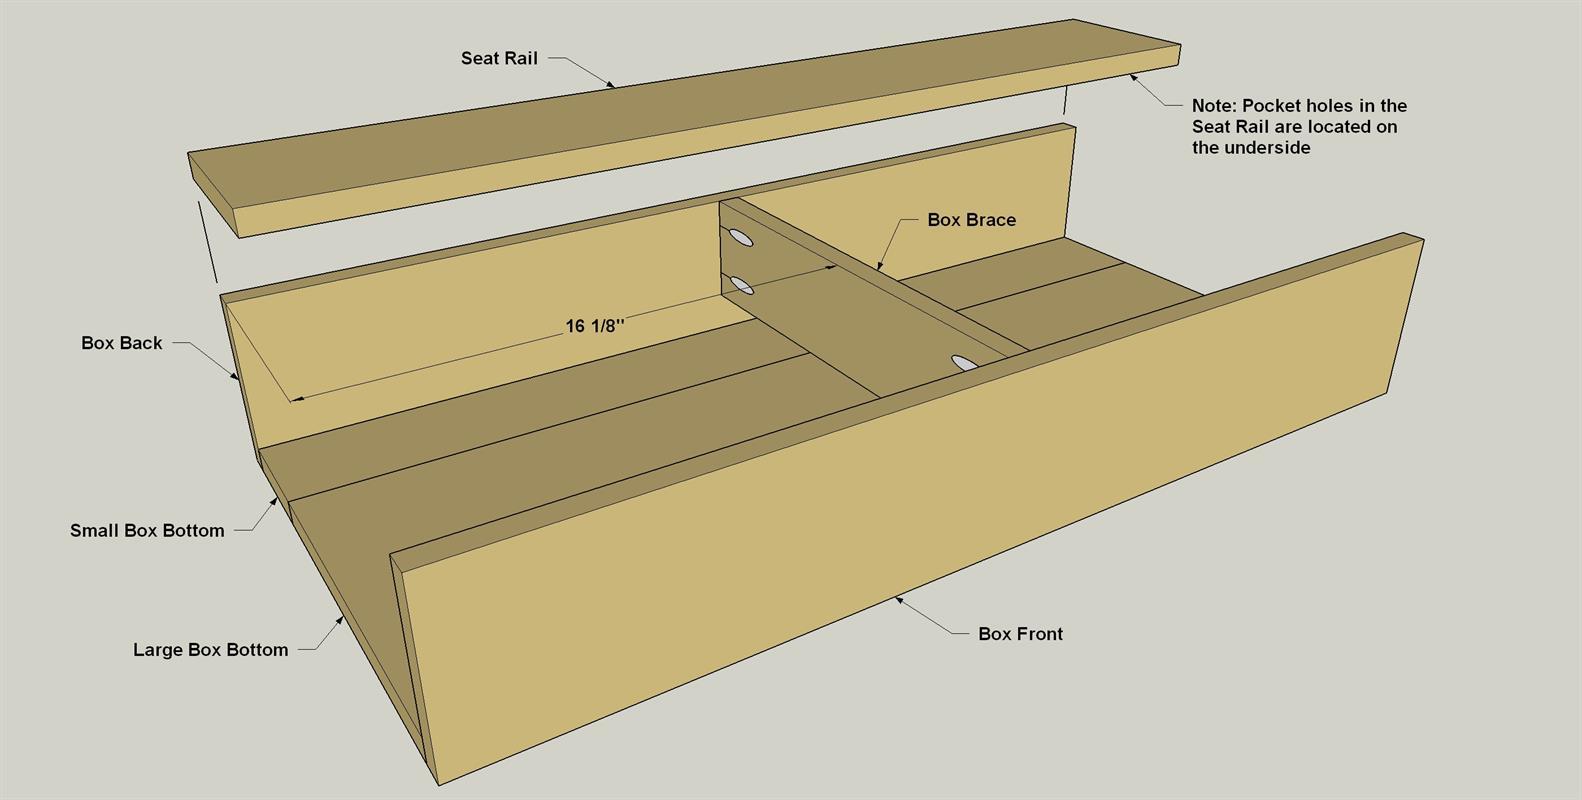
Add the Box Brace and Seat Rail
Now you can add the Box Brace using glue and 1 1/4" coarse-thread pocket-hole screws, making sure the Brace is centered, and that it sits flush with the upper edges of the Box Front and Box Back, as shown.
-
Attach the Frame to the Legs
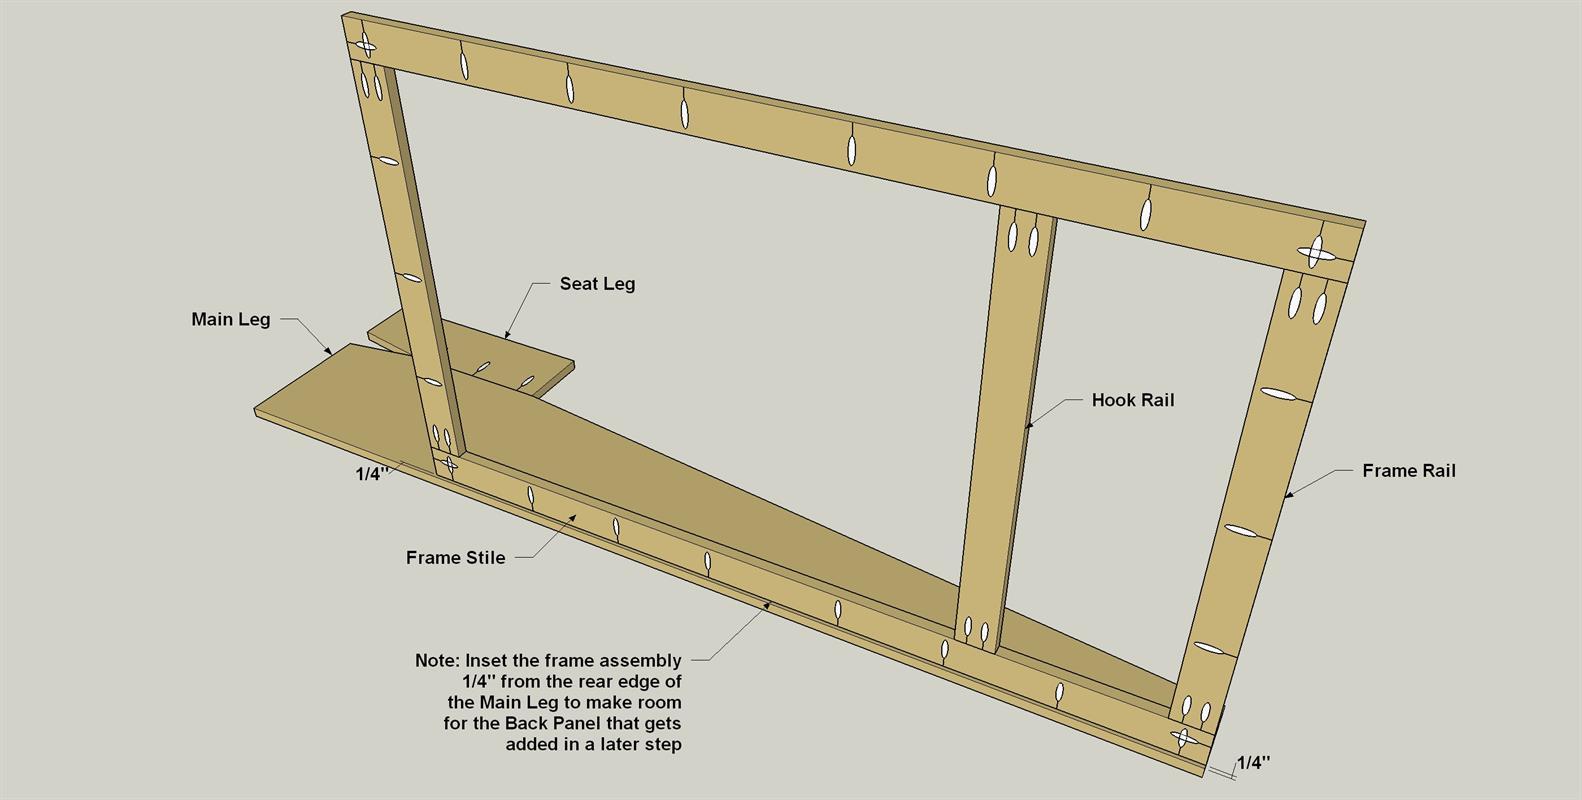
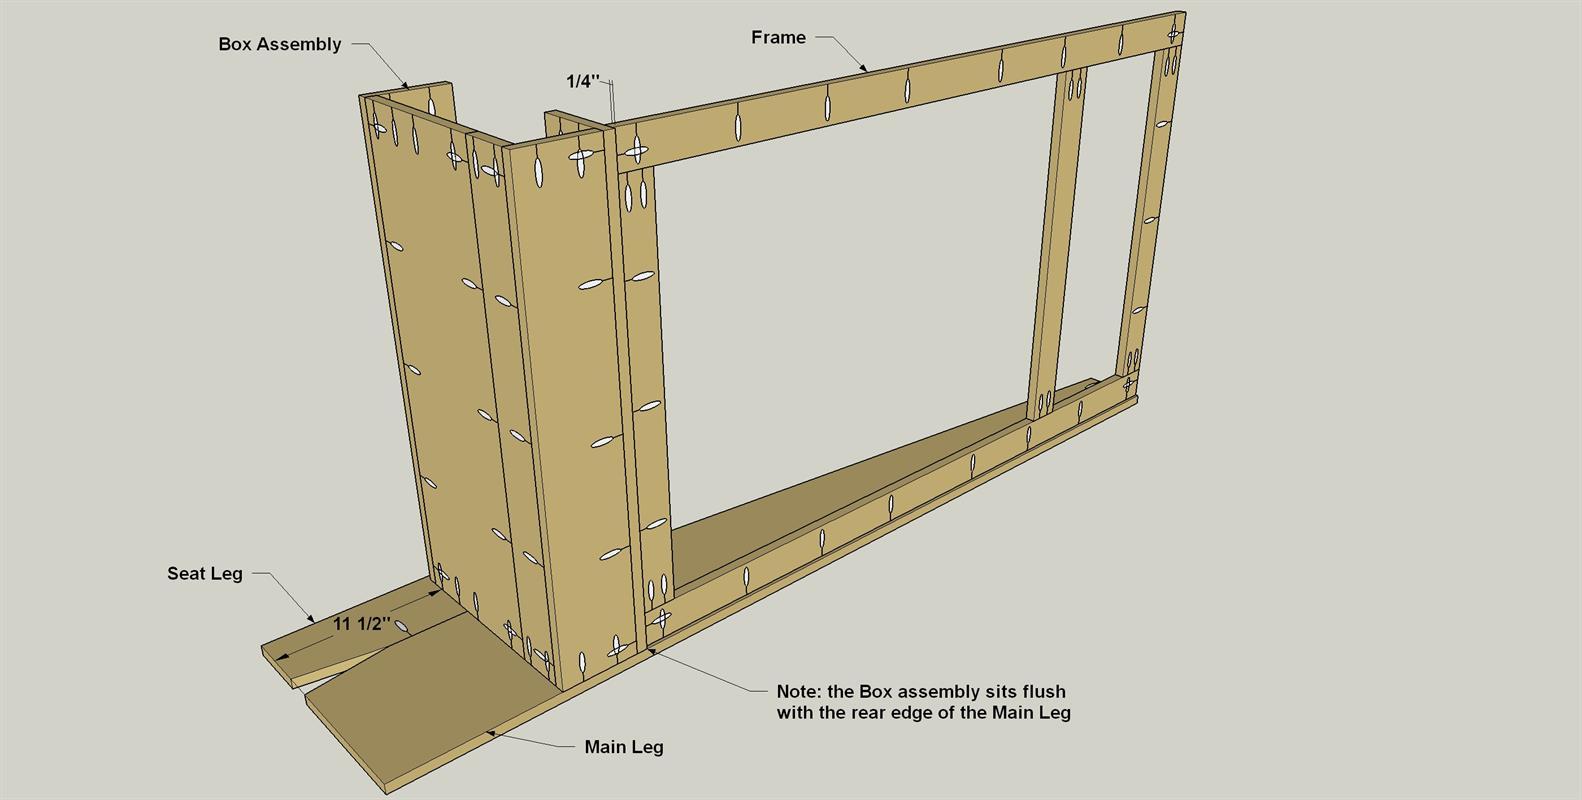
Now you can begin final assembly, which starts by attaching the frame assembly to on leg assembly. Spread glue along the edge of one Frame Stile, and then position it on a Main Leg, as shown. Note that the frame assembly is inset 1/4" from the rear edge of the Main Leg to make room for the back panel that gets added later. Attach the frame by driving 1 1/4" coarse-thread pocket-hole screws into the Main Leg.
-
Attach the Box Assembly
Next, it’s time to position and attach the box assembly. Notice that the box assembly is not inset on the Main Leg like the frame was. The box assembly sits flush with the rear edge of the leg. Spread glue on the mating edges of the box assembly, as well as on the lower edge of the frame assembly. Position the box assembly as shown, and then attach it to the leg assembly and frame assembly using 1 1/4" coarse-thread pocket-hole screws. Make sure, before you drive screws into the frame, that it remains inset 1/4" from the rear edge of the box assembly.
-
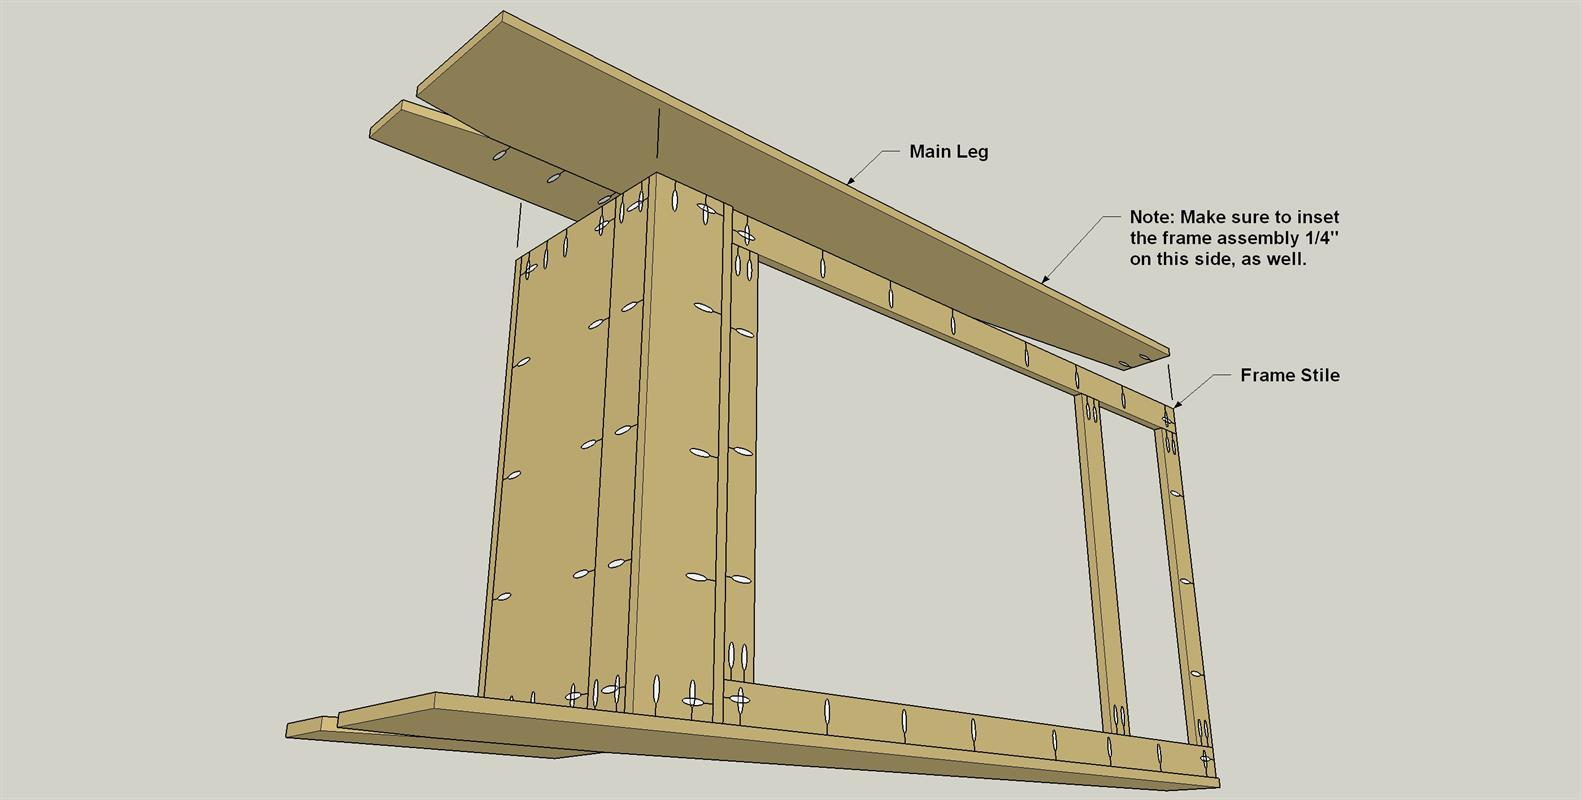
Attach the Second Leg Assembly
The second leg assembly can go on now. Spread glue on the box and frame edges, then position the leg. Make sure everything is lined up correctly—that the box assembly is flush with the rear edge, and that the frame assembly is inset by 1/4". Then you can drive in 1 1/4" coarse-thread pocket-hole screws.
-
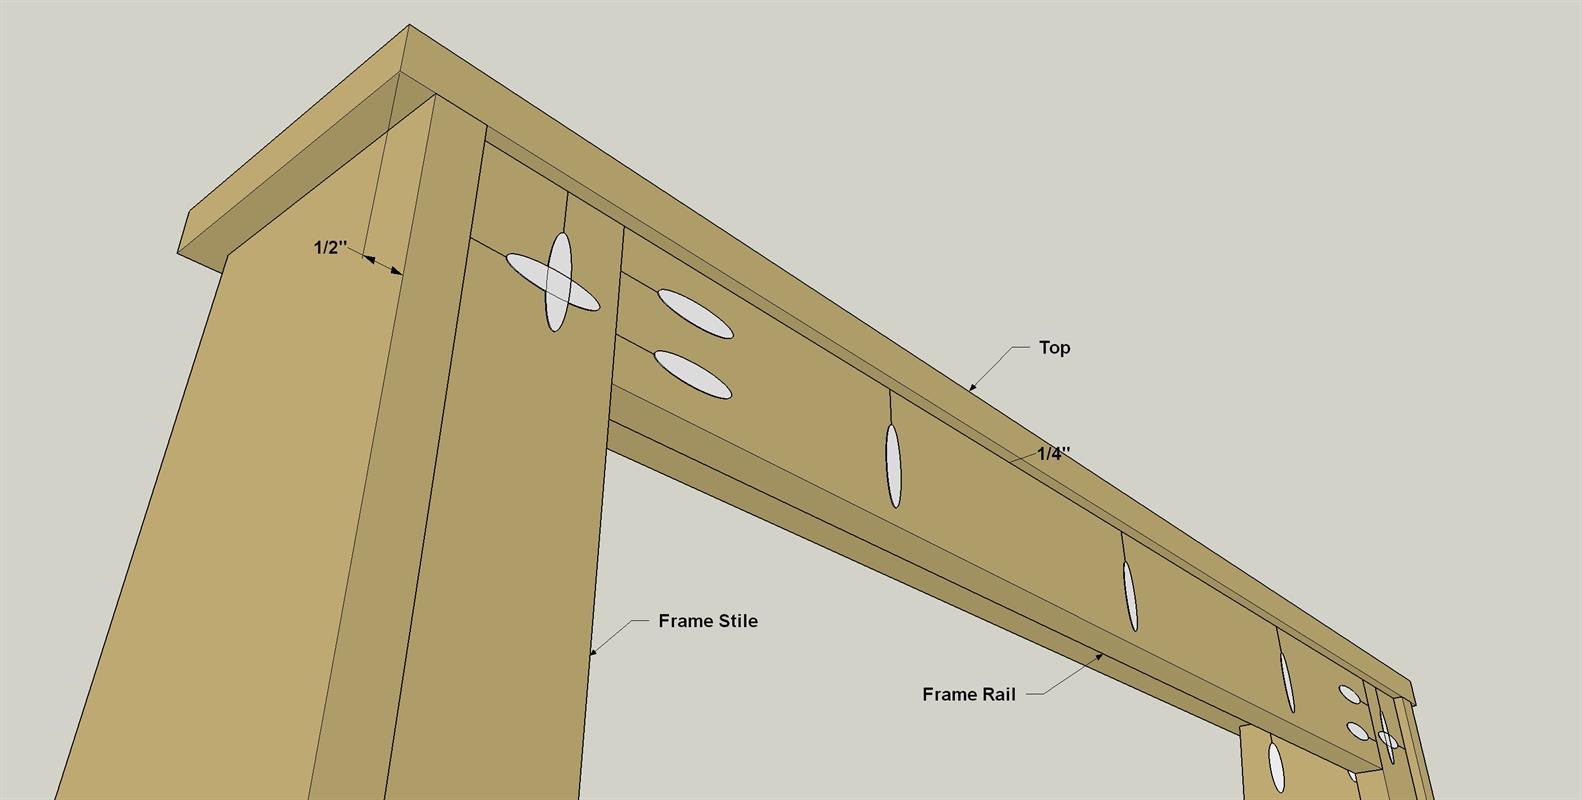
Add a Top
Cut a Top to length from a 1x6 board, as shown in the cutting diagram. Sand the faces and edges smooth. Then you can attach the Top. Spread glue on the upper ends of the Mina Legs and on the upper edge of the frame assembly. Then position the Top as shown. It should overhang the legs by 1/2" on each end, and the rear edge of the top should be flush with the rear edge of each Main Leg. Again, the frame assembly will be inset 1/4" to make room for the Back that gets added later.
-
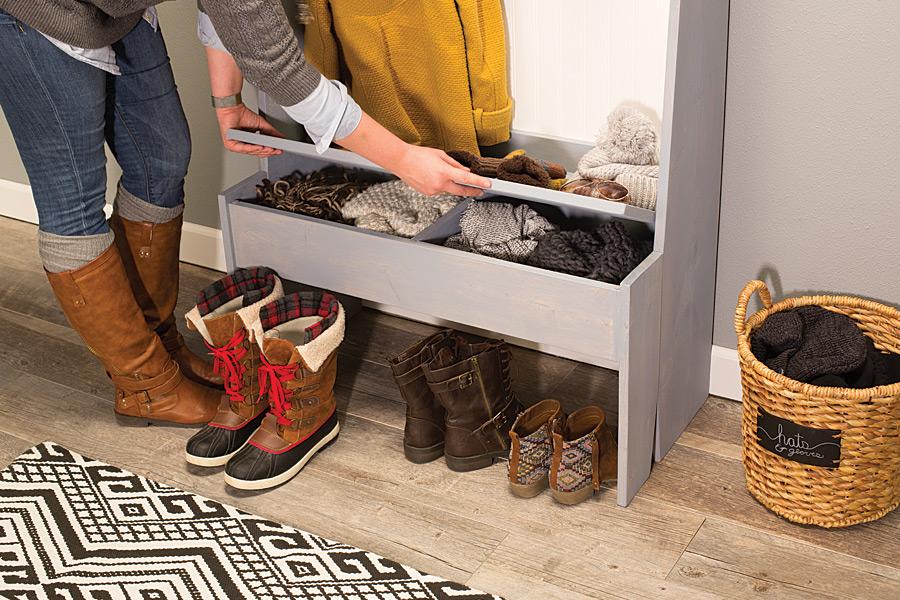
Add a Seat Lid
Cut a Seat Lid from a 1x12 pine board, as shown in the cutting diagram. Sand the faces and edges smooth.
Following manufacturer's instructions, install a pair of non-mortise hinges (ours were 2 1/2" long) to the back edge of the Seat Lid. Then center the Seat Lid in the opening, and attach the hinges to the Seat Rail. With the main assembly done, this is a good time to paint or stain it. We chose to do this since we planned to have a contrasting back panel. That way, we didn’t have to mask it off or worry about accidentally getting paint on it.
-
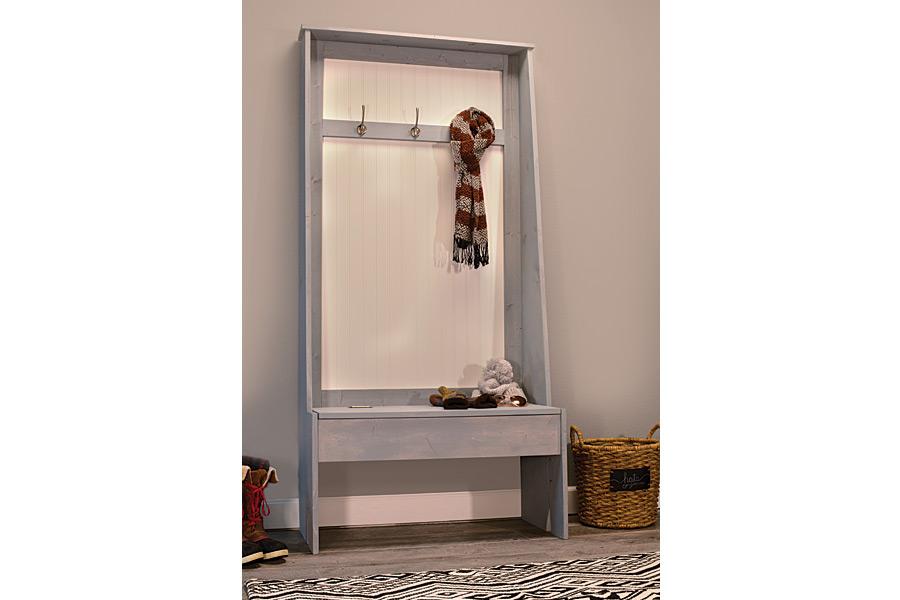
Add the Back Panel
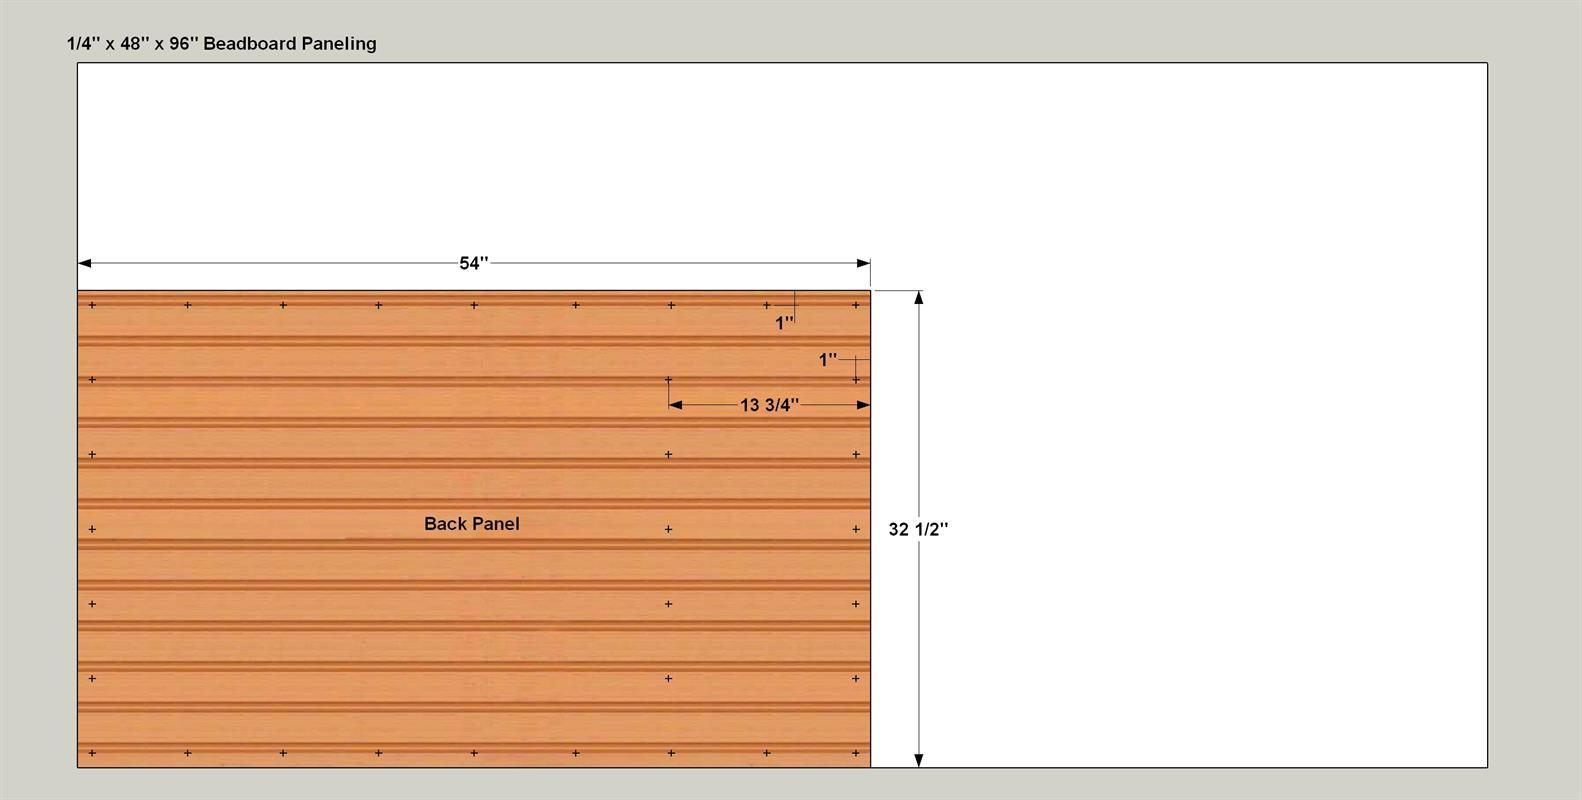
Cut the Back Panel from 1/4" beadbord paneling, as shown in the cutting diagram. Then drill 1/16" holes at the locations shown. These will be used for screwing the panel to the main assembly. The beadboard we used had a nice white surface, so we chose to just leave it alone and not paint it. If yours needs painted or stained, do that now. Once it’s dry, simply position the Back against the frame assembly, and then attach it using 3/4"flathead woodscrews, as shown.
